
You're staring at a dishwasher that just finished a cycle, but the glasses are cloudy and there's a pool of water at the bottom. Learning how to clean Maytag dishwasher filter is the one fix that solves both problems, and it takes about five minutes. Most owners don't realize their machine has a filter that needs regular attention until something goes wrong.
According to Maytag's official documentation, the two-piece filter system traps food particles down to coffee-ground size. When it clogs, rinse cycles run longer and dishes come out less clean. This guide walks you through each step with the visual cues that make the difference between a quick job and a frustrating struggle.
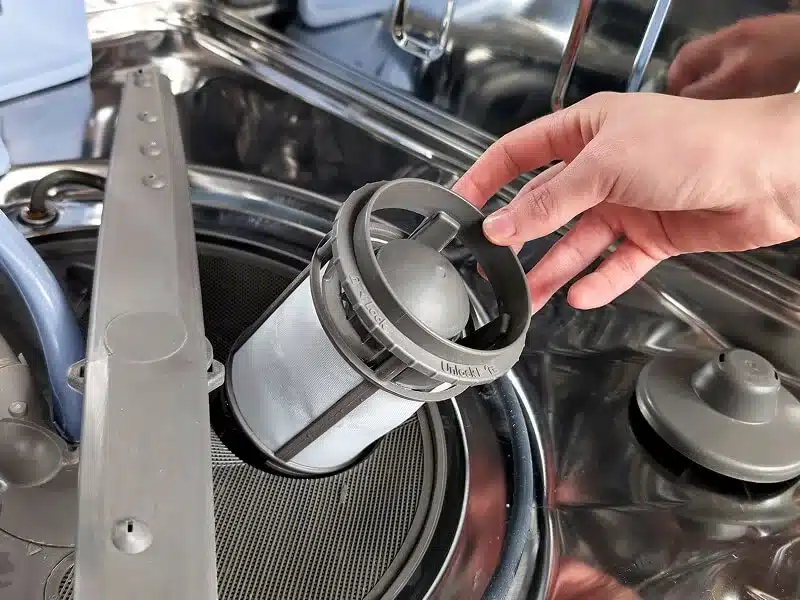
Image source: Bing (Web (fair-use with source credit))
Why This Guide Is Visual-Dependent (and Why That Matters)
This is a task you learn by looking, not by reading. The filter has a specific shape, a specific twist direction, and a specific locking sound. You can follow written instructions perfectly and still miss the one visual cue that tells you the filter is seated wrong.
The most common Maytag filter designs use a twist-lock mechanism. You turn it counterclockwise to release and clockwise to lock. But the exact position of the handle, the alignment tabs, and the way the two pieces fit together vary by model year.
As of 2026, Maytag has used at least three different filter assembly designs across their dishwasher lineup.
That's why the photos in this guide matter. They show you what a clean filter looks like, what a clogged filter looks like, and where the hidden catch points are. If you're standing at your dishwasher with a flashlight in one hand, a picture saves you ten minutes of trial and error.
Quick Answer: How to Clean Your Maytag Dishwasher Filter in 30 Seconds
Twist the filter counterclockwise. Lift it out. Rinse both pieces under hot water.
Scrub the fine mesh with a soft brush. Wipe out the housing. Reassemble and twist clockwise until it clicks.
That's the short version. The full job takes about five minutes. You need hot water, a soft brush, and a paper towel.
Do it every three to four weeks for best results. A clean filter means clear dishes and shorter cycle times.
What You're Actually Looking At: The Maytag 2-Piece Filter System
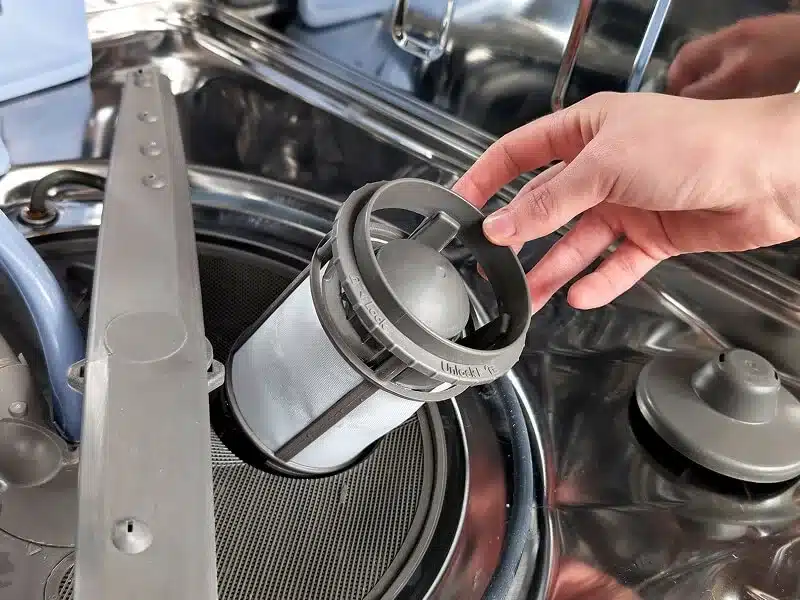
Image source: Bing (Web (fair-use with source credit))
Most Maytag dishwashers use a two-piece filter assembly. It sits at the bottom of the tub underneath the lower rack. The two pieces work together to catch food particles before they reach the pump.
The Coarse Basket
The top piece is a wide plastic basket with large holes. It catches big stuff like rice grains, bean skins, and vegetable scraps. This piece is tough.
You can scrub it with a sponge and dish soap without worrying about damage.
The Fine Mesh Cylinder
Below the basket sits a fine mesh cylinder. This is the piece that actually does the filtering work. It catches smaller particles that would otherwise recirculate onto your dishes.
The mesh is delicate. Scrub it gently with a soft brush. A metal brush or steel wool will tear the mesh and ruin the filter.
The Twist-Lock Mechanism
The filter locks into place with a quarter-turn twist. You'll see small alignment arrows or tabs on the filter and the housing. Line them up, push down, and twist clockwise.
You should feel a firm stop. If the filter spins freely, it's not locked.
The Filter Housing
The housing is the recess in the dishwasher tub where the filter sits. It has a drain opening at the bottom. When you remove the filter, you'll see a small pool of water with food debris.
Wipe this out thoroughly. A dirty housing causes odors even with a clean filter.
Step-by-Step: Cleaning the Filter with Visual Cues
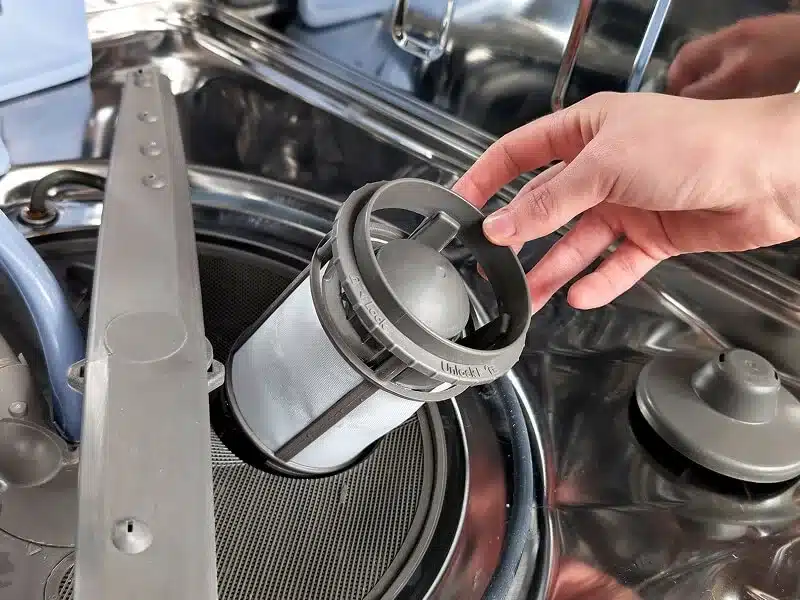
Image source: Bing (Web (fair-use with source credit))
Follow these steps in order. Each one builds on the last. Skip a step and you might leave debris behind.
Step 1: Locate the Filter
Pull out the bottom rack completely. Shine a flashlight into the back center of the tub. You're looking for a round plastic handle or a flat disc with a raised grip.
On most Maytag models, it sits near the back wall. On some models, it's centered under the spray arm.
Step 2: Remove the Lower Spray Arm (If It Blocks Access)
Some Maytag models have a spray arm that sits directly over the filter. If you can't see the filter handle, the spray arm is in the way. Press down on the center hub and twist counterclockwise.
The arm should lift off. Set it aside. If it doesn't twist, check for a metal clip.
Use a flathead screwdriver to pry it loose.
Step 3: Twist and Lift the Filter Assembly
Grip the filter handle firmly. Twist it counterclockwise about a quarter turn. You should feel a release.
Lift straight up. If the filter resists, don't force it. Food particles can glue it in place.
Wiggle it gently while lifting.
Step 4: Separate the Two Pieces
Hold the filter assembly over the sink. The coarse basket usually lifts off the fine mesh cylinder. It's a friction fit or a slight twist.
Separate them completely. If you only rinse the outside, you're leaving half the debris trapped between the layers.
Step 5: Rinse and Scrub
Rinse both pieces under hot running water. Hot water cuts grease better than cold. Scrub the fine mesh with a soft brush in a circular motion.
Pay attention to the corners and edges. For stubborn bits, use a toothpick or paperclip to gently push debris out of the mesh holes. Wash the coarse basket with a sponge and a drop of dish soap.
Step 6: Clean the Filter Housing
Shine the flashlight into the empty housing. You'll see food particles and a shallow pool of water. Use a paper towel or cloth to wipe it clean.
If there's a drain screen at the bottom, clean that too. A dirty housing is the number one cause of dishwasher odors.
Step 7: Reassemble and Reinstall
Fit the fine mesh cylinder back into the coarse basket. Align the tabs on the filter with the slots in the housing. Push down gently and twist clockwise until you feel a click.
The filter should sit flush with the tub floor. If it sits proud, it's not locked.
Step 8: Replace the Spray Arm
Snap the spray arm back into place. Twist it clockwise until it's secure. Spin it by hand to make sure it rotates freely.
A stuck spray arm means you didn't seat it correctly.
Step 9: Run a Rinse Cycle
Close the dishwasher and run a quick rinse cycle. No detergent needed. This flushes out any loose debris you might have knocked into the system.
After the cycle, open the door and check the filter area for leaks. A few drops around the filter housing is normal. A steady trickle means the filter isn't seated.
Common Visual Mistakes (and How to Spot Them)
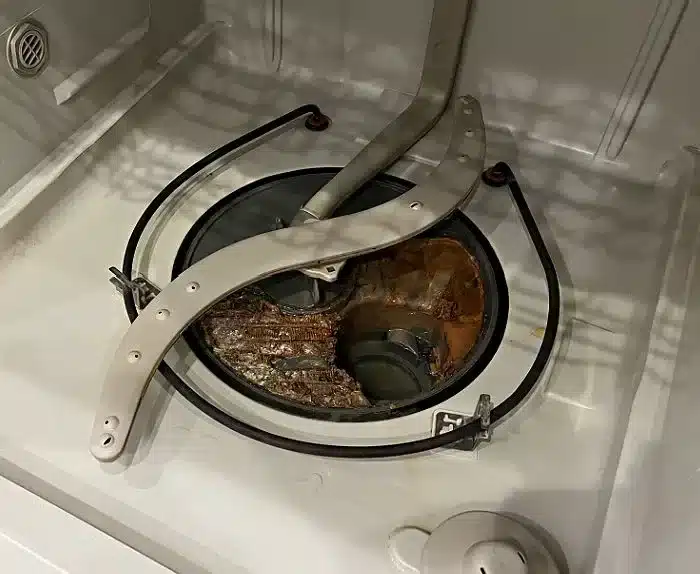
Image source: Bing (Web (fair-use with source credit))
Even experienced owners make these mistakes. Here's what to watch for.
Not separating the two pieces. The coarse basket and fine mesh cylinder trap debris between them. If you rinse only the top basket, the fine screen stays clogged. You're just moving the problem around.
Always separate them.
Scrubbing the fine mesh with a metal brush. The mesh is plastic or thin stainless steel. Scratches create rough spots where bacteria grow and odors form. Use a soft brush only.
An old toothbrush works perfectly.
Running the dishwasher without the filter. One cycle without the filter sends food particles straight into the pump. This can clog the spray arm jets and damage the drain pump. Always reinstall the filter before starting a cycle.
Overtightening the filter. The twist-lock mechanism needs only a quarter turn. If you force it further, you can crack the plastic tabs. A cracked filter won't seal properly.
Food will bypass it and end up on your dishes.
Ignoring the filter housing. The housing collects food debris and standing water. If you clean the filter but leave the housing dirty, odors will return within days. Wipe it out every time you clean the filter.
Using bleach or harsh chemicals. Bleach can corrode the plastic mesh and damage the rubber seals. Stick to hot water and mild dish soap. If you need extra cleaning power, use a paste of baking soda and water.
Forgetting to check the spray arm. While you're working at the bottom of the tub, spin the spray arm by hand. If it doesn't spin freely, check the bearings for debris. Clean the spray arm jets with a toothpick.
A blocked spray arm is often mistaken for a bad filter.
How Often to Clean: A Visual Frequency Guide
The right cleaning schedule depends on how much you use the dishwasher. Heavy users need more frequent cleaning. Light users can stretch the interval.
| Usage Level | How Often to Clean | Visual Clue It's Time |
|---|---|---|
| Heavy (daily, large family) | Every 2 to 3 weeks | Cloudy glasses, standing water |
| Moderate (3 to 4 times per week) | Every 4 to 6 weeks | Film on dishes, longer cycles |
| Light (once per week, single person) | Every 2 to 3 months | Noticeable odor, debris on dishes |
| After a greasy load (pans, roasts) | Immediately after cycle | Visible grease on filter surface |
If you see standing water in the bottom of the tub after a cycle, clean the filter right away. That's a sign the filter is clogged enough to block drainage. The same goes for a sour smell coming from the dishwasher.
Don't wait for the next scheduled clean.
What to Do If the Filter Won't Twist Out
A stuck filter is frustrating. It usually means food particles have dried and hardened around the locking mechanism. Don't force it.
You'll crack the plastic.
Try this first. Pour a cup of hot water directly into the filter housing. Let it sit for five minutes. The heat softens the dried food.
Then try twisting the filter again. It should loosen.
If that doesn't work. Run a rinse cycle with the filter still in place. The hot water and agitation will loosen the debris. After the cycle ends, try twisting immediately while the filter is still warm.
Last resort. Use a pair of pliers with rubber grips. Wrap the filter handle in a cloth to protect the plastic. Grip firmly and twist counterclockwise.
Use gentle pressure. If it still won't budge, the filter might be damaged. You may need a replacement.
When to replace instead. If the filter tabs are broken, the mesh is torn, or the plastic is warped, don't waste time cleaning it. Buy a new filter. They cost between $15 and $30.
Check your model number for the correct part.
Cleaning vs. Replacing: When to Just Buy a New Filter
A clean filter performs like new. But filters don't last forever. The mesh wears down over time.
The plastic tabs can crack. The seals can degrade.
Clean the filter when: The mesh is intact, the tabs are whole, and there's no visible damage. Regular cleaning keeps it working for years. Most filters last two to five years with proper care.
Replace the filter when: The mesh has a tear or hole, the plastic tabs are cracked or broken, the filter won't lock into place, or you've cleaned it thoroughly and odors persist. A damaged filter lets food particles bypass the mesh. That means dirty dishes and potential pump damage.
How to find the right replacement. Look for your model number on the door frame or the side of the tub. It's usually a sticker with numbers and letters. Search for that model number plus "filter." Maytag's official parts site is the most reliable source.
A new filter is a cheap fix that can save you a service call.
Bonus: Checking the Spray Arm Jets While You're Down There
Since you already have the rack out and the filter removed, take two extra minutes to check the spray arm. A clogged spray arm causes the same symptoms as a dirty filter. Cloudy dishes.
Wet spots. Poor cleaning.
How to check. Spin the spray arm by hand. It should rotate freely with no resistance. If it's stiff, food debris might be stuck in the bearings.
Remove the spray arm and rinse it under hot water. If it's still stiff, the bearing might be worn and need replacement.
How to clean the jets. Look at the spray arm holes. They're small. If they're clogged, use a toothpick or paperclip to push the debris out.
Don't use a metal pin that could scratch the plastic. Rinse the arm thoroughly after cleaning.
Reinstall carefully. Make sure the spray arm snaps or twists back into place. It should sit flat and level. If it's tilted, it won't spin properly.
A misaligned spray arm can hit the rack and stop spinning mid-cycle.
Frequently Asked Questions
Why does my Maytag dishwasher smell even after cleaning the filter?
The smell is usually in the filter housing, not the filter itself. Wipe out the housing with a cloth and hot water. If the odor persists, check the drain hose and the rubber gaskets around the door.
Food can get trapped in those areas. A musty smell under the sink might also be a sign of a different issue entirely.
How do I know if my Maytag dishwasher has a self-cleaning filter?
Not all Maytag models have a self-cleaning filter. Check your owner's manual or look for a "Clean Filter" or "Clean Cycle" button on the control panel. If you see a visible twist-lock filter at the bottom of the tub, you have a manual filter.
You need to clean it yourself.
Can I clean the filter in the dishwasher?
No. The filter is not dishwasher safe. The high heat and detergent can warp the plastic mesh.
Run it under hot tap water and scrub by hand with a soft brush. It takes less than five minutes. Don't risk damaging the filter.
What happens if I never clean the filter?
The dishwasher will gradually lose performance. Dishes will come out cloudy. Cycle times will get longer.
Standing water will appear in the tub. Eventually, the pump can clog and fail. That repair costs much more than a five-minute cleaning.
Does the filter type affect how often I need to clean it?
Yes. The two-piece design used in most Maytag models clogs faster than older self-cleaning designs. The fine mesh catches more particles, which means it needs more frequent cleaning.
That's a trade-off. Better filtration means less food on your dishes but more filter maintenance.
Can I use a dishwasher cleaner tablet instead of scrubbing the filter?
Dishwasher cleaner tablets help remove grease and mineral buildup inside the machine. They don't replace manual filter cleaning. The tablets circulate through the spray arm and wash the interior.
They won't dislodge food particles stuck in the filter mesh. You still need to scrub the filter by hand.
Final Thought: The 5-Minute Habit That Saves the Repair Bill
A clean filter is the difference between a dishwasher that works and one that frustrates you. Five minutes every month prevents cloudy glasses, sour smells, and costly pump repairs. It's the easiest maintenance task you can do for your kitchen.
Set a reminder on your phone for the first of the month. Pull the filter, rinse it, scrub it, lock it back in. That's it.
Your dishwasher will thank you. Your glasses will finally come out clear.
If you hit a stubborn filter that won't twist or a spray arm that won't come off, look up your model number on Maytag's official support site. They have model-specific guides and videos. For most owners though, this guide covers everything you need.
