
You're standing under your double kitchen sink with a flashlight, staring at a tangle of pipes that suddenly looks a lot more complicated than it did in the video you watched. If you need to know how to take pipe underneath double kitchen sink apart, you're in the right place. The good news is that this is one of the most straightforward plumbing jobs you can do yourself.
No soldering, no glue, no special permits.
Standard kitchen drain pipes in the United States use 1.5-inch diameter PVC or ABS plastic, connected by slip nuts that unscrew by hand. The entire job from start to finish typically takes 15 to 30 minutes. As of 2026, the same basic configuration has been the standard for decades, so the setup under your sink is almost certainly the same one we'll walk through here.
Let's get your hands on those pipes.
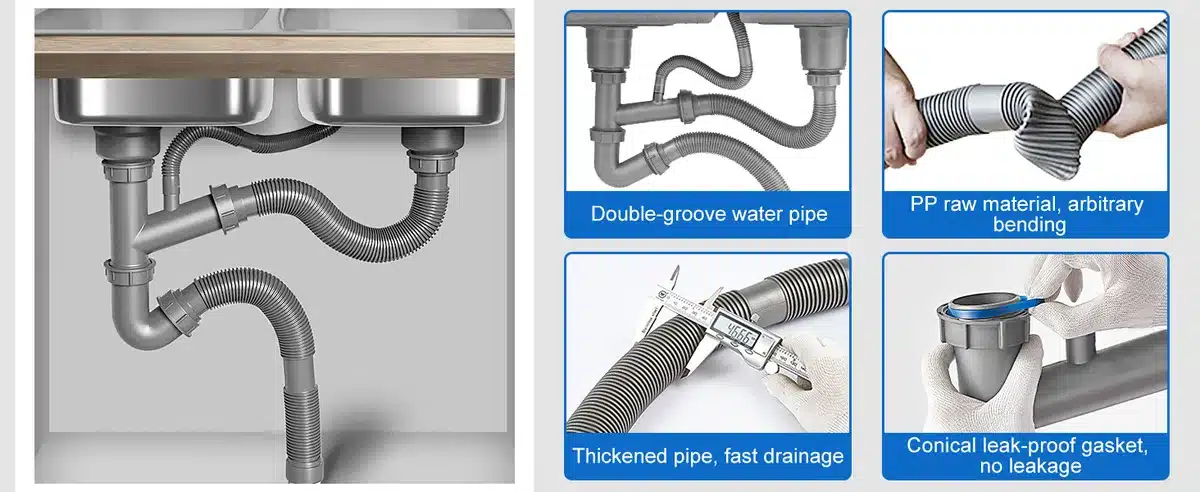
Image source: Web (Bing) / amazon.com (Web image (fair-use with source credit))
Quick Answer
Loosen the slip nuts at each joint by hand or with pliers. Slide the nuts back along the pipe. Pull the pipes apart at the waste tee and the P-trap.
Dump the water from the trap into a bucket. Replace any flattened rubber washers before reassembly. That's the whole process in six sentences.
Why You Need to See What You're Doing Under the Sink
Plumbing under a double sink is a visual puzzle. You have two separate drain openings that merge into one pipe, all crammed into a dark cabinet with the garbage disposal taking up half the space. If you can't see exactly where each joint is, you'll end up twisting the wrong thing and potentially cracking an old plastic fitting.
The biggest risk is applying force to a pipe that's glued or soldered instead of threaded. Slip joints are designed to come apart. Glued PVC joints are not.
If you try to twist a glued joint, you'll snap the pipe or split the fitting. That's a much bigger repair than the one you planned.
Taking a minute to identify every slip nut before you start turning saves you from a headache. Look for the knurled or hex-shaped rings at every connection point. Those are your targets.
Everything else stays put.
What You're Looking At: The Double Sink Drain Assembly
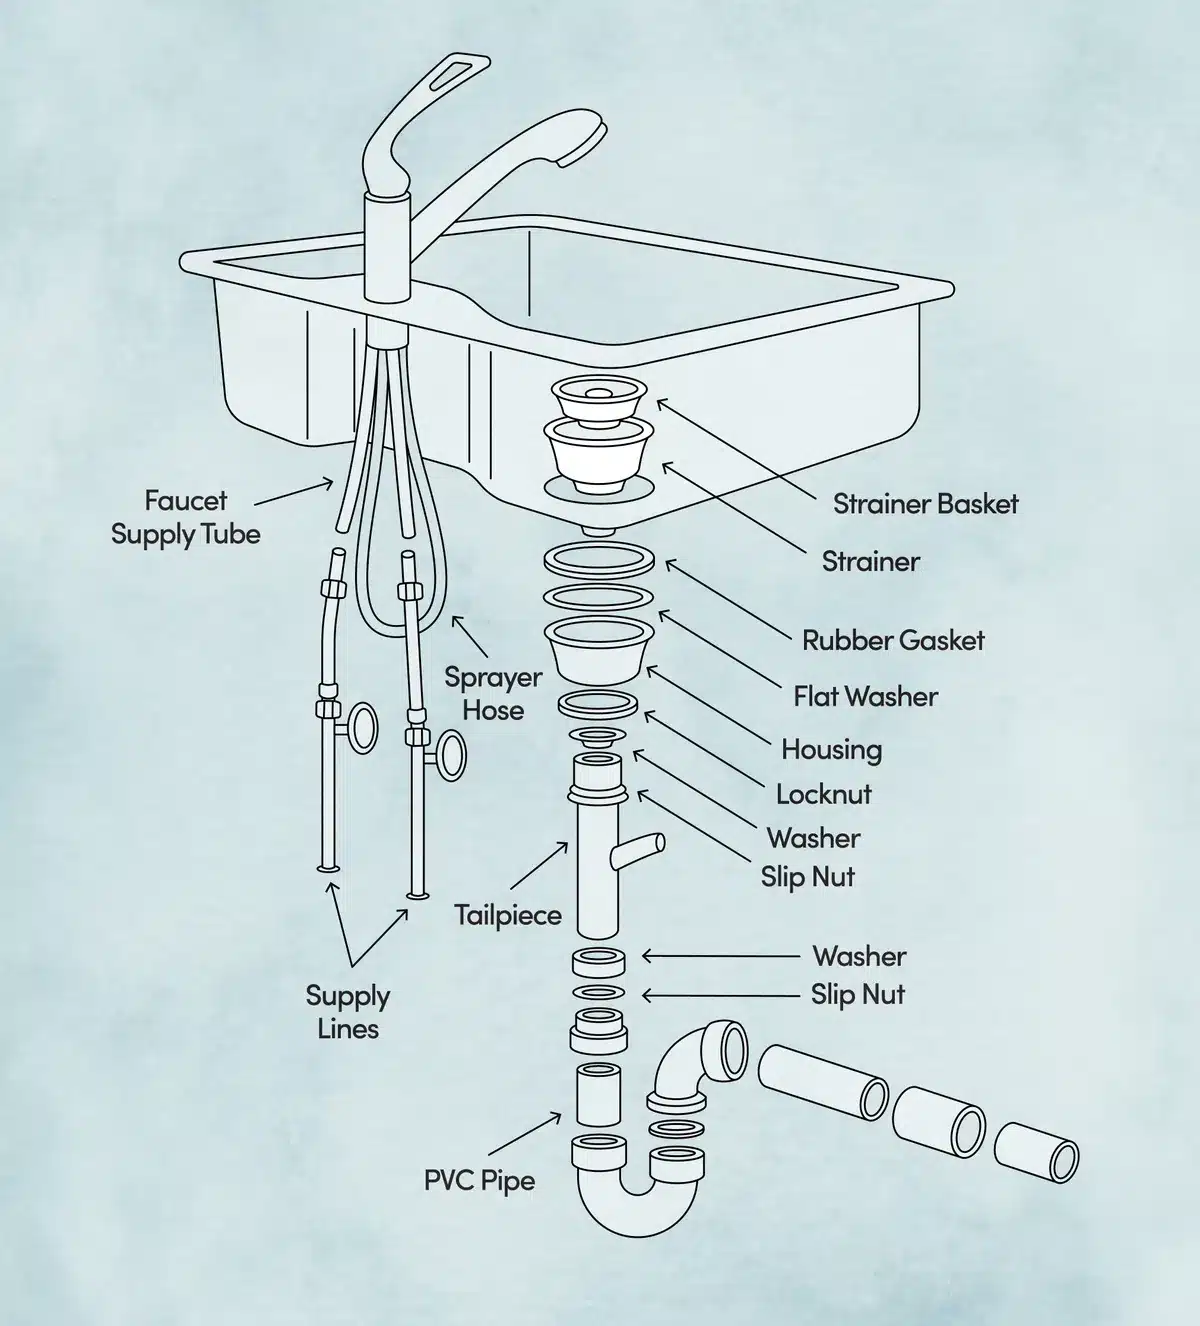
Image source: Web (Bing) / faroutfantasic.blogspot.com (Web image (fair-use with source credit))
Every double sink drain follows the same basic layout. You need to know each part by name so you can talk about it and, more importantly, know which one to disconnect.
The Tailpieces
These are the straight vertical pipes that drop from each sink strainer. They are usually made of PVC, ABS, or chrome-plated brass. Each tailpiece connects to the sink strainer at the top with a large slip nut and to the waste tee at the bottom with another slip nut.
If you are only clearing a clog on one side, you only need to disconnect that side's tailpiece.
The Waste Tee
This is the T-shaped fitting where the two tailpieces meet. One sink's tailpiece goes into the top of the T. The other sink's tailpiece goes into the side of the T.
The bottom of the T connects to the P-trap. The waste tee is the central hub of the entire system. If you need to remove the whole assembly, this is the joint that frees everything.
The P-Trap
The curved section of pipe that looks like a U or a P lying on its side. It holds water to block sewer gas from coming up through the drain. This is the most common location for clogs, especially from grease and food debris.
It also holds about two to four cups of water that will spill when you disconnect it. Have your bucket ready.
The Wall Tube
The straight pipe that goes from the P-trap into the wall fitting. It is held in place by a slip nut at the wall end. This nut is often the tightest one in the system because it has been sitting undisturbed for years.
It may require pliers and some penetrating oil to loosen.
Tools You'll Actually Need (and What to Skip)
You do not need a pipe wrench, a hacksaw, or a plumbing torch. This is a hand-tool job, and the list is short. Having a reliable set of sturdy kitchen tools for general maintenance around the house is a good idea, but for this specific job, the list is minimal.
| Tool | Why You Need It | What to Skip |
|---|---|---|
| Bucket or shallow pan | Catches water from the P-trap | A cup is too small |
| Slip joint pliers | Loosens stuck slip nuts | Pipe wrench will damage plastic |
| Flathead screwdriver | Pries off stubborn washers or clips | Crowbar is overkill |
| Towel or rag | Wipes up drips and protects the cabinet floor | Paper towels disintegrate |
| Penetrating oil | Frees rusted or stuck nuts | WD-40 works fine |
| Flashlight or headlamp | Illuminates the dark cabinet | Phone flashlight is awkward but works |
You already own most of these. The only thing you might need to buy is a set of replacement rubber washers, which cost about two dollars at any hardware store. If you are taking the pipes apart, you should replace the washers.
They flatten over time and will leak if you reuse them.
Before You Touch a Pipe, Take the Photo
This is the single best piece of advice for anyone attempting this job. Take a clear photo of the entire drain assembly before you loosen a single nut.
That photo becomes your reference for reassembly. You will forget which tailpiece goes to which side of the waste tee. You will forget which side of the P-trap faces the wall.
You will forget the exact angle of the wall tube. The photo answers all of those questions instantly.
Hold your phone level and get a straight-on shot of the full assembly. Then take a second photo from the side to capture the depth. If you have a third hand, take a video while you narrate which pipe goes where.
You will thank yourself when you are staring at a pile of disconnected pipes and a bucket of grey water.
A bad smell under the kitchen sink often comes from old food trapped in the waste tee or the P-trap. That photo will also help you identify exactly where the odor is coming from once the pipes are apart.
Step-by-Step: How to Take the Pipes Apart
Follow these steps in order. Do not skip ahead. Each step builds on the one before it.
Step 1: Clear the Cabinet and Protect the Floor
Remove everything from the cabinet. Cleaning supplies, sponges, the trash can, all of it. Lay down a towel or an old baking sheet to catch drips.
Place your bucket directly under the P-trap. If you have a garbage disposal, unplug it or turn off the breaker. You do not want it turning on accidentally while you have your hands in the drain.
Step 2: Loosen the Slip Nuts on the P-Trap
Start with the P-trap. It is the lowest point in the system and the easiest to access. Loosen the slip nut at the top of the trap where it connects to the waste tee.
Then loosen the slip nut at the bottom of the trap where it connects to the wall tube. Turn both nuts counterclockwise by hand. If they are stuck, use your slip joint pliers, but grip gently.
Plastic threads crack easily.
Step 3: Remove the P-Trap and Dump the Water
Slide both slip nuts back along the pipe. Pull the P-trap straight down and away from the waste tee and the wall tube. Tip the trap into your bucket to empty the water.
Check the inside of the trap for clogs. Grease buildup, food scraps, and small objects often collect right at the bottom of the curve. This is the most common cause of a slow drain.
Step 4: Disconnect the Tailpieces from the Waste Tee
Loosen the slip nut on each tailpiece where it enters the waste tee. The left sink and the right sink each have their own connection. If you are only clearing a clog on one side, you only need to disconnect that side.
If you are removing the full assembly, disconnect both. Pull the tailpieces upward and out of the tee.
Step 5: Remove the Waste Tee
Loosen the slip nut at the bottom of the waste tee where it connects to the P-trap arm. If you have already removed the P-trap, this nut is already loose. Pull the waste tee downward and out.
You now have full access to every section of the drain system. Clean each piece individually with a bottle brush or a pipe cleaner.
Step 6: Separate the Wall Tube (If Needed)
If you are snaking the wall drain or replacing a damaged wall tube, loosen the slip nut at the wall fitting. This nut is often the tightest in the system. Apply penetrating oil and wait five minutes before trying to turn it.
Pull the wall tube straight out. Be prepared for a small amount of water to drain from the wall opening. Stuff a rag into the opening to block sewer gas while you work.
The Garbage Disposal Complication: What's Different
If you have a garbage disposal, the drain setup changes in one important way. The disposal replaces the tailpiece on its side of the sink. The disposal's discharge tube connects directly to the waste tee, usually at a separate inlet.
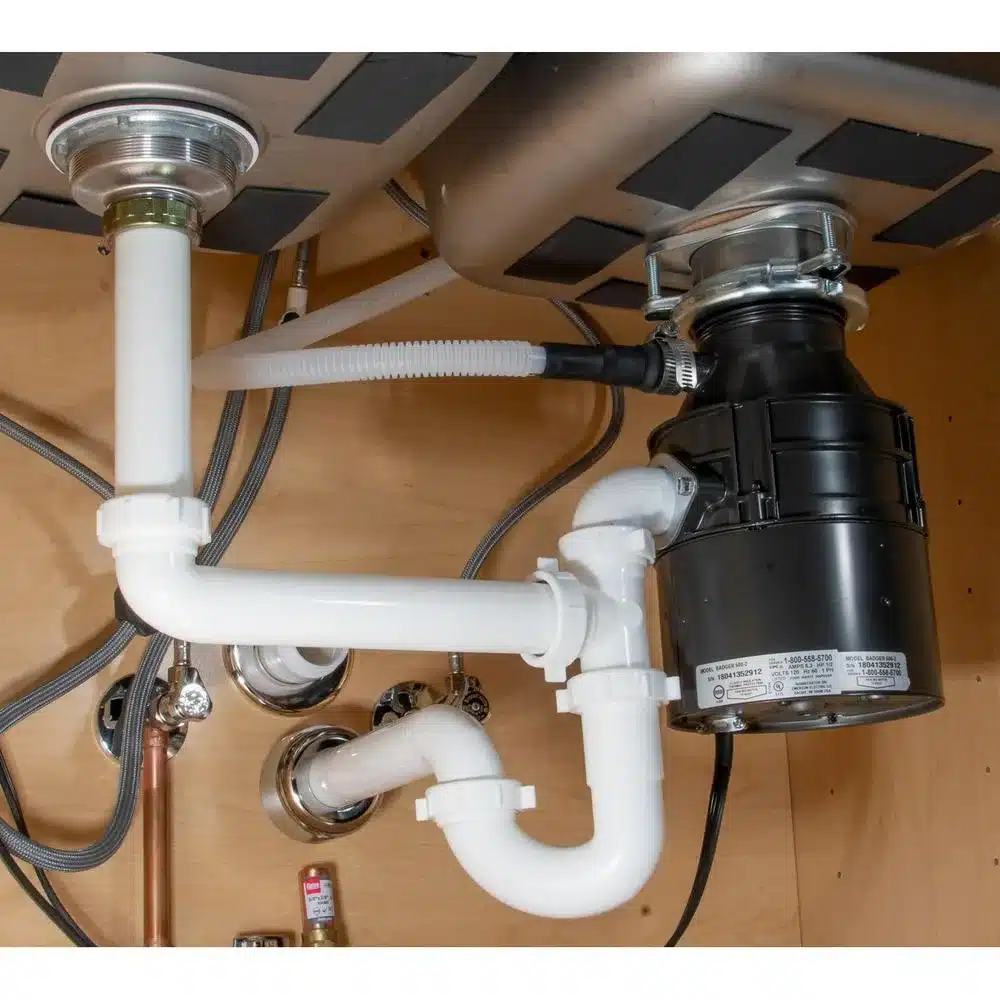
Image source: Web (Bing) / exopvuina.blob.core.windows.net (Web image (fair-use with source credit))
The disposal unit itself is held to the sink flange by a rotating mounting ring. You do not need to remove the disposal to take the pipes apart. You only need to disconnect the discharge tube from the waste tee.
That tube is held in place by a slip nut just like every other joint.
One extra detail. The dishwasher drain hose usually connects to a small inlet on the disposal or on the tailpiece of the opposite sink. If you see a rubber hose clamped to a small plastic fitting, that is the dishwasher connection.
You do not need to disconnect it unless you are removing the entire assembly. If you do disconnect it, expect a small amount of standing water to drain out. Keep your towel handy.
The garbage disposal also changes where clogs form. Food scraps that make it past the disposal blades can collect right at the waste tee where the discharge tube meets the main drain. That junction is a common trouble spot.
If both sinks are draining slowly, that tee is the first place to check.
Three Common Visual Mistakes (and How to Avoid Them)
These mistakes happen because the pipes look straightforward but the details are easy to miss. Each one is preventable once you know what to look for.
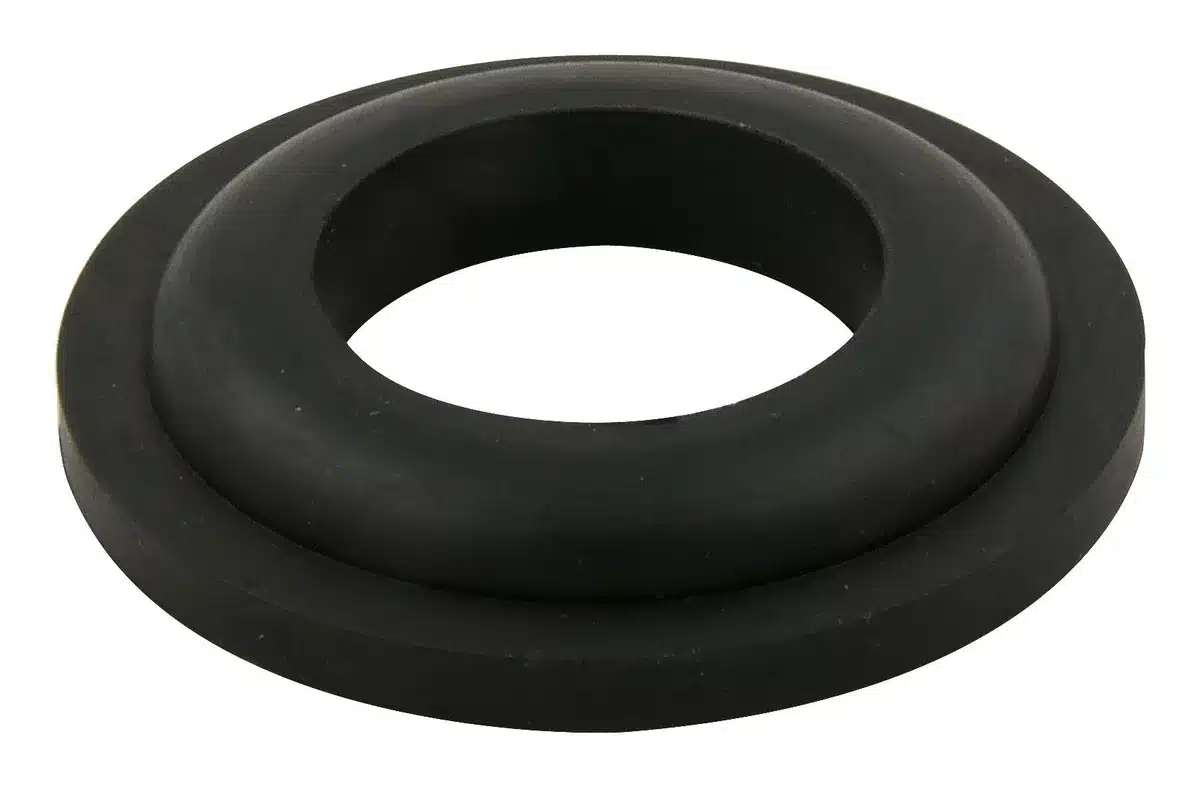
Image source: Web (Bing) / canadiantire.ca (Web image (fair-use with source credit))
Mistake #1: Forgetting Which Washer Faces Which Way
The rubber washer inside each slip nut has a tapered edge. That tapered side must face the pipe. If you put it in backward, the flat side presses against the pipe and the seal fails.
You will have a slow drip that shows up an hour after you finish.
The fix is simple. Look at the washer before you install it. One side is flat.
The other side is beveled or angled. The beveled side points toward the pipe. The flat side sits against the slip nut.
Remember it as "flat to the nut, bevel to the pipe."
Mistake #2: Twisting the Pipe Instead of the Nut
When you try to loosen a stuck slip nut, it is natural to grab the pipe and the nut together. That twists the pipe and can crack the fitting at the other end. The waste tee is especially vulnerable because it has three connections.
Torque on one arm stresses the other two.
Hold the pipe steady with one hand. Turn the slip nut with the other hand. If the nut is truly stuck, apply penetrating oil and wait.
Do not force it. A cracked waste tee means replacing the whole fitting.
Mistake #3: Overtightening Plastic Threads
Plastic slip nuts do not need to be cranked down. They seal by compressing the rubber washer against the pipe, not by crushing the threads. Hand-tight plus a quarter turn with pliers is enough.
If you tighten until the nut stops turning, you will strip the threads or crack the nut.
A stripped slip nut will not seal. You will have to buy a replacement nut and matching washer. That is a cheap fix but an annoying trip to the hardware store.
Save yourself the trouble and stop tightening once you feel the washer compress.
How to Put It Back Together Without Leaks
Reassembly is the reverse of disassembly, but with a few deliberate checks that make the difference between a dry cabinet and a puddle.
Start with the wall tube. Insert it into the wall fitting and hand-tighten the slip nut. Do not fully tighten it yet.
You want some play to align the other pipes.
Attach the P-trap to the wall tube. Slide the slip nut and washer onto the trap arm. Insert the trap arm into the wall tube.
Tighten the slip nut hand-tight plus a quarter turn.
Attach the waste tee to the top of the P-trap. Slide the slip nut and washer onto the tee's outlet. Insert it into the trap.
Tighten the slip nut.
Insert each tailpiece into the waste tee. Make sure the tailpiece sits straight. Cross-threading is easy here.
If the nut does not turn smoothly, pull it back and try again. Tighten each slip nut.
Now go back and tighten every nut to its final snugness. Work from the wall outward. This ensures the pipes settle into their natural alignment.
Test for leaks with a cup of water. Pour water down each sink basin. Watch every joint for drips.
If you see a drip, tighten that nut by another eighth of a turn. Check again. If it still drips, disassemble that joint and inspect the washer.
It might be pinched or seated wrong.
A common source of persistent bad smells under the sink is a small leak that evaporates before you see a puddle. The smell is the giveaway. Tighten every joint even if you do not see a drip.
For more on keeping your kitchen fresh, the blog has additional tips for tackling common kitchen issues.
When to Stop and Call a Plumber
Most of the time, taking apart the pipes under a double sink is a straightforward job. But there are a few situations where the smart move is to close the cabinet and call a professional.
The slip nut at the wall is rusted solid. You have applied penetrating oil, waited, and applied more oil. The nut still will not budge.
If you force it, you risk twisting the metal drain pipe inside the wall. That repair requires opening the wall.
The waste tee or the P-trap is cracked. Plastic fittings can become brittle after years of exposure to hot water and cleaning chemicals. If you see a crack, the fitting needs replacement.
That is a simple swap if the pipes are standard sizes. But if the crack is at a glued joint, cutting and replacing that section of pipe requires a hacksaw and a coupling.
You disconnected the wall tube and water keeps coming. A small amount of water is normal. A steady stream means there is a blockage further down the line that is backing up into your work area.
That clog is not in the pipes you can reach. It is in the main drain line. A plumber with a powered auger is the right tool for that job.
You have a double sink with a complex disposal and dishwasher setup that you did not install. If the pipes are not standard sizes or the connections look homemade, it is worth having a plumber inspect the setup. What looks like a five-minute fix can turn into a two-hour puzzle when nothing lines up.
Per the International Code Council's guidelines for residential plumbing, all drain connections under a sink must remain accessible. That is why slip joints are used instead of glued fittings. If your setup uses glued connections that you cannot take apart, that is a sign you need a professional assessment.
Frequently Asked Questions
Do I need to turn off the water before taking apart the pipes?
No. The water supply to the sink comes through the faucet, not through the drain pipes. You only need to turn off the water if you are also removing the faucet or working on the supply lines.
For drain work, just run the sink until it is empty before you start.
What if the slip nuts are glued or painted shut?
Some homeowners or contractors paint over the slip nuts during a kitchen remodel. That paint acts like glue. Use a utility knife to score the paint where the nut meets the fitting.
Then apply penetrating oil and let it soak. If the nut still will not move, call a plumber.
How do I know which pipe is the right one to disconnect?
Follow the path from the sink basin that is clogged. The tailpiece drops straight down from that basin. The tailpiece connects to the waste tee.
The waste tee connects to the P-trap. The P-trap connects to the wall. If you are clearing a clog, start at the P-trap and work upward.
Can I reuse the old rubber washers?
You can, but you should not. Rubber washers flatten and harden over time. Reusing them is the most common cause of a leak after reassembly.
Replacement washers cost about a dollar for a pack of four. Buy new ones and save yourself the frustration.
What if the pipes are metal instead of plastic?
Metal drain pipes use the same slip nut system. The difference is that metal nuts can corrode and seize. You will need more penetrating oil and more patience.
Use slip joint pliers with a gentle grip. Metal threads are stronger than plastic, but the fittings can still crack if you apply too much torque.
