Imagine this: You’ve just finished a delightful dinner with your family, and now it’s time to clean up. You load your KitchenAid dishwasher, press start, and walk away.
But when you return, you find water pooling at the bottom. Not exactly the outcome you were hoping for, right? Knowing how to drain a KitchenAid dishwasher can save you from a messy kitchen and a potential headache. We’ll walk you through the simple steps to ensure your dishwasher drains efficiently every time.
You’ll discover tips that not only tackle the issue but also prevent it from happening again. Get ready to take control of your kitchen cleanup, ensuring you never have to deal with unwanted water again. Keep reading, and you’ll be surprised at how easy it is to master this essential household task!
Preparation
Draining a Kitchenaid dishwasher needs proper preparation. It ensures a smooth process. Without preparation, complications may arise. Start by gathering the right tools. Safety is also crucial. Let’s begin the preparation.
Gather Necessary Tools
First, collect all required tools. You’ll need a screwdriver. A towel is also handy. A small bucket is essential. These tools make the task easier. Keep them within reach.
Ensure Safety Measures
Safety should be your priority. Disconnect the dishwasher from power. This prevents electric shock. Wear gloves to protect your hands. A safe environment is important.

Credit: www.reddit.com
Locating The Drain
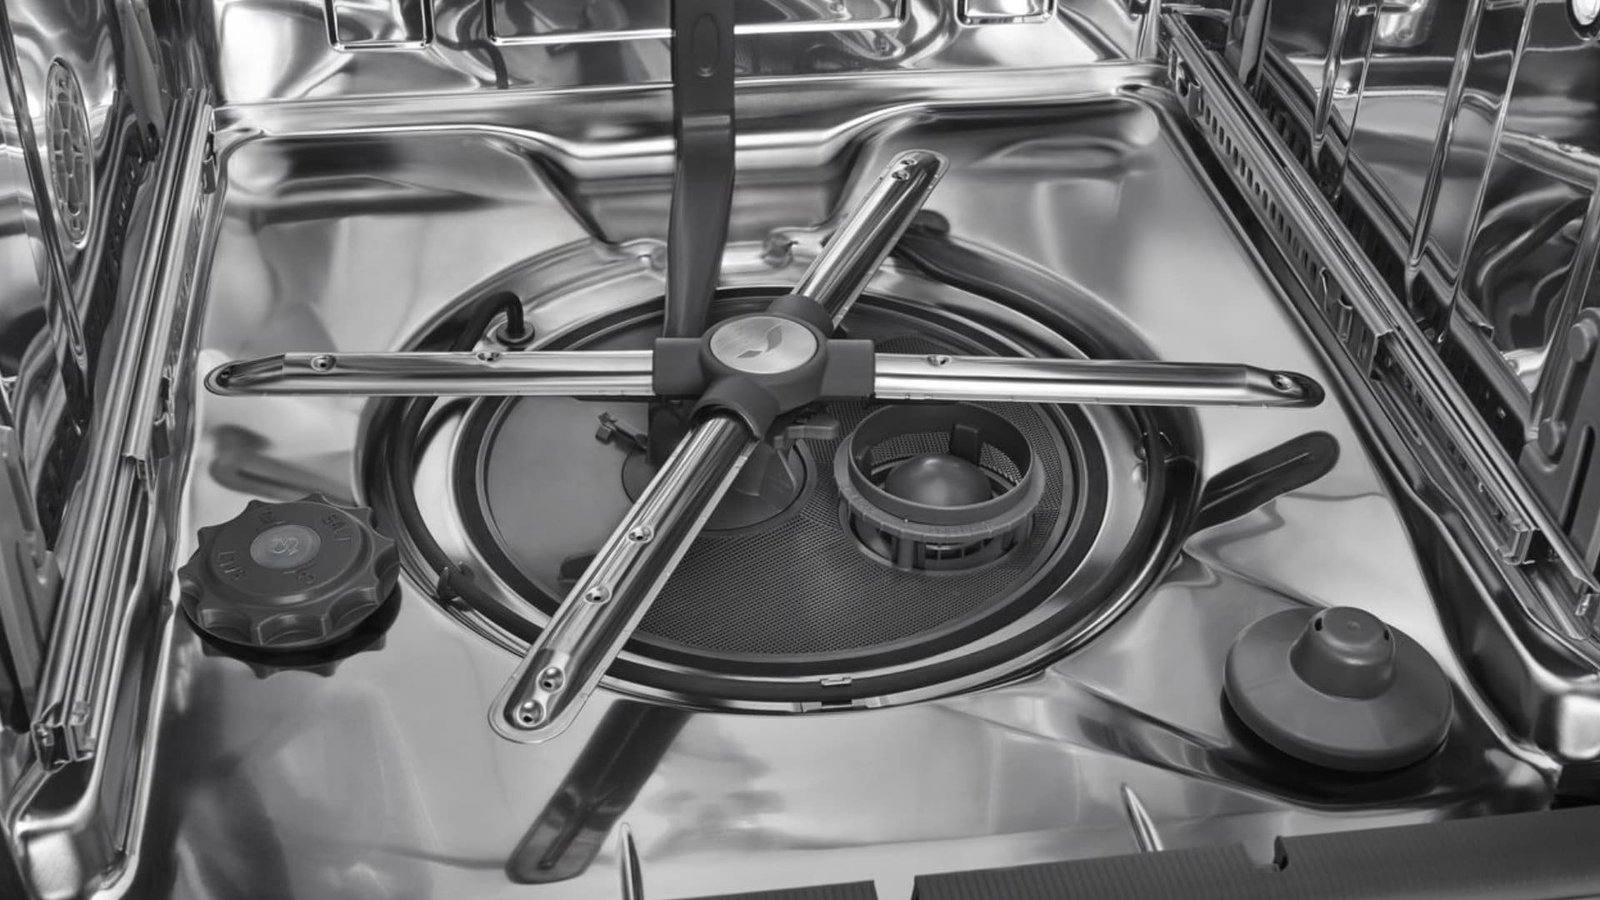
Find the drain at the bottom of the dishwasher. It is often hidden under the filter and spray arms. Check for any debris or blockages to ensure proper drainage.
Locating the drain in your KitchenAid dishwasher might sound like an intimidating task, but it’s easier than you think. Knowing where to find the drain is crucial for maintaining your dishwasher’s performance. Whether you’re dealing with a clog or just curious about how it all works, pinpointing the drain can save you time and prevent future issues. Let’s dive into the steps you need to take.Identify The Drainage System
First things first, understanding your dishwasher’s drainage system is key. Your KitchenAid dishwasher will have a drain located at the bottom of the tub. Look for a small opening, typically covered by a filter or a grill. This is where the water exits after a cycle. Knowing this can help you spot any blockages or debris. Have you ever noticed leftover water at the bottom of your dishwasher? This could be a sign of a blocked drain.Access The Drain Hose
Once you’ve identified the drainage system, it’s time to access the drain hose. This hose is responsible for carrying water from the dishwasher to your home’s plumbing system. To access it, you’ll need to look behind the dishwasher. You might need to remove a panel or two, so grab a screwdriver and get ready to explore. Have you ever felt stuck trying to figure out how to remove parts? Don’t worry, most panels are user-friendly and designed to be removed easily. With the drain hose in view, check for any kinks or leaks. A kinked hose can prevent proper drainage, leading to pooling water inside your dishwasher. Regular checks can help you catch these issues early, ensuring your appliance runs smoothly.Disconnecting The Dishwasher
Disconnecting your KitchenAid dishwasher is a straightforward task. Yet, it demands some caution. Before starting, ensure you have the necessary tools ready. A screwdriver, pliers, and towels should be enough. Follow these steps to disconnect safely and efficiently.
Turn Off Power Supply
Begin by cutting off the power supply. Locate the circuit breaker panel in your home. Find the switch labeled for the dishwasher. Turn it to the “off” position. This prevents any accidental electric shock. Always double-check to ensure the power is off. A multimeter can help confirm this.
Detach Water Supply
Next, detach the water supply line. Find the water valve under the sink. Turn it clockwise to stop the water flow. Use pliers to unscrew the hose from the valve. Have a towel ready to catch any water drips. Once done, inspect the hose for any signs of wear or damage.
Cleaning The Drain
Draining a Kitchenaid dishwasher involves simple steps for effective maintenance. First, ensure the appliance is unplugged. Next, remove the bottom dish rack to access the drain area. Finally, clear any debris to maintain smooth operation.
Cleaning the drain of your KitchenAid dishwasher is a crucial step in maintaining its efficiency and longevity. Over time, food particles and other debris can accumulate, leading to blockages that affect your dishwasher’s performance. By regularly checking and cleaning the drain, you can ensure your appliance runs smoothly. Let’s dive into how you can effectively clean the drain and keep your dishwasher in top shape.Remove Debris And Blockages
Start by disconnecting your dishwasher from the power supply. Safety first! Once unplugged, open the dishwasher door and locate the drain at the bottom of the appliance. This is usually a round or oval-shaped mesh cover. Carefully remove the cover. You might be surprised at what you find underneath—bits of food, labels, and other small debris often find their way here. Use a soft brush or damp cloth to clear away any visible debris. This simple step can significantly improve drainage. Have you noticed any stubborn build-up? A toothbrush can be a handy tool to get into tight spaces and scrub away residue.Inspect For Damage
After removing debris, it’s crucial to inspect the drain for any signs of damage. Check the mesh cover for tears or holes. A damaged cover can lead to larger debris entering the drain, causing blockages. Look closely at the drain area itself. Are there any cracks or signs of wear? If you notice any damage, consider reaching out to a professional for repairs. Timely intervention can prevent more severe issues down the line. Keeping your dishwasher’s drain clean not only helps with performance but also prolongs the life of your appliance. Have you ever faced drainage issues with your dishwasher? What was your experience like? Share your thoughts or tips in the comments below!Reconnecting The Dishwasher
After draining your KitchenAid dishwasher, reconnecting it is essential. This step ensures the appliance functions smoothly. It’s a straightforward process that requires care and attention. Let’s break it down into simple steps.
Secure The Drain Hose
Begin by checking the drain hose. Make sure it’s free of kinks. A kink can impede water flow, causing issues later. Reattach the hose to the drain pipe securely. Use a clamp to hold it firmly in place. This prevents leaks and keeps the connection tight. Ensure the hose is positioned correctly.
Restore Power And Water Supply
Next, turn on the power supply. Plug the dishwasher back into the socket. Verify the connection is stable. Then, open the water supply valve. Ensure water flows freely to the dishwasher. Check for any drips or leaks. Once confirmed, your dishwasher is ready to use. Regular checks can prevent future problems.

Credit: www.servicecare.net
Testing The Drainage
Ensuring your KitchenAid dishwasher drains properly is crucial. It prevents water buildup and potential damage. Testing the drainage system identifies issues early. This section guides you through key steps. You’ll learn to check for leaks and verify proper functionality.
Check For Leaks
Start by inspecting the area under the dishwasher. Look for any signs of water. Puddles or dampness indicate a leak. Check the hoses connected to the dishwasher. Ensure they are tightly secured. A loose hose can cause leakage. Examine the seals around the dishwasher door. Worn-out seals may let water escape.
Verify Proper Functionality
Run a short cycle on your dishwasher. Listen for unusual sounds during the draining phase. These could mean blockages or pump issues. Observe the drain pipe while the machine runs. Water should flow steadily without interruption. If water backs up, there might be a clog. Check the sink connected to the dishwasher. Ensure it drains smoothly too.
Maintenance Tips
Draining a KitchenAid dishwasher involves disconnecting the power, removing the bottom rack, and checking the drain hose. Ensure no debris blocks the hose by gently cleaning it with a wire. Reassemble the parts and test the dishwasher to ensure proper drainage.
Maintaining your KitchenAid dishwasher in peak condition is crucial for ensuring it functions effectively and lasts for years. By following a few straightforward maintenance tips, you can prevent drainage issues and keep your dishwasher running smoothly. Whether it’s setting up a regular cleaning schedule or identifying signs of drainage problems early on, these insights will help you maintain your appliance with ease.Regular Cleaning Schedule
Establishing a regular cleaning schedule is vital. Aim to clean your dishwasher every month. Start by removing the lower dish rack to access the drain area. Wipe away any debris or food particles with a damp cloth. Run a cycle with a dishwasher cleaner or a cup of white vinegar placed on the top rack. This helps in removing grease and mineral buildup.Signs Of Drainage Issues
How do you know if your dishwasher might have drainage issues? Look out for water pooling at the bottom of the dishwasher after a cycle. You might also notice dishes aren’t as clean as they used to be. This could be a sign that water isn’t draining properly and is re-circulating dirty water. Another indicator is an unpleasant odor emanating from your dishwasher. This often means food particles are trapped and decomposing in the drain. By addressing these issues promptly, you can avoid more severe problems down the line. Have you ever noticed these signs in your dishwasher? Taking action sooner rather than later can save you both time and money.
Credit: www.reddit.com
Frequently Asked Questions
How To Get A Kitchenaid Dishwasher To Drain?
Ensure the dishwasher is plugged in and the door is securely closed. Clean the filter and check the drain hose for clogs. Reset the dishwasher by pressing the “Cancel” button. If issues persist, consult the user manual or contact KitchenAid customer service for assistance.
How Do I Force My Dishwasher To Drain?
To force your dishwasher to drain, check for clogs in the drain hose or filter. Clean any blockages. Reset the dishwasher by turning off its power for a few minutes. Restart the machine, selecting the drain cycle. If issues persist, consult the manual or contact a professional for assistance.
How Do You Drain Standing Water In A Dishwasher?
To drain standing water in a dishwasher, first check the filter and drain hose for blockages. Clean them thoroughly if needed. Next, ensure the drain pump is functioning properly. If issues persist, consult your dishwasher’s manual or contact a professional for assistance.
Regular maintenance prevents future clogs.
What Button To Press To Drain A Dishwasher?
Press the “Cancel” or “Drain” button on your dishwasher to drain it. Consult your dishwasher’s manual for specific instructions if these buttons are not present.
Conclusion
Draining a Kitchenaid dishwasher is simple with the right steps. First, check the filter. It can be blocked. Next, inspect the drain hose. It might be kinked or clogged. Regular maintenance helps avoid issues. Keep the filter clean. Ensure hoses are in good condition.
These steps ensure a smooth dishwasher operation. Troubleshooting doesn’t have to be hard. Follow these tips for a hassle-free experience. Your dishwasher will work efficiently. Enjoy clean dishes every time. Don’t let small issues turn into big problems. Stay proactive.
Keep your appliance in top shape.
