Are you staring at your brand-new dishwasher, wondering where to begin? You’re not alone.
Installing a dishwasher might seem like a daunting task, but with a bit of guidance, you can transform this challenge into a simple DIY project. Imagine the convenience of having your dishwasher up and running, taking care of those endless piles of dishes.
This guide will walk you through each step, breaking down the process into easy, manageable parts. By the end, you’ll not only save money on installation costs but also feel the satisfaction of having done it yourself. Ready to dive in and make your kitchen life easier? Let’s get started!
Tools And Materials Needed
Gather essential tools and materials like a screwdriver, adjustable wrench, and Teflon tape. Ensure access to a dishwasher installation kit. Have a bucket and towel ready for any water spills.
Setting up a dishwasher can seem like a daunting task, especially if you haven’t done it before. However, with the right tools and materials at your disposal, the process becomes much more manageable. Understanding what you need beforehand can save you time and frustration. You might be surprised at how straightforward it can be with some preparation and a bit of guidance.Essential Tools
To start, gather a few basic tools that will make the installation process smoother. A screwdriver is crucial for removing and securing panels. You will also need an adjustable wrench to tighten plumbing connections. A drill might be necessary if you need to make holes for mounting brackets. Don’t forget a level to ensure your dishwasher sits perfectly flat. This helps prevent leaks and ensures proper operation. A tape measure will assist in confirming that your dishwasher fits the space and aligns with existing plumbing and electrical outlets.Necessary Materials
You’ll need some materials on hand to complete the hookup. Plumber’s tape is essential for sealing threaded plumbing connections. This prevents leaks and ensures a tight seal. Make sure you have a water supply line and drain hose that match your specific dishwasher model. These lines are vital for connecting the appliance to your home’s plumbing. Also, consider having some wire connectors if you’re dealing with electrical connections. These help secure the wiring safely and reduce the risk of electrical issues.Safety Equipment
Safety should always come first, so don’t overlook protective gear. A pair of gloves can protect your hands from sharp edges. Safety goggles are a good idea to shield your eyes from dust or debris, especially if you’re drilling or working in tight spaces.Additional Accessories
While not strictly necessary, some additional items might make the process easier. A bucket can catch any water that leaks while you’re disconnecting old plumbing. Rags or towels are useful for cleaning up spills or drying off parts as you work. Having these tools and materials ready can make all the difference. Have you ever started a project only to realize halfway through that you’re missing something essential? Preparing in advance helps you avoid that frustration and keeps your project on track.Preparing The Area
Before installing your dishwasher, it’s crucial to prepare the area properly. Ensuring the space is ready can prevent headaches later. This step involves clearing the space and checking the plumbing and electrical setup.
Clearing The Space
Begin by removing any items from the area where the dishwasher will sit. This includes kitchen cabinets or drawers nearby. Make sure nothing obstructs the path for the appliance. Give yourself ample room to work comfortably.
Measure the space to confirm the dishwasher will fit. Check for any potential barriers like pipes or wires. Ensure the floor is level. A level surface is vital for proper installation.
Checking The Plumbing And Electrical Setup
Inspect the plumbing connections. Locate the water supply line. Ensure it’s accessible and in good condition. Check the drain line, too. It must be ready to connect to the dishwasher.
Examine the electrical setup. Locate the power source for the dishwasher. Make sure it’s within reach and capable of handling the load. Verify it meets local electrical codes. Safety should be a top priority.
Preparing the area thoroughly avoids complications. A well-prepared space ensures a smooth installation process.
Installing The Water Supply Line
Installing the water supply line is crucial for your dishwasher’s operation. It ensures a steady flow of water. This step involves connecting the dishwasher to the plumbing system. Understanding each part of this process helps prevent leaks and damages.
Shutting Off The Water
First, locate the main water valve. Turn it clockwise to stop water flow. This step prevents any accidental water spills. Check if the water is off by turning on a faucet. No water should come out.
Connecting The Hose
Next, identify the water inlet on your dishwasher. Attach one end of the supply hose to it. Make sure the connection is tight. A loose connection can cause leaks. Now, connect the other end to the water supply valve. Again, ensure it’s securely attached. Use a wrench if needed to tighten the connection.
After connecting, turn the water back on. Check for any leaks around the connections. If you see any, tighten the hose further. Proper installation ensures efficient water flow to your dishwasher.
Setting Up The Drain Line
Setting up the drain line is a crucial step in dishwasher installation. Proper drainage ensures your dishwasher works efficiently. It prevents water from backing up into your kitchen. Follow these simple steps to connect the drain line.
Attaching The Drain Hose
Start by locating the drain hose on your dishwasher. It is usually at the back. Take the hose and connect it to the dishwasher’s drain outlet. Make sure it fits snugly. Use a clamp to hold it in place. This prevents leaks. Ensure the hose is not kinked or twisted.
Securing The Connection
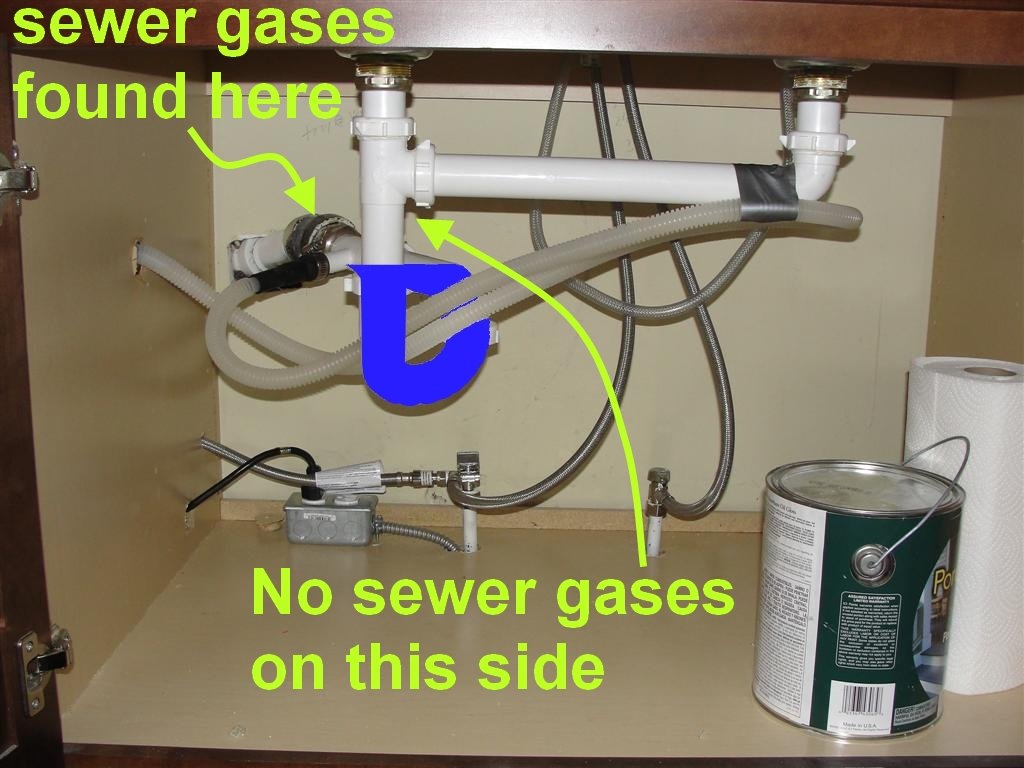
Check the other end of the drain hose. It connects to your sink’s drain pipe. You may need an adapter for a secure fit. Attach the hose and tighten the clamp. This helps avoid leaks. Test the connection by running water through the sink. Watch for any drips or leaks.
Connecting The Electrical Supply
Connecting a dishwasher to the electrical supply requires careful attention. First, ensure the power is off. Then, connect the dishwasher’s electrical wires to the junction box. Secure the connections with wire nuts for safety. Always follow the manufacturer’s instructions for proper installation.
Connecting the electrical supply of your dishwasher is a crucial step in its installation. Without proper connection, your dishwasher won’t operate effectively. But don’t worry, it’s simpler than it sounds. By following a few straightforward steps, you can ensure your appliance is safely wired and ready to go.Turning Off The Power
Before you begin, safety is your top priority. You need to turn off the power to avoid any electrical mishaps. Head over to your home’s main electrical panel. Identify the circuit breaker that controls the area where you’ll be working. Flip it to the “off” position. Double-check by trying to turn on a light in the same area. This step ensures your safety while connecting the dishwasher’s electrical supply.Wiring The Dishwasher
Once you’ve ensured the power is off, it’s time to get down to the wiring. Locate the dishwasher’s junction box; it’s usually at the bottom or back of the unit. Using a screwdriver, open the junction box cover. You should see wires inside. Typically, there are three wires: black (hot), white (neutral), and green or bare (ground). Connect these wires to the corresponding wires from the electrical supply. Use wire nuts to secure each connection. Imagine the satisfaction of knowing your dishwasher is hooked up safely and securely. Did you ever think that a simple screwdriver and wire nuts could be your best friends in this process? Remember to close the junction box cover after wiring. This prevents any accidental contact with the electrical components. Once everything is connected, head back to your electrical panel. Flip the circuit breaker back to “on.” Your dishwasher is now powered and ready to tackle those dirty dishes. How does it feel to have accomplished a task that seemed daunting at first?
Credit: www.reddit.com
Positioning The Dishwasher
Positioning the dishwasher is a crucial step in the installation process. A well-positioned dishwasher ensures efficient operation and longevity. It prevents leaks and uneven wear. Follow these steps to correctly position your dishwasher. This will help you achieve optimal performance.
Leveling The Unit
Before sliding the dishwasher into place, level it. Use a spirit level to check. Place it on the top edge of the unit. Adjust the legs if needed. Most dishwashers have adjustable legs. Turn them clockwise or counterclockwise. This raises or lowers the unit. A level dishwasher prevents water pooling inside. It also avoids noisy operation.
Sliding Into Place
Once leveled, slide the dishwasher into its space. Ensure the power cord and hoses are out of the way. Gently push the unit back. Check alignment with the cabinets. It should fit snugly. Avoid forcing it if resistance is felt. Double-check the door clearance. It should open and close easily. This ensures proper function and aesthetic alignment.
Testing The Installation
Ensure the dishwasher is level to prevent leaks and noise. Connect water supply, drain, and power. Test by running a short cycle to check for proper water flow and drainage.
After you’ve gone through the physical steps of installing your dishwasher, the final and crucial stage is testing the installation. This ensures everything is working as it should be. Without this step, you might find unpleasant surprises like leaks or dysfunctional components. So, roll up your sleeves and let’s make sure your new appliance is ready for action.Checking For Leaks
Start by checking for leaks. Before running a full cycle, turn on the water supply. Look at the connections you made for any drips or puddles. Make sure all hose connections are secure and tight. A simple glance might save you from potential water damage. Use a dry cloth to wipe around the connections and see if it comes back damp. If you spot a leak, don’t panic. Tighten the connection slightly, and check again. Small adjustments are often all that’s needed.Running A Test Cycle
Once you’re confident there are no leaks, it’s time to run a test cycle. Choose a short cycle to start with. It’s like giving your dishwasher a little warm-up. Check if the dishwasher fills with water correctly. Listen for unusual noises. It should hum, not clatter. Open the door mid-cycle to ensure the water is hot and the spray arms are moving. This will confirm that the heating element and motor are functioning properly. Close the door quickly to avoid water spillage. Once the cycle completes, inspect the interior. Are dishes clean and dry? This is a good sign that all systems are go. Remember, a successful test cycle means your dishwasher is installed correctly. Feel a sense of accomplishment in knowing you’ve done it yourself. Doesn’t it feel great to be self-sufficient? Before you celebrate, ask yourself: Did I check everything thoroughly? This question will guide you to double-check your work, ensuring the dishwasher is ready for regular use without issues.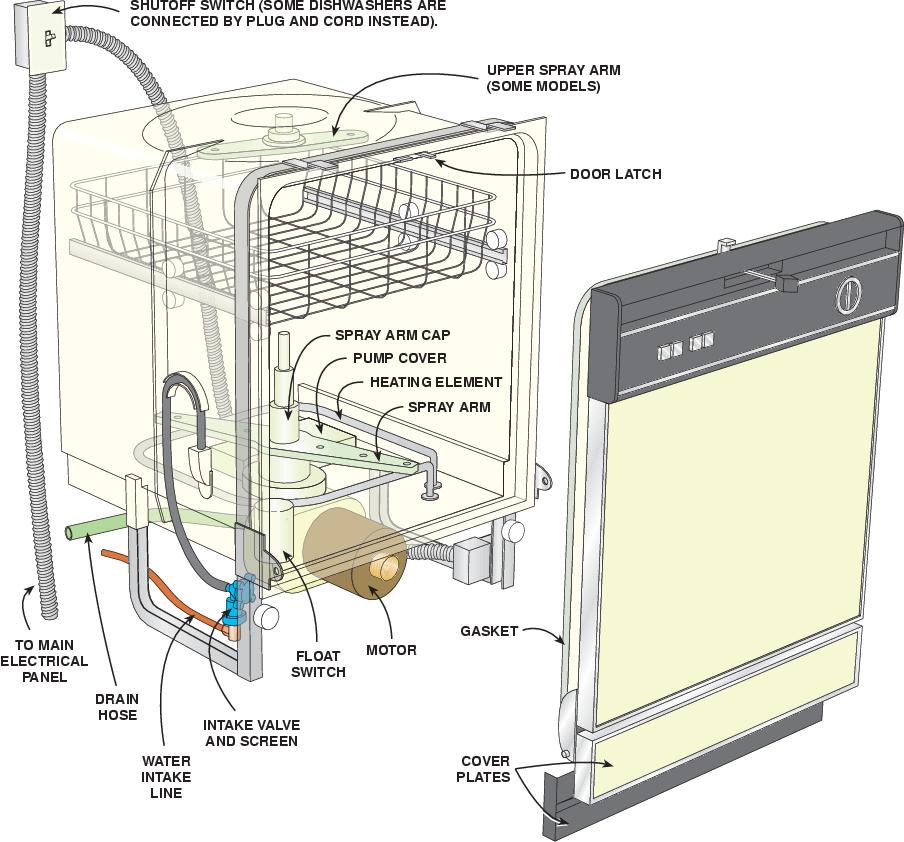
Credit: www.homeconstructionimprovement.com
Troubleshooting Common Issues
Setting up a dishwasher can be tricky. Sometimes, issues arise after installation. Understanding these problems helps maintain your appliance. It’s essential to learn how to troubleshoot. This guide covers common issues you might face.
Addressing Water Leaks
Water leaks are a frequent problem. Check the connections first. Ensure hoses are tight and secure. Look for any cracks or damage. Also, inspect the door gasket. A worn gasket often causes leaks. Replace it if necessary.
Sometimes, improper leveling leads to leaks. Use a spirit level to check. Adjust the feet until balanced. Another tip: avoid overloading the dishwasher. Too many dishes can cause water overflow.
Resolving Electrical Problems
Electrical issues can be daunting. Start by checking the power supply. Ensure the plug is firmly in the outlet. Look at the circuit breaker. It might have tripped.
If the dishwasher won’t start, check the door latch. A faulty latch stops the appliance from running. Inspect the control panel as well. Buttons can get stuck or damaged.
Lastly, examine the wiring. Loose wires might disrupt power flow. If unsure, consulting an electrician is wise. Safety comes first.
Maintenance Tips
Connecting a dishwasher is a straightforward process. Start by turning off the power and water supply. Attach the water line and drain hose securely. Finally, connect the power cord and test the appliance. With these steps, your dishwasher will be ready for use in no time.
When you hook up a dishwasher, ensuring its longevity and optimal performance requires regular maintenance. Proper care not only saves you money on repairs but also keeps your dishwasher running smoothly. By dedicating a little time to maintenance, you can prevent many common issues.Regular Cleaning
Regular cleaning is essential for your dishwasher’s health. Start by wiping down the door edges and seals with a damp cloth. This removes grime and food particles that can cause unpleasant odors. Inspect the dishwasher’s filter monthly. A clogged filter can reduce efficiency and lead to dirty dishes. Simply remove it, rinse it under running water, and replace it. Don’t forget to clean the spray arms. Blocked holes can prevent water from reaching all areas. Detach the arms, and use a thin wire to clear any blockages.Preventing Future Issues
To prevent future problems, always scrape off food particles from dishes before loading them. This simple step reduces the risk of clogs and keeps your machine in top shape. Check the water supply lines for leaks every few months. A small leak can lead to bigger issues over time, including water damage to your kitchen floor. Adjusting the water softener settings can also help, especially if you have hard water. This reduces mineral buildup, which can affect performance. Have you ever been surprised by an unexpected dishwasher breakdown? These maintenance tips can help you avoid the hassle and ensure your appliance remains a reliable kitchen companion.:max_bytes(150000):strip_icc()/how-to-install-a-dishwasher-2718667-07-6017b066ae494514873e3c2593749f3c.jpg)
Credit: www.thespruce.com
Frequently Asked Questions
Can You Hook Up A Dishwasher By Yourself?
Yes, you can hook up a dishwasher by yourself. Ensure you have basic plumbing skills and necessary tools. Follow the manufacturer’s instructions carefully. Turn off water and electricity before starting. If unsure, consult a professional to avoid damage or leaks.
What Hookups Are Needed For A Dishwasher?
A dishwasher requires water supply, drainage, and an electrical hookup. Connect to a hot water line, ensure a waste pipe for drainage, and plug into a grounded electrical outlet. Always follow manufacturer guidelines for installation.
How Does A Dishwasher Connect To Plumbing?
A dishwasher connects to plumbing via a water supply line and a drain hose. The water line links to the hot water valve, while the drain hose attaches to the sink’s drain or garbage disposal. Ensure proper sealing to prevent leaks.
Do You Need A Plumber To Connect A Dishwasher?
Hiring a plumber to connect a dishwasher ensures proper installation and avoids potential leaks. Plumbers have the expertise to handle water and drainage connections safely. While DIY is possible, professional help is recommended for peace of mind. Proper installation also helps maintain your dishwasher’s warranty.
Conclusion
Congratulations on successfully installing your dishwasher! This task might seem tough, but you did it. Now, enjoy the benefits of clean dishes without the hassle. Remember, a well-installed dishwasher saves time and water. It’s a great addition to your kitchen.
Feel free to share this guide with friends who need help. Practice makes perfect, so each installation gets easier. Keep learning and improving your skills. Now, relax and let your new appliance do the work. You’ve got this!
