Ever looked at those stubborn stains or grime on your floors and thought there must be a faster way to clean them? Imagine turning your regular drill into a powerful cleaning tool.
Yes, you can make a drill scrub brush right at home! It’s easier than you think and can save you loads of time and elbow grease. You’re about to discover a simple hack that transforms your cleaning routine and tackles dirt with zero fuss.
Keep reading, and you’ll learn the step-by-step process to create this game-changer in cleaning. Get ready to make your chores quicker and more efficient, so you can enjoy more of your free time doing what you love.
Materials Needed
Gather materials like a drill, scrub brush, and sturdy bolt. Ensure the brush fits securely on the drill. Opt for brushes with firm bristles for effective cleaning.
To create an effective drill scrub brush, gathering the right materials is key. These materials will help transform a simple drill into a powerful cleaning tool. Let’s dive into what you will need to get started.Drill
The drill is the main tool. It should be cordless for easy movement. Ensure it has adjustable speed settings for better control.Scrub Brush
Choose a scrub brush with sturdy bristles. The bristles should be strong enough to handle tough stains. A round brush works well for most surfaces.Drill Attachment Kit
This kit helps connect the brush to the drill. Look for a kit that includes multiple sizes of attachments. It ensures a snug fit for various brushes.Screw And Washer
A screw and washer secure the brush to the attachment. The screw should fit the drill’s chuck size. The washer ensures a tight, secure connection.Safety Goggles
Safety goggles protect your eyes. They shield against any flying debris during cleaning. Always wear them to ensure safety.Cleaning Solution
Select a cleaning solution based on the surface. It enhances the brush’s effectiveness. Always follow the solution’s usage instructions.
Credit: www.amazon.co.uk
Choosing The Right Brush
Selecting the right brush for a drill scrub requires careful consideration of bristle type and size. Soft bristles work well for delicate surfaces, while stiff ones tackle tough grime. Ensure compatibility with your drill for efficient cleaning performance.
When crafting a drill scrub brush, the choice of brush is crucial. It determines the effectiveness and safety of your cleaning task. The right brush will enhance your drill’s cleaning power, while the wrong one might just make a mess.Understanding Brush Materials
Different materials serve different cleaning needs. A nylon bristle brush, for example, is perfect for gentle surfaces like car interiors or delicate tiles. Meanwhile, a stainless steel brush is more suited for tough grime on grills or concrete. Consider what you’ll clean most often before making a choice.Size And Shape Matter
Brush size can significantly impact your cleaning efficiency. A larger brush covers more area but may struggle in tight spots. Smaller brushes excel in corners and crevices. Think about the surfaces you clean frequently, and choose accordingly.Attachment Compatibility
Not all brushes fit every drill. Ensure the brush you choose attaches securely to your drill. Check the shank size and compatibility with your drill model. Nothing is more frustrating than a brush that won’t stay put during use.Purpose And Frequency Of Use
How often will you use your drill scrub brush? For frequent, heavy-duty cleaning, investing in a durable, high-quality brush makes sense. Occasional use may not require as robust a tool. Match the brush’s durability with your cleaning habits.Cost Vs. Value
Price often reflects quality, but not always. Weigh the cost against the brush’s features and reviews. Sometimes, a mid-range brush offers the best balance of quality and value. Consider what you’re willing to spend for a hassle-free cleaning experience. Selecting the right brush can transform your cleaning routine. What factors will you prioritize in your choice?Preparing The Drill
Preparing the drill involves gathering the right materials. First, select a sturdy brush head compatible with your drill. Ensure the brush is securely attached to the drill’s chuck. This setup helps in tackling tough cleaning tasks effectively and efficiently.
Preparing the drill is a key step in making a drill scrub brush. Ensuring your drill is ready sets the foundation for effective cleaning. Start with a few simple checks and adjustments to get your drill in top shape.Check Drill Compatibility
Ensure your drill is suitable for the brush attachment. Most drills will work, but confirm the chuck size matches the brush shank. This prevents any issues during use.Secure The Drill Bit
Insert the brush attachment into the drill chuck. Tighten the chuck to secure it firmly. A loose brush could slip or cause injury. Double-check for a snug fit.Inspect The Drill Battery
Ensure the battery is fully charged. A weak battery can slow down the cleaning process. Keep a spare battery ready to avoid interruptions.Adjust The Speed Setting
Set the drill to a low or medium speed. High speeds might damage surfaces or wear the brush quickly. Start slow, and adjust as needed for different tasks.Test The Drill’s Functionality
Before starting, run the drill for a few seconds. Check for any unusual noises or vibrations. A smooth operation indicates readiness for scrubbing.Attaching The Brush
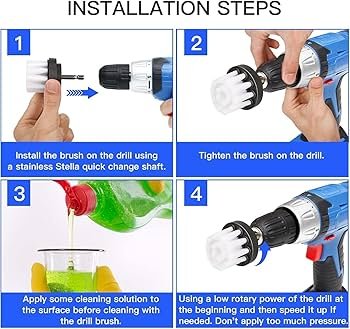
Attach the brush securely to the drill using a compatible adapter. Ensure the brush fits snugly for effective cleaning. Tighten the drill chuck around the brush’s shaft to prevent wobbling during use.
Attaching the brush to your drill can seem daunting if you’ve never done it before. However, it’s an essential step in transforming your drill into a powerful cleaning tool. With the right guidance, this process can be a breeze, even for beginners. Let’s dive into the details of how to attach a scrub brush to your drill effectively.Choosing The Right Drill
Ensure that your drill has a chuck. The chuck is the part of the drill where you insert the drill bit or, in this case, the scrub brush attachment. Most household drills will be compatible with brush attachments, but it’s always worth checking beforehand.Prepare The Brush Attachment
Your scrub brush attachment will typically come with a hexagonal shaft. This design helps it fit securely into the drill’s chuck. Before attaching, inspect the shaft for any dust or debris, ensuring a snug fit.Open The Drill Chuck
To open the chuck, you’ll need to rotate it counterclockwise. This widens the jaws, allowing you to insert the brush attachment. Ensure it’s wide enough to accommodate the shaft of your brush.Insert The Brush Attachment
Place the hexagonal shaft of your brush into the open chuck. Push it in as far as it will comfortably go. This ensures a stable connection and prevents wobbling during use.Tighten The Chuck
Turn the chuck clockwise to tighten it around the brush’s shaft. Make sure it’s securely fastened, so the brush doesn’t slip out while you’re cleaning. A firm grip is crucial for safety and efficiency.Test The Attachment
After securing the brush, give your drill a quick test run. Start the drill at a low speed to ensure the brush is firmly attached and rotates smoothly. If there’s any wobbling, tighten the chuck a bit more.Safety Precautions
Always ensure your drill is off when attaching or detaching the brush. This prevents accidental starts, which can lead to injury. It’s a simple step but vital for your safety. By following these steps, you’ll have your scrub brush securely attached to your drill, ready to tackle any cleaning challenge. What will you clean first with your newfound cleaning tool?Safety Tips
Ensure the drill is unplugged before attaching the scrub brush. Use safety goggles to protect your eyes from debris. Secure the brush tightly to prevent accidents while scrubbing surfaces.
Safety Tips Ensuring safety while making a drill scrub brush is as crucial as the task itself. You want to protect yourself while you work, and a few safety precautions can help you do just that. With proper precautions, you can enjoy a hassle-free DIY experience.Wear Protective Gear
Ensure you wear safety goggles to protect your eyes from flying debris or accidental drill slips. Gloves can offer extra grip and protect your hands from potential injuries. Comfortable, close-fitting clothing helps prevent getting caught in the drill.Secure Your Workspace
Clear your workspace of any clutter. A clean, organized area reduces the risk of accidents. Ensure your drill is on a stable surface to prevent it from tipping over.Check Your Tools
Inspect your drill and brush for any damage before starting. A faulty drill can lead to unexpected accidents. Regular checks can save you from a lot of trouble.Use The Right Drill Speed
Begin with a low speed setting to maintain control. High speeds can lead to loss of control and increase the risk of injury. Adjust speed gradually as you become more comfortable.Secure The Brush Attachment
Ensure the brush is tightly secured to the drill. A loose attachment can fly off and cause injury. Double-check the attachment before starting the drill.Work In A Well-ventilated Area
Adequate ventilation prevents inhalation of dust or cleaning agents. Fresh air helps keep you alert and focused. An open window or fan can make a big difference.Be Mindful Of Your Surroundings
Keep an eye on what’s around you to avoid accidental collisions. Ensure pets and children are not in your workspace. A moment’s distraction can lead to accidents.Maintain Control
Always maintain a firm grip on your drill. Control is key to avoiding mishaps. Practice maintaining balance and control before beginning your task.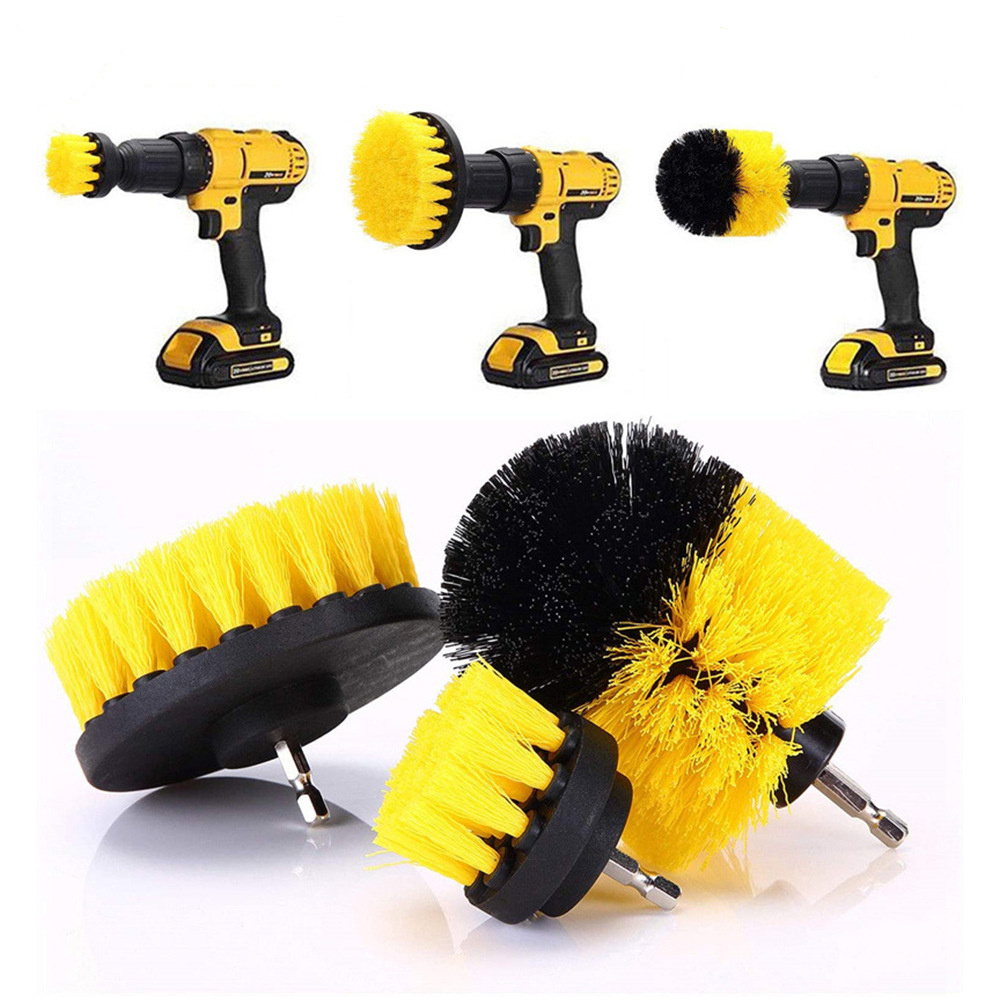
Credit: theraleighbeergarden.com
Using Your Drill Scrub Brush
Transform your drill into a powerful scrubber by attaching a brush head. Select a compatible brush and secure it tightly. This tool enhances cleaning efficiency for stubborn dirt on various surfaces.
Using your drill scrub brush can transform your cleaning routine into a more efficient and even enjoyable task. Imagine cutting your scrubbing time in half while achieving a deeper clean with less effort. Whether you’re tackling stubborn grime on your bathroom tiles or refreshing your outdoor furniture, this tool is a game changer. But how exactly do you maximize its potential?Preparing The Surface
Before you dive in with your drill scrub brush, make sure the surface is ready. Clear any loose debris or dirt with a quick sweep or rinse. This prevents the brush from simply spreading around the grime instead of cleaning it.Selecting The Right Brush
Your drill scrub brush likely came with different attachments. Choose the one best suited for your task. A softer brush works well for delicate surfaces, while a stiff-bristled brush is ideal for tougher spots like grout lines.Setting Up Your Drill
Attach your selected brush to the drill. Ensure it’s securely fastened. Adjust the drill’s speed settings based on the task at hand. A slower speed is better for gentle cleaning, while a faster speed can tackle tougher stains.Applying The Cleaning Solution
Apply your chosen cleaning solution directly onto the surface or the brush. Consider using eco-friendly solutions for a safe and effective clean. How much solution do you really need? Start small—you can always add more if necessary.Scrubbing Technique
Hold the drill firmly and start at a low speed. Gradually increase the speed as needed, applying gentle pressure. Let the brush do the work—there’s no need to press down hard. Move in circular motions for an even clean.Rinsing And Finishing Touches
Once you’ve scrubbed the area, rinse it thoroughly with clean water to remove any residue. Wipe the surface with a clean cloth to reveal the refreshed appearance. Is it sparkling clean or does it need another round?Cleaning Your Brush
After use, clean the brush bristles with warm water and a mild detergent. This prevents buildup and extends the life of your brush. Let it dry completely before storing it away for your next cleaning adventure.Cleaning Different Surfaces
Using a drill scrub brush can make cleaning different surfaces easier. This tool fits onto your drill, transforming it into a powerful scrubber. It can tackle dirt and grime efficiently. Each surface requires a unique approach for best results. Let’s explore how to clean various surfaces effectively with your drill scrub brush.
Cleaning Tiles And Grout
Tiles and grout often gather dirt. A medium-bristle brush works best here. Attach it to your drill. Ensure the drill is on a low speed setting. This prevents damage to the tiles. Move the brush in circular motions over the surface. Rinse with water after scrubbing.
Scrubbing Wooden Surfaces
Wood needs gentle care. Choose a soft-bristle brush attachment. Test a small area first. Use the drill at a low speed. Scrub along the grain of the wood. Avoid harsh pressure to prevent scratches. Finish by wiping with a soft cloth.
Polishing Metal Surfaces
Metal surfaces can lose their shine over time. Use a stiff-bristle brush for tough stains. Apply a metal polish or cleaner to the surface. Use the drill at medium speed. Scrub gently to bring back the shine. Wipe off excess cleaner with a clean cloth.
Refreshing Bathroom Fixtures
Bathroom fixtures attract soap scum and mineral deposits. A soft-bristle brush attachment is ideal. Apply a cleaning solution to the fixtures. Use the drill on a low speed setting. Scrub in small circles. Rinse with water and dry with a towel.
Detailing Car Interiors
Car interiors gather dust and dirt quickly. A small, soft-bristle brush is perfect for detailing. Use the drill on low speed for control. Focus on seams and tight spots. Vacuum after scrubbing to remove loosened dirt. Finish with a microfiber cloth for a clean look.
Maintenance And Care
Transform your ordinary drill into a cleaning tool with a scrub brush attachment. Attach the brush to the drill, ensuring it’s secure. Use gentle pressure to effectively clean surfaces, enhancing your cleaning routine.
Maintaining your DIY drill scrub brush is essential for ensuring its longevity and effectiveness. Proper care not only saves you time but also keeps your cleaning tool in optimal condition. Let’s dive into some easy ways to maintain and care for your scrub brush.Cleaning The Brush After Use
Regular cleaning prevents dirt buildup. Rinse the brush under warm water to remove soap and debris. Use a mild detergent for stubborn grime, making sure not to soak the brush for too long.Drying The Brush Properly
Avoid leaving your brush wet after use. Shake off excess water and let it air dry. Place it bristle-side up to allow thorough drying, preventing mold and unpleasant odors.Inspecting For Wear And Tear
Frequent inspections help catch early signs of wear. Look for frayed bristles or loose attachments. Replace worn parts to maintain efficiency and avoid damage to surfaces.Storing The Brush Correctly
Store your drill scrub brush in a dry, cool place. Avoid direct sunlight, which can weaken the bristles. A dedicated storage bin or hook will keep it safe from accidental damage.Replacing The Brush Head
Consider replacing the brush head when it becomes ineffective. A fresh brush head ensures optimal performance and extends the lifespan of your tool. Keep spares handy for uninterrupted cleaning sessions. Remember, the better you care for your drill scrub brush, the more rewarding your cleaning experience will be. What challenges have you faced while maintaining your cleaning tools?Troubleshooting Common Issues
Crafting a drill scrub brush can save time and effort in cleaning tasks. Identify the right brush attachment and securely fasten it to your drill. Ensure compatibility to avoid common issues like wobbling or damage.
Creating a drill scrub brush can simplify cleaning tasks. Sometimes, problems arise during assembly or use. Knowing how to troubleshoot these issues is essential. This can save time and effort. Let’s explore common issues and solutions for your drill scrub brush project.Loose Brush Head
If the brush head is loose, ensure it’s tightly secured. Check the connection between the brush and the drill. Tighten it using a wrench if needed. This will prevent wobbling during use.Incompatible Drill
The drill may not fit the scrub brush. Make sure the drill’s chuck size matches the brush’s attachment. Use an adapter if they don’t match. This ensures a secure fit and effective scrubbing.Brush Not Spinning
If the brush isn’t spinning, check the drill’s settings. Ensure it’s set to a forward motion. Reverse settings won’t allow the brush to spin correctly. Adjusting the settings can solve this issue.Excessive Wear
Brushes wearing out too quickly can be frustrating. Check the surface type you’re cleaning. Hard surfaces can cause fast wear. Use softer brushes for delicate surfaces. This will extend the brush’s life.Motor Overheating
An overheating drill can halt your work. Ensure you’re giving the drill breaks. Continuous use can cause overheating. Allow the motor to cool down between uses. This will prevent damage and prolong its life.Slipping Chuck
The chuck may slip if not tightened properly. Ensure it’s clamped down securely on the brush. Use the drill’s chuck key for a tight fit. This will prevent the brush from falling off during use.Safety Concerns
Ensure safety while using the drill scrub brush. Wear protective gear, like gloves and goggles. Avoid using the drill in wet conditions. This prevents accidents and ensures a safe cleaning experience.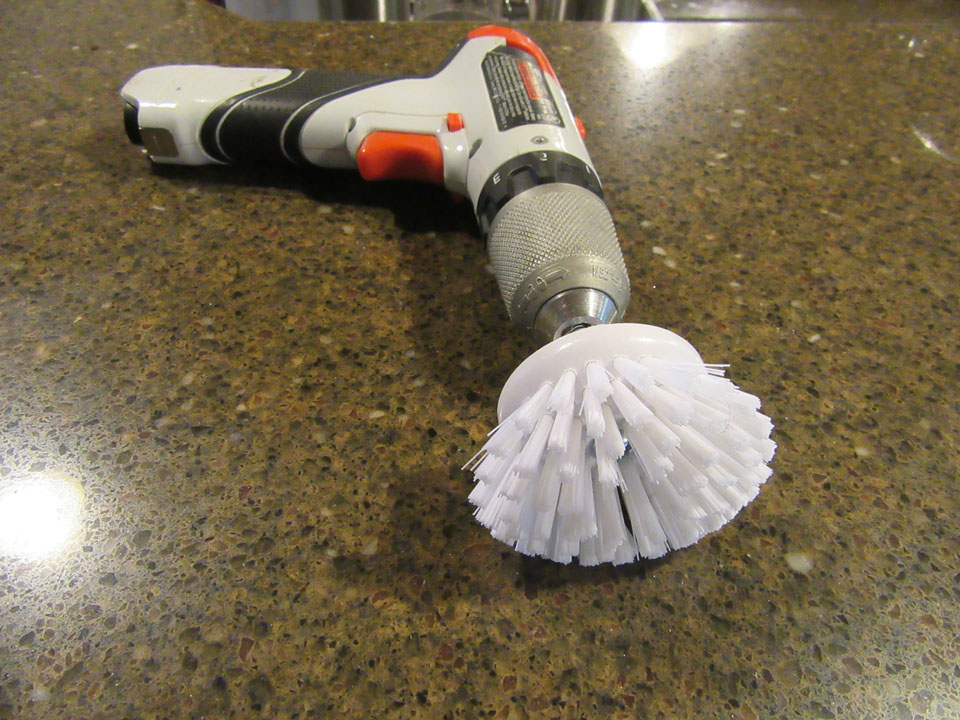
Credit: lifehackster.com
Frequently Asked Questions
What Are Drill Brushes Made Of?
Drill brushes are made of durable nylon bristles. These bristles come in various stiffness levels for different cleaning tasks. The backing is typically a plastic or metal base that attaches securely to the drill. Drill brushes are designed for effective scrubbing on surfaces like tiles, carpets, and grills.
How To Make A Homemade Brush Cleaner?
Mix equal parts of dish soap and warm water. Swirl brushes gently in the solution. Rinse thoroughly under running water. Pat dry with a clean towel, reshape, and let them air dry. This homemade cleaner effectively removes paint and maintains brush quality.
What Kind Of Drill For Drillbrush?
Use a cordless drill with a 3/8 inch chuck for your Drillbrush. Ensure it has adjustable speed settings. This type of drill provides flexibility and ease for cleaning tasks. It should be compatible with most Drillbrush attachments, offering efficient and thorough cleaning performance for various surfaces.
How Are Scrub Brushes Made?
Manufacturers assemble scrub brushes using durable bristles and ergonomic handles. They mold or cut plastic, wood, or metal for handles. Workers attach synthetic or natural bristles securely. Brushes undergo quality checks before packaging. This process ensures durability and effectiveness in cleaning.
Conclusion
Creating a drill scrub brush is simple and effective. With basic tools and materials, you can enhance cleaning efficiency. This DIY project saves time and effort in scrubbing tasks. You’ll find it useful for tackling tough stains and grime. The process is straightforward, and results are impressive.
Feel accomplished as you transform your drill into a powerful cleaning tool. Try it out and enjoy cleaner surfaces without the hassle. Your home will sparkle, and you’ll wonder why you didn’t try it sooner. Get ready to make cleaning easier with this handy tool!
