Have you ever noticed water dripping or an unpleasant smell coming from under your kitchen sink? An open pipe under your kitchen sink might be the cause.
This small issue can quickly turn into a big problem if left unchecked. You need to know how to spot it, what risks it brings, and how to fix it before damage starts. Keep reading to learn exactly what an open pipe means for your home and the simple steps you can take to protect your kitchen and avoid costly repairs.
Your sink’s health matters, and this guide is here to help you keep it in top shape.

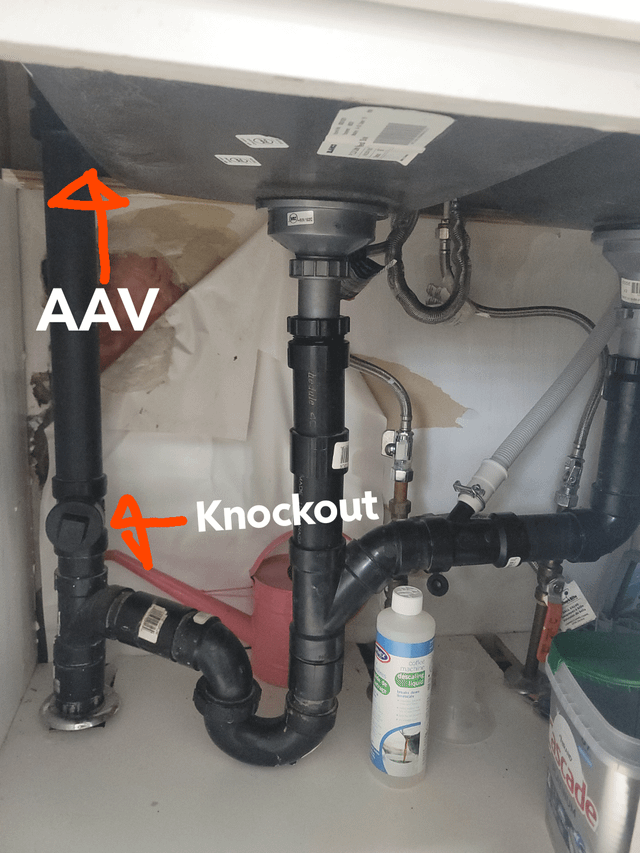
Credit: www.reddit.com
Common Causes Of Leaks
Leaks under the kitchen sink often catch you off guard, causing water damage and frustration. Understanding what typically causes these leaks can help you spot issues early and avoid costly repairs. Here are some common reasons why your open pipe might be leaking.
Loose Connections
Connections between pipes and fittings can loosen over time due to vibrations or improper installation. You might notice water dripping right where pipes join, especially after using the sink vigorously.
Check all nuts and joints regularly. Tightening them gently can often stop leaks without needing new parts.
Cracked Pipes
Plastic or metal pipes under the sink can crack from wear, impact, or temperature changes. Even a tiny crack can cause persistent dripping that worsens with time.
Have you ever felt a sudden cold snap or accidentally hit your pipe while cleaning? These small events can lead to cracks you wouldn’t expect.
Look closely for any visible damage and replace cracked pipes quickly to prevent water damage.
Worn-out Seals
Seals and washers create a tight barrier between pipe joints. Over months and years, these materials can dry out, shrink, or break down.
If you see water pooling around pipe connections despite tight fittings, worn seals could be the culprit. Replacing these small parts is usually inexpensive and easy to do.

Credit: www.amazon.com
Tools And Materials Needed
Fixing an open pipe under the kitchen sink needs the right tools and materials. Having these ready makes the task easier and faster. This section covers essential items for a smooth repair process.
Basic Plumbing Tools
- Adjustable wrench – for loosening and tightening nuts
- Pipe wrench – grips and turns pipes securely
- Slip-joint pliers – handy for gripping and twisting
- Bucket – catches water when pipes are open
- Utility knife – cuts tape and sealants cleanly
- Flashlight – helps see in dark, tight spaces
Sealants And Tapes
- Plumber’s tape (Teflon tape) – seals threaded joints
- Pipe joint compound – prevents leaks on fittings
- Silicone sealant – seals gaps and joints
Replacement Parts
- New pipe sections – to replace damaged parts
- Washers and gaskets – ensure tight connections
- Pipe connectors and couplings – join pipe sections
- Slip nuts – secure pipes under the sink
Step-by-step Leak Repair
Fixing a leak under the kitchen sink needs careful attention. Follow these clear steps to repair the open pipe and stop water waste. Each step focuses on a simple task to make the repair easy and effective. Prepare your tools and start with a dry workspace for best results.
Shutting Off Water Supply
Turn off the main water valve or the valve under the sink. This stops water flow and prevents spills. Open the faucet to drain any water left in the pipes. Keep a bucket or towels nearby for any drips.
Inspecting The Pipe
Look closely at the open pipe for cracks or holes. Check for loose joints or worn-out seals. Use a flashlight to see hard-to-reach areas. Note where the leak comes from to focus your repair.
Tightening Loose Fittings
Use a wrench to gently tighten any loose nuts or fittings. Avoid over-tightening to prevent damage. Check the pipe again after tightening. Sometimes, a small adjustment stops the leak entirely.
Applying Sealant Or Tape
Wrap plumber’s tape around threaded pipe ends to seal gaps. Apply pipe joint compound for extra protection if needed. Smooth the sealant evenly with a cloth. Allow it to dry as per product instructions before testing.
Replacing Damaged Sections
Cut out the damaged pipe section using a pipe cutter or saw. Measure and prepare a replacement piece that fits correctly. Connect the new section using appropriate fittings. Tighten all joints securely and test for leaks by turning the water back on.
Temporary Leak Stoppers
Temporary leak stoppers are essential tools when you discover a leak in the open pipe under your kitchen sink. They provide a quick fix that prevents water damage until you can arrange a permanent repair. Knowing how to apply these solutions correctly can save you from costly water cleanup and stress.
Using Pipe Clamps
Pipe clamps are an easy and effective way to stop leaks temporarily. These clamps wrap around the leaking area and tighten to create a strong seal.
When using a pipe clamp, make sure the pipe surface is clean and dry for the best grip. You can find clamps with rubber padding that cushions the pipe while sealing the leak.
Have you ever tried tightening a clamp only to find it still leaks? Applying consistent pressure and checking for small cracks before clamping can make a big difference.
Rubber Patch Fixes
Rubber patches work well for sealing small cracks or holes in pipes. You can cut a piece of rubber from an old inner tube or use a commercial rubber patch.
Wrap the patch tightly around the damaged section and secure it with hose clamps or waterproof tape. This method is simple but surprisingly reliable for short-term fixes.
Think about what materials you have at hand—sometimes a rubber glove or a piece of thick rubber can do the trick in a pinch.
Epoxy Putty Applications
Epoxy putty is a versatile option that hardens quickly to seal leaks. You knead the putty until it’s a uniform color, then press it onto the leak.
It adheres well to most pipe materials and can withstand water pressure once cured. This makes it a great choice if you want a longer-lasting temporary fix.
Have you noticed how some epoxy putties need moisture to set? Applying them to a damp pipe can sometimes speed up the curing process, so don’t overlook that detail.
Preventing Future Leaks
Preventing future leaks from the open pipe under your kitchen sink starts with understanding how everyday actions affect your plumbing. Small habits can either protect your pipes or cause damage over time. Being proactive not only saves you from costly repairs but also keeps your kitchen running smoothly.
Regular Maintenance Tips
Check the open pipe regularly for any signs of moisture or corrosion. Wipe down around the pipe weekly to catch drips early before they turn into leaks.
Clear out debris or buildup that might block drainage. You can use a mild cleaner or a mixture of baking soda and vinegar to keep the pipe fresh and clear.
Make sure all pipe connections are tight but avoid overtightening, which can cause cracks. A simple twist with your hand or a wrench is usually enough.
Avoiding Common Mistakes
- Don’t pour grease or oil down the drain; these substances harden and clog pipes.
- Avoid using harsh chemical drain cleaners that can corrode metal pipes over time.
- Never hang heavy items on pipes or use them as support; this puts unnecessary stress on joints.
- Don’t ignore small leaks or drips thinking they will stop on their own—these often get worse quickly.
When To Call A Professional
If you notice persistent moisture, unusual noises, or water pooling under your sink despite your efforts, it’s time to get expert help. Professionals can spot hidden issues like cracks or faulty seals that aren’t visible.
DIY fixes are great for minor problems, but complex leaks require tools and knowledge you might not have. Would you risk flooding your kitchen or damaging cabinets by delaying repairs?
Reaching out early can prevent bigger headaches and keep your plumbing in top shape for years.

Credit: www.reddit.com
Frequently Asked Questions
Why Is My Kitchen Sink Pipe Leaking?
A leaking pipe under your kitchen sink can be due to loose fittings, worn-out washers, or cracks. Regular inspections can prevent leaks. Ensure all connections are secure and replace any damaged parts promptly to avoid further damage and maintain functionality.
How Do I Fix A Leaking Pipe?
To fix a leaking pipe, first turn off the water supply. Inspect the pipe for cracks or loose connections. Tighten any fittings and replace damaged parts. If unsure, seek professional help to ensure a proper fix and prevent future issues.
What Tools Are Needed For Pipe Repair?
Basic tools for pipe repair include a wrench, plumber’s tape, and pipe sealant. A bucket and towel can help manage any residual water. For more complex repairs, additional tools may be needed. It’s always best to have a professional toolkit ready.
Can A Clogged Pipe Cause Leaks?
Yes, clogs can increase pressure, leading to leaks. Regular cleaning prevents clogs and maintains pipe integrity. Use drain cleaners and avoid disposing of grease or large particles down the sink. Check pipes regularly for signs of blockages or damage.
Conclusion
An open pipe under the kitchen sink can cause leaks and bad smells. Fixing it quickly saves water and money. Check pipes often to avoid bigger problems later. Use simple tools or call a plumber if unsure. A small effort keeps your kitchen clean and safe.
Don’t ignore signs of damage or dripping water. Taking care of pipes helps your home stay comfortable and dry. Simple steps make a big difference in plumbing health.
