
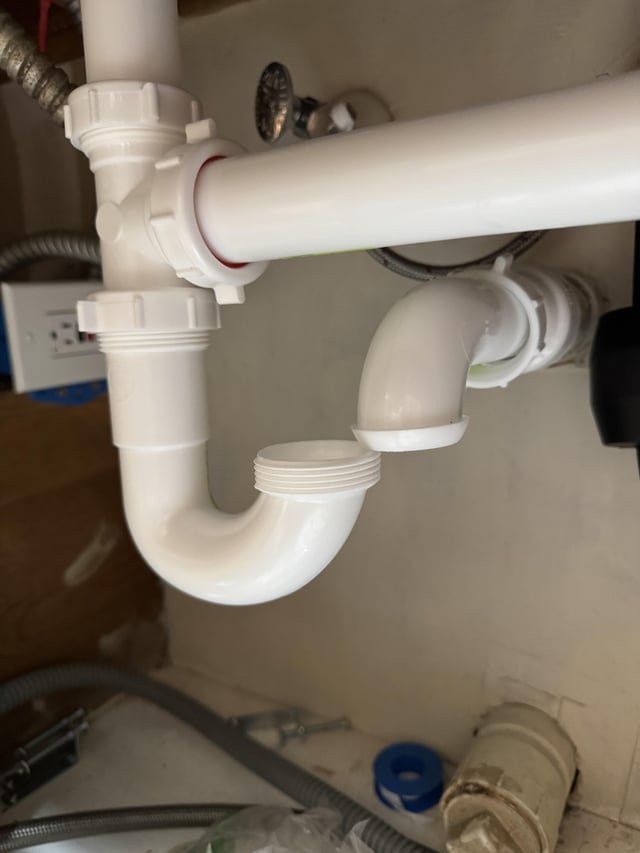
A slow drain, a persistent drip, or a musty smell under the kitchen sink can derail your morning routine quickly. The good news: most of these issues are straightforward to diagnose and fix yourself with basic tools and a little patience. In practice, the vast majority of under-sink problems come down to loose connections, worn washers, or grease buildup—none of which require a plumber. This guide covers the most frequent issues and gives you clear, actionable steps to resolve them.
Identifying the Problem Before You Start
Before touching any pipe, take a minute to figure out what you're dealing with. Different symptoms point to different causes.
Leaks: What to Look For
Leaks rarely appear without warning. Check for these early signs:
- Water stains or dark spots on the cabinet floor or walls
- Rust streaks on metal pipe surfaces
- White or greenish mineral deposits around threaded joints
- A persistent musty smell inside the cabinet
- Visible drips when you run water
The most common leak sources are loose slip nuts, degraded rubber washers, and cracked plastic fittings. Supply line connections at the shutoff valves are another frequent culprit.
Clogs: Slow Drainage Warning Signs
A sink that drains slowly is the most common complaint. Watch for:
- Water that takes more than 10 seconds to drain after removing the plug
- Gurgling sounds as air pushes past a partial blockage
- Water backing up into the opposite basin in a double sink
- Standing water that eventually drains very slowly
Kitchen clogs are almost always caused by grease and cooking oil solidifying inside pipes, combined with food particles and soap scum.
Odors: Pinpointing the Source
If your sink smells like rotten eggs or sewage, the cause is usually one of two things:
- A dried-out P-trap. If you haven't used the sink for several days, the water in the trap can evaporate, breaking the seal. Running water for 30 seconds usually fixes this.
- Trapped food debris. Organic matter stuck on the sink strainer or inside the disposal decays and produces foul odors.
If the smell returns quickly after cleaning, you may have a deeper blockage or a venting issue that needs professional attention.
Understanding Your Pipes: Components and Materials
Knowing what you're looking at under the sink makes repairs much easier.
Key Parts of the Drain Assembly
The plumbing under your kitchen sink is a simple system with a few key components:
- Tailpiece: The vertical pipe connecting directly to the sink drain basket
- P-trap: The curved, U-shaped pipe that holds standing water to block sewer gases
- Continuous waste pipe: The horizontal pipe carrying water from the P-trap to the main drain
- Supply lines: Flexible braided hoses bringing hot and cold water to the faucet
- Dishwasher drain hose: Connects to the tailpiece or P-trap through a built-in nipple
For a visual walkthrough of each part's placement, see our complete plumbing under kitchen sink diagram.
What Your Pipes Are Made Of
The material affects how you repair them:
| Material | Appearance | Typical Use | Repair Notes |
|---|---|---|---|
| PVC | White plastic | Modern homes | Easy to cut and cement; resists corrosion |
| ABS | Black plastic | Older construction | Slightly flexible; can become brittle with age |
| Galvanized steel | Silver metal | Pre-1980s homes | Prone to rust and scale buildup |
| Chrome-plated brass | Shiny metal | Visible tailpieces | Durable but can pit at threads |
| Stainless steel | Brushed metal | High-end installations | Corrosion-resistant; lasts longest |
If you're unsure what you have, scratch an inconspicuous area. Plastic will show a lighter color underneath; metal will stay the same.

Common drain and supply components you might find under your kitchen sink
Essential Tools for DIY Repairs
Most under-sink repairs require only a basic set of tools. Having them ready before you start saves frustration.
What You'll Need
- Adjustable wrench — for tightening or loosening slip nuts and compression fittings
- Channel-lock pliers — for gripping rounded fittings and holding pipes steady
- Bucket — for catching water when you open pipes (a shallow pan works even better)
- Flashlight — for seeing into dark cabinet spaces
- Plumber's tape (PTFE) — for sealing threaded connections
- Rubber gloves — for protecting your hands from debris
Replacement Parts to Keep on Hand
A few small parts can save a trip to the hardware store:
- Slip-joint washers (1.25-inch and 1.5-inch sizes fit most residential drains)
- Flush-bushing washers for supply line connections
- P-trap repair kit (includes a replacement trap section with washers)
- Supply line set (braided stainless steel, standard lengths of 12, 20, and 30 inches)
- Drain basket strainer if your existing one is cracked
When buying replacement parts, take the old piece with you to the store for sizing. Not all threads match between brands or between metal and plastic fittings. The National Sanitation Foundation provides standards for plumbing components, which most reputable hardware stores follow.
Fixing Leaks Under the Kitchen Sink
The right fix depends on where the leak is coming from. Here's how to handle each common scenario.
Tightening Loose Connections
A loose slip nut is the most common cause of drips under the sink.
- Locate the dripping joint. Wipe everything dry, then run water and watch where moisture first appears.
- Tighten the slip nut clockwise by hand first. If it won't move, use channel-lock pliers wrapped with tape to avoid scratching chrome.
- Turn only ¼ to ½ turn. Overtightening can crack plastic fittings or strip threads.
- Test by running water and checking for drips after 30 seconds.
If the nut is already tight but still leaks, the washer inside has likely failed. Tightening won't fix a worn seal.
Replacing Worn Washers and Seals
Slip joints use cone-shaped rubber washers that compress to form a seal. Over time, these harden, crack, or flatten.
- Place a bucket under the joint and loosen the slip nut.
- Pull the pipes apart and remove the old washer. It may be stuck—gently pry it out with a flathead screwdriver.
- Slide the new washer onto the pipe with the tapered end facing into the fitting. Lubricate it with a drop of dish soap to help it seat properly.
- Reconnect and tighten the slip nut just until snug. Test for leaks.
A common mistake is overtightening the new washer, which can deform it and cause a leak. Snug is sufficient.
Fixing Cracked or Damaged Pipes
A cracked plastic pipe needs replacement. Temporary patches (epoxy putty or pipe repair tape) can buy you time but are not permanent solutions.
For PVC or ABS cracks:
- Shut off the water supply. Locate the main shutoff valve near your water meter or where the main line enters your home.
- Cut out the damaged section using a hacksaw or PVC cutter. Make clean, straight cuts at least 1 inch past the crack on each side.
- Clean the cut ends with sandpaper or a deburring tool.
- Dry-fit the replacement piece with two slip couplings. Adjust length as needed.
- Apply PVC primer and cement to both mating surfaces (or ABS cement for black pipe). Push together and hold for 15 seconds.
- Wait 30 minutes before turning the water back on to allow the cement to cure.
If you're dealing with a leak at the shutoff valve itself, our guide on how to turn off water under kitchen sink walks through the process step by step.
Supply Line Leaks: A Special Case
Braided stainless steel supply lines are durable but not indestructible. If you see water at the connection where the supply line meets the shutoff valve or faucet:
- First, try tightening the nut gently with an adjustable wrench.
- If it still leaks, the rubber gasket inside may be worn. Replace the entire supply line—they cost $8-15 and are safer than trying to repair them.
Supply lines typically last 5-10 years. If yours are older than that, consider replacing them proactively during your next repair.
Clearing Clogs from Kitchen Sink Pipes
Most clogs are in the P-trap or just beyond it. You can clear these yourself without chemical drain cleaners, which damage pipes over time and are harmful to septic systems.
Using a Plunger
A standard cup plunger works well for sink clogs if you create a good seal.
- Remove the sink strainer if possible, or stuff a wet rag into the overflow opening.
- Add enough water to cover the plunger cup.
- Position the plunger over the drain and pump vigorously for 20-30 seconds.
- Lift quickly to break the seal and check drainage. Repeat if needed.
For double sinks, block the second drain with a wet rag to maintain pressure. This prevents the force from simply pushing air out the other basin.
Baking Soda and Vinegar Method
This natural approach breaks down grease and soap scum without harsh chemicals.
- Scoop out standing water from the sink basin.
- Pour ½ cup baking soda directly down the drain.
- Follow with ½ cup white vinegar. Cover the drain immediately with a plug or wet cloth.
- Let the fizzing reaction work for 15-30 minutes.
- Flush with boiling water (if your pipes are metal) or very hot tap water (for PVC, because boiling water can soften plastic joints).
This method works best as weekly maintenance rather than a cure for severe clogs.
Using a Drain Snake (Auger)
A manual drain snake reaches clogs that plunging and baking soda can't move.
- Remove the P-trap to access the waste pipe directly. Have your bucket ready.
- Insert the snake into the open pipe and push gently while turning the handle clockwise.
- When you meet resistance, push and twist to break through or hook the clog.
- Retract the snake slowly, pulling out debris as you go.
- Reassemble the P-trap and run hot water to test.
If the snake goes in more than 6 feet without hitting anything, the clog may be in your main drain line. That's a job for a professional.
Cleaning the Garbage Disposal
If you have a disposal, clogs often form there first.
- Never put your hand inside. Use tongs or pliers to remove visible debris.
- Run cold water while operating the disposal to solidify any grease so it gets chopped and flushed.
- Ice cubes and citrus peels can help clean the blades and deodorize—run them through with cold water.
A disposal that hums but doesn't spin usually has a jammed flywheel. Most units have a hex hole on the bottom for an Allen wrench to manually rotate the blades free.
Preventive Maintenance for Under-Sink Pipes
A few minutes of regular attention can prevent most common problems.
Monthly Quick Check
Once a month, spend 60 seconds looking under your sink with a flashlight. Check for:
- Moisture on any fitting or pipe surface
- Rust or mineral deposits around threaded connections
- Damp spots on the cabinet floor
- Loose slip nuts that may have vibrated free
- Signs of mice or insects
Catching a slow drip early is far easier than replacing water-damaged cabinet bottoms.
What to Never Put Down the Drain
What you put down the drain directly determines how often you'll face clogs.
- Never pour cooking grease, oil, or fat down the sink. Pour cooled grease into a can and throw it in the trash.
- Scrape plates thoroughly before rinsing. Even small food scraps accumulate over time.
- Avoid fibrous foods (celery, corn husks, potato peels, coffee grounds) in the disposal—they can tangle or clump.
- Run hot water for 30 seconds after each use to flush residue through the pipes.
Preventing Musty Smells
If you notice a musty odor even with a working P-trap, check for leaks or moisture buildup. Our article on under kitchen sink smells musty covers specific causes and fixes for this common issue.
Winter Precautions
Before winter, inspect pipes that run near exterior walls. If your kitchen sink is on an outside wall:
- Open cabinet doors during cold snaps to let warm air circulate
- Insulate exposed pipes with foam sleeves (under $5 at any hardware store)
- If temperatures drop below freezing, let both hot and cold faucets drip slightly—moving water rarely freezes
When to Call a Professional Plumber
Some problems are beyond a basic tool kit. Here's when to stop DIY and call a licensed plumber.
Signs of Serious Damage
- Persistent leaks after replacing washers and tightening connections
- Water stains extending beyond the cabinet into walls or flooring
- Recurring clogs that return within days of clearing, even after snaking
- Sudden drop in water pressure affecting multiple fixtures
Complex Issues Requiring a Pro
Call a professional for:
- Sewer gas odors that persist after refilling the P-trap and cleaning the drain
- Dishwasher drainage problems involving electrical connections or complex hose routing
- Old galvanized or cast iron pipes showing widespread corrosion
- Any repair involving gas lines or cutting into walls
If you're planning a full replacement rather than a repair, our guide on pipe under kitchen sink leaking covers the complete process for a permanent fix.
Frequently Asked Questions About Under-Sink Plumbing
How do I fix a leaking pipe under the kitchen sink?
Identify the exact leak point by drying all surfaces and running water slowly. If it's at a slip nut, tighten gently. If that doesn't stop the drip, replace the washer inside the fitting. For a cracked pipe, cut out the damaged section and install a replacement with slip couplings. If you're uncertain after trying these steps, call a plumber before water damage spreads.
What causes kitchen sink pipes to clog?
Grease and cooking oil are the primary culprits—they coat pipe interiors and trap other debris. Food scraps, soap scum, and mineral deposits from hard water all contribute over time. Unlike bathroom sinks (where hair is the main issue), kitchen clogs are almost always organic and fatty.
How can I prevent pipes from freezing?
During cold weather, leave cabinet doors open under the sink to let warm room air reach the pipes. Insulate exposed pipes with foam sleeves. If temperatures drop below freezing, let both hot and cold faucets drip slightly—moving water rarely freezes.
Why does my kitchen sink smell bad?
The most common cause is a dried-out P-trap. Run water for 30 seconds to refill it. If the smell returns quickly, flush the drain with baking soda and vinegar to clear trapped debris. Persistent odors after cleaning suggest a deeper venting problem or a crack in the trap itself.
Can I use chemical drain cleaners?
Chemical drain cleaners can damage PVC pipes over time and are harmful to septic systems. They also create toxic fumes in enclosed cabinet spaces. Mechanical methods (plunger, snake, or disassembling the trap) are safer and more effective for kitchen sink clogs.
Conclusion
The plumbing under your kitchen sink is straightforward enough that most homeowners can handle common problems—leaks, clogs, and odors—with basic tools and a little know-how. Regular monthly inspections, mindful disposal habits, and quick attention to drips will keep your system running smoothly for years. When you do need to make a repair, take your time, use the right replacement parts, and don't hesitate to call a professional for problems that go beyond the basics. Fixing a small issue today costs far less than repairing water damage tomorrow.
