Is water dripping under your kitchen sink? A leak can cause more damage than you think—wasting water, raising your bills, and even ruining your cabinets.
But don’t worry; fixing it might be easier than you expect. In this guide, you’ll learn simple, step-by-step tips to stop that leak fast and save your kitchen from costly repairs. Keep reading, and by the end, you’ll know exactly how to handle the problem yourself—no plumber needed.
Identifying The Source Of The Leak
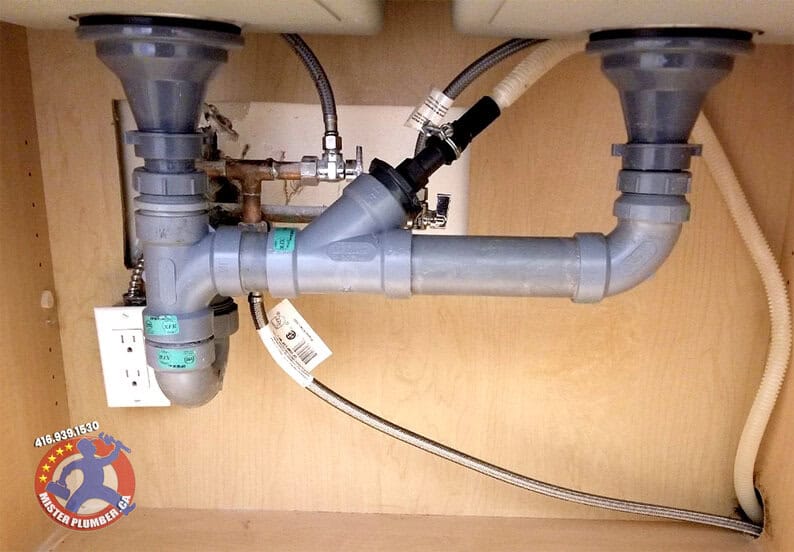
Finding the exact source of a leak under the kitchen sink saves time and effort. Leaks can come from various places, and spotting them early helps avoid bigger problems. Start by carefully checking all parts under the sink. Look closely at pipes, connections, and seals. Understanding where leaks usually happen and how to spot signs is key to a quick fix.
Common Leak Locations
- Pipe joints and connections
- Drain trap (P-trap)
- Water supply lines
- Faucet base and handles
- Sink basin edges
- Garbage disposal unit (if installed)
Leaks often occur where pipes join or bend. The drain trap collects debris and can develop cracks. Supply lines may loosen or crack over time. Faucet seals wear out and cause drips. Check the edges of the sink basin for water pooling. Garbage disposals can leak at their seals or connections.
Signs Of A Leak
- Water puddles or wet spots
- Damp cabinet floor or walls
- Musty or moldy smell
- Dripping sounds
- Discoloration or stains
- Peeling or bubbling paint
Visible water is the easiest sign. Dampness in the cabinet often means a slow leak. Mold or a bad smell can indicate hidden moisture. Listen for dripping sounds, especially when the water is off. Stains or discoloration show water damage. Paint that peels or bubbles means persistent wetness.

Credit: www.youtube.com
Gathering Necessary Tools And Materials
Before you dive into fixing that leak under your kitchen sink, you need to gather the right tools and materials. Having everything ready saves time and keeps frustration at bay. Missing a crucial item halfway through can turn a simple repair into a stressful ordeal.
Essential Tools
Start with the basics that make plumbing repairs manageable. A good wrench set is key—adjustable wrenches work best because they fit different sizes of nuts and bolts. Don’t forget a pair of slip-joint pliers for gripping tight spots and turning stubborn fittings.
A flashlight or headlamp helps you see clearly in the cramped, dark space under the sink. You’ll also want a bucket to catch any drips and old towels for quick cleanups. These small tools make the repair process smoother and less messy.
Recommended Materials
Choosing the right materials can make your repair last longer. Start with plumber’s tape (also called Teflon tape); it seals threaded connections and prevents future leaks. Having a replacement washer or gasket on hand is smart since worn-out seals often cause leaks.
Consider getting a pipe joint compound for extra sealing strength, especially if the leak is at a threaded connection. If the leak is in a plastic pipe, some waterproof epoxy putty can provide a temporary fix until you can replace the part. What materials do you think will be most useful in your specific repair situation?
Preparing The Area For Repair
Preparing the area under the kitchen sink is key before starting the repair. A clean, safe workspace helps you work faster and avoid accidents. Clear space and follow safety steps carefully.
Clearing The Space
Remove everything stored under the sink. Take out cleaning supplies, trash bins, and any loose items. Wipe the area dry with a cloth. This prevents slipping and gives you room to move. Check for any water puddles and soak them up. A clear space means better access to pipes and leaks.
Safety Precautions
Turn off the water supply valves below the sink. This stops water flow during the repair. Keep a bucket or towel nearby for any drips. Wear gloves to protect your hands from sharp edges and dirty water. Use eye protection if you expect splashes. Good lighting helps you see small parts and leaks clearly. Safety first makes the job easier and faster.

Credit: www.youtube.com
Fixing Pipe Connections
Fixing pipe connections is essential to stop leaks under the kitchen sink. Pipes may loosen or crack over time. Checking connections ensures water flows properly without drips. This section explains how to tighten and replace pipes safely.
Tightening Loose Connections
Loose pipe connections often cause leaks. Use a wrench to gently tighten the nuts on the pipes. Turn the wrench clockwise to secure the connection. Avoid overtightening, as it can damage the pipes.
Check the pipe fittings for any signs of wear or corrosion. Replace any washers or seals that look worn. These small parts help prevent leaks and keep connections tight.
After tightening, run water to see if the leak stops. Watch carefully for any drips around the joints. Tightening usually fixes minor leaks quickly and cheaply.
Replacing Damaged Pipes
Cracked or broken pipes need full replacement. Start by turning off the water supply below the sink. Use a bucket to catch any remaining water in the pipes.
Remove the damaged pipe by loosening the fittings with a wrench. Measure the old pipe to buy the correct replacement size. Choose pipes made from durable materials like PVC or metal.
Install the new pipe by connecting it firmly to existing pipes. Use plumber’s tape on threaded connections for a tight seal. Turn the water supply back on and check for leaks.
Replacing damaged pipes stops leaks and prevents water damage. It may take more time but avoids future problems under the sink.
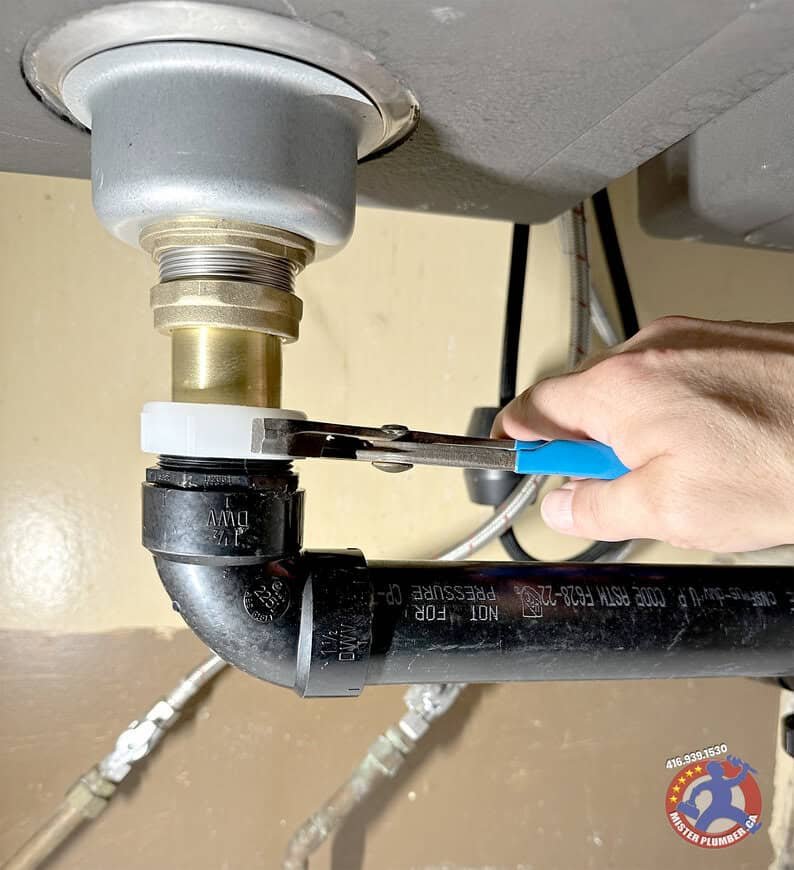
Repairing Or Replacing The Drain Seal
Repairing or replacing the drain seal is often the key to fixing leaks under your kitchen sink. This small but vital part stops water from escaping where the sink drain meets the plumbing. Ignoring a damaged seal can lead to water damage and costly repairs later, so addressing it early is crucial.
Assessing Seal Condition
Start by carefully inspecting the drain seal for cracks, brittleness, or signs of wear. Even a tiny tear can cause leaks, so look closely under good lighting. If the seal feels hard or crumbly, it has likely lost its flexibility and needs replacement.
Have you noticed water pooling after using your sink? That’s a sign the seal isn’t doing its job. Sometimes, cleaning the seal and surrounding area of debris can temporarily help, but it’s usually a sign the seal’s lifespan is ending.
Installing A New Seal
Before installing a new seal, make sure you have the correct size and type for your drain. Remove the old seal by loosening the drain flange and carefully pulling it out. Clean the area thoroughly to remove old putty or residue.
Place the new seal evenly around the drain opening. Tighten the drain flange back carefully, ensuring the seal stays in place and doesn’t shift. Avoid overtightening as this can damage the new seal and cause leaks.
After installation, run water and check for any drips. If you still see leaks, double-check the seal’s position and the tightness of connections. Small adjustments often make a big difference in stopping leaks completely.
Credit: www.misterplumber.ca
Dealing With Faucet Leaks
Faucet leaks under the kitchen sink waste water and increase bills. Fixing these leaks stops damage and saves money. Start by checking the faucet parts carefully.
Inspecting Faucet Components
Turn off the water supply before touching the faucet. Remove the faucet handles and look for worn parts. Check the washers, O-rings, and cartridges for cracks or damage. Use a flashlight to see inside the faucet body clearly. Look for mineral buildup or corrosion that may cause leaks. Take notes or photos to remember what needs replacement.
Replacing Faulty Parts
Buy parts that match your faucet model. Use a wrench and screwdriver to remove old washers and O-rings. Clean the faucet parts gently with vinegar to remove buildup. Install new washers and O-rings carefully to avoid damage. Tighten all screws and bolts but avoid over-tightening. Turn on the water supply slowly and watch for leaks. Repeat replacement if leaks continue or call a plumber for help.
Testing For Leak Resolution
Testing for leak resolution is a key step after fixing a leak under the kitchen sink. It confirms if the repair worked and ensures no water escapes. This step helps avoid future water damage and costly repairs.
Testing requires patience and careful observation. It involves running water through the pipes and watching for any signs of moisture. Proper testing gives peace of mind that the leak is fully sealed.
Running Water Tests
Turn on the faucet and let water flow at full pressure. Listen carefully for dripping sounds or unusual noises. Check the pipes and connections under the sink as water runs.
Use a dry paper towel or cloth to wipe around joints and seals. Any wet spots mean the leak is not fixed. Repeat the test several times to catch slow leaks.
Monitoring For Drips
After running water, leave the area dry and wait for 10 to 15 minutes. Watch closely for small drops forming on pipes or fittings. Place a dry paper towel under the pipes to spot hidden drips.
Check the area again after a few hours to be sure. Sometimes leaks show up slowly or only when water pressure changes. Continuous monitoring ensures the repair holds over time.
Preventive Measures For Future Leaks
Preventing future leaks under your kitchen sink saves you time, money, and hassle. Small problems often start unnoticed, but with the right care, you can stop leaks before they begin. Let’s look at practical ways to keep your plumbing in top shape.
Regular Maintenance Tips
Check your sink area regularly for signs of moisture or drips. Even a tiny puddle can signal a developing issue. Wiping down pipes and connections during your cleaning routine helps spot problems early.
Make sure to tighten any loose nuts or fittings gently—you don’t want to overtighten and cause damage. Replace worn-out washers or seals promptly, as these parts wear down faster than you might expect.
Have you ever noticed a slow drip but ignored it? That small drip can turn into a big leak if left unattended. Setting a monthly reminder to inspect under your sink can prevent surprises.
Upgrading Plumbing Fixtures
Older pipes and fixtures are more prone to leaks. If your kitchen sink setup is over 10 years old, consider upgrading to newer, more durable materials like stainless steel or brass. These resist corrosion better and last longer.
Switching to compression fittings or push-fit connectors can also reduce leak risks. They create a tighter seal and are easier to install without special tools.
Think about installing a water leak detector under your sink. This simple device alerts you instantly if a leak starts, giving you a chance to act fast and avoid water damage.
Frequently Asked Questions
How Do I Identify A Leak Under The Kitchen Sink?
Check for water puddles, dampness, or mold beneath the sink. Inspect pipes, drain connections, and the faucet for visible drips or corrosion. Early detection prevents damage and costly repairs.
What Tools Are Needed To Fix A Kitchen Sink Leak?
You typically need a wrench, plumber’s tape, bucket, sponge, and replacement washers or seals. Having the right tools ensures a quick, effective repair and avoids further damage.
Can I Repair A Leaking Pipe Under My Sink Myself?
Yes, minor leaks from loose fittings or worn washers can be fixed DIY. Turn off water, tighten connections, or replace seals carefully. For complex leaks, consult a plumber.
How Long Does It Take To Repair A Leak Under The Sink?
Simple leaks usually take 30 minutes to an hour to fix. Complex issues or pipe replacements may require more time. Quick repairs help prevent water damage and mold growth.
Conclusion
Fixing a leak under the kitchen sink saves water and money. Start by turning off the water supply. Check all pipes and connections carefully. Tighten loose parts or replace damaged ones. Use plumber’s tape to stop small drips. Test your repair by running water for a few minutes.
Watch closely to ensure no leaks appear again. Simple steps can prevent bigger problems later. Taking quick action helps keep your kitchen dry and safe. Don’t wait for the leak to get worse. Small repairs today mean less stress tomorrow.
