Are you tired of dealing with a leaking kitchen sink or an old, clogged pipe? Installing new pipes under your kitchen sink might seem like a daunting task, but it’s easier than you think.
With the right steps and a little guidance, you can save money and avoid calling a plumber. You’ll learn exactly how to install pipes under your kitchen sink quickly and correctly. Keep reading, and by the end, you’ll have the confidence to handle this common home repair like a pro.

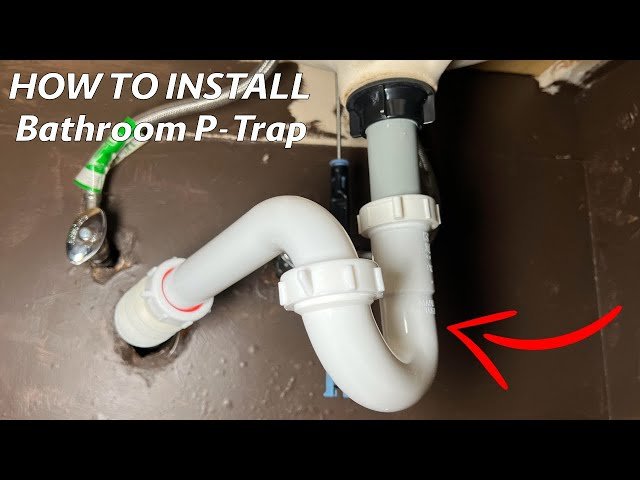
Credit: us.amazon.com
Tools And Materials Needed
Installing pipes under a kitchen sink requires specific tools and materials. Having the right items ready makes the job easier and faster. It also helps avoid mistakes and leaks. Prepare everything before starting the installation.
Basic Tools Needed
- Adjustable wrench for tightening nuts
- Pipe wrench for gripping pipes
- Slip-joint pliers for holding fittings
- Hacksaw to cut pipes to size
- Measuring tape for accurate measurements
- Pipe cutter for clean pipe cuts
- Plumber’s tape to seal threaded joints
- Screwdriver for removing or tightening screws
- Bucket to catch water during removal
Materials Required For Installation
- PVC or metal pipes depending on your sink type
- Pipe connectors like elbows and couplings
- Compression fittings to join pipes securely
- Pipe sealant or plumber’s putty for leak-proof joints
- Drain trap (P-trap) to prevent sewer gases
- Slip nuts and washers for tight seals
Safety And Preparation Items
- Gloves to protect hands from sharp edges
- Safety goggles to shield eyes from debris
- Rags or towels to clean spills
- Flashlight for better visibility under the sink
Preparing The Area
Preparing the area is a key part of installing pipes under the kitchen sink. A clean, safe workspace makes the job easier and faster. It also helps avoid accidents and damage to existing plumbing. Proper preparation sets a solid foundation for the installation process.
Clearing The Space
Remove everything from under the sink. Take out cleaning supplies, buckets, and any stored items. This gives you full access to the plumbing area. Wipe the space clean to avoid dirt and debris. Clear space helps you see pipes and fittings clearly. It also prevents tools from slipping or getting lost.
Turning Off Water Supply
Locate the water shut-off valves under the sink. These valves control water flow to the faucet and pipes. Turn both valves clockwise to close them. This stops water from flowing during installation. Open the faucet to release any water left in the lines. This step prevents leaks and water damage while working.
Removing Old Pipes
Removing old pipes under the kitchen sink is an important task before installing new plumbing. It ensures a clean and secure connection for the new pipes. Careful removal prevents damage to the sink and walls. Take your time and work carefully to avoid leaks or breaks. This process involves disconnecting the existing pipes and cleaning the connection points thoroughly.
Disconnecting Existing Pipes
Start by turning off the water supply. Place a bucket under the pipes to catch any water. Use a wrench or pliers to loosen the slip nuts on the drain pipes. Gently twist and pull the pipes apart. Be careful not to force them, which can cause damage. Remove all pipe sections connected to the sink drain and trap. Dispose of old pipes properly.
Cleaning The Connection Points
After removing the pipes, clean all connection points carefully. Use a cloth or sponge to wipe away dirt and debris. Scrape off any old plumber’s putty or sealant. Check for cracks or damage around the drain opening and wall fittings. Clean surfaces ensure a tight seal for new pipes. Dry the area well before starting installation.
Installing New Pipes
Installing new pipes under the kitchen sink is a task that improves water flow and prevents leaks. Proper pipe installation ensures a durable and efficient plumbing system. This process requires careful selection, precise measurement, and secure connections.
Choosing The Right Pipes
Select pipes based on material, size, and compatibility with your sink. Common materials include PVC, PEX, and copper. PVC is affordable and easy to cut. PEX is flexible and resists corrosion. Copper offers durability but costs more. Match pipe diameter to your sink drain and existing plumbing. Use pipes designed for water drainage to avoid problems.
Measuring And Cutting Pipes
Measure the distance between the sink drain and the wall or floor pipe. Allow extra length for connections and fittings. Mark the pipe where you will cut. Use a pipe cutter or hacksaw for clean, straight cuts. Smooth rough edges with sandpaper or a deburring tool. Accurate measurements prevent leaks and ensure proper fit.
Connecting Pipes To Sink Drain
Attach the new pipe to the sink drain using the correct fittings. Common fittings include slip nuts, washers, and compression rings. Tighten connections by hand, then secure with a wrench without over-tightening. Check alignment to avoid strain on joints. Test the connection by running water and watching for leaks. Adjust fittings if necessary to ensure a tight seal.
Securing Pipes In Place
Securing pipes under your kitchen sink is crucial to avoid movement that can lead to leaks or damage. Properly fastened pipes stay in place during daily use and help maintain a tidy, safe workspace. Let’s look at how to keep your pipes firmly secured and leak-free.
Using Pipe Clamps
Pipe clamps hold pipes firmly against walls or cabinet surfaces. You can choose from plastic or metal clamps depending on your pipe material and weight. Attach clamps every 12 to 18 inches to prevent sagging or shifting.
When installing clamps, make sure not to overtighten them; this can damage the pipes. Instead, tighten just enough to hold the pipe securely without restricting its natural expansion or contraction. Have you checked if your clamps allow for easy removal in case you need to replace a pipe later?
Ensuring Leak-free Connections
Secure pipes are only part of the equation—your connections must also be watertight. Use plumber’s tape (Teflon tape) on threaded joints to create a tight seal. Wrap tape clockwise around the threads at least 3-4 times before screwing parts together.
Hand-tighten fittings first, then use a wrench for a snug fit—but avoid overtightening. A loose connection leaks, but an overly tight one can crack fittings. After installation, run water to check for drips and tighten connections slightly if needed. Have you considered keeping a small towel handy for quick cleanup during your test run?
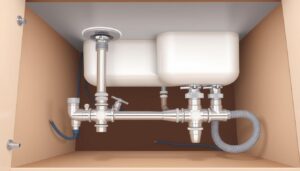
Credit: avorenovations.co.uk
Testing The Installation
Testing the installation is a key step after fitting pipes under the kitchen sink. It ensures everything works well and there are no water leaks. Proper testing saves time and prevents damage to your kitchen. Follow these simple checks to confirm your pipe setup is secure and functional.
Turning On The Water Supply
Locate the water valves beneath the sink. Slowly open the valves to allow water flow. Listen for any unusual sounds like hissing or dripping. Watch the pipes closely as water runs through them. Make sure the water pressure feels normal and steady.
Checking For Leaks
Inspect all joints and connections carefully. Use a dry cloth or paper towel to spot any moisture. Look under the sink and around pipe fittings for drips. Check after a few minutes to catch slow leaks. Tighten any loose connections if you find water escaping.
Troubleshooting Common Issues
Troubleshooting common issues is a key part of installing pipes under a kitchen sink. Small problems can cause leaks or blockages. Finding and fixing these issues early saves time and money. Focus on two main areas: leaks and pipe alignment. Both affect how well your sink drains.
Fixing Leaks
Leaks usually happen at connection points. Check all joints and fittings carefully. Tighten loose nuts with a wrench but avoid overtightening. Use plumber’s tape on threaded connections to improve the seal. Replace worn-out washers or gaskets that cause drips. Look for cracks in pipes and replace damaged sections. Clean the pipe ends before reconnecting to ensure a better fit.
Adjusting Pipe Alignment
Misaligned pipes cause poor drainage and leaks. Make sure pipes line up correctly under the sink. Use a level to check horizontal pipes. Adjust the position of pipes by loosening fittings slightly. Move pipes until they fit straight without stress or bending. Secure pipes firmly to prevent movement over time. Proper alignment reduces strain on joints and helps water flow smoothly.
Maintenance Tips
Proper maintenance of pipes under the kitchen sink helps avoid leaks and clogs. Regular care keeps the plumbing working well and extends its life. Focus on two main tasks: inspecting the pipes and cleaning them. These simple steps save time and money on repairs.
Regular Inspections
Check the pipes often for signs of damage or leaks. Look for water spots, rust, or cracks. Tighten any loose fittings carefully. Early detection prevents bigger problems later. Also, listen for unusual sounds like dripping or gurgling.
Cleaning The Pipes
Keep the pipes clear of food scraps and grease. Use a mix of baking soda and vinegar to clean naturally. Pour the mixture down the drain, wait 10 minutes, then flush with hot water. Avoid harsh chemicals that can damage pipes. Regular cleaning helps stop clogs and bad smells.

Credit: www.reddit.com
Frequently Asked Questions
How Do I Install Pipes Under A Kitchen Sink?
First, turn off the water supply. Next, measure and cut pipes to fit. Connect pipes using slip joints or compression fittings. Finally, secure pipes and check for leaks by turning water back on.
What Tools Are Needed To Install Kitchen Sink Pipes?
You will need a pipe wrench, adjustable pliers, pipe cutter, plumber’s tape, bucket, and a flashlight. These tools help you fit, cut, and tighten the pipes properly under the sink.
How Can I Prevent Leaks Under My Kitchen Sink?
Ensure all pipe connections are tight and use plumber’s tape on threaded joints. Inspect for cracks or damage in pipes before installation. Test for leaks by running water and checking for drips.
What Type Of Pipes Work Best Under A Kitchen Sink?
PVC and ABS pipes are common for drain lines due to durability and ease of installation. For water supply, copper or PEX pipes are preferred for reliability and corrosion resistance.
Conclusion
Installing pipes under your kitchen sink is simpler than it seems. Follow each step carefully, and take your time. Use the right tools and check for leaks after finishing. A well-installed pipe system helps avoid water damage and keeps your kitchen clean.
Practice makes perfect, so don’t worry if it takes a few tries. Soon, you will handle small plumbing tasks with confidence. Keep this guide handy for future repairs or upgrades. Simple skills like these save money and give you peace of mind.
