Have you ever wondered why your kitchen sink sometimes gurgles or drains slowly? The secret often lies in a small but crucial part called the plumbing vent under your kitchen sink.
This hidden component keeps water flowing smoothly and prevents foul smells from creeping into your home. If you want to understand how it works and why it matters for your kitchen’s health, keep reading. By the end, you’ll know exactly what to look for and how to keep your plumbing vent in top shape.
Role Of Plumbing Vents
Plumbing vents play a crucial role in the kitchen sink setup. They help maintain the balance of air pressure in the drainage system. This balance allows water and waste to flow smoothly. Without vents, plumbing systems can face serious problems like slow drainage and bad odors.
Preventing Sewer Gas
Vents stop sewer gases from entering your kitchen. These gases come from waste breaking down in pipes. The vent allows these gases to escape outside safely. This keeps your home free from harmful and unpleasant smells.
Maintaining Drainage Flow
Vents keep air moving in the drain pipes. This air prevents vacuum pressure that can block water flow. With proper ventilation, water drains quickly and without noise. It also stops water traps from drying out, which blocks sewer gas.

Credit: www.amazon.ca
Types Of Vents For Kitchen Sinks
Understanding the different types of vents for kitchen sinks can save you from unexpected plumbing issues. Vents play a crucial role in maintaining proper air flow and preventing drain traps from being emptied by siphoning. Choosing the right vent type affects both installation ease and long-term function.
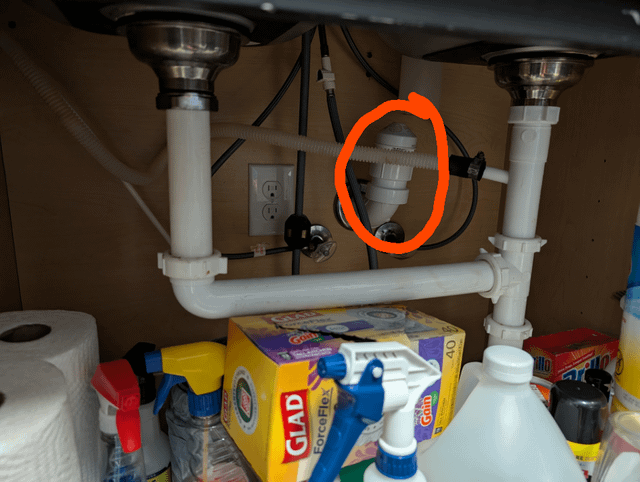
Air Admittance Valves
Air Admittance Valves (AAVs) are one of the most convenient options for kitchen sink vents. They allow air to enter the plumbing system when water drains, preventing vacuum pressure without letting sewer gases escape into your home.
AAVs are especially useful when adding a vent pipe is difficult or impossible, such as under tight kitchen cabinets. They are compact and install directly on the drain line, which can save you space and reduce installation costs.
However, AAVs rely on a mechanical valve that can wear out over time. Have you checked your vent valve recently? If it fails, odors might sneak into your kitchen, so regular inspection is key.
Conventional Vent Pipes
Conventional vent pipes run through walls or ceilings and connect to the main vent stack, letting air flow naturally in and out. This method has been trusted for decades and ensures consistent ventilation without moving parts.
While installing a traditional vent pipe requires more work, it offers reliability and durability that many homeowners appreciate. If you have easy access to your walls or attic, this might be the best long-term solution.
Think about your kitchen layout: is there a clear path to the main vent stack? If yes, a conventional vent pipe might provide better peace of mind and fewer maintenance worries over time.
Tools And Materials Needed
Fixing or installing a plumbing vent under your kitchen sink requires the right set of tools and materials. Having everything prepared before you start can save you time and frustration. Let’s look at what you’ll need to get the job done effectively.
Common Tools
- Pipe Wrench:Essential for gripping and turning pipes, especially when loosening or tightening fittings.
- Adjustable Wrench:Useful for various sizes of nuts and bolts, providing flexibility during installation.
- Hacksaw:Needed to cut pipes to the correct length. Make sure the blade is sharp for a clean cut.
- Pipe Cutter:A cleaner and quicker option than a hacksaw for cutting PVC or copper pipes.
- Plumber’s Tape (Teflon Tape):Prevents leaks by sealing threaded connections tightly.
- Measuring Tape:Accuracy matters. Measure twice to cut once.
- Pipe Deburring Tool:Removes sharp edges from cut pipes, ensuring smooth joints.
Do you have these tools on hand, or will you need to pick some up? Sometimes, a missing tool can slow down the whole project.
Recommended Materials
- Vent Pipe (PVC or ABS):Choose the right type based on your local plumbing codes and existing pipes.
- Pipe Fittings:Elbows, couplings, and connectors to fit pipes together and navigate under the sink.
- Pipe Cement or Solvent:Bonds PVC pipes and fittings securely for a leak-proof seal.
- Rubber Gaskets or Washers:Provide a tight seal around joints to prevent leaks.
- Vent Cap:Prevents debris or pests from entering the vent pipe.
Choosing quality materials can make a big difference in how long your plumbing vent lasts. Are you ready to invest in durable parts that save you from future repairs?
Step-by-step Installation Guide
Installing a plumbing vent under your kitchen sink improves drainage and prevents unpleasant odors. While it might seem tricky at first, breaking the process into clear steps makes it manageable. Here’s a detailed guide to help you install the vent correctly and efficiently.
Locating The Vent Spot
Start by identifying the best spot for the vent pipe under your kitchen sink. Look for a location close to the drain line but with enough clearance to connect the vent pipe without interference.
Check your cabinet space and the wall behind the sink. Is there easy access for cutting and fitting the vent? Choosing the right spot ensures your vent works properly and stays hidden.
Cutting And Fitting The Pipe
Once you have the vent spot, measure and mark where the pipe will go. Use a pipe cutter or saw to make clean cuts. Clean the edges of the pipe to avoid leaks and ensure a snug fit.
Dry-fit the pipe pieces before gluing or sealing. Does everything align smoothly? Adjust as needed to keep the pipe straight and secure.
Sealing And Testing
Use appropriate PVC cement or pipe sealant to join the vent pipe sections firmly. Apply the sealant evenly to prevent leaks. Give it time to cure according to the product instructions.
After sealing, test your work by running water through the sink. Listen for gurgling sounds or check for slow drainage—these signs mean you might need to revisit your connections. A properly sealed vent keeps your plumbing system running smoothly and odor-free.
Common Mistakes To Avoid
Understanding common mistakes helps keep your plumbing vent under the kitchen sink working well. Avoiding these errors can prevent leaks, bad smells, and poor drainage. Fixing problems early saves time and money.
Incorrect Pipe Slope
The pipe slope must allow water to flow smoothly. Pipes sloping too steeply cause water to rush and leave air behind. Pipes with too little slope trap water and debris. Both errors block vent airflow. Proper slope usually means a gentle downward angle of about 1/4 inch per foot.
Improper Vent Placement
Placing the vent too far from the drain causes poor air flow. The vent should be close enough to balance air pressure in the drain pipe. Vents placed too low or blocked by cabinet walls lose effectiveness. Proper vent placement ensures odors do not enter the kitchen and drains work fast.

Credit: www.reddit.com
Maintenance Tips
Proper care of the plumbing vent under the kitchen sink helps keep your drainage system working well. Regular maintenance prevents bad smells and slow drains. Simple steps can protect your home from costly repairs.
Regular Inspection
Check the vent pipe regularly for cracks or damage. Look for signs of rust or loose connections. Inspect the area under the sink for leaks or moisture. Early detection stops small problems from growing.
Use a flashlight to see inside the vent pipe. Make sure it is free from debris or blockages. Keep the pipe securely attached to the wall or cabinet.
Clearing Blockages
Clear any debris that blocks the vent pipe to allow air flow. Use a flexible brush or a small plumber’s snake to remove clogs. Avoid pouring grease or food scraps down the drain to reduce buildup.
Flush the vent pipe with warm water to help remove dirt. Repeat this cleaning every few months for best results. Proper vent flow stops water from draining slowly or causing gurgling sounds.
Local Codes And Regulations
Understanding local codes and regulations is crucial when installing or repairing a plumbing vent under your kitchen sink. These rules ensure your plumbing system works safely and efficiently, preventing problems like sewer gas leaks or slow drainage. Ignoring them can lead to costly fines or even having to redo your work.
Permits Needed
Before you start any plumbing work, check if a permit is required in your area. Many municipalities ask for permits to make sure the installation meets health and safety standards. You can usually find this information on your city or county’s website or by calling the local building department.
Applying for a permit might seem like a hassle, but it protects you from future issues. Without a permit, you risk your work being inspected and condemned, which could mean tearing out the vent and starting over. Have you ever had a project stalled because of missing paperwork? Getting the permit upfront saves time and money.
Code Compliance Tips
- Follow vent pipe size requirements.Most codes specify minimum diameters to ensure proper airflow.
- Keep vent pipes vertical or at correct slopes.This prevents water from pooling and blocking airflow.
- Use approved materials.Some areas ban certain plastics or metals for vents.
- Maintain proper distance from windows and doors.This keeps sewer gases from entering your home.
One practical tip is to double-check the height of the vent pipe above the roofline or wall. Some codes require it to extend a certain distance to avoid blockages. When I installed a kitchen sink vent, missing this detail caused a backflow issue that was only fixed after I reworked the pipe.
Have you thought about how small changes in your vent installation could impact your whole plumbing system? Following code not only keeps you legal but also improves your kitchen’s safety and comfort.

Credit: www.facebook.com
Frequently Asked Questions
What Is A Plumbing Vent Under The Kitchen Sink?
A plumbing vent under the kitchen sink allows air to enter the drain system. This prevents water traps from losing their seal. It helps waste flow smoothly and avoids sewer gases entering your home.
Why Is The Kitchen Sink Vent Important?
The kitchen sink vent maintains proper air pressure in pipes. It prevents slow drainage and gurgling noises. Without it, water drains slowly and odors can escape from drains.
Can I Install A Vent Under My Kitchen Sink Myself?
Yes, you can install a vent if you know plumbing basics. Use proper vent pipes and fittings to meet local codes. However, hiring a professional ensures safety and compliance.
How Do I Know If My Kitchen Sink Vent Is Clogged?
Signs include slow drainage, gurgling sounds, and foul odors. You may notice water backup or bubbling in the sink. Regular inspection helps detect vent blockages early.
Conclusion
A plumbing vent under the kitchen sink helps water drain smoothly. It stops bad smells from coming back into your home. Keeping this vent clean and clear is very important. A blocked vent can cause slow drains or gurgling sounds.
Regular checks can save you from costly repairs later. Understanding how this part works helps you keep your plumbing healthy. Remember, small fixes now prevent bigger problems later. Take care of your kitchen plumbing vent for a safer, cleaner home.
