Imagine creating perfect, glossy chocolates that not only taste divine but also look professionally crafted. If you’re eager to elevate your chocolate-making skills, you’ve come to the right place.
The secret to achieving stunning results lies in mastering the best way to fill chocolate molds. But don’t worry, you don’t need to be a master chocolatier to get it right. With a few simple techniques, you can transform your homemade chocolates into delightful works of art.
Whether you’re making treats for a special occasion or simply indulging in your passion for chocolate, understanding how to fill molds correctly will make all the difference. Ready to unlock the secrets to perfect molded chocolates? Let’s dive in and explore the methods that will have you creating confections that are as visually appealing as they are delicious.
Choosing The Right Chocolate
Filling chocolate molds requires patience and precision. Melt chocolate evenly, then pour slowly to avoid bubbles. Tap molds gently to spread chocolate and ensure smooth surfaces.
Choosing the right chocolate is crucial when it comes to filling chocolate molds. Your choice affects not only the taste but also the texture and appearance of your finished product. So, how do you make the best choice for your sweet creations? Let’s dive into the essentials of selecting the perfect chocolate for your molds.Types Of Chocolate
First, consider the type of chocolate that suits your needs. Dark chocolate, with its rich flavor and high cocoa content, is perfect for those who enjoy a more intense taste. If you prefer something sweeter, milk chocolate offers a creamy and smooth option, popular among many. For a unique twist, white chocolate adds a sweet and vanilla flavor, although technically it’s not chocolate since it contains no cocoa solids. Each type of chocolate brings a different experience to the table. Which one aligns with your taste?Quality Considerations
When selecting chocolate, quality matters more than you might think. Look for chocolate with a higher percentage of cocoa; it typically indicates better quality. I once tried making molded chocolates with cheaper chocolate, and they ended up looking dull and didn’t have that satisfying snap. Invest in high-quality chocolate to ensure a glossy finish and a delightful texture. Check the ingredients list too. Avoid chocolates with artificial additives and excessive sugar. The fewer ingredients, the better. Real cocoa butter should be one of the main components. This not only enhances the taste but also ensures your chocolates have a smooth, melt-in-your-mouth consistency. What’s your go-to chocolate for molding? Choosing the right chocolate can transform your mold-filling experience from ordinary to extraordinary. Next time you’re at the store, take a moment to read the labels and make a thoughtful choice. Happy chocolate crafting!Preparing Your Molds
Creating perfect chocolates begins with preparing your molds. Proper preparation ensures a flawless finish and easy release. It’s a crucial step for both amateur and professional chocolatiers. Let’s dive into the essentials of preparing your molds.
Cleaning And Drying
Always start with clean molds. Residues can affect chocolate texture and taste. Use warm soapy water to wash the molds thoroughly. Rinse them well to remove any soap traces. For a streak-free finish, dry the molds completely. Use a soft cloth or air drying method. Moisture can cause chocolate to seize or develop spots.
Optimal Mold Materials
Choose the right mold materials for best results. Silicone molds are flexible and easy to use. They allow for easy chocolate removal. Polycarbonate molds offer a professional finish. They are durable and impart a glossy sheen to chocolates. Both materials have unique benefits. Decide based on your preference and experience level.
Melting Chocolate Perfectly
Perfectly melted chocolate is the key to creating stunning and delicious chocolate molds. It’s more than just heating up some chocolate; it’s a delicate dance between temperature and texture. If you’re anything like me, you’ve probably experienced the frustration of chocolate that refuses to melt smoothly or clumps together like a stubborn child. But fear not, with the right techniques and a bit of patience, you can master the art of melting chocolate perfectly.
Melting Methods
Several methods can help you achieve that smooth, glossy chocolate you crave. The double boilermethod is a classic choice. Simply place a heatproof bowl over a pot of simmering water, allowing the steam to gently melt the chocolate. Stir frequently to ensure even melting.
Microwaving is another popular option. Use a microwave-safe bowl and heat the chocolate in short bursts, stirring in between. This prevents hot spots and ensures the chocolate melts evenly.
Have you tried using a chocolate melting pot? These nifty gadgets are specifically designed for chocolate, offering precise temperature control. They’re a fantastic investment if you melt chocolate often.
Preventing Overheating
Overheating chocolate can lead to grainy textures and burnt flavors. To avoid this, keep a close eye on the temperature. Chocolate should not exceed 120°F (49°C) for dark chocolate and 110°F (43°C) for milk or white chocolate.
Use a thermometer to monitor the temperature. This tool can be your best friend in the kitchen, ensuring your chocolate remains smooth and luscious.
What if you accidentally overheat your chocolate? Don’t panic. Add a small amount of unmelted chocolate to the bowl and stir. This can help cool it down and bring back its shine. Have you ever tried this trick?
By mastering these melting techniques, you’ll be on your way to creating chocolate molds that look as good as they taste. So, what’s your favorite chocolate melting method? Share your thoughts in the comments!
Filling Techniques
Pour melted chocolate slowly into molds for a smooth finish. Tap molds lightly to remove air bubbles. Refrigerate until set for perfect results.
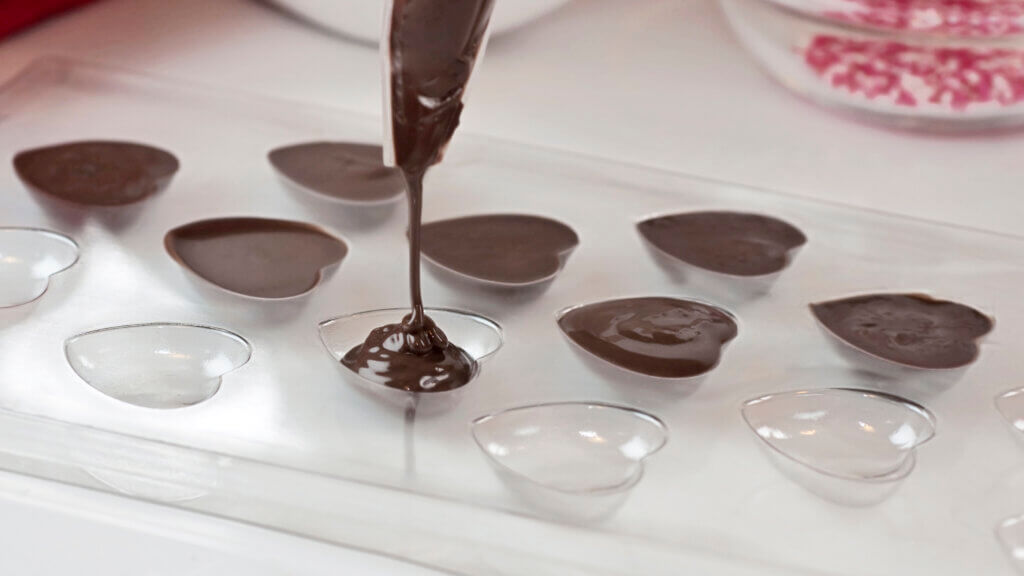
Filling chocolate molds can be a fun and rewarding activity. Various techniques help ensure a smooth and even fill. Mastering these techniques can elevate your chocolate crafting skills. Let’s explore some effective methods for filling chocolate molds.Pouring Methods
Pouring is a straightforward way to fill molds. Melt your chocolate until it’s smooth. Carefully pour it into the molds, filling them evenly. Use a spatula to level the chocolate. This prevents overfilling and ensures a clean finish. Tap the mold gently on the counter. This helps remove air bubbles.Using A Piping Bag
A piping bag offers more control. Melt the chocolate and let it cool slightly. Fill the piping bag with the melted chocolate. Cut a small tip from the bag’s end. Squeeze gently to fill the molds. This method ensures precision. It’s ideal for intricate mold designs. Use a toothpick to pop any air bubbles.Avoiding Common Mistakes
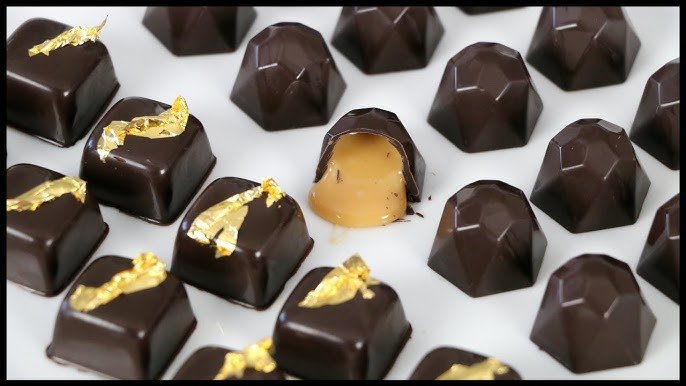
Filling chocolate molds requires precision and care. Many beginners face common mistakes that affect the final product. Understanding these pitfalls can lead to beautiful, glossy chocolates.
Air Bubble Elimination
Air bubbles ruin the texture of chocolates. Use a gentle tap on the mold after filling. This helps release trapped air. A toothpick can also be used to pop visible bubbles. Ensure a smooth surface by removing bubbles.
Preventing Chocolate Bloom
Bloom appears as a dull, white coating. It results from improper tempering or storage. Use well-tempered chocolate for a shiny finish. Store chocolates in a cool, dry place. Avoid fluctuating temperatures to prevent bloom.
:max_bytes(150000):strip_icc()/adding-final-layer-of-melted-chocolate-to-filled-molded-chocolates-photo-by-jessica-furniss-2000-dd5ae600055745d2b56c650593f5cc8d.jpg)
Credit: www.allrecipes.com
Setting And Cooling
Setting and cooling your chocolate molds is crucial for perfect results. Proper temperature and timing ensure a glossy finish. It also prevents unwanted white streaks or dull surfaces. Understanding these factors helps in achieving professional-looking chocolates.
Optimal Temperature
Temperature control is key for chocolate molds. Keep the room cool, around 65°F to 70°F. This prevents premature melting and ensures even setting. Use a thermometer to check the chocolate’s temperature. Dark chocolate should be about 88°F to 90°F. Milk and white chocolate should be slightly cooler, around 84°F to 86°F. Maintaining these temperatures helps in getting a smooth texture.
Time Considerations
Timing is essential for setting chocolate properly. Typically, allow the molds to cool for about 20 to 30 minutes. This timeframe lets the chocolate harden evenly. For larger molds, extend the cooling time to ensure a firm set. Avoid rushing the process, as this may lead to imperfections. After cooling, gently tap the molds to release air bubbles. Then, place the molds in the refrigerator for an additional 10 to 15 minutes. This final step ensures the chocolate is fully set.
Unmolding Chocolate
Unmolding chocolate can be a delicate process. The goal is to preserve the intricate details of your chocolate creations. Proper techniques ensure your chocolates look as appealing as they taste. With some patience and care, you can achieve perfect results.
Gentle Removal Techniques
Begin by placing the filled mold in the refrigerator. Let it chill until the chocolate hardens completely. Cold chocolate contracts and releases from the mold easily. Once chilled, hold the mold upside down over a clean surface. Tap it gently to encourage the chocolate to release. If the chocolate doesn’t release, don’t force it. Return it to the fridge for a few more minutes.
Handling Tips
Handle the chocolate with clean, dry hands. Moisture or warmth can spoil the finish. Consider wearing food-safe gloves to avoid leaving fingerprints. Use a soft cloth or paper towel to polish any dull spots. Store the unmolded chocolates in a cool, dry place. Avoid direct sunlight or warm areas to maintain their shine and shape.
Credit: nielsenmassey.com
Decorative Enhancements
Decorative enhancements elevate chocolate molds to a new level of artistry. These techniques transform simple chocolate into exquisite creations. With a few tricks, you can make your chocolates look stunning. Let’s explore how textures and colors can add charm to your chocolate molds.
Adding Textures
Texture is a key element in chocolate decoration. Use tools like brushes or stamps to imprint patterns. Create unique surfaces by using textured mats. Experiment with different textures for added visual interest. For a smooth finish, use a spatula to level the chocolate. Enhance the design with textured powders like cocoa or cinnamon. These small details can make your chocolates stand out.
Coloring Tips
Color adds vibrancy to chocolate molds. Use edible powders to tint chocolates. Mix colors for a marbled effect. For a uniform color, use liquid food coloring. Avoid using too much coloring; it can affect taste. Brush colors onto the surface for a subtle shine. Experiment with metallic hues for a luxurious look. Bright colors can create festive chocolates. Simple coloring can transform ordinary molds into art.
Storing Finished Chocolates
For perfect chocolate molds, ensure the chocolate is properly tempered before pouring. Use a squeeze bottle for precision. This minimizes air bubbles and creates smooth, glossy chocolates.
Storing finished chocolates properly ensures they remain delicious and fresh. After crafting beautiful chocolates, their storage is crucial for preserving taste and texture. Proper storage keeps them safe from spoilage and discoloration. Follow the guidelines below for the best results.Temperature Conditions
Chocolates require a cool environment for storage. The ideal temperature is 60 to 70°F. A refrigerator can be too cold and dry for chocolates. Cold temperatures may cause them to sweat when brought to room temperature. This can lead to dull surfaces and spoilage. Consider using a cool pantry or a wine fridge. These provide the right temperature without the drawbacks of a regular fridge.Avoiding Moisture
Moisture is chocolate’s biggest enemy. It can cause sugar bloom, which creates white spots. Always store chocolates in an airtight container. This prevents moisture from reaching them. Humidity can also affect the flavor and texture. Silica gel packets inside containers can help absorb moisture. Keep chocolates away from water sources and damp areas.:max_bytes(150000):strip_icc()/scraping-off-excess-chocolate-from-homemade-molded-chocolate-photo-by-jessica-furniss-2000-36cac63ec3234e149e207d4b1a17caf6.jpg)
Credit: www.allrecipes.com
Frequently Asked Questions
What Is The Best Way To Pour Chocolate Into Molds?
To pour chocolate into molds, ensure it’s fully melted and smooth. Use a piping bag or small ladle for precision. Tap molds gently to remove air bubbles, ensuring an even layer. Allow chocolate to set at room temperature or refrigerate for quicker results.
Clean edges with a knife for a polished finish.
How To Fill Silicone Chocolate Molds?
To fill silicone chocolate molds, melt chocolate evenly. Pour carefully into molds, filling them completely. Tap molds gently to remove air bubbles. Refrigerate until chocolate hardens. Remove chocolates carefully once set.
Do I Put A Chocolate Mold In The Refrigerator Or Freezer?
Place chocolate molds in the refrigerator for quicker setting. Use the freezer briefly for fast hardening. Avoid prolonged freezing to prevent condensation issues. Ensure molds are dry before use for best results.
Do I Need To Grease Silicone Moulds For Chocolate?
No, you don’t need to grease silicone moulds for chocolate. Silicone naturally releases chocolate easily. Ensure the mould is clean and dry before use for best results. This helps maintain the chocolate’s shape and finish. Silicone’s non-stick property makes it ideal for chocolate moulding.
Conclusion
Filling chocolate molds can be fun and rewarding. Use quality chocolate for the best results. Melt chocolate evenly for smooth filling. Pour carefully to avoid spills. Tap molds to remove air bubbles. Chill for firm chocolates. Enjoy making shapes and flavors.
Practice makes perfect with chocolate molds. Share your creations with friends and family. Experiment with different techniques and flavors. Follow these tips to make your chocolates shine. Chocolate-making is a sweet art. Let your creativity flow and enjoy the process.
Happy chocolate crafting!
