Imagine pulling a batch of perfectly golden popovers from the oven, their fluffy tops rising majestically. But your excitement quickly fades when you try to remove them from the pan, only to find them stubbornly stuck.
Frustrating, isn’t it? You’re not alone. Many home bakers face this sticky dilemma, and it can turn your baking adventure into a sticky nightmare. The good news? There’s a solution. In this guide, you’ll discover the best way to keep your popover pan from sticking, ensuring each popover slides out effortlessly.
Say goodbye to the struggle and hello to popover perfection. Ready to transform your baking experience and enjoy flawless popovers every time? Let’s dive in!
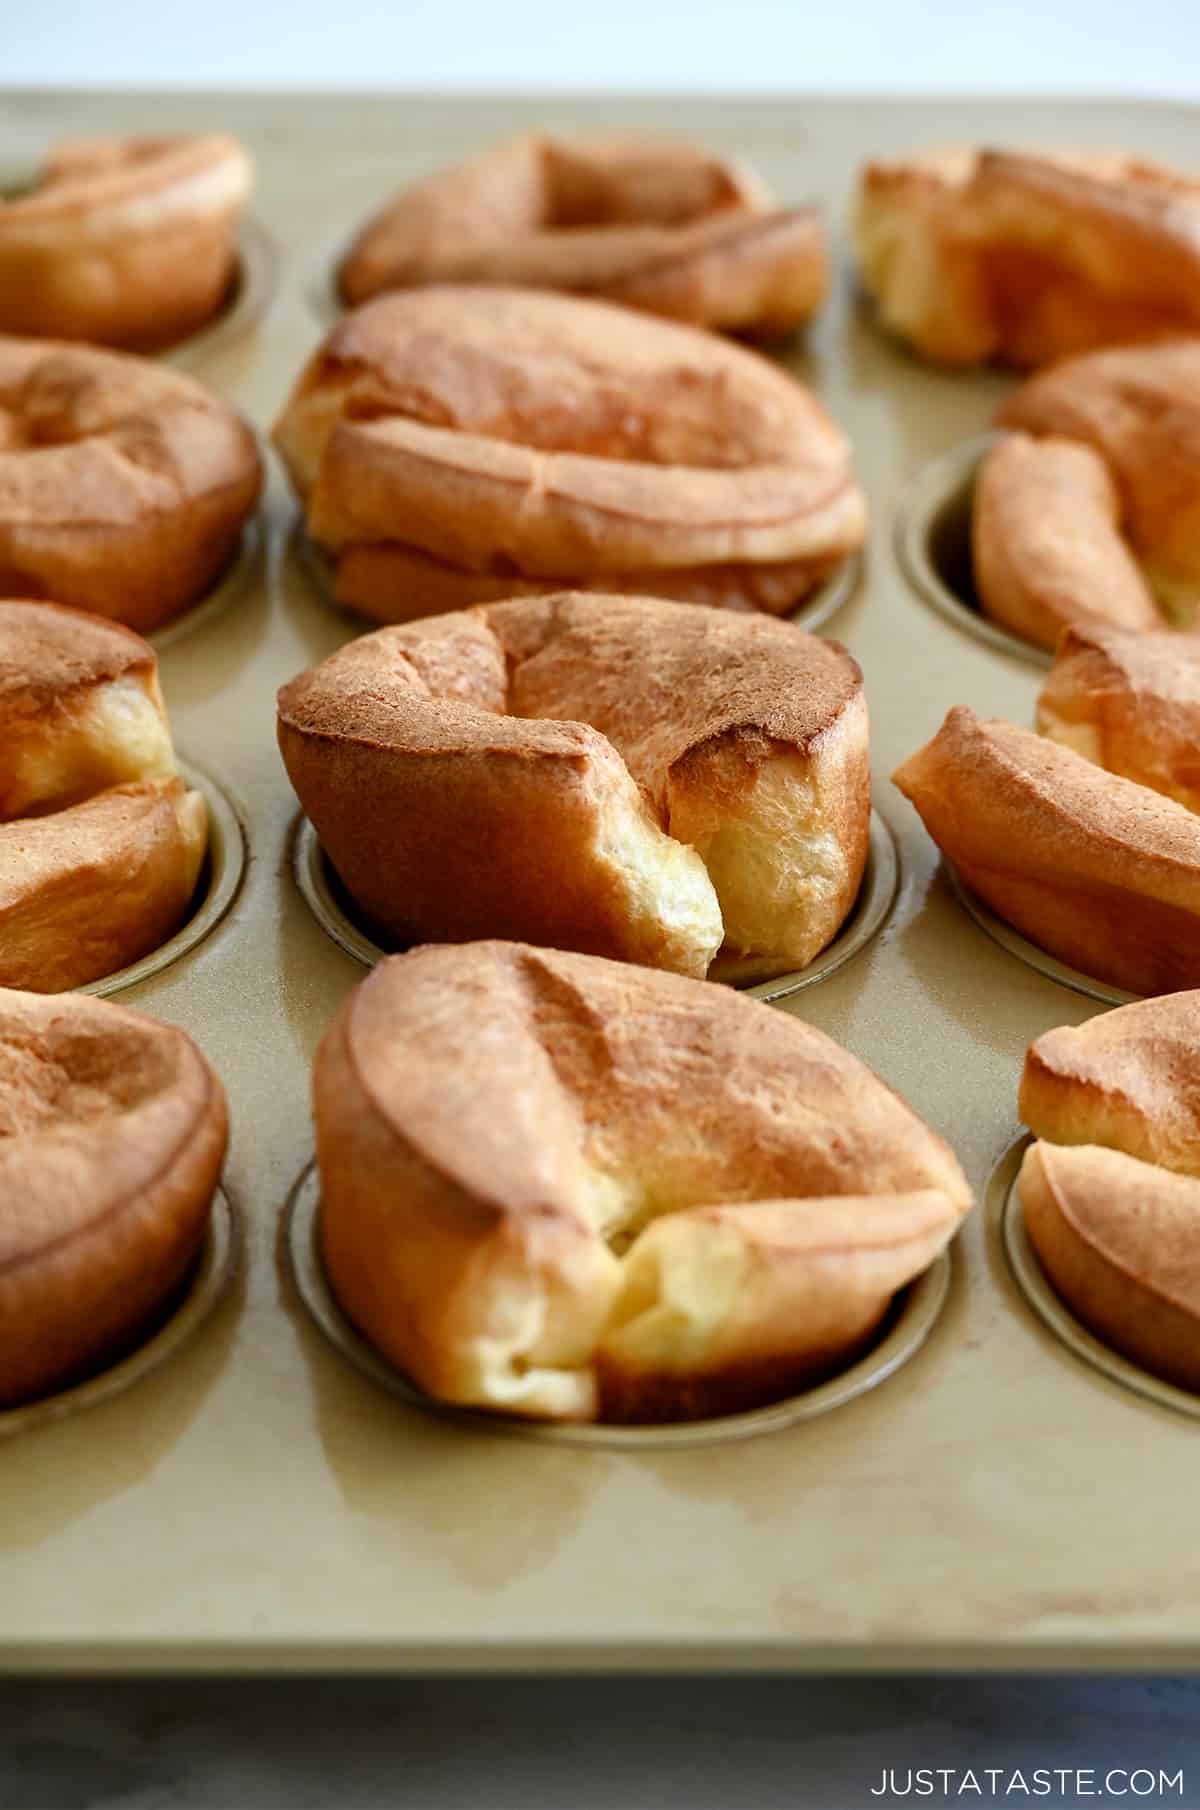
Credit: www.justataste.com
Choosing The Right Popover Pan
Choosing the right popover pan is crucial for perfect popovers. A good pan prevents sticking and ensures even baking. Consider material, size, and shape when selecting your pan.
Material Considerations
Material affects cooking performance. Non-stick surfaces are popular. They help popovers release easily. Stainless steel pans offer durability. They are resistant to rust and staining. Cast iron pans provide even heat distribution. They require seasoning before use. Each material offers unique benefits. Match your needs with the right material.
Size And Shape Preferences
Size impacts popover quality. Small pans create individual servings. Large pans suit family meals. Consider your portion needs. Shape affects baking results. Deep cups encourage tall popovers. Shallow cups produce wider popovers. Choose the shape based on your desired outcome. Experiment with different sizes and shapes. Find what works best for you.
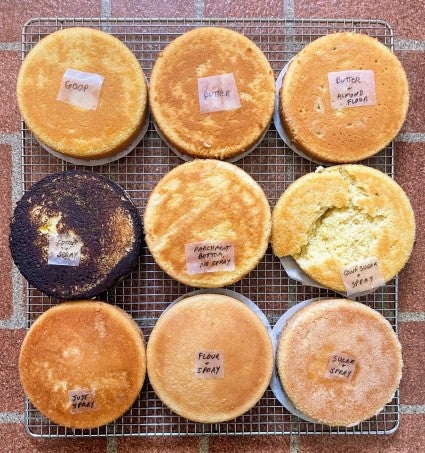
Proper Greasing Techniques
To keep a popover pan from sticking, ensure even greasing with melted butter or oil. Coat every nook and cranny thoroughly for the best results. Avoid excess greasing to prevent burning and ensure delightful popovers every time.
Proper greasing techniques are crucial when baking popovers to ensure they slide out effortlessly from the pan. Imagine the disappointment of seeing your perfectly risen popovers stuck to the pan! The right greasing method can save you from this kitchen mishap. Using the correct technique not only helps in easy removal but also enhances the texture and taste of your popovers. Let’s dive into the most effective ways to grease your popover pan.Butter Vs. Oil
Butter gives popovers a rich, savory flavor that many people love. Its natural fats create a smooth surface, making the removal process easier. However, butter can sometimes burn at high temperatures, leaving a residue that’s hard to clean. Oil, on the other hand, has a higher smoke point and is less likely to burn. It provides a reliable non-stick layer. Olive oil or vegetable oil are great choices, but be cautious of using too much, as it might pool at the bottom of the pan. Which do you prefer? The luscious taste of butter or the reliability of oil? Experiment with both to find your ideal match.Using Non-stick Sprays
Non-stick sprays offer convenience and even coverage. A quick, even spray can cover every nook and cranny of your popover pan. This ensures your popovers rise evenly and don’t stick. Some sprays come with added flavors like butter or olive oil, giving you the taste without the fuss. However, check the ingredients for additives that might not align with your dietary preferences. Have you tried using non-stick sprays? They’re a time-saver and can help achieve consistent results every time you bake. Proper greasing is an art that can transform your baking experience. With these techniques, you’ll be on your way to mastering perfect popovers every time. Do you have a favorite greasing method or a tip to share? Let’s hear it in the comments!Preheat Strategies
Preheating your popover pan is crucial for a non-stick experience. The right preheat strategies ensure perfect popovers every time. It enhances the batter’s rise and prevents sticking. Let’s explore essential preheat strategies for your popover success.
Temperature Settings
Set your oven to the right temperature before baking. A common setting is 425°F (220°C). A hotter oven helps the popovers rise quickly. This rapid rise creates a crispy exterior. Always use an oven thermometer for accuracy.
Time Recommendations
Preheat your oven for at least 15 minutes. This ensures consistent heat throughout. Consistent heat helps the popovers bake evenly. Start your timer once the oven reaches the right temperature. Avoid opening the oven door during this time. Heat escapes quickly, affecting baking results.

Credit: www.amazon.com
Mixing Batter For Non-stick Success
Creating the perfect popover starts with the right batter mix. A non-stick result depends heavily on how you prepare this mixture. Ensuring a smooth, lump-free batter can mean the difference between sticking and easy release.
Consistency Tips
The batter should be smooth and pourable. Aim for a consistency similar to heavy cream. Lumps can cause the popovers to stick, making cleanup difficult. Whisk your ingredients until fully blended. Use a hand or stand mixer for the best results. Avoid over-mixing as it can make the popovers tough. Let the batter rest for about 30 minutes. This allows the flour to absorb the liquid, improving texture.
Ingredient Choices
Choosing the right ingredients is crucial for non-stick success. Use fresh eggs for a richer batter. Their proteins help structure the popovers. Whole milk is preferable over skim. It adds fat, which aids in non-stick properties. Opt for all-purpose flour. It provides a balanced structure without being too dense. Consider adding a pinch of salt. It enhances flavor and complements the batter’s consistency.
Cooling And Removal Process
Proper cooling ensures popovers release easily from pans. A light dusting of flour, paired with cooling, prevents sticking. Non-stick spray can provide extra assurance, maintaining the popover’s delightful texture.
The cooling and removal process is crucial in ensuring popovers don’t stick. After baking, the proper method helps achieve perfect popovers. Avoiding sticking issues makes them easier to remove. Let’s explore effective techniques.Cooling Time
Allow popovers to cool for 2-3 minutes. This brief cooling period helps them firm up. Cooling helps prevent tearing when removing. It also allows steam to escape. Steam release helps the popovers detach easily.Gentle Removal Techniques
Use a small spatula to loosen edges. Gently slide it around each popover. Avoid using sharp tools that might damage the pan. Once edges are free, lift popovers carefully. If they resist, give them another minute to cool. This extra time can make a difference.Cleaning And Maintenance
Keeping your popover pan in pristine condition ensures delightful baking every time. Proper cleaning and maintenance play a crucial role in this. With a little care, your pan will stay non-stick and ready for action.
Removing Residue
After baking, allow the popover pan to cool completely. Use a soft cloth to wipe away any loose crumbs or particles. For stubborn residue, mix warm water and a few drops of mild dish soap. Soak a sponge in the solution and gently scrub the pan. Avoid using abrasive pads to prevent scratches. Rinse the pan thoroughly with warm water to remove soap traces.
Long-term Care
Store your popover pan in a cool, dry place. Ensure the pan is completely dry before storing to prevent rust. Occasionally, check for scratches or damage. If the non-stick coating begins to wear, consider replacing the pan. This ensures your popovers come out perfectly each time. Regular maintenance extends the life of your pan.
Additional Expert Tips
Popovers are a delightful treat but can often stick to pans. This can ruin their shape and your baking spirit. Understanding expert techniques can save your popovers and your day. Let’s dive into some expert tips that can help you achieve perfect popovers every time.
Common Mistakes
Using a cold pan is a common mistake. Popovers need a hot surface to rise properly. Ensure your pan is warm before pouring the batter. Another mistake is overfilling the cups. Fill each cup only halfway. This prevents overflow and sticking. Avoid using too much flour in the batter. It makes popovers dense and sticky. Also, opening the oven door too early can cause collapse. Keep the door closed until popovers are fully cooked.
Advanced Techniques
Consider using a silicone brush for greasing. It ensures even coverage and reduces sticking. You can also try preheating the pan with a bit of oil. This creates a non-stick layer. Experiment with different fats like butter or shortening. Each offers a unique flavor and texture. Some bakers swear by lining the bottom with parchment circles. These can help release popovers easily. Lastly, let popovers cool slightly before removal. This allows them to firm up and release smoothly.
Credit: www.kingarthurbaking.com
Frequently Asked Questions
How Do You Keep Popovers From Sticking To The Pan?
Use a non-stick pan and grease it well with butter or oil. Ensure the oven is preheated properly. Avoid opening the oven door during baking. Use high-quality ingredients for better results.
Should Popover Pans Be Greased?
Yes, you should grease popover pans. Greasing helps prevent sticking and ensures easy removal. Use butter or non-stick spray for best results. Proper greasing improves texture and enhances the baking process.
What Is The Secret To The Great Popovers?
The secret to great popovers is using room-temperature ingredients. Ensure your oven is preheated, and don’t open the oven during baking. Mix the batter until smooth for perfect texture. Use a hot, greased pan for ideal rise. These steps ensure airy, delicious popovers.
Do You Preheat A Pan For Popovers?
Yes, preheat the pan before baking popovers. A hot pan helps them rise perfectly. Ensure the oven is fully preheated to achieve the best results. Place the pan in the oven for a few minutes before adding the batter. This technique leads to crisp, airy popovers every time.
Conclusion
Keeping your popover pan from sticking doesn’t have to be hard. Start with a good non-stick spray or butter. Ensure even coating across the pan. This prevents sticking and makes cleanup easier. Use quality ingredients for better results. Choose flour and eggs wisely for smooth batter.
Preheat the oven properly. This helps in firm crust formation. Remember to cool popovers before removing. They should slide out easily. Follow these tips for perfect popovers every time. Your baking will be more enjoyable and less stressful. Happy baking!