
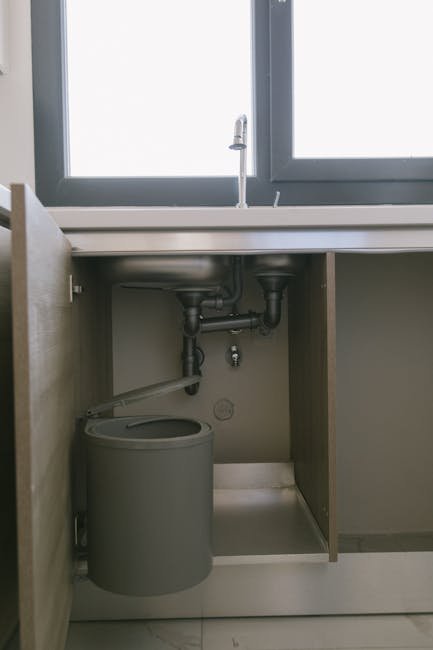
Every homeowner has faced that moment of dread — opening the cabinet under the kitchen sink to find a puddle, a mysterious smell, or a pipe that simply refuses to cooperate. Understanding the plumbing under your sink transforms confusion into confidence. Whether you're diagnosing a slow drain, installing a new faucet, or tackling a leak, knowing how each component connects is the foundation of every successful repair.
This guide walks you through a complete diagram of the plumbing under the kitchen sink, explains each part in plain language, covers the most common configurations, and gives you the practical know-how to handle routine maintenance and repairs yourself.
Core Components of Under-Sink Plumbing
The plumbing beneath your kitchen sink is a carefully coordinated system. Every piece has a specific job, and when one part fails, the whole setup suffers. Here is exactly what you will find when you open that cabinet.
Drain Pipe
The drain pipe carries wastewater from the sink basin to your home's main drain line. It runs straight down from the sink's drain flange (the metal piece you see inside the bowl) and connects to the P-trap below.
In practice, the drain pipe is usually 1½ inches in diameter for kitchen sinks. It must be sloped slightly downward — about ¼ inch per foot — so water flows freely and doesn't pool. A common mistake is cutting this pipe too short, which puts stress on the joints and causes leaks over time.
P-Trap
The curved P-trap is arguably the most important piece of your entire under-sink system. It holds a small reservoir of standing water that creates an airtight seal, blocking sewer gases from rising into your kitchen. That trapped water also catches small objects — rings, silverware, food scraps — before they reach deeper plumbing and cause blockages.
Modern traps come in two materials: PVC (white plastic, easy to install, corrosion-resistant) and brass (more durable, visible in exposed installations). Both work the same way. The trap includes a slip nut at the bottom that you can unscrew by hand for easy cleaning.
Supply Lines
Supply lines deliver fresh water from your home's pipes to the faucet. You will see two lines under any kitchen sink: one for hot water (usually on the left) and one for cold (on the right). These flexible hoses connect the shut-off valves to the faucet's threaded inlets.
Older homes often have chrome-plated copper supply lines, which are rigid and harder to work with. Modern installations use braided stainless steel hoses — these are far more flexible, resist bursting under pressure, and install in minutes without special tools.
Shut-Off Valves
Each supply line has its own shut-off valve mounted directly to the wall or floor beneath the sink. These valves let you isolate the water supply to the sink without shutting off water to the entire house — essential when replacing a faucet or fixing a leak mid-dinner.
The two most common valve types are:
| Valve Type | How It Works | Best For |
|---|---|---|
| Compression valve | Tightens a brass ferrule against the pipe | Older copper pipe installations |
| Quarter-turn ball valve | Lever rotates 90 degrees to shut off flow | Easy operation, reliable seal |
| Push-fit (SharkBite) | Connector pushes onto pipe, no tools required | DIY repairs, quick replacement |
Quarter-turn ball valves are the gold standard today. They rarely stick or fail, unlike older multi-turn valves that can seize up after years of disuse.
Common Under-Sink Plumbing Configurations
The parts above stay the same, but how they connect depends on your sink type and any extra appliances attached to the drain.
Single Basin Setup
A single basin sink is the simplest arrangement. One drain pipe drops straight from the basin into one P-trap, then connects to the wall drain. This layout has fewer joints and fewer places for leaks to develop. Repairs and clogs are straightforward because there is only one path for water to follow.
If you have a single basin and never use a garbage disposal, this is what you likely have. The only variation is whether the trap connects directly to a wall stub-out or drops into a floor drain.
Double Basin Setup
Double basin sinks use a connector pipe that joins the two basin drains together before feeding into a single P-trap. This "center outlet" pipe must be precisely aligned so water from both basins drains equally well.
The most common mistake in double basin installations is improper slope on the connector pipe. If the pipe runs flat or rises between the two basins, one side will drain slowly and eventually clog. Every inch of connector pipe should drop at least ¼ inch toward the trap.
A dedicated fixture described on our plumbing guide page covers the exact measurements for this setup.
Garbage Disposal Integration
When a garbage disposal is installed, it replaces the drain pipe on one side of the sink. The disposal grinds food waste into small particles that wash through the drain. A dishwasher drain hose typically connects to a small inlet fitting on the disposal itself.
The disposal's discharge pipe must connect into the main drain line upstream of the P-trap — never after it. This ensures solid particles that pass through the disposal get flushed completely out of the system.
If your kitchen also has a dishwasher, verify that the dishwasher drain hose forms a high loop up under the counter before connecting to the disposal or sink drain. This prevents contaminated water from siphoning back into the dishwasher.
Tools and Materials for Under-Sink Work
Having the right tools before you start saves hours of frustration. Here is what every DIY plumber should keep on hand for work under the kitchen sink.
Essential Tools
- Adjustable wrench — the single most used tool for tightening and loosening supply line nuts and slip nuts.
- Basin wrench — a specialized L-shaped tool that reaches the retaining nut behind the sink bowl, which no standard wrench can access.
- Pipe cutter or hacksaw — needed when replacing sections of drain pipe or cutting a new length to size.
- Plumber's putty — creates a watertight seal under the sink drain flange.
- Teflon tape (PTFE tape) — wraps clockwise around threaded connections to prevent leaks.
- Bucket and rags — always have these ready before you loosen any connection.
Recommended Materials
- Braided stainless steel supply lines — upgrade from old copper or plastic lines; they last longer and resist bursting.
- PVC P-trap kit — inexpensive and easy to install; includes the trap, wall tube, and all slip nuts and washers.
- Compression fittings — best for connecting shut-off valves to copper pipe without soldering.
- Rubber slip-joint washers — keep a few spare sizes in your toolbox; they degrade over time and cause drips.
Always check local plumbing codes before buying materials. Some jurisdictions require brass traps or specify minimum pipe diameters.
Installation Tips for a Leak-Free Setup
Getting the plumbing right from the start prevents every major headache later. These steps apply whether you are installing a new sink or replacing old pipes.
Measuring and Cutting Pipes
Measure twice. Cut once. This is the golden rule.
Hold the pipe in position and mark it with a pencil where it meets the fitting. Add the depth of the fitting socket to your mark — usually about 1 inch — before cutting. Use a fine-tooth hacksaw or a tubing cutter for clean edges. A ragged cut will not seal properly.
Dry-fit every joint before applying glue or tightening nuts. If the alignment looks off, recut. PVC pipes have slight flexibility, but forcing a misaligned joint creates stress points that crack over time.
Sealing Connections
Threaded connections need Teflon tape. Wrap the tape clockwise (looking at the end of the pipe) three to five times around the male threads. Overtightening is more dangerous than undertightening — snug is enough. If you hear a cracking sound on plastic fittings, you have gone too far.
For slip joints (the plastic nuts on P-traps), hand-tighten first, then give a quarter turn with pliers. Do not use pipe dope or Teflon tape on slip joint washers — the rubber washer itself provides the seal.
A step-by-step guide to installing these connections walks through every joint in detail.
Proper Slope for Drainage
The drain pipe must slope downward at ¼ inch per foot of horizontal run. This is not optional. Water that sits in a flat pipe evaporates, leaving behind grease and debris that harden into a rock-solid clog.
Use a 2-foot level to check the slope before securing pipes. If the pipe rises at any point, you have created a low spot that will trap water. Adjust the hanger straps or trim the pipe to correct it.
Troubleshooting Common Under-Sink Problems
Most under-sink problems fall into three categories, and each has a clear cause and fix.
Leaking Pipes
The most frequent source of leaks is a loose slip nut on the P-trap or at the wall connection. These nuts loosen over time from vibration and temperature changes. Tighten them a quarter turn and check again.
If the leak persists, the rubber washer inside the nut has likely flattened or cracked. Replace the washer — they cost less than a dollar and take thirty seconds to swap out.
A hidden source of leaks is the supply line connection at the shut-off valve. If you see water dripping from the valve stem itself (not the pipe connection), the valve packing nut is worn. Tighten it slightly, or replace the valve entirely.
For a comprehensive list of leak locations and fixes, the dedicated repair guide covers each one with specific instructions.
Clogged Drains
Most kitchen sink clogs are caused by grease and food particles building up in the P-trap or the horizontal pipe leading to the wall.
Start by removing the P-trap — loosen both slip nuts and catch the water in a bucket. Clean out all debris, then look down the wall pipe with a flashlight. If you see standing water or sludge, use a drain snake to clear it.
Never pour chemical drain cleaners down a kitchen sink. They do not dissolve grease effectively, and they damage PVC pipes over time. A plunger or snake is safer and more reliable.
Noisy Plumbing
Banging, knocking, or rattling noises usually mean pipes are not secured properly. Drain pipes should be held in place with hanger straps every 3–4 feet. Loose pipes vibrate against cabinet walls, creating that annoying sound.
Whistling or high-pitched noise when running water is almost always a partially closed shut-off valve. Open the valve fully — if the noise stops, the valve was restricted. If it continues, the valve may have a damaged seat and needs replacement.
Safety Precautions
Under-sink work is generally safe, but a few precautions prevent serious damage.
Shut Off the Water First
Before loosening any supply line or valve, close both shut-off valves completely. Then open the faucet to confirm no water flows. Place a bucket directly under the work area — residual water in the supply lines will drip out.
If your shut-off valves do not stop the water (common in older homes), you must shut off the main water valve for the house. Replacing faulty shut-off valves should be a priority in that case.
Protect Against Water Damage
One drip left overnight can ruin cabinet flooring, breed mold, and rot the subfloor. After any repair, run the faucet at full flow for one minute while you inspect every joint with a dry paper towel. Any moisture you find requires tightening or disassembly.
Check under the sink monthly for signs of corrosion or dampness. Catching a problem early means a simple fix instead of a major renovation.
Frequently Asked Questions
What are the main parts under a kitchen sink?
The main parts are the drain pipe, P-trap, two supply lines, and two shut-off valves. A garbage disposal or dishwasher drain connection may also be present.
How does a P-trap function under the sink?
The P-trap holds standing water that creates an airtight barrier. This prevents sewer gases from entering your kitchen. The curve also catches debris before it reaches the main drain line.
Why is a plumbing diagram important for kitchen sinks?
A diagram shows you exactly how each component connects. When you understand the layout, you can identify the source of a leak, plan a repair, or verify that a new installation is correct before turning the water back on.
How can I prevent leaks under the kitchen sink?
Tighten slip nuts gently by hand plus a quarter turn. Replace rubber washers whenever you disassemble a joint. Check supply line connections annually. And always use a new P-trap when installing a new sink — reuse is not worth the risk.
Conclusion
The plumbing under your kitchen sink is not as complicated as it looks. Every pipe and valve serves a clear purpose, and once you understand the diagram, you can handle leaks, clogs, and installations with confidence. Keep a basic toolkit handy, check your connections regularly, and never hesitate to tighten a loose nut or replace a worn washer.
Small preventative measures today save you from costly emergency repairs tomorrow. Bookmark this guide, share it with anyone tackling their first under-sink project, and remember: a clear picture of your plumbing makes every repair easier.
