Is water pooling under your kitchen sink? A leak there can cause damage, waste water, and hike up your bills.
But don’t worry—you can fix it yourself without calling a plumber. You’ll discover simple steps to find the source of the leak and stop it fast. Keep reading to save your kitchen and avoid costly repairs. Your sink—and your wallet—will thank you!

Credit: www.reddit.com
Identifying The Source Of The Leak
Finding the exact spot of a leak under your kitchen sink can save you time and money on repairs. It requires a careful look at all possible areas where water might escape. Knowing what to check helps you act fast before minor drips turn into major damage.
Common Leak Origins
Leaks often start in predictable places under the sink. The most usual culprits include:
- Drain pipes:Cracks or loose connections in the drain can cause water to drip steadily.
- Water supply lines:These flexible tubes can develop small holes or loosen at the fittings.
- Faucet base:Water may seep from where the faucet meets the sink surface.
- Garbage disposal:If you have one, its seals and connections can wear out over time.
Each of these spots deserves a close look. Missing one could mean the leak keeps coming back no matter what you fix.
Signs Of A Leak
Not all leaks are obvious puddles under the sink. Sometimes the clues are subtle and easy to miss.
- Damp cabinet floor:Feel for wetness or soft spots inside the cabinet.
- Water stains or discoloration:Look for yellow or brown marks on wood or drywall.
- Mold or musty smell:Persistent moisture encourages mold growth and an unpleasant odor.
- Dripping sounds:Listen closely for the quiet drip-drop of water.
Have you checked all these signs before starting repairs? Sometimes a small drip hides behind pipes or inside walls, making it tricky to find.
Gathering Necessary Tools And Materials
Before you dive into fixing a leak under your kitchen sink, gathering the right tools and materials is crucial. Without proper preparation, you might find yourself stuck halfway through the repair or risking further damage. Having everything ready saves time and reduces frustration.
Essential Tools For Repair
Start with basic plumbing tools that help you access and tighten connections easily. A good adjustable wrench is your best friend here—it fits various pipe sizes and nuts.
- Adjustable wrench:For loosening and tightening fittings.
- Pipe wrench:Useful for gripping round pipes securely.
- Basin wrench:Designed to reach tight spots behind sinks.
- Screwdrivers:Both flathead and Phillips for removing clamps or covers.
- Bucket or container:To catch any water that spills during the repair.
- Flashlight:Helps you see clearly in dim cabinet spaces.
Do you have these tools handy, or will you need to make a quick trip to the hardware store? Being equipped avoids unnecessary interruptions.
Materials Required
Once your tools are ready, focus on the materials needed to stop the leak and ensure a lasting fix. The exact items depend on the type of leak—whether it’s from a pipe joint, a gasket, or a cracked pipe.
- Plumber’s tape (Teflon tape):Seals threaded pipe connections to prevent leaks.
- Pipe sealant or joint compound:Adds extra protection over tape for tight seals.
- Replacement washers or gaskets:Often the source of leaks in faucet connections.
- Slip joint pliers:Handy for gripping and adjusting fittings.
- Replacement pipes or fittings:Needed if parts are damaged beyond repair.
- Rags or towels:To clean surfaces before sealing and to wipe up spills.
Think about the last time you fixed something at home—did having the right materials make the task smoother? Getting these items ready before you start means you won’t have to stop mid-repair to hunt for a missing part.
Turning Off Water Supply
Before you begin fixing a leak under your kitchen sink, turning off the water supply is crucial. This simple step prevents water damage and keeps the repair process safe. Knowing exactly how to locate and shut off the water can save you from unexpected floods and costly repairs.
Locating The Shutoff Valve
The shutoff valve is usually found directly under the kitchen sink. It looks like a small knob or lever connected to the pipes. Sometimes it can be hidden behind cleaning supplies or stored items, so clear the area to get a good look.
If you can’t find a valve under the sink, check where the water line enters your home. This main valve controls water for the entire house. Knowing its location is useful for emergencies beyond just the sink leak.
Steps To Turn Off Water
Start by turning the valve clockwise if it’s a knob, or moving the lever perpendicular to the pipe if it’s a lever. You should feel resistance as the water flow stops. After shutting it off, open the faucet to drain any remaining water from the pipes.
Have you ever tried fixing a leak only to find water still flowing? This extra step of opening the faucet helps you confirm that the water is truly off. It also relieves pressure in the pipes, making your repair work easier.
If the valve is stuck or hard to turn, don’t force it too much. Instead, use a wrench carefully or call a professional to avoid damaging the plumbing. Properly turning off the water supply protects both you and your kitchen from further trouble.
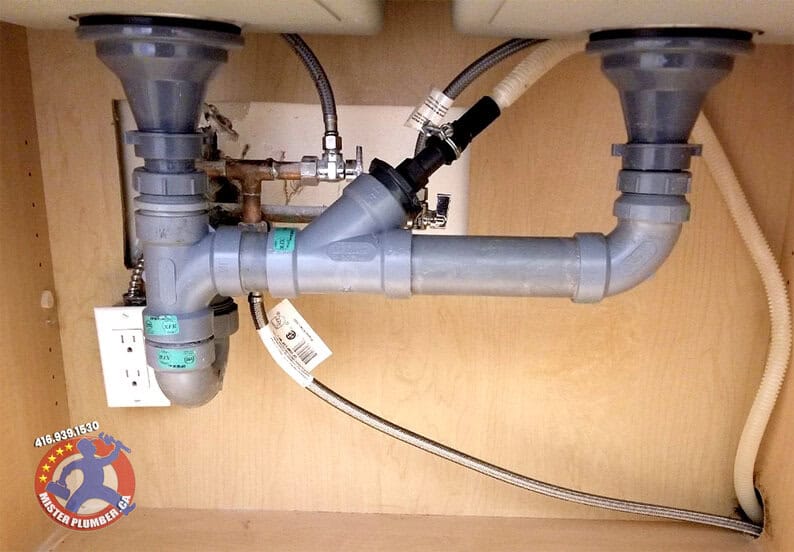
Inspecting Pipes And Connections
Inspecting the pipes and connections under your kitchen sink is a crucial step to find the source of a leak. Many leaks hide in plain sight but require a careful eye to spot. You’ll want to closely examine both the condition of the pipes themselves and how they join together.
Checking Pipe Integrity
Start by looking at the pipes for any visible cracks, holes, or corrosion. Even a tiny crack can cause a slow drip that wastes water and damages your cabinets over time.
Feel around the pipes to detect any wetness or softness, which might indicate hidden leaks or weakened areas. Don’t forget to check plastic pipes as well as metal ones, since plastic can become brittle with age.
Ask yourself: does any part of the pipe look worn out or different in color? That’s a sign it might need replacing before it fails completely.
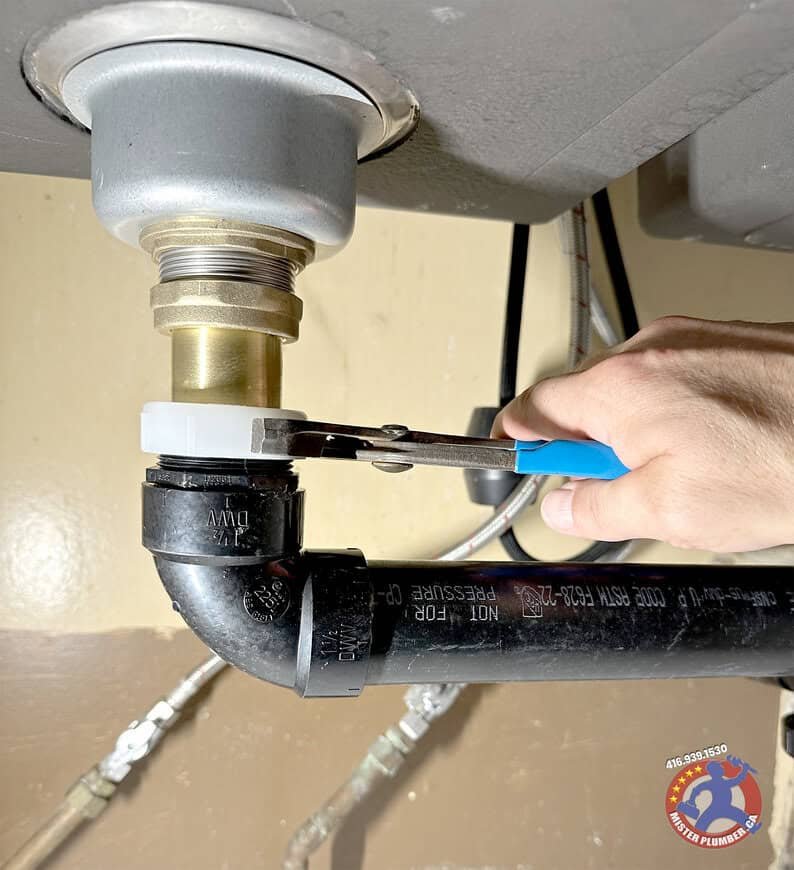
Examining Connections And Seals
Next, inspect the joints where pipes connect. These spots often use rubber washers or sealants that can dry out or crack.
Look closely for water stains, mineral buildup, or rust around these connections—they usually reveal slow leaks. Tighten any loose fittings by hand, then check again for drips.
If you notice old or damaged washers, replacing them can stop leaks without needing to swap out the entire pipe. Have you ever overlooked a loose connection only to find it was the real cause of a persistent drip?
Repairing Pipe Leaks
Repairing pipe leaks under your kitchen sink can feel daunting, but understanding your options makes a big difference. Leaks vary from tiny drips to significant breaks, each requiring a different approach. Knowing when to apply a quick fix or commit to a permanent repair can save you time, money, and a lot of frustration.
Temporary Fixes For Small Leaks
Small leaks often appear as slow drips or damp spots around pipe joints. You can stop these leaks quickly using materials you might already have at home.
- Rubber patch and hose clamp:Cut a piece of rubber from an old inner tube or rubber glove, wrap it around the leak, and tighten a hose clamp over it.
- Pipe tape or plumber’s tape:Wrap Teflon tape tightly around the leaking threads to create a temporary seal.
- Epoxy putty:Knead the putty, apply it directly to the leak, and let it cure as directed on the package.
These fixes can hold for a few days or weeks, giving you time to plan a permanent solution. Have you ever delayed a repair only to face a bigger problem later? Temporary fixes help you avoid that risk while you gather tools or schedule a plumber.
Permanent Solutions For Damaged Pipes
When a pipe is cracked, corroded, or severely damaged, a temporary fix won’t last. Permanent repairs restore your plumbing’s integrity and prevent future leaks.
- Replace the damaged section:Cut out the broken pipe segment using a pipe cutter. Measure and install a new piece with appropriate connectors.
- Use slip couplings:Ideal for repairing mid-pipe leaks without removing long sections. Slip couplings slide over the damaged area and tighten to seal.
- Upgrade old pipes:If your pipes are old and prone to leaks, consider replacing them with modern materials like PEX or PVC for longer-lasting results.
Permanent fixes require more tools and skills, but they save you from repeated repairs. If you’re unsure, consulting a professional can ensure your kitchen stays leak-free for good. What’s stopping you from making that permanent repair today?
Addressing Faucet Leaks
Faucet leaks under the kitchen sink waste water and increase bills. Fixing these leaks saves money and prevents water damage. Small leaks often come from worn parts or loose fittings. Addressing faucet leaks early stops bigger problems later.
Replacing Worn Washers
Washers inside the faucet stop water flow when off. Over time, washers wear out and cause drips. To fix, turn off water supply first. Remove the faucet handle carefully. Take out the old washer and check for damage. Match a new washer by size and shape. Insert the new washer and reassemble the faucet. Turn the water back on and test for leaks. Replacing washers is a quick fix for slow drips.
Tightening Loose Fixtures
Loose parts around the faucet cause leaks and wobbling. Check the faucet base and handles for looseness. Use a wrench or screwdriver to tighten nuts and screws. Do not overtighten to avoid damage. Tightening fixtures improves faucet stability and stops leaks. Regularly check fittings to keep the faucet secure and leak-free.
Dealing With Drainage Issues
Dealing with drainage issues under your kitchen sink can feel frustrating, especially when leaks start to appear. These problems often stem from clogged drains or faulty seals that allow water to escape. Understanding how to address these issues quickly can save you money and prevent water damage.
Unclogging Blocked Drains
Blocked drains are a common cause of leaks under the sink. Food scraps, grease, and soap buildup can slow down water flow and cause pressure to build up. This pressure sometimes forces water out through weak points in your pipes.
To clear a blockage, start with a plunger designed for sinks. If that doesn’t work, try a drain snake or a biodegradable drain cleaner. Avoid harsh chemicals as they can damage your pipes.
Have you noticed water pooling around your sink after using it? This is a clear sign your drain might be clogged and causing leaks. Regularly cleaning the drain can prevent buildup and keep water flowing smoothly.
Ensuring Proper Seal
The seal around your pipes and sink connections must be tight to prevent leaks. Over time, seals can dry out, crack, or become loose, allowing water to escape.
Check the rubber gaskets and washers for wear and tear. If you find any damage, replace these parts promptly. Use plumber’s putty or silicone sealant to reinforce the seal if needed.
Have you ever tightened a pipe only to find the leak comes back? This often means the seal itself is compromised, not just the fitting. Taking a moment to inspect and replace worn seals can make a big difference in stopping leaks for good.
Credit: www.misterplumber.ca
Testing The Repair
After fixing a leak under your kitchen sink, testing the repair is crucial to ensure the problem is truly resolved. This step helps you catch any small drips before they cause more damage. Taking your time during this phase can save you from future headaches and expenses.
Gradually Turning On Water
Start by slowly turning the water supply back on. Opening the valve too quickly might cause pressure surges that can stress your repair. A gentle flow allows you to monitor how the pipes and connections behave under normal water pressure.
Keep an eye on the area where you made the repair. If you notice water spraying or dripping right away, turn off the supply immediately. This cautious approach helps you avoid flooding your cabinet or floor.
Observing For Any Leaks
Once the water is flowing, carefully watch the repaired section for several minutes. Look closely at joints, seals, and any replaced parts. Even a tiny drip can mean the repair needs a bit more tightening or resealing.
Don’t just rely on sight. Feel the pipes and fittings with your hand to detect any moisture you might miss. Have a dry cloth handy to wipe around and check if it gets wet again after a few moments.
Ask yourself: does everything feel secure, or is there a slight dampness that could get worse? Trust your instincts here. If you spot any issues, turn off the water and review your repair before finishing up.
Preventive Measures For Future Leaks
Preventing leaks under the kitchen sink saves time and money. Taking simple steps helps stop water damage and mold growth. Regular care extends the life of pipes and fixtures. Focus on two key areas to avoid future leaks.
Routine Maintenance Tips
- Check pipes and connections for drips every month.
- Tighten loose nuts and bolts gently to avoid cracks.
- Clean the drain and traps to prevent clogs and pressure build-up.
- Look under the sink for signs of moisture or rust.
- Replace worn washers and seals before they fail.
- Run water through the pipes regularly to spot slow leaks early.
Choosing Quality Materials
Use durable pipes made from materials like copper or thick PVC. Avoid cheap or thin plastic parts that wear out quickly. Select corrosion-resistant fittings to keep joints strong. Buy parts from trusted brands with good reviews. Proper materials reduce the chance of cracks and leaks. Invest in quality now to prevent costly repairs later.

Credit: www.reddit.com
Frequently Asked Questions
How Do I Identify A Leak Under My Kitchen Sink?
Look for water stains, dampness, or mold under the sink. Check pipes, connections, and the drain for drips or moisture. Early detection prevents bigger damage and costly repairs.
What Tools Do I Need To Fix A Kitchen Sink Leak?
You’ll need a wrench, plumber’s tape, a bucket, and a flashlight. These help tighten connections and catch water. Having these tools ready makes the repair process smoother and faster.
Can I Fix A Leaking Pipe Myself Easily?
Yes, many leaks can be fixed with simple tightening or replacing washers. If the leak persists, consider calling a professional plumber. DIY saves money but know your limits to avoid damage.
How Long Does It Take To Fix A Leak Under The Sink?
Most minor leaks can be fixed within 30 minutes to an hour. Complex issues may take longer or require professional help. Quick repairs prevent water damage and mold growth.
Conclusion
Fixing a leak under the kitchen sink saves water and money. Small leaks can cause big damage over time. Act quickly to prevent mold and bad smells. Use basic tools and follow simple steps carefully. Regular checks help catch problems early.
A dry, leak-free sink keeps your kitchen clean and safe. Don’t ignore drips—they only get worse. Take control and keep your home in good shape. Simple repairs make a big difference.

Hi, I’m Daniel Harper, a senior editor here at KitchenBucks.com. For over 10 years, I’ve been exploring kitchen gadgets and appliances to help people find tools that truly add value without breaking the bank. I love simplifying product choices so you can focus more on cooking and less on worrying about what to buy. When I’m not reviewing the latest gadgets, you’ll usually find me experimenting with coffee brewing or firing up the grill for a weekend barbecue.