
Are you tired of washing dishes by hand and dreaming of the convenience a dishwasher could bring to your daily routine? Imagine a life where you can simply load up your dishwasher, press a button, and let it handle the dirty work while you relax or focus on more important tasks.
But before you can enjoy this modern luxury, there’s one crucial step you need to tackle: connecting your dishwasher. At first, this task might seem daunting, especially if you’ve never done it before. You might wonder if you have the skills or tools needed to get the job done.
Fear not! This guide is here to empower you with simple, straightforward instructions on how to connect your dishwasher without the stress or confusion. By the end of this article, you’ll be equipped with the knowledge and confidence to install your appliance smoothly, saving time and avoiding unnecessary hassle. Ready to dive in and make your kitchen life easier? Let’s get started!
Credit: structuretech.com
Preparing For Installation
Connecting a dishwasher can seem daunting, but with the right preparation, it becomes a straightforward task. Before you start the installation process, it’s crucial to set the stage for success. By gathering the necessary tools and materials, and following essential safety precautions, you’ll ensure a smooth and efficient installation experience. Let’s dive into the steps you need to take to prepare for this home improvement project.
Gathering Tools And Materials
Imagine being midway through your dishwasher installation only to realize you’re missing a key tool. Frustrating, right? To avoid this, make a checklist of items you’ll need. Start with a screwdriver, adjustable wrench, and pliers. These basics will help you with essential connections and adjustments.
Don’t forget the mounting brackets and screws that came with your dishwasher. They are essential for securing the appliance. Check your manual to ensure you have all necessary components. A roll of Teflon tape can be handy for sealing water connections, preventing leaks.
Also, ensure you have the correct power cord and hoses. Many dishwashers require specific fittings, so double-check before starting. It might seem overwhelming, but taking time now will save you from unnecessary trips to the hardware store.
Safety Precautions
Your safety is crucial during installation. Begin by turning off the power supply to the area where you’ll be working. This simple step can prevent electrical accidents. Use a voltage tester to ensure that the power is indeed off.
Water and electricity are a dangerous mix. Ensure that the water supply is shut off before handling any plumbing connections. Keep a towel or cloth nearby to quickly wipe up any spills, avoiding slippery surfaces.
Consider wearing gloves to protect your hands from sharp edges and tools. Are you working alone? Make sure someone knows where you are, in case you need assistance. Safety might seem like an extra step, but it’s a vital part of the process.
As you prepare for installation, remember these practical steps. How will you make sure that your installation process goes smoothly? Preparing well can make all the difference in successfully connecting your dishwasher with ease.
Choosing The Right Location
Choosing the right location for your dishwasher is essential. It ensures efficiency and ease of use. Proper placement enhances functionality and convenience. Consider space, water, and power access. These factors influence installation success.
Space Requirements
Adequate space is crucial. Dishwashers need room to operate effectively. Measure the area where you plan to install. Ensure the dishwasher fits comfortably. Leave space for door opening. Access for loading is important. Consider surrounding cabinets and appliances. Avoid tight corners or cramped spaces. Proper ventilation is necessary.
Access To Water And Power
Water and power are essential for dishwashers. Check proximity to plumbing. The water line should be easily reachable. Ensure a nearby electrical outlet. Verify voltage compatibility. Avoid using extension cords. Check for existing water valves. Consider ease of connection. Access impacts efficiency.
Plumbing Connections
Connecting a dishwasher can seem daunting, but once you understand the plumbing connections, it becomes straightforward. Whether you’re upgrading your kitchen or installing a dishwasher for the first time, knowing how to connect the water supply and set up the drain hose is essential. You might be surprised at how manageable these tasks can be, even if you’re not a plumbing expert.
Connecting The Water Supply
The first step in plumbing connections is attaching the water supply to your dishwasher. Typically, dishwashers use hot water for cleaning. Locate the hot water line under your sink, and ensure it has a shut-off valve. This valve is crucial for controlling water flow during installation.
Use a flexible braided hose to connect the water supply to the dishwasher inlet. This hose is durable and resistant to leaks, making it an ideal choice. Make sure the connections are secure to avoid any water leakage. Hand-tighten and then give it a quarter turn with a wrench for a snug fit.
Have you ever wondered why dishwashers use hot water? It’s because hot water helps to dissolve detergent and remove grease more effectively. Knowing this can help you appreciate the importance of a secure water connection.
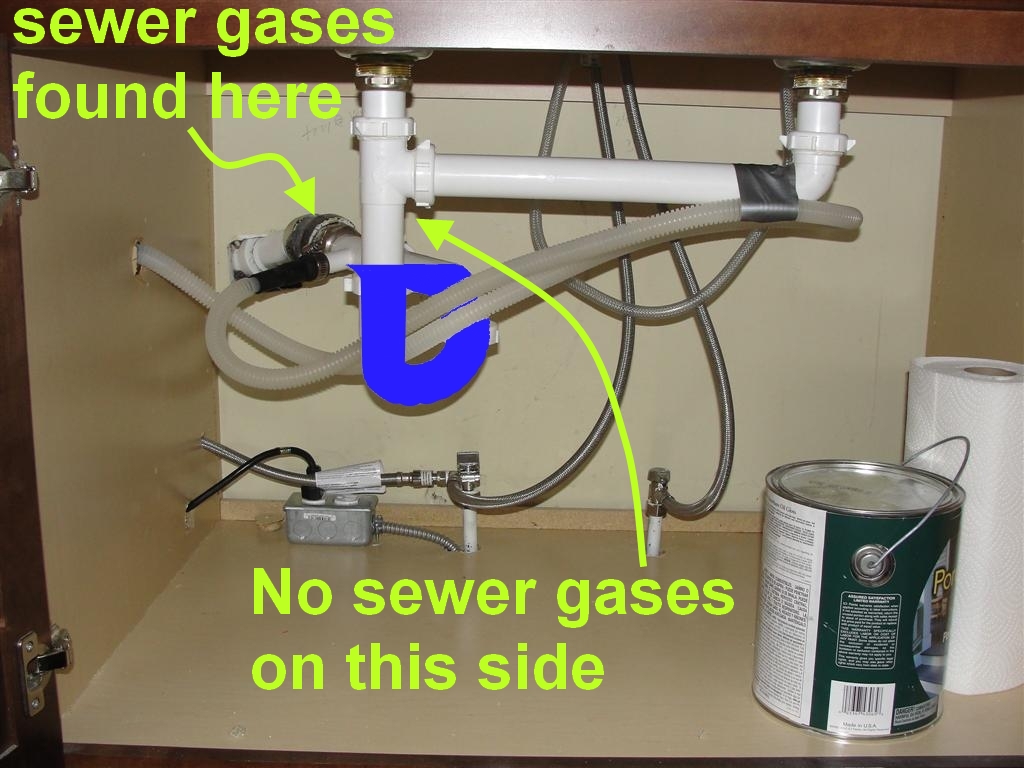
Drain Hose Setup
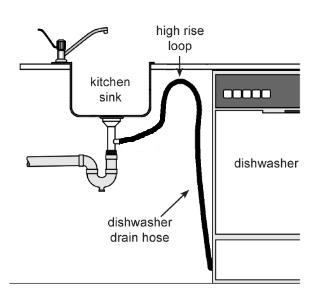
Once the water supply is connected, it’s time to focus on the drain hose setup. The drain hose carries away dirty water after the wash cycle. You’ll typically connect this hose to the garbage disposal or directly to the drain pipe under your sink.
Ensure the hose is looped upward before attaching it. This prevents dirty water from siphoning back into the dishwasher. It’s a small step that makes a big difference in keeping your appliance functioning well.
Have you ever had a dishwasher that didn’t drain properly? Often, the cause is an improperly looped drain hose. A simple upward loop can save you from this common issue.
By following these plumbing connections, you ensure your dishwasher operates efficiently. Are there any other tips you’d like to share from your own experiences? Feel free to comment below!
Credit: 8pointshome.com
Electrical Connections
Connecting a dishwasher involves understanding its electrical needs. The electrical connections ensure your dishwasher runs smoothly and safely. This section provides clear guidance on making these connections. Let’s explore power outlet requirements and wiring instructions.
Power Outlet Requirements
Check the power outlet before starting. It must match the dishwasher’s voltage rating. Most dishwashers require a standard 120-volt outlet. Ensure the outlet is grounded for safety. Use a dedicated circuit to prevent overloads. Avoid using extension cords. They can cause overheating and are unsafe for permanent connections.
Wiring Instructions
Start by turning off the power supply. Safety first. Locate the junction box on the dishwasher. Remove its cover using a screwdriver. Connect the black wire to the black terminal. Connect the white wire to the white terminal. Attach the green wire to the ground terminal. Ensure all connections are tight. Replace the junction box cover. Turn the power back on to test your work.
Securing The Dishwasher
Connecting a dishwasher involves securing it properly to ensure safe operation. Begin by attaching the water supply hose to the water inlet valve. Next, connect the drain hose to the sink’s drain pipe, ensuring a snug fit to prevent leaks.
Finally, plug the dishwasher into an electrical outlet for power.
Securing the dishwasher is crucial for its safe operation. Proper installation prevents movement during use. This section guides you through two key steps. Follow these instructions to ensure your dishwasher remains stable and secure.Leveling The Appliance
Start by checking the level of your dishwasher. Uneven surfaces can cause issues. Use a spirit level to check balance. Adjust the legs if necessary. Most dishwashers have adjustable feet. Rotate the feet to raise or lower the unit. Aim for a stable and level position. This prevents the appliance from tilting or rocking.Mounting Brackets
Mounting brackets hold the dishwasher firmly in place. Locate the brackets on the top or sides. Secure them to the countertop or cabinetry. Use screws to fasten the brackets tightly. Ensure they are flush with the surface. This prevents the dishwasher from shifting during operation. Properly mounted brackets add stability and support. They are essential for a safe installation.
Credit: diy.stackexchange.com
Testing The Dishwasher
Connecting a dishwasher involves attaching water supply and drain hoses securely. Ensure electrical connections are safely established. Test the appliance by running a short cycle to check for leaks and proper functionality.
Testing your newly installed dishwasher is crucial to ensure it works efficiently and safely. It’s the final step before you can enjoy the convenience it brings to your kitchen routine. A thorough check can save you from unexpected leaks or malfunctions, which can be frustrating and costly. So, how do you go about testing it? Let’s dive into the steps you need to take to ensure your dishwasher is ready to go.Running A Test Cycle
Before you load your dishwasher with dirty dishes, it’s smart to run an empty test cycle. This helps you ensure that everything is connected correctly and the dishwasher functions properly. Start by selecting a normal wash cycle and allow the dishwasher to run its full course. Listen for any unusual sounds such as grinding or loud buzzing, which could indicate a problem. Also, watch the control panel to check if any error codes appear. As the cycle runs, observe the dishwasher’s performance. Does the water fill and drain properly? Are the arms spinning without obstructions? These are signs that your installation was successful.Checking For Leaks
After the test cycle, inspect the area around your dishwasher for any signs of water leakage. Pay special attention to connections such as the water inlet and drain hose. Place your hand along the edges and underneath the dishwasher to feel for moisture. If you notice any wet spots, this could indicate a loose connection or a faulty seal. Tighten any connections if needed and run another test cycle to ensure the issue is resolved. Does the floor remain dry throughout the cycle? If so, you can confidently move on to using your dishwasher for daily cleaning tasks. If not, it might be time to troubleshoot further or call in a professional for assistance. Testing your dishwasher might seem like an extra step, but it’s a vital one. Would you rather catch a leak now or deal with potential water damage later? Take the time to test thoroughly, and you’ll enjoy peace of mind with every cycle.Troubleshooting Common Issues
Connecting a dishwasher can be tricky. Sometimes, issues arise. Understanding these problems helps. You can fix them yourself. This saves time and money.
Addressing Water Leaks
Water leaks are a common problem. Check the connections first. Look at the hose and clamps. Ensure they are tight. Inspect the door seal. It should be clean and intact. Replace it if damaged. Examine the water inlet valve. A faulty valve can cause leaks. Tighten or replace it if needed.
Fixing Electrical Problems
Electrical problems can stop your dishwasher. First, check the power supply. Ensure the dishwasher is plugged in. Check the circuit breaker. It should not be tripped. Inspect the door latch. The dishwasher won’t start if it is faulty. Replace it if necessary. Look at the wiring connections. They should be secure. Loose wires can cause issues.
Maintenance Tips
Maintaining your dishwasher is crucial to ensure it runs smoothly and lasts longer. Consistent upkeep not only saves you from potential costly repairs but also ensures your dishes come out sparkling clean every time. But what does proper maintenance look like? Let’s delve into some practical tips that might surprise you.
Regular Cleaning
How often do you clean your dishwasher? If your answer is rarely, it might be time to rethink your cleaning schedule. Dishwashers accumulate food particles and soap residue over time.
To keep the machine efficient, clean the filter and spray arms at least once a month. This routine helps prevent clogs and enhances the washing performance.
Don’t forget to wipe down the door seals and the interior with a damp cloth. A clean dishwasher means cleaner dishes, and isn’t that the ultimate goal?
Routine Inspections
Have you ever wondered why your dishwasher suddenly stops draining? Routine inspections can help identify small issues before they turn into big problems.
Check the hoses for any signs of wear or leaks regularly. A simple glance can save you from a water disaster later.
Inspecting the racks and wheels can prevent them from breaking, which might lead to uneven cleaning. Think of routine inspections as giving your dishwasher a health check-up.
Your dishwasher is a valuable appliance; treating it with care ensures it treats your dishes with the same respect. What’s the most unexpected discovery you’ve had during a maintenance check?
Frequently Asked Questions
Can I Hook Up A Dishwasher Myself?
Yes, you can install a dishwasher yourself. Ensure you have the right tools and follow the manufacturer’s instructions. Turn off electricity and water before starting. If unsure, consult a professional for safety. Proper installation ensures efficient operation and prevents leaks.
How Does A Dishwasher Get Connected?
Connect a dishwasher by attaching the water supply line to the inlet valve. Connect the drain hose to the sink drain or garbage disposal. Plug in the power cord to a nearby outlet. Ensure all connections are secure and test for leaks.
Always follow the manufacturer’s instructions.
What Do I Need To Connect A Dishwasher?
You need a water supply line, a drain hose, and an electrical outlet to connect a dishwasher. Ensure proper installation by following manufacturer instructions. Use a wrench for tightening connections and check for leaks. Safety precautions are crucial to prevent electrical hazards.
Do I Need A Plumber To Hook Up A Dishwasher?
Hiring a plumber ensures a safe and proper dishwasher installation. They handle plumbing connections, preventing leaks and potential issues. While DIY is possible, professional help guarantees compliance with local codes and regulations. Investing in a plumber provides peace of mind and longevity for your appliance.
Conclusion
Connecting a dishwasher might seem tricky, but it’s manageable. Follow the steps carefully. Use the right tools and be patient. Check connections to prevent leaks. Ensure electricity and water lines are secure. Reading the manual helps a lot. Don’t rush; take your time.
If unsure, seek professional help. Safety is crucial. A well-installed dishwasher saves time and effort. Enjoy hassle-free cleaning with your new appliance. Practice makes perfect, so stay calm. With these tips, you’re ready to connect your dishwasher confidently. Happy dishwashing!
