
Is water dripping under your kitchen sink? A leak can cause damage fast, waste water, and raise your bills.
But don’t worry—you don’t have to call a plumber right away. You can fix this yourself with just a few simple steps. In this guide, you’ll learn exactly what to look for and how to stop that leak for good.
Keep reading, and you’ll save money and protect your home from costly damage.
Identify The Leak Source
Finding the exact spot where water escapes under your kitchen sink can be tricky but is essential for a proper fix. Leaks often hide in plain sight, and missing the source means wasting time and possibly causing more damage. You need to carefully check each potential cause to catch the leak before it worsens.
Check The Pipes
Start by looking closely at the pipes beneath your sink. Pay special attention to the joints and connections, as these are common weak points where leaks develop.
Use a flashlight to see clearly in dark corners. Run the water and watch for any drips or moisture forming on the pipes. Even a small bead of water can signal trouble.
Inspect The Faucet
The faucet itself can be the leak source, especially if the base or handles are loose or worn out. Water can seep from where the faucet meets the sink or from the spout.
Try wiping around the faucet with a dry cloth and then turn on the water. If the cloth quickly gets wet, the leak is likely coming from there. Tightening or replacing faucet parts might be your next step.
Examine The Drain
The drain assembly is another area to scrutinize. Over time, seals and washers can wear down and allow water to escape.
Look for water pooling around the drain or signs of rust and corrosion. Gently tug on the drain pipe to see if it’s loose. A leak here often calls for resealing or tightening the drain fittings.

Credit: www.youtube.com
Gather Necessary Tools
Gathering the right tools is key to fixing a leak under your kitchen sink. Having everything ready saves time and avoids frustration. Knowing which tools to use makes the job easier and safer.
Basic Plumbing Tools
- Adjustable wrench – for tightening or loosening nuts and bolts.
- Pipe wrench – offers a strong grip on pipes.
- Basin wrench – designed for hard-to-reach nuts under the sink.
- Plumber’s tape (Teflon tape) – seals pipe threads to prevent leaks.
- Bucket – catches water that may drip during repairs.
- Plunger – useful if the leak is related to drainage blockage.
- Flashlight – helps see clearly in dark cabinet spaces.
- Rags or towels – clean up water spills quickly.
Safety Equipment
- Protective gloves – protect hands from sharp edges and chemicals.
- Safety goggles – shield eyes from splashes and debris.
- Face mask – prevents inhaling dust or mold spores.
- Proper clothing – wear clothes that cover arms and legs.
- Non-slip shoes – keep your footing stable in wet areas.
Turn Off Water Supply
Turning off the water supply is the first and most important step in fixing a leak under your kitchen sink. Stopping the water flow prevents further damage and keeps the area dry. It also makes the repair process safer and easier.
Locate Shutoff Valves
Look under the sink for small valves on the water pipes. These valves control the water flow to the faucet. Usually, there are two valves—one for hot water and one for cold water.
Turn each valve clockwise until it stops. This action closes the valve and stops water from flowing. Make sure both valves are fully closed before you start repairs.
Drain Remaining Water
Open the faucet to let any water in the pipes drain out. Water left in the pipes can spill during repair. Keep the faucet open until no more water comes out.
Use a small container or towel to catch any dripping water. This step helps keep the area clean and dry.
Fix Common Leak Types
Fixing common leaks under the kitchen sink saves water and prevents damage. Leaks often come from loose parts, worn washers, or cracked pipes. Knowing how to address these issues helps you stop leaks fast.
Tighten Loose Connections
Loose connections cause many leaks. Check the pipes and fittings under the sink. Use a wrench to gently tighten any loose nuts or bolts. Avoid overtightening to prevent damage.
Look for water drips while tightening. Stop when leaks stop or parts feel secure.
Replace Damaged Washers
Washers seal the joints between pipes. Old washers crack or wear out, causing leaks. Turn off the water supply before starting.
Remove the pipe joint, take out the old washer, and insert a new one. Reassemble the parts and check for leaks by turning the water back on.
Seal Cracked Pipes
Small cracks cause slow leaks under the sink. Dry the pipe area fully before sealing. Use waterproof tape or pipe sealant to cover the crack.
For bigger cracks, replace the pipe section. Keep a bucket nearby to catch any water during repair.
Test The Repair
After fixing the leak under your kitchen sink, testing the repair is essential. This step confirms whether your efforts worked and ensures there won’t be any future water damage. Taking the time to carefully check your work can save you from costly repairs down the line.
Turn On Water Slowly
Start by turning on the water supply slowly. This helps you monitor the pipes and connections without sudden pressure that might cause another leak. Gradually increasing the flow gives you better control and prevents surprises.
As you open the valve, pay attention to any unusual sounds or resistance. If something feels off, stop and double-check your repair. This cautious approach protects your plumbing and gives you confidence in the fix.
Check For Drips
Once the water is flowing, watch carefully for any drips or moisture around the repaired area. Use a flashlight if needed to spot tiny leaks that might not be obvious at first. Even small drips can indicate that the seal isn’t perfect.
Don’t rush this step; leaks often show up after a few minutes. Keep a dry cloth nearby and check periodically. If you see any wet spots, tighten connections or reapply sealant until everything stays dry.

Credit: www.reddit.com
Prevent Future Leaks
Stopping a leak under your kitchen sink is just the beginning. To truly protect your home, you need to prevent future leaks from happening. Taking simple, regular steps can save you from costly repairs and sleepless nights worrying about water damage.
Regular Maintenance Tips
Check your pipes and fittings every few months. Look for signs of moisture, corrosion, or wear. Catching small problems early can stop leaks before they start.
Keep the area under your sink dry and clean. Moisture buildup encourages rust and mold, which can weaken pipes. Wipe down surfaces after using the sink.
Replace worn-out washers and seals immediately. These small parts often cause leaks, and swapping them out is usually quick and cheap. Don’t wait for dripping to turn into flooding.
Test your water pressure regularly. High pressure strains pipes and joints, increasing the chance of leaks. If the pressure is too high, consider installing a pressure regulator.
When To Call A Professional
If you notice persistent leaks or water damage despite your efforts, it’s time to get expert help. Some problems hide deep inside plumbing and require special tools or knowledge to fix.
Unusual noises, foul smells, or discolored water around your sink signal issues that go beyond simple DIY fixes. Don’t ignore these signs, as they often point to bigger problems.
Remember, hiring a plumber early can save you money by preventing serious damage. Would you rather spend a little now or face a major repair later? Knowing when to call a professional is key to protecting your home and peace of mind.
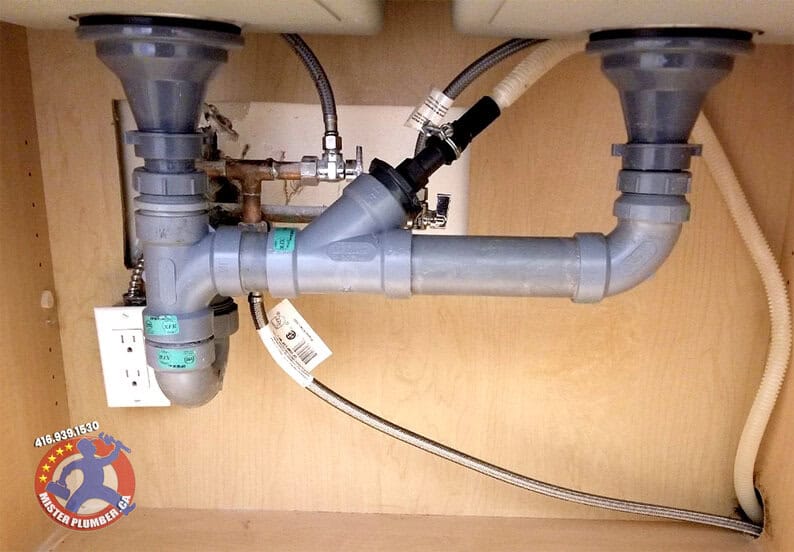
Credit: www.misterplumber.ca
Frequently Asked Questions
What Causes Leaks Under The Kitchen Sink?
Leaks under the kitchen sink often result from worn-out seals, loose connections, or damaged pipes. Corrosion and clogs can also cause leaks. Identifying the exact cause helps in selecting the right repair method. Regular inspection prevents small leaks from becoming major issues.
How Can I Fix A Leaking Pipe Under The Sink?
To fix a leaking pipe, first turn off the water supply. Tighten loose connections or replace damaged washers. For cracked pipes, use a pipe repair clamp or replace the section. Always test for leaks after repair to ensure the problem is resolved.
When Should I Call A Plumber For Sink Leaks?
Call a plumber if the leak persists after basic repairs, or if you notice water damage. Complex issues like damaged drain pipes or hidden leaks require professional tools and expertise. Early professional help can prevent costly repairs and extensive water damage.
How Do I Prevent Leaks Under The Kitchen Sink?
Prevent leaks by regularly checking pipes and connections for signs of wear. Avoid putting grease or debris down the drain to prevent clogs. Use plumber’s tape on threaded connections and tighten fittings as needed. Routine maintenance extends the life of your plumbing system.
Conclusion
Fixing a leak under the kitchen sink saves water and prevents damage. Start by turning off the water supply. Check all pipes and connections carefully. Tighten loose parts or replace damaged ones. Keep a bucket handy to catch drips. Clean up any water spills quickly to avoid mold.
Regular checks help spot leaks early. Simple steps can stop leaks fast and protect your home. Take action today for a dry, safe kitchen space.

Hi, I’m Daniel Harper, a senior editor here at KitchenBucks.com. For over 10 years, I’ve been exploring kitchen gadgets and appliances to help people find tools that truly add value without breaking the bank. I love simplifying product choices so you can focus more on cooking and less on worrying about what to buy. When I’m not reviewing the latest gadgets, you’ll usually find me experimenting with coffee brewing or firing up the grill for a weekend barbecue.