Is water dripping under your kitchen sink? A leak can quickly turn from a small drip into a costly problem if you don’t act fast.
You might feel overwhelmed, but fixing it yourself is easier than you think. In this guide, you’ll learn simple steps to stop the leak and save money on repairs. Keep reading, and you’ll have your kitchen dry and worry-free in no time.
Identify The Leak Source
Before you can fix a leak under your kitchen sink, pinpointing exactly where it’s coming from is crucial. Leaks often hide in plain sight or drip slowly, making them tricky to catch right away. Take a careful look at the common trouble spots to save time and avoid unnecessary repairs.
Check The Pipes
Look closely at the pipes beneath your sink, especially where they connect. These joints can loosen over time, causing slow drips or puddles. Gently run your fingers along the pipes to feel for moisture or corrosion.
Don’t forget to inspect the water supply lines too. They might have tiny cracks or pinholes that drip water steadily but subtly. Sometimes, a towel wrapped around the pipe helps you spot wetness more easily.
Inspect The Faucet
Leaks can also originate from the faucet itself, often where it meets the sink. Turn on the faucet and watch for any water escaping around its base or handles. You might notice water pooling after use, indicating a faulty seal or worn-out washers.
Have you noticed your faucet dripping even when it’s off? That’s a sign the internal parts need replacing. Tightening loose parts might stop the leak temporarily, but real repair often involves swapping out damaged components.
Examine The Drain
The drain area under the sink is another common leak source. Check the seal where the drain meets the sink basin—if it’s cracked or worn, water can escape during washing. Also, inspect the P-trap for cracks or loose connections.
Sometimes, leaks occur only when water flows fast, like during dishwashing. Run water for a minute and watch carefully under the sink. Spotting the leak in action can help you decide whether to tighten fittings or replace parts.

Credit: www.reddit.com
Gather Essential Tools
Before you dive into fixing a leak under your kitchen sink, gathering the right tools is crucial. Having everything at hand saves time and spares you from frustration. Plus, the right tools make the job safer and more efficient.
Basic Plumbing Tools
Start with some plumbing essentials that every DIYer should have. An adjustable wrench is a must for loosening and tightening nuts and bolts under the sink.
A pipe wrench helps when dealing with larger pipes, while a basin wrench is perfect for those hard-to-reach fittings behind the sink basin. Don’t forget a plumber’s tape (Teflon tape) to seal threaded pipe connections and prevent future leaks.
- Adjustable wrench
- Pipe wrench
- Basin wrench
- Plumber’s tape (Teflon tape)
- Bucket or container to catch water
- Rags or towels for spills
Having a flashlight nearby can help you see in tight, dark spaces. How often have you struggled with poor lighting only to make a small leak worse?
Safety Gear
Your safety matters as much as the repair itself. Wearing gloves protects your hands from sharp edges and dirty water. Goggles shield your eyes, especially if you need to disconnect pipes and water sprays unexpectedly.
Consider using knee pads if you’ll be crouching for a long time under the sink. A simple dust mask can be helpful if you encounter mold or dust buildup.
- Rubber gloves
- Safety goggles
- Knee pads
- Dust mask (optional)
Would you take on a leaky pipe without protecting your eyes and hands? Probably not. Taking a few safety precautions upfront can prevent minor injuries and keep you comfortable throughout the repair.
Turn Off Water Supply
Turning off the water supply is the first and most crucial step when fixing a leak under your kitchen sink. Without stopping the water flow, any repair work will be messy and ineffective. Knowing exactly where and how to shut off the water can save you from unexpected floods and damage.
Locate The Shut-off Valves
Look under your sink for small valves connected to the water pipes. These valves usually have round or lever handles and control the flow of water to your faucet. If you don’t see any valves here, check the main water supply line to your home.
Turn The Valves Clockwise To Close
To stop the water, turn the shut-off valves clockwise until they stop moving. This action closes the valve and cuts off water to the sink. You don’t need much force—turn gently to avoid damaging the valve.
Test The Water Flow
After closing the valves, open the faucet to ensure no water is coming out. If water still flows, you might need to shut off the main water supply. This test confirms you’re ready to safely work on the leak.
Know Where Your Main Water Shut-off Is
Every home has a main water shut-off valve, often found near the water meter or where the main line enters your house. In emergencies, turning this off stops water to the entire home. Familiarize yourself with its location before you face a leak.
Use A Bucket To Catch Drips
Even after shutting off the valves, some water may drip from the pipes. Place a bucket or towel underneath to catch any remaining water. This simple tip keeps your cabinet dry and your workspace clean.
Fixing Common Pipe Leaks
Fixing common pipe leaks under the kitchen sink can save water and prevent damage. These leaks often happen at joints or connections. Simple tools and materials can help stop the drip quickly. Understanding the basic fixes helps tackle the problem with confidence.
Tighten Loose Connections
Loose connections cause many leaks under the sink. Use a wrench to gently tighten the nuts on the pipes. Avoid over-tightening as it can damage the fittings. Check all the visible joints and tighten any that feel loose. After tightening, run water to see if the leak stops.
Replace Damaged Washers
Washers create a seal in pipe joints. Over time, they wear out and cause leaks. Turn off the water supply before removing the faucet or pipe parts. Take the old washer out and replace it with a new one of the same size. Reassemble the parts and turn the water back on. The leak should be gone if the washer was the issue.
Seal With Plumber’s Tape
Plumber’s tape, also called Teflon tape, seals threaded pipe joints. Wrap the tape clockwise around the threads of the pipe. Use two or three layers to ensure a good seal. Screw the parts back together tightly after wrapping. The tape fills small gaps and stops water from escaping.
Repairing Faucet Leaks
Repairing faucet leaks under the kitchen sink saves water and prevents damage. Leaks can occur from worn parts inside the faucet or from the sprayer hose connection. Fixing these issues requires simple tools and replacement parts. A careful approach avoids bigger problems and keeps your kitchen dry.
Replace Cartridge Or Valve
The cartridge or valve inside the faucet controls water flow. Over time, these parts wear out and cause leaks. Start by turning off the water supply under the sink. Remove the faucet handle by loosening the screw. Take out the cartridge or valve carefully.
Check for damage or buildup. Clean the area if needed. Install a new cartridge or valve that matches your faucet model. Put the handle back and tighten the screw. Turn on the water and test for leaks. The faucet should stop dripping.
Fix Sprayer Hose
The sprayer hose may leak where it connects to the faucet or the water supply. Inspect the hose for cracks or loose connections. Tighten any loose fittings with a wrench but do not overtighten.
If the hose is damaged, remove it from the faucet and supply line. Replace it with a new hose of the same size. Attach the new hose securely. Turn on the water and check for leaks. A tight connection stops water from escaping.
Clearing And Sealing Drain Leaks
Clearing and sealing drain leaks is essential to stop water damage under the kitchen sink. Leaks often come from loose or worn parts around the drain flange. Fixing these leaks prevents mold, bad odors, and costly repairs. Focus on tightening and sealing the drain to keep water where it belongs.
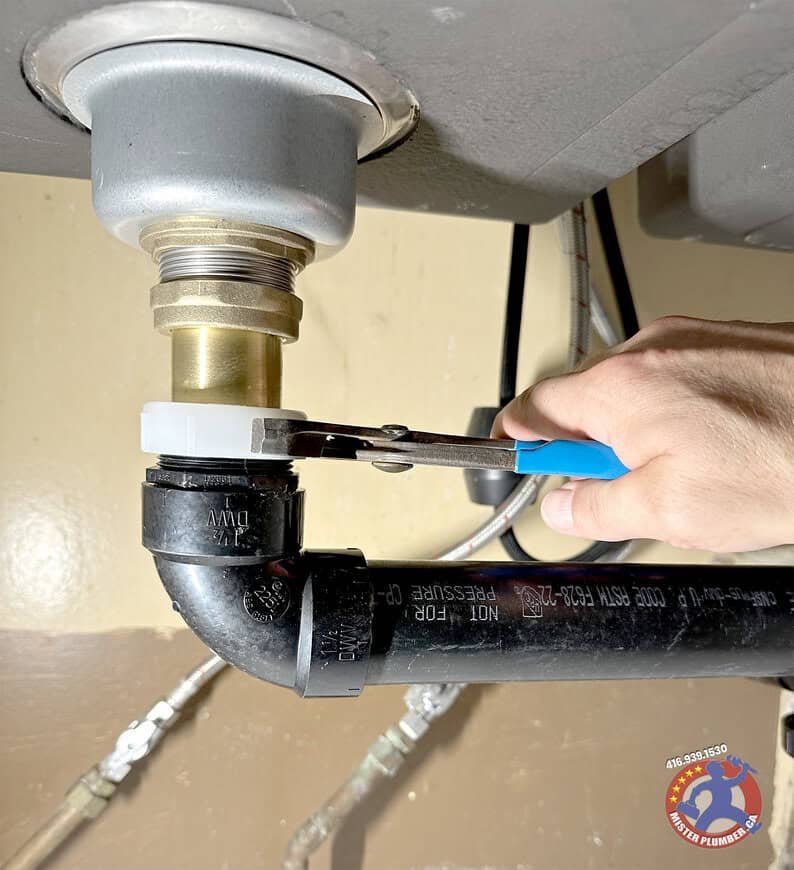
Tighten Drain Flange
The drain flange connects the sink drain to the pipe below. A loose flange can cause water to drip under the sink. Use a wrench to gently tighten the flange’s locknut. Turn it clockwise until it feels snug. Avoid overtightening, which can crack the sink or damage the flange.
Check the flange for cracks or corrosion. Replace it if you find any damage. After tightening, run water to see if the leak stops. Repeat the process if necessary, but always be gentle.
Apply Plumber’s Putty
Plumber’s putty creates a watertight seal between the sink and the drain flange. First, clean the sink surface and the underside of the flange. Roll a small amount of putty into a rope shape. Place the rope around the drain hole on the sink.
Press the drain flange firmly into the putty. Tighten the locknut under the sink to secure the flange. Excess putty will squeeze out. Wipe away the extra putty with a cloth. Let the putty set before using the sink to ensure a strong seal.
Test The Repair
Testing the repair is a crucial step after fixing a leak under the kitchen sink. It confirms whether the leak is fully sealed and prevents water damage. Take your time during this phase to ensure everything is secure and dry.
Turn On Water Slowly
Open the water valve gently to avoid sudden pressure. This helps to check the repair under normal flow. Watch closely as the water starts moving through the pipes.
Turning the water on slowly reduces stress on the fittings. It also allows you to spot any weak points early. Stay patient and keep an eye on the repair area.
Check For Drips
Look carefully around the repair spot for any water droplets. Use a dry cloth or paper towel to detect small leaks. Even tiny drips can mean the fix is not complete.
Inspect all connections and joints near the repair. Check beneath the pipes and on the cabinet floor. Wait a few minutes to be sure no new drips appear.
Credit: www.misterplumber.ca
When To Call A Professional
Knowing when to call a professional can save time and prevent damage. Some leaks are simple to fix, but others require expert help. Ignoring complex or persistent leaks can lead to costly repairs. Assess the situation carefully before deciding to handle it yourself.
Complex Leaks
Leaks involving pipes deep inside the wall or under the floor need special tools. Problems with the main water line or damaged valves also require professional skills. Professionals have the right equipment to detect hidden leaks. Attempting these fixes without experience can cause more harm.
Persistent Issues
Leaks that return after several repairs signal a bigger problem. Continuous dripping wastes water and raises bills. Persistent leaks may mean corroded pipes or loose fittings. A plumber can find the root cause and fix it properly. Repeated DIY fixes often only mask the issue temporarily.
Prevent Future Leaks
Preventing future leaks under your kitchen sink is just as important as fixing the current one. Small actions you take today can save you from costly repairs and water damage later. Let’s look at practical ways to keep your plumbing in top shape and avoid those annoying drips.
Regular Maintenance
Check your pipes and connections under the sink every few months. Look for signs of wear like cracks, rust, or loose fittings before they become a problem.
Cleaning the drain regularly can prevent clogs that put pressure on your pipes. Use a gentle drain cleaner or a mixture of baking soda and vinegar to keep things flowing smoothly.
Remember, I once ignored a tiny drip and it turned into a big leak. A quick monthly inspection could have saved me hours of work and a hefty plumber’s bill.
Proper Usage Tips
Be mindful about what goes down your sink. Avoid pouring grease, coffee grounds, or large food scraps into the drain as they can cause blockages and strain your pipes.
Don’t use excessive force when opening or closing the cabinet doors under the sink. Rough handling can loosen plumbing connections and cause leaks over time.
Also, consider installing a drip tray or water sensor to catch leaks early. Would you rather find a small puddle or discover a soaked cabinet weeks too late?

Credit: www.youtube.com
Frequently Asked Questions
How Do I Identify A Leak Under My Kitchen Sink?
Look for water stains, puddles, or dampness under the sink cabinet. Check pipes, joints, and the faucet base for dripping water.
What Tools Are Needed To Fix A Kitchen Sink Leak?
Basic tools include a wrench, plumber’s tape, bucket, and replacement washers or pipe fittings. These help tighten or replace leaking parts.
Can I Fix A Leaking Pipe Myself Safely?
Yes, many leaks are simple to fix with basic tools. Always turn off the water supply before starting repairs.
How Long Does It Take To Fix A Kitchen Sink Leak?
Most minor leaks can be fixed within 30 to 60 minutes, depending on the leak’s location and complexity.
Conclusion
Fixing a leak under the kitchen sink is easier than you think. Start by turning off the water supply. Check all pipes and connections carefully for damage. Tighten or replace parts as needed. Use a wrench to avoid over-tightening. Test your repair by turning the water back on slowly.
Watch for any drips or leaks. Small leaks can cause big problems if ignored. Regular checks help keep your kitchen dry and safe. Taking quick action saves money and stress. You can handle this repair with simple tools and patience.