Is your kitchen sink leaking and causing a mess you just can’t ignore? A leak under your kitchen sink can lead to water damage, mold, and higher bills if left unchecked.
But don’t worry—you don’t have to call a plumber right away. You can fix it yourself, even if you’re not an expert. In this guide, you’ll discover simple, step-by-step solutions to stop the leak quickly and protect your home. Keep reading, and you’ll learn how to take control of the problem before it gets worse.
Identify The Leak Source
Finding the exact source of a leak under the kitchen sink is key to fixing it. Water can come from different spots, so careful checking is essential. Start by drying the area and watching where water appears first. This helps save time and avoids unnecessary repairs.
Check The Water Supply Lines
Water supply lines run from the wall to the faucet. Look closely at these lines for any wet spots or cracks. Feel along the pipes for moisture or drips. Tighten any loose connections with a wrench. Replace damaged hoses or tubes right away.
Inspect The Drain Pipes
Drain pipes carry wastewater away from the sink. Examine the pipes and joints under the sink. Look for water stains, rust, or puddles. Run water through the sink and watch for leaks. Tighten slip nuts or replace worn washers if needed.
Look At The Faucet Base
The faucet base can leak if seals wear out. Check around the base for water pooling. Turn the faucet on and off to see if water escapes. Tighten mounting nuts under the sink. Replace old or cracked gaskets to stop leaks.

Credit: www.reddit.com
Gather Necessary Tools And Materials
Before you start fixing a leak under your kitchen sink, gathering the right tools and materials is crucial. Having everything ready will save you time and prevent unnecessary trips to the hardware store. It also helps you stay focused and confident as you tackle the repair.
Essential Plumbing Tools
To fix a leak effectively, you need some basic plumbing tools. A good adjustable wrench is essential for loosening and tightening nuts and bolts. Slip-joint pliers come in handy for gripping pipes and fittings tightly without damaging them.
A pipe wrench is useful if you have larger pipes that need extra force. Don’t forget a bucket to catch any dripping water and a flashlight to see clearly under the sink. Lastly, keep a utility knife nearby to cut any damaged sealant or tape.
Replacement Parts And Sealants
Leaks often come from worn-out washers, gaskets, or pipes. Having replacement washers and rubber gaskets of various sizes ensures you can swap out damaged parts quickly. If the leak is from a cracked pipe, you might need a new section of pipe or a pipe repair clamp.
Sealants like plumber’s putty or silicone caulk help create watertight seals around joints and fittings. Teflon tape is another must-have for wrapping threaded pipe connections to prevent leaks. Do you know which sealant works best for your pipe material? Knowing this can make all the difference in stopping the leak for good.
Turn Off Water Supply
Turning off the water supply is the first crucial step to fix a leak under your kitchen sink. It stops water flow and prevents flooding. This step protects your cabinets and flooring from water damage. Act quickly and carefully to avoid making the leak worse.
Locate Shutoff Valves
Find the shutoff valves under the sink. These small handles control water flow to the faucet. Usually, there are two valves: one for hot water and one for cold water. They often look like round knobs or small levers. Turn both valves clockwise to close them. If you cannot find valves under the sink, check the main water supply valve in your home.
Drain Remaining Water
Open the faucet after closing the valves. This action helps drain water left in the pipes. Let the water run until it stops completely. Use a bucket or towel to catch any drips under the sink. Draining water reduces pressure and stops leaks while you work on the repair.
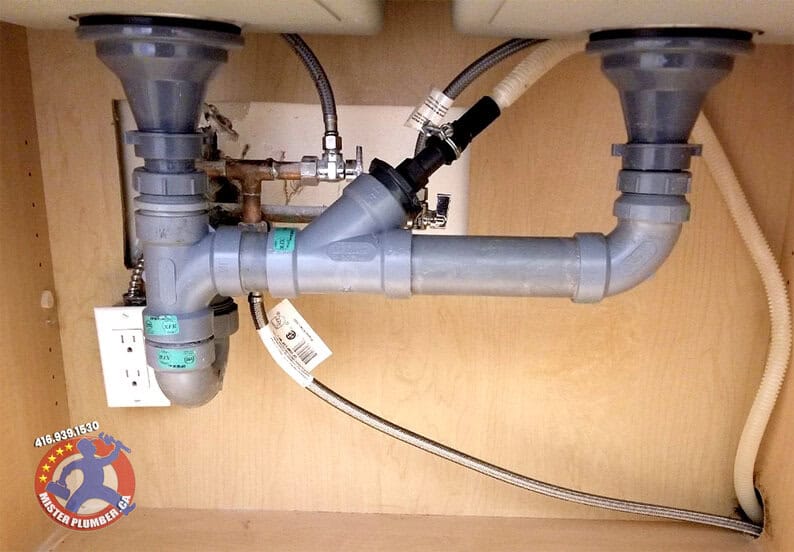
Credit: www.misterplumber.ca
Fix Common Leak Types
Leaks under the kitchen sink often come from a few common sources. Understanding these typical leak types makes fixing them quicker and less stressful. You don’t need to call a plumber every time; many leaks are easy to handle with simple tools and a little patience.
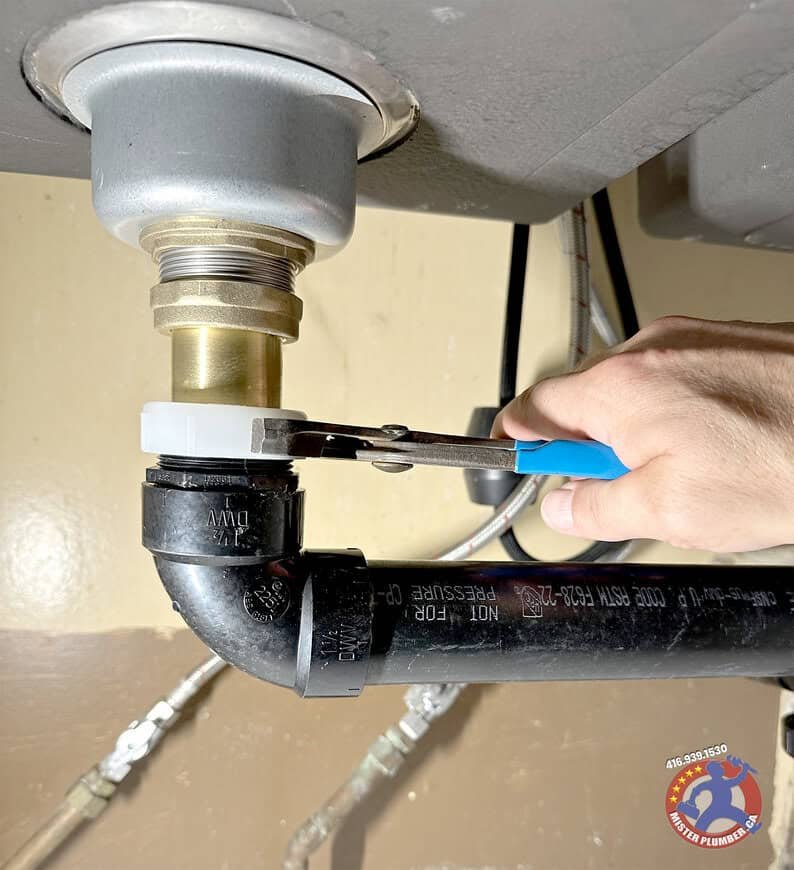
Tighten Loose Connections
Loose connections are a frequent cause of leaks under the sink. Check all the nuts and fittings where pipes meet, especially around the drain trap and supply lines.
Use a wrench or pliers to gently tighten these connections. Be careful not to overtighten, as this can damage the fittings or cause cracks.
Have you ever noticed a tiny drip that stops as soon as you give the pipe a slight turn? That’s a loose connection waiting to be tightened.
Replace Damaged Washers Or Gaskets
Worn-out washers or gaskets can cause water to seep from joints. These small rubber or silicone parts create a tight seal but wear down over time.
Turn off the water supply, disassemble the leaking joint, and inspect the washers or gaskets for cracks or flattening. Replace them with new ones from any hardware store.
This simple swap often stops leaks immediately and saves you from bigger repairs later. Have you checked these parts before calling for help?
Seal Pipe Joints With Plumber’s Tape
Plumber’s tape (also known as Teflon tape) is a handy tool for sealing threaded pipe joints. It fills tiny gaps that water can sneak through.
Wrap the tape clockwise around the male threads of the pipe, then screw the joint back together tightly. The tape creates a waterproof barrier that prevents leaks.
Many people overlook this step, but adding plumber’s tape can make a big difference. Could a simple tape wrap be the fix your kitchen sink needs?
Test For Leaks After Repair
After fixing a leak under your kitchen sink, testing for leaks is crucial to ensure your repair holds up. Skipping this step can lead to water damage and costly repairs later on. Taking a few extra minutes now saves you from future headaches.
Turn Water Back On
Start by slowly turning the water supply back on. Avoid opening it all at once to prevent sudden pressure that might disrupt your repair. Listen carefully for any unusual sounds, like hissing or dripping, which could signal a problem.
Once the water is flowing, check the repaired area closely. Are there any signs of moisture or wet spots forming? Even a tiny drip can mean the fix isn’t complete, so don’t rush this part.
Monitor For Drips
Next, grab a dry cloth or paper towel and gently wipe around the repair site. This helps you spot fresh leaks faster. Place a dry container or towel underneath the pipes to catch any drips that might appear unnoticed.
Keep an eye on the area for at least 10–15 minutes, running the faucet and turning the water on and off a few times. If you see water pooling or feel dampness, you’ll know the repair needs tightening or resealing.
Have you ever thought about how often leaks go unnoticed simply because people don’t watch carefully after a repair? Taking this extra step can protect your kitchen and your wallet. What’s your experience with testing repairs—do you trust your initial fix or always double-check?
Prevent Future Leaks
Preventing leaks under your kitchen sink is just as important as fixing them. Small drips can turn into costly repairs and damage your cabinets or flooring over time. Staying proactive with simple habits and knowing when to get expert help can save you stress and money.
Regular Maintenance Tips
Check the pipes and connections under your sink every few months. Look for signs of moisture, rust, or loose fittings. Tighten any loose nuts gently with a wrench, but avoid over-tightening, which can cause damage.
Clean the drain and trap regularly to prevent clogs that increase pressure on pipes. Avoid pouring grease or thick substances down the drain, as they build up and cause blockages. Use a drain strainer to catch food particles and clean it often.
Consider applying plumber’s tape to threaded connections when you notice minor leaks starting. This tape creates a better seal and helps keep water from sneaking through. Don’t forget to inspect the water supply lines for cracks or bulges — replacing these early can prevent sudden bursts.
When To Call A Professional
If you’ve tightened connections and cleaned drains but still see leaks, it’s time to get expert help. Persistent leaks might mean hidden damage or corroded pipes that need special tools and experience to fix.
Also, if you notice water pooling under the cabinet or walls feeling damp, don’t wait. These signs can indicate serious problems like pipe bursts or mold growth. A plumber can perform a thorough inspection and recommend lasting solutions.
Ask yourself: Are you confident in handling plumbing issues beyond simple fixes? Sometimes, calling a professional early prevents bigger headaches later. Your kitchen’s safety and your peace of mind are worth it.

Credit: www.reddit.com
Frequently Asked Questions
How Do I Identify A Leak Under The Kitchen Sink?
Check for water stains, puddles, or dampness under the sink. Inspect pipes, connections, and the drain for visible drips or corrosion. Smell for mold or mildew, which indicates hidden leaks. Early detection prevents water damage and costly repairs.
What Tools Are Needed To Fix A Kitchen Sink Leak?
You need a wrench, plumber’s tape, bucket, and replacement washers or pipes. A flashlight helps inspect dark areas. These basic tools allow you to tighten connections, replace faulty parts, and stop leaks effectively.
Can I Fix A Leak Under The Sink Myself?
Yes, most minor leaks can be fixed by homeowners. Turn off the water supply first. Tighten loose connections or replace worn washers. For complex leaks, consult a professional plumber to avoid further damage.
How Long Does It Take To Fix A Sink Leak?
Simple leaks can be fixed within 15 to 30 minutes. Replacing pipes or seals might take up to an hour. Time depends on leak severity and your plumbing skill level.
Conclusion
Fixing a leak under your kitchen sink saves water and money. Start by turning off the water supply. Check all pipes and connections carefully. Tighten loose parts or replace damaged ones. Clean any debris blocking the pipes. Test the area after repairs to ensure no leaks remain.
Small leaks can cause big problems if ignored. Taking quick action helps keep your kitchen safe and dry. Remember, regular checks prevent future leaks and costly repairs. Simple steps make a big difference in maintaining your sink.