Are you tired of dealing with lingering cooking odors in your kitchen? Or perhaps you’re looking to upgrade your kitchen’s ventilation system for better air quality and safety?
Installing a range hood vent through your ceiling could be the perfect solution. This task might sound daunting, but with the right guidance, you can tackle it like a pro. Imagine cooking in a kitchen where the air is always fresh, free from smoke and strong smells.
You deserve that kind of comfort and efficiency in your home. In this guide, you’ll discover step-by-step instructions to make this installation process simple and straightforward. Stick with us, and you’ll soon transform your kitchen into a space where you and your family can enjoy every meal without the hassle of unwanted odors. Let’s get started on creating the kitchen atmosphere you’ve always dreamed of!
Preparation And Planning
Installing a range hood vent through the ceiling requires careful preparation and planning. Proper planning ensures efficient installation and avoids future problems. Knowing the correct tools and materials is crucial. Safety precautions protect you during the process. Detailed preparation saves time and effort. Let’s dive into the essentials.
Tools And Materials Needed
Gather necessary tools before starting. You need a screwdriver, drill, and measuring tape. A pencil helps mark positions. Use a stud finder to locate beams. Get a jigsaw or saw for cutting. Purchase the vent kit and ductwork. Ensure all materials match your range hood model.
Safety Precautions
Safety is key during installation. Wear goggles to protect your eyes. Use gloves to prevent cuts. Ensure the ladder is stable before climbing. Turn off electricity when handling wires. Keep the workspace clean to avoid tripping. Follow manufacturer’s guidelines strictly.
Choosing The Right Range Hood
Choosing the right range hood is a crucial step in your kitchen upgrade. It ensures efficient ventilation and enhances your cooking experience. With various types and sizes available, finding the perfect fit might seem challenging. Let’s break down the essentials to make your decision easier.
Types Of Range Hoods
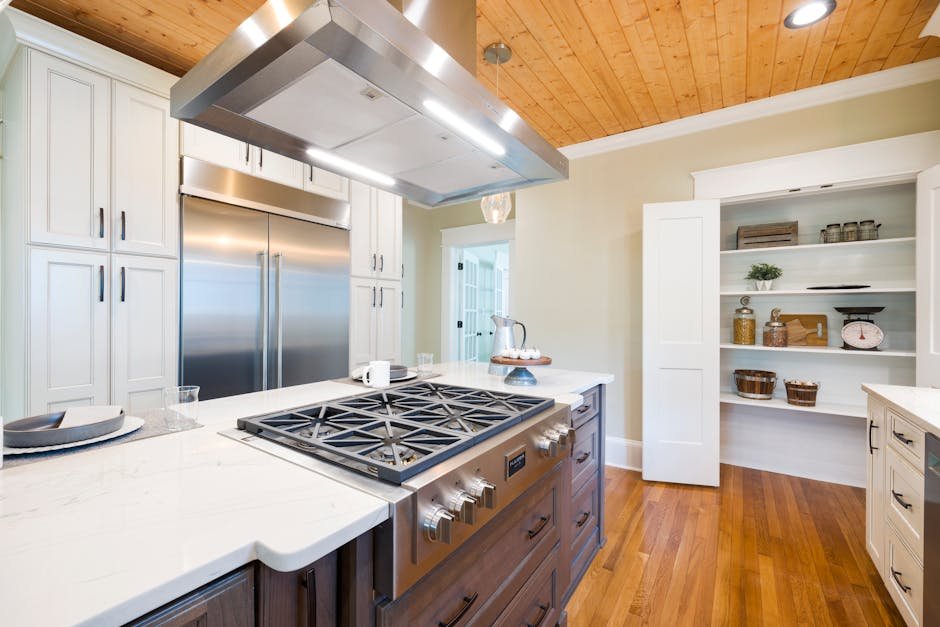
Range hoods come in several styles. Wall-mounted hoods attach directly to the wall above your stove. They are popular in many kitchens. Under-cabinet hoods fit beneath overhead cabinets. They save space and offer a sleek look. Island hoods hang from the ceiling over a kitchen island. They are stylish and functional. Each type serves a unique purpose. Match the style to your kitchen layout for best results.
Size And Capacity Considerations
Size matters when selecting a range hood. Measure your cooktop’s width. Your hood should be at least as wide as your cooktop. Some prefer a slightly larger hood for better coverage. Capacity is equally important. A hood’s power is measured in cubic feet per minute (CFM). For effective ventilation, consider your kitchen size and cooking style. More frequent cooking requires higher CFM. Proper size and capacity ensure efficient performance.
Locating The Vent Position
Identifying the vent position is crucial when installing a range hood through the ceiling. Measure carefully to ensure alignment with existing kitchen fixtures. Precise placement guarantees efficient ventilation and seamless integration.
Locating the vent position is a crucial step in installing a range hood vent through the ceiling. This step ensures that your kitchen remains free from smoke and odors. Proper placement enhances the efficiency of your range hood. Follow these easy steps to find the perfect spot for your vent.Measuring And Marking
Begin by measuring the distance from the range hood to the ceiling. Use a measuring tape for accuracy. Mark this point on the ceiling with a pencil. Ensure the mark aligns with the center of the range hood. This helps in maintaining symmetry. Next, confirm the diameter of the vent pipe. Use this measurement to draw a circle on the ceiling. The circle should match the vent pipe’s size. Double-check your markings for precision. This avoids errors during installation.Checking For Obstructions
Check for any potential obstructions in the ceiling. Use a stud finder to locate ceiling joists. Avoid placing the vent near these joists. This prevents structural issues. Look for electrical wires and plumbing pipes. Use a flashlight to inspect the ceiling cavity. Ensure the vent path is clear of these elements. Rerouting may be necessary if obstructions exist. This ensures a safe and efficient installation. By carefully measuring and checking for obstructions, you’ll avoid common pitfalls. Your range hood will function optimally, keeping your kitchen fresh.Cutting The Ceiling
Cutting the ceiling is a crucial step in vent installation. Accuracy and precision are vital here. A well-cut ceiling allows smooth vent placement. Avoid mistakes to prevent damage.
Creating The Cutout
Start by marking the spot for the vent. Use a pencil to outline the area. Ensure the cutout matches the vent dimensions. Double-check measurements for accuracy.
Use a drywall saw for cutting. Follow the pencil lines carefully. Cut slowly to avoid jagged edges. Keep the saw steady for a clean cut.
Handling Ceiling Debris
Ceiling debris can be messy. Place a tarp underneath the working area. This catches falling debris. Wear safety goggles for eye protection.
Use a vacuum to clean up debris. This keeps the space tidy. Dispose of debris responsibly. Check for any remaining dust or fragments.
Ensure the area is clear before proceeding. A clean space helps in further installation steps. It also prevents hazards later on.
Installing The Range Hood
Installing a range hood can be a rewarding DIY project, transforming your kitchen into a more functional and stylish space. As someone who once wrestled with bulky instructions and endless YouTube videos, I discovered that breaking down the process into manageable steps made all the difference. Let’s dive into how you can install your range hood through the ceiling efficiently and effectively.
Securing The Hood
Start by ensuring you have all the necessary tools and materials. A drill, screws, and a measuring tape are crucial.
Measure twice and drill once. Position the hood carefully over your cooktop, allowing for optimal suction and airflow.
Use the screws to secure the hood to the ceiling bracket, ensuring it’s stable and not wobbling. Tighten the screws properly but avoid over-tightening which can damage the unit.
Do you feel the hood is securely in place? A little shake test can assure you of its stability.
Connecting Electrical Wiring
Now, it’s time to handle the electrical connections. Always prioritize safety and switch off the power at the main circuit breaker.
Locate the wiring compartment on the hood. Connect the wires according to the color codes: black to black, white to white, and green or bare wire to the ground.
Use wire nuts to secure each connection, ensuring they are snug and won’t come loose.
Have you ensured there are no exposed wires? Double-check to prevent any electrical mishaps.
Once connected, turn the power back on and test the hood. A gentle hum will confirm successful installation.
Installing a range hood doesn’t need to be daunting. With patience and precision, you can transform your kitchen effortlessly. What insights will you discover on your installation journey?
Vent Duct Installation
Installing a range hood vent through the ceiling requires careful planning. The vent duct installation is a critical step. It ensures proper airflow and efficient functioning. Choosing the right duct type and connecting ductwork are essential. This process improves your kitchen’s ventilation system.
Choosing Duct Type
The choice of duct type is crucial. It affects the efficiency of your range hood. Round ducts are often recommended. They offer better airflow and less resistance. Galvanized steel is a popular material. It is durable and resistant to corrosion. Flexible ducts are easier to install. But they may not last as long. Consider your kitchen’s layout. Choose a duct type that fits well and performs efficiently.
Connecting Ductwork
Once you’ve chosen the duct type, connecting ductwork is next. Start by measuring the required length. Cut the duct to fit the space precisely. Secure the duct to the hood with clamps. Ensure no gaps between connections. Use foil tape to seal joints. This prevents air leaks and enhances efficiency. Check for obstructions. Ensure the path is clear for smooth airflow.
Final Adjustments
Make sure to check the vent’s alignment with the ceiling before tightening screws. Adjust the duct connections for a snug fit. Secure all parts firmly to avoid vibrations during use.
Installing a range hood vent through the ceiling is a task that demands precision and attention to detail. But once the main installation steps are completed, it’s time for the final adjustments. These tweaks ensure everything runs smoothly and your kitchen remains a pleasant environment. Whether it’s testing the range hood or ensuring proper ventilation, these last steps are crucial to guarantee your hard work pays off.Testing The Range Hood
Testing your range hood is essential. Turn it on and listen for any unusual sounds. A quiet operation indicates a successful installation. Check the fan speed settings to ensure they are functioning properly. Adjust if necessary. Ask yourself: Are all the lights working? Inspect the lighting to verify each bulb illuminates correctly. If any bulb seems off, replace it to maintain a bright cooking space.Ensuring Proper Ventilation
Proper ventilation is key to keeping your kitchen air fresh. Stand near the range hood and notice the airflow. Does it effectively remove smoke and steam? Adjust the vent settings to optimize air circulation. Consider using a tissue test. Hold a tissue near the hood and observe if it’s pulled upwards. This simple test confirms strong suction power and effective ventilation. Don’t forget to check for any air leaks. Feel around the vent connection for escaping air. Seal any gaps with duct tape or caulk to prevent loss of efficiency. These final adjustments not only enhance the functionality of your range hood but also contribute to a healthier kitchen atmosphere. Have you ensured everything is perfect? Taking the time now can save you from potential issues later.Maintenance Tips
Once you’ve installed your range hood vent through the ceiling, keeping it well-maintained is crucial for its performance and longevity. Neglecting maintenance can lead to inefficient operation and unpleasant odors in your kitchen. Regular upkeep ensures that your vent works effectively and keeps your cooking area fresh. Let’s dive into some practical tips to help you maintain your range hood vent.
Regular Cleaning
Cleaning your range hood vent regularly is essential. Grease and grime can accumulate quickly, making it less effective. You don’t want your kitchen to smell like last night’s dinner. A clean vent also helps in preventing potential fire hazards.
Set a routine to clean the filters and the hood’s surface. Use warm soapy water for washable filters. If they’re non-washable, replace them according to the manufacturer’s guidelines. A clean vent ensures optimal airflow and keeps your kitchen smelling fresh.
Checking For Blockages
Imagine cooking a feast, only to realize your vent isn’t doing its job because it’s blocked. Regularly checking for blockages can save you from such frustrations. Inspect the ductwork for any obstructions or buildup that could hinder airflow.
Look out for any foreign objects or excessive grease buildup. These can reduce the efficiency of your vent. An unobstructed vent not only performs better but also saves energy and keeps your kitchen environment comfortable.
Have you ever had to deal with a malfunctioning kitchen appliance because of poor maintenance? Share your experience and how you resolved it in the comments. Keeping your range hood vent in top shape might prevent such headaches in the future.
Frequently Asked Questions
Can You Vent A Range Hood Into The Ceiling?
Yes, you can vent a range hood into the ceiling. Ensure it connects to an external vent system. This prevents grease, smoke, and odors from circulating indoors. Proper installation is crucial for safety and efficiency. Always follow manufacturer guidelines and local building codes.
Do Range Hoods Have To Be Vented Outside?
Range hoods can be vented outside or recirculated indoors. Venting outside removes smoke and odors more effectively. Recirculating hoods use filters to clean the air but may be less efficient. Consider kitchen layout and preferences when choosing.
Do Ceiling Range Hoods Work?
Ceiling range hoods effectively remove smoke, odors, and grease from kitchens. They offer a sleek design and save space. Performance depends on model and installation. Proper ventilation ensures efficiency in maintaining air quality. Choose a hood with suitable power for your kitchen size to maximize effectiveness.
How Much Does It Cost To Vent A Range Hood Through The Roof?
Venting a range hood through the roof typically costs $300 to $700. Prices vary based on materials and labor. Consider factors like roof type and distance from the vent. Proper installation ensures safety and efficiency, so hiring a professional is recommended.
Always get quotes from several contractors for the best deal.
Conclusion
Installing a range hood vent through the ceiling is doable. Follow each step with care. Safety is key. Secure all tools and materials beforehand. Measure twice, cut once. Use proper protective gear. Ensure the vent path is clear. Check the connections tightly.
A well-installed vent improves kitchen air quality. It also enhances your cooking experience. You can enjoy fresher air now. Clean the range hood regularly. This keeps it efficient. Don’t hesitate to seek help if needed. Your kitchen will thank you for this upgrade.
Happy cooking!
