Have you ever stood in your kitchen, wishing you could magically whisk away all the smoke and lingering odors from your latest culinary creation? The answer to your problem might be simpler than you think.
Installing a range hood vent through the wall can transform your cooking space into a fresh and inviting area. But how do you get started with such a project? You’re about to discover the steps to install a range hood vent through the wall, a task that might seem daunting at first.
Whether you’re a seasoned DIY enthusiast or just someone who loves a good home improvement project, this guide is tailored for you. Imagine having a kitchen where the air is always clean and comfortable, where you can cook with ease and breathe freely. By following these straightforward instructions, you will not only upgrade your kitchen’s functionality but also enhance its overall ambiance. Keep reading, and unlock the secrets to a fresh, fragrant kitchen with a range hood vent that works wonders. Let’s dive into the details and make your kitchen the heart of your home once again.

Credit: www.homedepot.com
Choosing The Right Range Hood
Installing a range hood vent through the wall involves choosing a suitable location and ensuring proper alignment. Cut a hole in the wall for the vent, attach ductwork securely, and seal any gaps to ensure efficient airflow. This setup helps keep your kitchen air clean and fresh.
Choosing the right range hood for your kitchen is crucial. It ensures effective ventilation and enhances your cooking environment. But how do you choose the best one for your needs?Types Of Range Hoods
There are several types of range hoods available, each with its own benefits. Wall-mounted hoods attach directly to the wall above your stove and are perfect if you have open wall space. If your stove is located under cabinetry, under-cabinet hoods are a great fit as they blend seamlessly with your kitchen design. Island hoods are ideal for stoves located on kitchen islands, while downdraft hoods are less common but suitable for those who prefer a minimalist look. Which type aligns with your kitchen layout?Size And Capacity Considerations
Choosing the right size is more than just measurements. The hood should be as wide as your cooktop or slightly wider for optimal performance. If your cooktop is 30 inches wide, aim for a 30-inch or 36-inch hood. Capacity is another key factor. Range hood power is measured in cubic feet per minute (CFM). For a gas stove, you’ll need a hood with at least 100 CFM for every 10,000 BTUs of burner output. For electric stoves, a simple rule is 1 CFM per 100 BTUs. Do you cook a lot or have a large kitchen? You might need a higher CFM to keep your space fresh and smoke-free. Consider your cooking habits and kitchen layout carefully. The right choice will enhance both functionality and aesthetics in your kitchen.Preparing For Installation
Preparing for the installation of a range hood vent is crucial. A successful installation depends on careful planning and preparation. This step ensures safety and efficiency. Here, we cover the essentials to get you ready.
Gathering Necessary Tools
Begin by assembling all required tools. You’ll need a power drill, a jigsaw, measuring tape, and a screwdriver. Don’t forget a level and a pencil for accurate markings. Having these tools ready saves time and frustration.
Safety Precautions
Safety is paramount during any installation. Wear safety goggles to protect your eyes. Use gloves to prevent cuts from sharp tools. Ensure your workspace is clean and free from obstacles. Double-check your ladder for stability. Prioritize safety to avoid accidents.
Locating The Vent Hole
Start by marking the wall where the vent will go. Ensure it’s free from obstructions. Measure carefully to align with the range hood’s ductwork.
Locating the vent hole is a crucial step when installing a range hood vent through the wall. This process ensures that your kitchen is free from smoke, odors, and excess heat. A well-placed vent can significantly improve air circulation, making your cooking experience more enjoyable. Let’s dive into how you can determine the best location for your vent hole.Determining The Vent Path
Before you grab any tools, consider the path your vent will take. The vent path is essentially the route from your range hood to the outside of your home. Start by examining the layout of your kitchen and adjoining rooms. Identify any obstacles like pipes, wires, or studs that could interfere with the vent path. You want a path that is as straight and short as possible to ensure efficient airflow. Next, think about the exterior of your home. The vent should ideally exit in a discreet location that is easily accessible for future maintenance. You don’t want it too close to windows or doors, as this could allow smoke to drift back inside.Marking The Wall
Once you have determined the vent path, it’s time to mark the wall for cutting. This step requires precision, so take your time. First, measure the dimensions of your vent duct. Use these measurements to mark the exact spot on the interior wall where you will cut the vent hole. A pencil or chalk works well for this. It’s a good idea to drill a small pilot hole through the center of your marked area. This helps verify the location on both sides of the wall. Remember, double-checking your marks can save you from making unnecessary holes in your walls. Have you ever drilled a hole only to find it’s in the wrong spot? It’s a mistake you definitely want to avoid here. By carefully planning and marking your vent location, you ensure a smoother installation process. This attention to detail pays off with a functional and efficient venting system.Cutting The Vent Hole
Installing a range hood vent through your wall can seem like a daunting task, but cutting the vent hole is where the magic begins. This step requires precision, patience, and the right tools. Getting it right means your range hood will work effectively, pulling out smoke and odors, and keeping your kitchen fresh. Let’s dive into the essentials of cutting a vent hole.
Tools For Cutting
Having the right tools is crucial for a clean and accurate cut. You’ll need a drillwith a masonry bit to start the hole, especially if your wall is made of brick or stone. A reciprocating sawor a jigsawwith a blade suitable for the wall material will help you cut through with ease.
Don’t forget your measuring tapefor precise dimensions and a levelto ensure your markings are straight. Safety glasses and gloves are also essential to protect yourself from debris.
Cutting Techniques
Start by measuring the area where you want to cut the hole. Mark it clearly using a pencil or chalk. Double-check your measurements; you don’t want to cut an incorrect size.
Once marked, drill a pilot hole in each corner of the marked area. This will guide your saw and prevent the wall from cracking. Use your saw to cut from one pilot hole to the next, following the outline.
Cut with steady hands. If you rush, you risk an uneven cut. Consider your wall material; brick requires patience, while drywall cuts more easily. Remember, a clean cut means easier vent installation.
Have you ever cut a hole in your wall before? Share your experiences. Did you find it easier or harder than expected?
Cutting a vent hole is a crucial step in installing a range hood. Equip yourself with the right tools and techniques, and you’ll be well on your way to a successful installation. The right approach will save you time and effort, and ensure your kitchen is ventilated efficiently.
Installing The Range Hood
Installing a range hood enhances kitchen ventilation. It removes smoke and odors effectively. This task can be straightforward with the right tools. Follow these steps for a successful installation.
Mounting The Hood
Begin by marking the position on the wall. Use a pencil for accuracy. Ensure the marks align with the wall studs. This provides strong support for the hood.
Next, drill pilot holes into the marked spots. These guide the screws into place. Use a level to keep the hood straight. Securely fasten the hood with screws. Tighten them properly for stability.
Securing The Vent
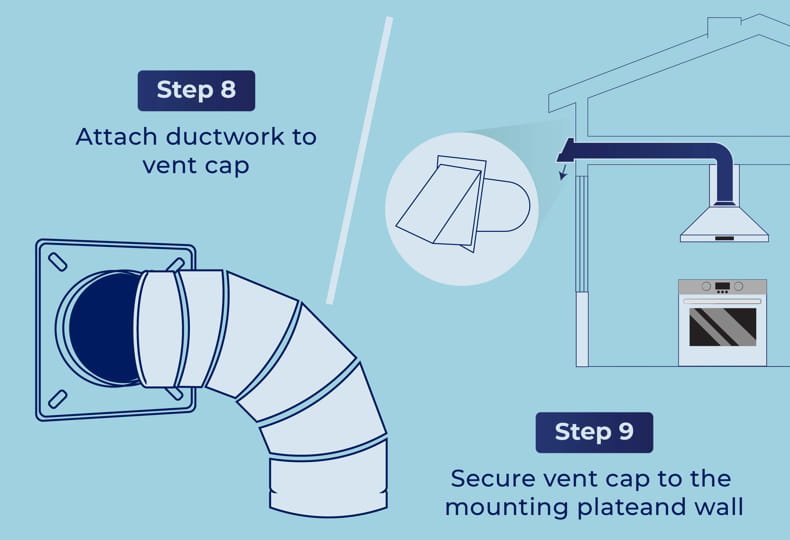
Attach the vent pipe to the hood. Ensure a snug fit to prevent leaks. Run the pipe through the wall opening. Double-check alignment for a smooth flow.
Seal the edges around the vent pipe. Use high-quality caulk for a tight seal. This prevents unwanted drafts and moisture. Finally, attach the vent cap outside. This completes the venting process.

Credit: prolinerangehoods.com
Connecting Electrical Components
Installing a range hood vent through the wall involves connecting electrical components carefully. Begin by securing the vent, ensuring proper alignment. Then, connect wiring according to the manufacturer’s instructions, ensuring safety and functionality.
Connecting electrical components is a crucial part of installing a range hood vent through the wall. It’s where functionality meets safety. You want your range hood to work effectively without any electrical mishaps. Let’s break down the process so you can get it right the first time.Wiring Basics
Before you start, ensure that the power is off. Use a voltage tester to double-check. Safety first, always! Identify the wires in your range hood and wall. Typically, you’ll have a black (hot), white (neutral), and green (ground) wire. Match these with the corresponding wires from your home’s electrical system. Use wire connectors to securely join the wires. Twist them firmly, and cover them with electrical tape for added safety. Have you ever had wires come loose? It’s a risk you don’t want to take.Testing The Connections
Once everything is connected, turn the power back on. This is the moment of truth. Try turning on the range hood. Does it light up or start venting? If yes, then you’re on the right track. If nothing happens, check your connections. Could a wire be loose or improperly connected? Sometimes, it’s just a simple fix. By carefully connecting and testing the electrical components, you ensure your range hood vent works efficiently and safely. Have any tips from your own installation experience? Share them in the comments!Ensuring Proper Ventilation
Installing a range hood vent through a wall ensures fresh air in your kitchen. Start by measuring the area for the vent. Next, cut a hole in the wall, then securely attach the vent hood. Make sure the vent is properly aligned for optimal airflow.
Ensuring proper ventilation is crucial when installing a range hood vent through a wall. It guarantees that kitchen fumes, smoke, and odors are effectively expelled outside, keeping your indoor air fresh and healthy. Many homeowners underestimate the importance of this step, leading to inefficient kitchen ventilation systems that don’t serve their purpose well. Trust me; you want to avoid that mistake.Checking Airflow
Before you start, check the airflow direction of your range hood. A surprising number of people skip this, leading to poor performance. Hold a piece of tissue near the vent to see if it pulls in or pushes away air. If your range hood isn’t drawing air properly, it might be blocked or wrongly installed. Ensure there are no obstructions in the ductwork. Also, make sure the hood is mounted at the correct height. Think about whether your kitchen might need more ventilation. Does it ever feel stuffy or smell strongly of last night’s dinner? If so, you may need to adjust your setup.Adjusting Vent Settings
Once you’ve confirmed your airflow is optimal, focus on the vent settings. Most range hoods come with adjustable speed settings for different cooking needs. Set a higher speed when you’re frying or cooking dishes with strong odors. Lower settings work fine for simple tasks like boiling water. Don’t forget to adjust the direction of the vent flap. It should always open outward, allowing smoke to escape easily while preventing backflow. Remember, the small details matter. Properly adjusted settings make a significant difference in the effectiveness of your range hood. Are you giving enough attention to these settings, or just assuming they’re fine as is? Incorporate these checks into your installation process to ensure your range hood works as intended. Breathing easier in your kitchen is worth the extra effort.
Credit: hauslane.com
Maintenance Tips
Learn how to install a range hood vent through a wall with these simple maintenance tips. Begin by measuring the vent location. Drill a hole for the vent cap. Secure the vent with screws. Seal edges to prevent leaks. Follow these steps for a successful installation.
Installing a range hood vent through the wall is a rewarding DIY project. But once your vent is up and running, keeping it in tip-top shape is essential for its longevity and efficiency. With a few practical maintenance tips, you can ensure your range hood stays clean and functional. Dive into these straightforward practices to make the most of your investment.Cleaning The Range Hood
Grease and grime can build up quickly on your range hood. Regular cleaning is key to maintaining its performance. Start by wiping down the exterior with a damp cloth and mild detergent. For the filters, soak them in hot, soapy water and scrub gently to remove residue. If your hood has a built-in light, check the bulb and clean any dust that may have settled. Have you ever noticed that strange odor in the kitchen, even after cooking? A clean range hood can help with that. It’s a simple task that makes a big difference.Regular Inspections
Conducting regular inspections can save you from unexpected issues. Check the vent for blockages that might hinder airflow. Look at the ductwork to ensure there are no leaks or damages. Also, listen to the motor. Unusual noises could signal that it’s time for a professional check-up. A quiet motor means smooth operation, so keep an ear out. When was the last time you inspected your range hood? Regular checks can help you catch small problems before they turn into big headaches. Don’t wait for the next cooking disaster to realize your hood needs attention. By maintaining a clean and well-inspected range hood, you ensure a healthy and efficient kitchen environment. These simple actions can save you time and money in the long run.Frequently Asked Questions
Can A Range Hood Be Vented Through The Wall?
Yes, a range hood can be vented through the wall. Proper installation ensures efficient smoke and odor removal. Use appropriate ductwork to maintain airflow. Always follow local building codes and manufacturer instructions. Wall venting is a common choice for effective kitchen ventilation.
Do Range Hoods Have To Be Vented Outside?
Range hoods can be vented outside or recirculate air internally. Venting outside removes smoke and odors effectively. Internal recirculation uses filters to trap pollutants. Choose based on kitchen layout and ventilation needs. External venting is preferred for better air quality.
Always consider installation costs and local building codes.
What Is The Code For Range Hood Venting?
The code for range hood venting depends on local building regulations. Generally, it requires exterior venting through a duct. Duct size, material, and length are crucial. Check the International Residential Code (IRC) or consult local authorities for specific requirements. Ensure proper installation for safety and efficiency.
Can I Install A Hood Vent Myself?
Yes, you can install a hood vent yourself if you’re comfortable with DIY projects. Ensure proper measurements and follow safety guidelines. Consult the manufacturer’s instructions for specific installation steps. If unsure, hiring a professional can ensure correct installation and prevent potential issues.
Conclusion
Installing a range hood vent through the wall can be simple. Follow the steps carefully for best results. Measure accurately and use the right tools. Safety is key; always wear protective gear. Check your work to ensure proper ventilation. A well-installed vent improves kitchen air quality.
It also reduces cooking odors and smoke. Don’t rush the process; patience brings success. With the right approach, your kitchen will feel fresher. Enjoy a cleaner, more comfortable cooking space.