If you’ve ever noticed a bad smell or slow drainage under your kitchen sink, the problem might be your P-trap. Installing a P-trap might sound tricky, but with the right steps, you can do it yourself quickly and easily.
In this guide, you’ll learn exactly how to install a P-trap under your kitchen sink without any confusion or hassle. Keep reading, and you’ll save time, avoid costly repairs, and make sure your sink works perfectly every time.
Tools And Materials Needed
Installing a P-trap under your kitchen sink requires specific tools and materials. Having these ready ensures a smooth and quick installation. Using the right items prevents leaks and future plumbing problems.
Gather everything before starting. This helps avoid interruptions and saves time. Below is a list of essential tools and required materials for the job.
Essential Tools
- Adjustable wrench – for tightening nuts and fittings
- Pipe wrench – useful for stubborn pipes
- Slip-joint pliers – helps grip and twist parts easily
- Hacksaw – to cut pipes to the correct length
- Measuring tape – ensures accurate pipe measurements
- Plumber’s tape (Teflon tape) – seals threaded connections
- Bucket – to catch water during removal and installation
- Rag or towel – for cleaning spills and drying parts
Required Materials
- P-trap assembly – includes curved trap and connecting pipes
- Slip nuts and washers – secure connections and prevent leaks
- PVC or metal pipes – depending on your sink’s plumbing
- Pipe dope or sealant – for extra leak protection
- Extension pipe (if needed) – to bridge gaps under the sink
Preparing The Area
Preparing the area under your kitchen sink is essential before installing a P-trap. This step ensures safety and smooth installation. Proper preparation helps avoid leaks and damage later on. Follow simple actions to get ready.
Turn Off Water Supply
Locate the water valves under the sink. Turn them clockwise to shut off the water. Check both hot and cold valves. This prevents water flow during the installation. Open the faucet to drain any remaining water in the pipes.
Clear The Cabinet Space
Remove all items stored under the sink. This creates enough room to work comfortably. Wipe the area clean to remove dust and debris. Clear space helps avoid accidents and keeps tools handy.
Removing The Old P-trap
Removing the old P-trap is the first task before installing a new one. This step ensures no leaks or blockages remain. Proper removal makes the installation easier and cleaner.
Prepare a bucket to catch water that may spill. Wear gloves to protect your hands from dirt and grime. Have a wrench or pliers ready to loosen the fittings.
Loosen Slip Nuts
Locate the slip nuts connecting the P-trap to the sink drain and wall pipe. Use your hands or a wrench to turn these nuts counterclockwise. Loosen them gently to avoid damaging the pipes. Water may drip, so keep the bucket in place.
Detach Old Trap
Once the slip nuts are loose, carefully pull the old P-trap away from the pipes. The trap may have water or debris inside, so tip it over the bucket. Check the drain pipes for any remaining residue or buildup. Clean them before installing the new P-trap.
Measuring And Cutting Pipes
Measuring and cutting pipes accurately is crucial when installing a P-trap under your kitchen sink. If your pipes are too long or too short, the whole setup won’t fit properly, leading to leaks or awkward angles. Getting the measurements right the first time saves you from extra trips to the hardware store and prevents frustration.
Measure Pipe Length
Start by positioning the P-trap components under the sink without tightening them. Use a tape measure to check the distance between the sink drain and the wall drain pipe. Measure along the path where the pipe will run, not in a straight line, since bends matter.
Don’t forget to include the length of connectors and fittings. It’s better to measure twice than cut once. Have you ever cut a pipe only to find it’s too short? That mistake can cost time and money.
Cut Pipes To Fit
Mark the pipe where it needs to be cut using a permanent marker or pencil. Use a pipe cutter or a hacksaw for a clean, straight cut. A rough or angled cut can cause leaks or make it hard to fit the pipe into connectors.
After cutting, check the pipe ends for burrs or sharp edges. Use sandpaper or a deburring tool to smooth them out. This small step ensures a tight seal and prevents damage to washers or gaskets.
Do you have the right tools ready? Investing in a good pipe cutter pays off with cleaner cuts and less effort. Trying to force a pipe to fit after a bad cut never ends well.
Assembling The New P-trap
Assembling the new P-trap is a simple task that ensures proper drainage and prevents sewer gases from entering your kitchen. It involves fitting the trap bend and connecting the trap arm to the drain pipe. The process requires a few basic tools and some attention to detail to achieve a leak-free seal.
Follow these steps carefully to complete the assembly efficiently and securely.
Attach Trap Bend
The trap bend is the curved part that holds water to block sewer gases. Begin by sliding a slip nut and washer onto the tailpiece coming from the sink drain.
Push the trap bend up to the tailpiece, aligning the washers for a tight seal. Hand-tighten the slip nut to hold the trap bend in place. Avoid overtightening, which can crack the fittings.
Ensure the trap bend is positioned so it can connect easily to the trap arm later. The curve should face downward to hold water properly.
Connect Trap Arm
The trap arm connects the trap bend to the wall drain pipe. Slide a slip nut and washer onto the trap arm before fitting it into the trap bend.
Insert the trap arm into the open end of the trap bend, making sure the washers are seated correctly. Align the trap arm with the drain pipe in the wall.
Hand-tighten the slip nut on the trap bend and the one on the wall pipe. Check the alignment and adjust if needed for a smooth connection.
Tighten all slip nuts firmly but carefully. Run water to test for leaks at all joints and tighten further if necessary.

Credit: www.youtube.com
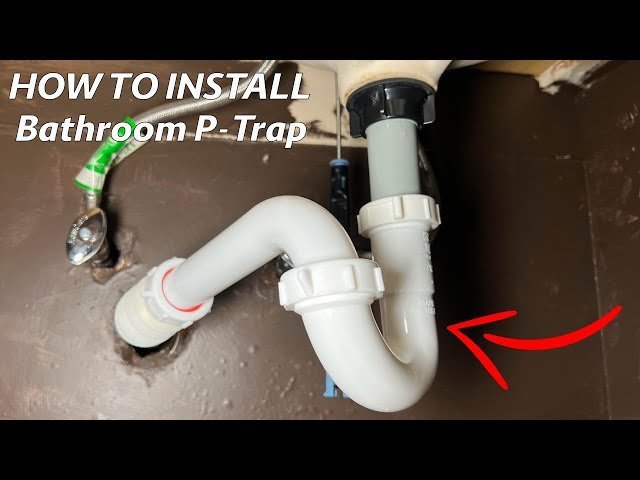
Installing The P-trap
Installing the P-Trap under your kitchen sink is essential to prevent sewer gases from entering your home. It also helps the water drain smoothly. The process involves carefully aligning the pipes and securing them tightly. Follow these simple steps to ensure a proper fit and avoid leaks.
Align And Connect Pipes
Start by positioning the P-Trap below the sink drain and the wall pipe. Make sure both pipes line up straight. Adjust the trap arm and the curved trap section to fit perfectly. The trap should have no gaps or forced bends. Push the pipes together gently to form a snug connection. Check that the P-Trap sits level and supports the drain flow correctly.
Tighten Slip Nuts
Slip nuts hold the pipes securely in place. Slide a slip nut onto each pipe section before connecting them. Once the pipes are aligned, screw the slip nuts onto the threaded ends by hand. Tighten the nuts firmly but avoid over-tightening. Use a wrench if needed, but be careful not to crack the pipes. Test the connections by running water and watching for leaks. Adjust nuts if any drips appear.
Testing For Leaks
Testing for leaks is a key step after installing the P-trap under your kitchen sink. It ensures the connections are tight and water flows properly without causing damage. Catching leaks early prevents water damage and costly repairs later.
Take your time during this phase. Watch closely for any signs of drips or moisture. Small leaks can be hard to spot but can cause problems over time.
Run Water
Turn on the faucet slowly. Let water flow through the drain and P-trap. Run water for at least one minute.
Observe the pipes carefully during this time. Look for any dripping or pooling water. Also, check if water flows smoothly without backing up.
Check Connections
Inspect every joint and connection point on the P-trap. Feel around the slip nuts and washers for dampness. Tighten any loose nuts by hand or with a wrench.
Use a dry cloth to wipe the pipes. This helps spot fresh leaks quickly. Repeat running water and checking until no leaks appear.

Credit: www.familyhandyman.com
Tips For Maintenance
Proper maintenance of the P-trap under your kitchen sink ensures smooth drainage and prevents leaks. Regular care helps avoid plumbing problems and extends the life of your pipes. Simple habits and checks can keep your P-trap working efficiently.
Regular Cleaning
Remove the P-trap carefully to clean it at least twice a year. Use a bucket to catch any water before loosening the connections. Clear out any debris or buildup inside the trap with a brush or cloth. Rinse the P-trap with warm water to remove grease and dirt. Reinstall it tightly to avoid leaks.
Preventing Clogs
Avoid pouring grease, coffee grounds, or food scraps down the drain. Use a sink strainer to catch solid particles before they enter the pipes. Flush the drain with hot water weekly to keep oils from hardening inside. Baking soda and vinegar can help break down minor blockages naturally. Regular checks prevent major clogs and costly repairs.

Credit: www.facebook.com
Frequently Asked Questions
What Tools Are Needed To Install A P-trap?
You need a pipe wrench, plumber’s tape, a hacksaw, and a bucket. These tools help fit and secure the P-Trap properly under your sink.
How Do I Prevent Leaks When Installing A P-trap?
Ensure all connections are tight and use plumber’s tape on threads. Check the fittings carefully and test by running water to spot leaks early.
Can I Install A P-trap Myself Easily?
Yes, installation is straightforward with basic plumbing knowledge. Follow step-by-step instructions, measure correctly, and tighten all connections for a secure fit.
How Do I Measure For The Right P-trap Size?
Measure the distance from the sink drain to the wall pipe. Select a P-Trap that fits these measurements to avoid installation issues.
Conclusion
Installing a P-trap under your kitchen sink is simple and useful. It stops bad smells and keeps water flowing right. Follow the steps carefully and check for leaks. Use the right tools and parts to fit everything well. Fixing your P-trap yourself saves time and money.
You will feel proud after doing this job. Keep your kitchen sink working smoothly and clean. Try it today and enjoy the benefits.

Hi, I’m Daniel Harper, a senior editor here at KitchenBucks.com. For over 10 years, I’ve been exploring kitchen gadgets and appliances to help people find tools that truly add value without breaking the bank. I love simplifying product choices so you can focus more on cooking and less on worrying about what to buy. When I’m not reviewing the latest gadgets, you’ll usually find me experimenting with coffee brewing or firing up the grill for a weekend barbecue.