Are you struggling with venting your kitchen sink, especially when it’s located right under a window? You’re not alone.
Venting a sink in this spot can feel tricky, but it’s crucial for keeping your plumbing running smoothly and preventing unpleasant odors or slow drainage. You’ll discover simple, step-by-step solutions to tackle this common problem. By the end, you’ll have the confidence and know-how to vent your kitchen sink properly—even under that tricky window.
Keep reading to learn how to protect your home and make your kitchen work just the way it should.
Why Venting Matters
Venting a kitchen sink is often overlooked, but it plays a key role in your plumbing system. Proper venting lets air flow into the pipes, which helps water drain smoothly. Without good venting, drains can become slow or noisy. It also stops bad smells from coming back into your kitchen. Venting under a window adds some challenges, but it is still important to get it right.
Role Of Kitchen Sink Vents
Kitchen sink vents allow air to enter the drain system. This air helps balance pressure inside the pipes. Balanced pressure means water flows easily without backing up. Vents also prevent water traps from being sucked dry. Water traps keep sewer gases from entering your home. Without vents, these gases can cause unpleasant odors and health risks. Good venting keeps your kitchen safe and your plumbing working well.
Common Venting Issues
Poor venting leads to many problems in the kitchen sink. Slow draining is one of the most common issues. You might hear gurgling sounds or notice water draining in bursts. These signs show air is not flowing properly. Blocked or missing vents cause traps to lose water. This lets sewer gases escape into your kitchen. Another issue is water backup, which can cause leaks or damage. Proper venting fixes these problems and protects your home.
Challenges With Window Placement
Placing a kitchen sink under a window adds natural light and charm. Yet, venting the sink in this spot creates unique challenges. The window’s position can limit pipe routes and vent placement options. These restrictions require careful planning to maintain proper airflow and prevent plumbing issues.
Venting Restrictions Near Windows
Window frames and sills reduce wall space for vent pipes. Vents cannot pass through or too close to windows. This limits direct venting options, requiring alternate vent routes.
Outdoor vent terminals must be far enough from windows. This avoids smells or gases entering the home. Local rules often set minimum distances between vents and windows.
Sometimes, vent pipes must extend above the roof or to side walls. These longer paths increase installation work and cost.
Building Code Considerations
Building codes set rules to keep venting safe and effective. Codes regulate vent pipe size, height, and location. They also require vents to avoid windows and openings.
Codes often mandate vent pipe clearance from windows. This prevents air pollution or water leaks.
Inspectors check vent placement closely near windows. Non-compliance can lead to costly fixes or failed inspections.
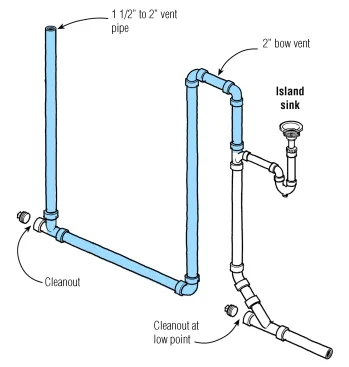
Types Of Venting Options
Venting a kitchen sink under a window can be tricky. Choosing the right venting option is key for proper airflow and preventing odors. Various venting types suit different setups and local codes. Understanding each helps pick the best solution for your space.
Air Admittance Valves
Air admittance valves (AAVs) let air enter the drain line. They stop sewer gases from escaping into the room. AAVs are small, easy to install, and fit in tight spaces. They work well where traditional vent pipes are hard to run. These valves open only when water drains, keeping the system sealed otherwise.
Traditional Vent Pipes
Traditional vent pipes go through the roof or walls. They allow continuous airflow to balance pressure. These vents are reliable and meet most building codes. Installing them under a window may need extra planning. The pipe must avoid blocking the window or affecting its function.
Combination Systems
Combination systems mix air admittance valves and vent pipes. This setup solves space or code challenges. For example, use a vent pipe through the wall plus an AAV near the sink. It ensures proper ventilation without major changes to your kitchen. Combination systems offer flexibility and improved performance.
Planning The Vent Installation
Planning the vent installation for a kitchen sink under a window requires careful thought. You want to ensure proper airflow to avoid drainage problems and odors. Taking time to plan helps you avoid costly mistakes and makes the installation process smoother.
Assessing Your Plumbing Layout
Start by examining the existing plumbing setup beneath your sink. Identify where the drain pipes run and where the current vent pipes connect. This helps you figure out the best place to add the vent without disturbing other pipes.
Check if the drain line has access to a vent stack or if you need to install an air admittance valve (AAV). Knowing these details upfront saves you from unexpected challenges once you begin.
Selecting Vent Locations
Choosing the right spot for the vent is key. Since your sink is under a window, you might have limited wall space, so consider vent placement carefully.
Look for areas that allow easy pipe routing while staying within local plumbing codes. Can you run the vent pipe through the cabinet or up the wall near the window frame? Think about accessibility for future maintenance as well.
Tools And Materials Needed
Gathering the right tools and materials before starting will save you time. Typical items include:
- PVC or ABS vent piping
- Pipe cutter or hacksaw
- Pipe fittings and connectors
- Plumber’s tape and sealant
- Drill and hole saw
- Measuring tape and pencil
Having everything on hand helps you stay focused and avoid interruptions. Do you already have these tools, or will you need to invest in a few? Planning for this ensures you’re ready to tackle the job efficiently.
Step-by-step Venting Process
Venting a kitchen sink under a window requires careful attention to detail to ensure proper airflow and drainage. The process involves removing any old parts, adding a vent pipe that meets code, and making sure all connections are tight and leak-free. Getting these steps right helps avoid common problems like slow drainage or sewer gas smells.
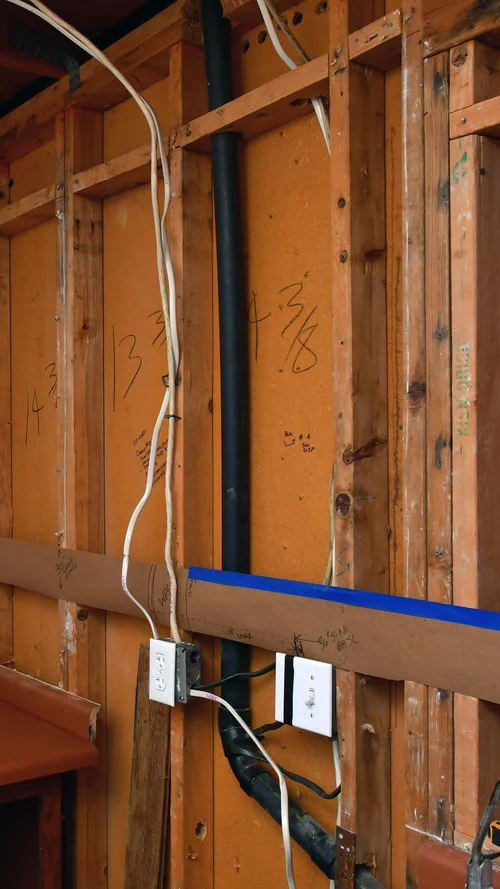
Removing Existing Plumbing Components
Start by turning off the water supply and clearing out the area under your sink. Carefully disconnect the drain pipes and trap, keeping a bucket handy to catch any water. Removing old vent pipes or fittings that block the new vent path is essential, so inspect everything closely before proceeding.
Have you noticed any corrosion or damage on your current pipes? This is a good time to replace worn parts to avoid future leaks. Take photos or notes of how the plumbing was originally connected; this will help you when installing new components.
Installing The Vent Pipe
Choose a vent pipe material that matches your existing plumbing, typically PVC or ABS. Position the vent pipe so it runs vertically from the drain line up through the wall or window frame, ensuring it stays above the flood level of the sink trap.
- Cut the vent pipe to the correct length using a pipe cutter.
- Dry-fit the pipe and fittings first to check alignment and fit.
- Use a proper vent cap or extend the pipe above the window frame as local codes require.
Have you checked local building codes for vent height and placement? These rules help prevent water traps from siphoning and keep air flowing smoothly.
Sealing And Securing Connections
Once the vent pipe fits well, apply PVC primer and cement or the appropriate adhesive for your pipe type to each joint. Make sure each connection is fully sealed to prevent leaks and odors.
Secure the vent pipe with brackets or straps to keep it stable and avoid strain on joints. Double-check all seals after the adhesive cures by running water through the sink and watching for any drips or air leaks.
Think about how a loose connection could affect your kitchen’s air quality. Proper sealing is key to a healthy, odor-free environment.

Credit: www.plumbingforums.com
Testing And Troubleshooting
Testing and troubleshooting are key after venting a kitchen sink under a window. Proper venting stops bad smells and keeps water flowing smoothly. This section helps you check your setup and fix common issues fast.
Checking For Proper Airflow
Start by running water in the sink. Listen for gurgling or bubbling sounds. These noises suggest poor airflow in the vent system.
Next, hold a piece of tissue paper near the vent opening. The tissue should move slightly if air flows well. No movement means the vent might be blocked or sealed too tight.
Smell near the vent and under the sink. Foul odors can signal vent problems. Proper airflow prevents sewer gases from entering your kitchen.
Common Problems And Fixes
- Blocked Vent:Remove debris or clean the vent pipe if airflow is weak.
- Improper Vent Location:Adjust the vent pipe to ensure it is not obstructed by window frames or other objects.
- Loose Connections:Tighten all pipe joints and seals to stop air leaks.
- Incorrect Pipe Size:Use the right vent pipe diameter as per local building codes.
- Clogged Drain:Clear clogs with a plunger or drain snake to restore smooth water flow.
Maintenance Tips For Longevity
Proper maintenance keeps your kitchen sink vent working well. It helps prevent clogs and bad smells. Regular care extends the vent’s life and avoids costly repairs. Simple checks and cleaning keep water flowing smoothly under the window.
Regular Inspections
Check the vent pipe every few months. Look for cracks, loose fittings, or blockages. Make sure the vent cap is clear of leaves and debris. Inspect the area under the sink for leaks or water damage. Early detection helps fix small problems fast.
Cleaning And Repairs
Clean the vent pipe with a brush or water spray to remove buildup. Clear any dirt or nests from the vent opening outside. Tighten loose connections to stop leaks and improve airflow. Replace damaged parts immediately to keep the system safe and efficient.

Credit: www.diychatroom.com
Credit: www.jlconline.com
Frequently Asked Questions
How Do You Vent A Kitchen Sink Under A Window?
To vent a kitchen sink under a window, install an air admittance valve (AAV) or extend the vent pipe vertically through the wall. Ensure proper slope and sealing to prevent odors and maintain drainage efficiency. Local codes may require specific venting methods.
Why Is Venting A Kitchen Sink Important?
Venting a kitchen sink prevents sewer gases from entering your home. It also helps maintain proper drainage by allowing air into the plumbing system. This ensures smooth water flow and avoids issues like slow drains or gurgling noises.
Can I Use An Air Admittance Valve Under A Window?
Yes, an air admittance valve (AAV) can be used under a window. It allows air into the drainage system without a traditional vent pipe. However, check local plumbing codes, as some areas restrict or prohibit AAV usage.
What Are Common Challenges Venting Under A Window?
Challenges include limited space for vent pipes, maintaining proper vent height, and avoiding window obstruction. Proper planning ensures code compliance and effective venting. Using an AAV often simplifies installation in tight spaces.
Conclusion
Venting a kitchen sink under a window can seem tricky at first. Following the right steps makes the job easier and safer. Proper venting stops bad smells and keeps water flowing well. Use the right tools and check local codes before starting.
Take your time and work carefully for the best results. This simple task improves your kitchen’s comfort and function. Try these tips next time you need to vent a sink near a window. It’s worth the effort.

Hi, I’m Daniel Harper, a senior editor here at KitchenBucks.com. For over 10 years, I’ve been exploring kitchen gadgets and appliances to help people find tools that truly add value without breaking the bank. I love simplifying product choices so you can focus more on cooking and less on worrying about what to buy. When I’m not reviewing the latest gadgets, you’ll usually find me experimenting with coffee brewing or firing up the grill for a weekend barbecue.