Is water dripping under your kitchen sink? A leaking pipe might seem like a small problem, but it can quickly turn into a costly mess.
If you don’t fix it soon, you could face damaged cabinets, mold growth, and higher water bills. You need to act fast, but don’t worry—we’re here to help. You’ll learn how to spot the signs of a leaking pipe, understand what causes it, and find easy solutions you can try yourself.
Keep reading to protect your kitchen and save money before the problem gets worse.
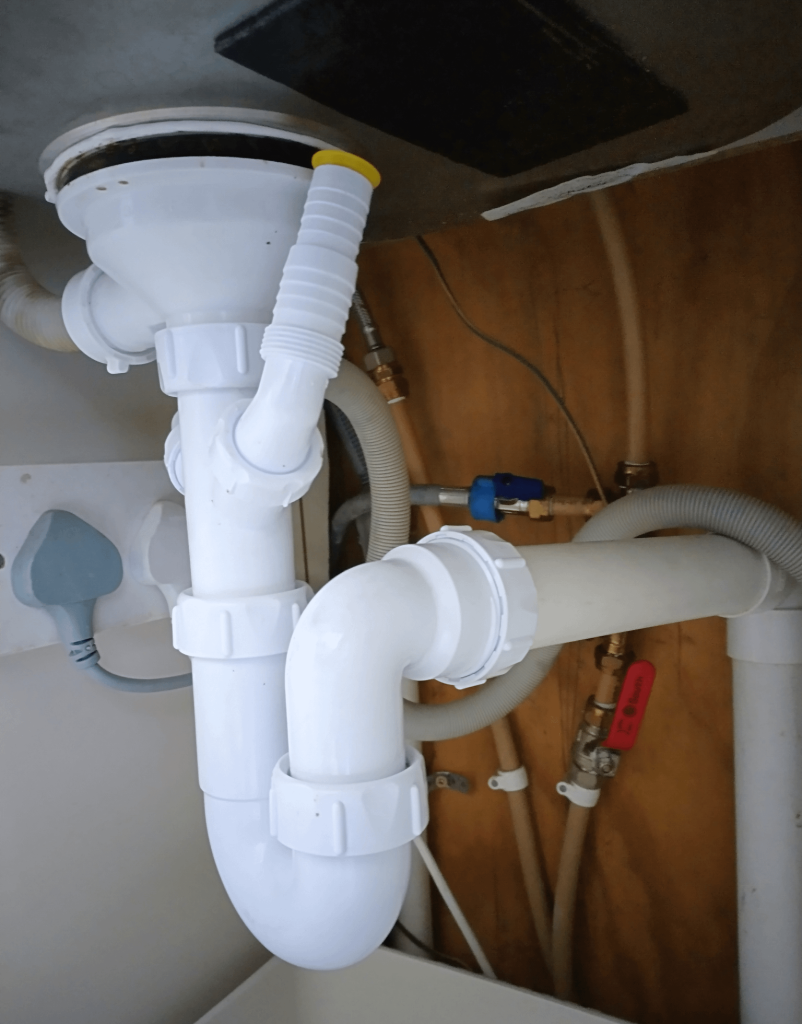
Credit: piccfla.com
Common Causes Of Sink Leaks
Leaks under the kitchen sink are common and frustrating. Knowing why they happen helps fix them faster. Many leaks start from simple problems that worsen over time. Some issues need quick attention to prevent water damage.
Worn Out Washers And Seals
Washers and seals block water from escaping pipes. Over time, they dry out or crack. This wear allows water to drip or leak. Replacing these small parts often stops leaks quickly.
Loose Or Damaged Pipes
Pipes under sinks can loosen from vibrations or use. Damage from hitting or bending also causes leaks. Tightening or replacing pipes often solves this problem.
Clogged Drains And Blockages
Clogs create pressure that forces water to leak. Food scraps, grease, and soap build-up block drains. Clearing the blockage can stop the leak and improve flow.
Corroded Plumbing Components
Metal parts can rust or corrode with age and moisture. Corrosion weakens pipes and joints, causing leaks. Replacing corroded parts is needed to prevent further damage.
Tools And Materials Needed
Fixing a leaking pipe under your kitchen sink starts with gathering the right tools and materials. Having everything ready saves time and frustration. It also helps you avoid unnecessary trips to the hardware store.
Basic Plumbing Tools
You’ll need some essential tools to handle the leak effectively. A pipe wrench or adjustable wrench is crucial for loosening and tightening pipe connections. Slip-joint pliers help grip small parts and fittings securely.
A flashlight is handy for seeing into tight, dark spaces under the sink. Don’t forget a bucket or container to catch any water that might drip during the repair. Having a towel nearby also keeps the area dry and safe.
Sealants And Tape
Sealants prevent leaks by creating a waterproof barrier. Plumber’s putty is great for sealing drain fittings and joints. It’s easy to apply and molds to fit the space perfectly.
Thread seal tape, often called Teflon tape, wraps around threaded pipe ends to stop leaks at connections. It’s thin, flexible, and works well on metal and plastic pipes. Choosing the right type of tape can make a noticeable difference in how well the repair holds up.
Replacement Parts
Sometimes, you need to replace damaged parts to stop the leak completely. Common replacements include washers, gaskets, and sometimes sections of pipe. Bringing the old parts to the store helps you find exact matches.
Pay attention to pipe material—PVC, copper, or galvanized steel—since each requires compatible replacement parts. Investing in quality parts means fewer repairs down the road. Have you ever used a cheaper part only to find the leak returned quickly?
Step-by-step Leak Repair
Fixing a leaking pipe under your kitchen sink might seem tricky, but breaking down the process makes it manageable. You don’t need to be a plumber to handle basic repairs if you follow clear steps. Let’s walk through the essential actions that will help you stop the leak and protect your kitchen from water damage.
Shutting Off Water Supply
Before you touch any pipes, turn off the water supply to your kitchen sink. Usually, there’s a small valve located under the sink. Turning this valve clockwise will stop the water flow and prevent more leaks while you work.
If you can’t find the valve, shutting off the main water supply to your home is your next option. It might be inconvenient but necessary to avoid a bigger mess.
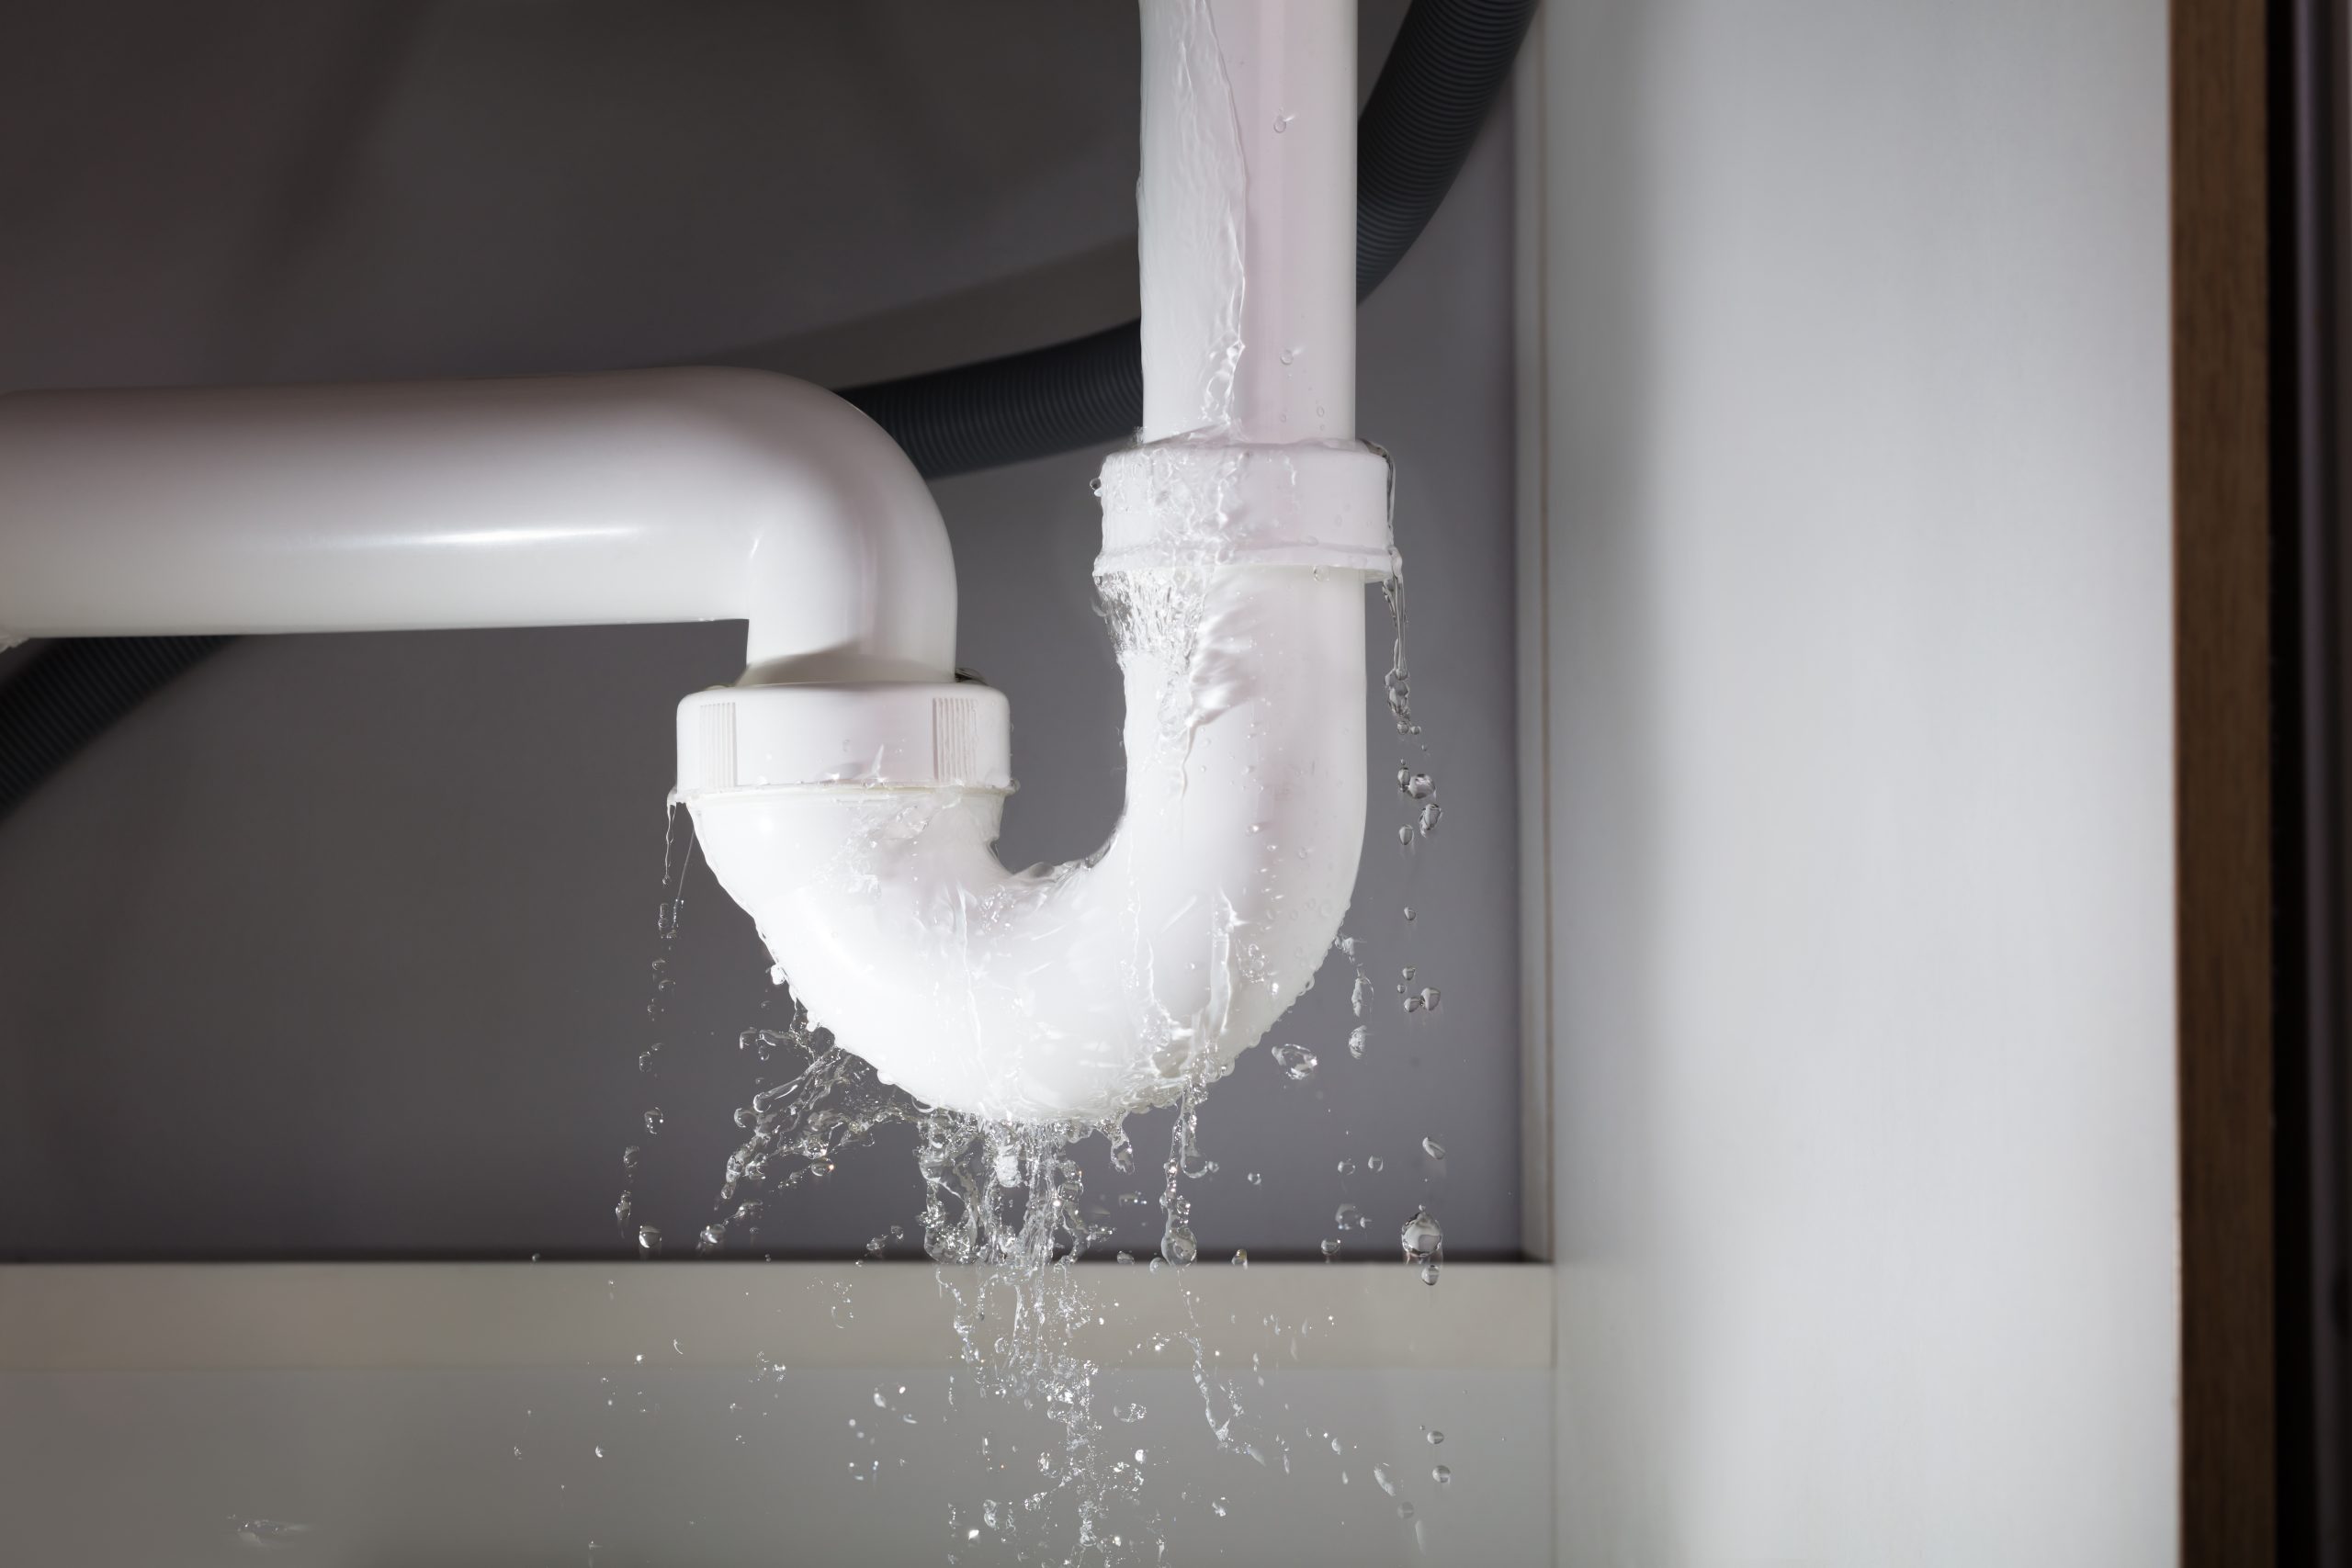
Identifying The Leak Source
Look closely under the sink to find exactly where the water is coming from. Check the pipes, joints, and connections for any visible drips or wet spots. Sometimes leaks appear as tiny cracks or loose fittings that might be easy to miss at first glance.
Use a dry cloth to wipe down the pipes, then watch carefully to spot fresh water. This simple trick helps pinpoint the exact leak source quickly.
Tightening Loose Connections
If the leak is coming from pipe joints or connections, try tightening them first. Use an adjustable wrench to gently turn the nuts clockwise until they feel snug. Be careful not to overtighten, as this can crack the fittings or damage the pipes.
Many leaks happen because fittings loosen over time. Fixing this can often solve the problem without needing new parts.
Replacing Damaged Parts
When tightening doesn’t stop the leak, you may need to replace worn-out parts like washers, seals, or sections of pipe. Take the damaged piece to a hardware store to find the exact match. This step usually requires disconnecting the old part and fitting the new one securely.
Dealing with pipe replacements can feel intimidating, but having the right tools and parts makes the job straightforward.
Applying Sealant Or Tape
For extra protection, use plumber’s tape (also called Teflon tape) or pipe sealant on threaded connections. Wrap the tape around the threads before reconnecting parts to create a watertight seal. This simple addition often stops leaks that come from small gaps.
Remember, applying sealant is a quick fix that complements tightening and part replacement—it’s rarely a standalone solution.
Temporary Fixes For Emergencies
A leaking pipe under the kitchen sink can cause water damage fast. Temporary fixes help stop leaks until a plumber arrives. These quick solutions can reduce water waste and protect your home. Use easy tools and materials found in most homes or hardware stores.
Using Pipe Repair Tape
Pipe repair tape sticks tightly around the leaking spot. Clean and dry the pipe before applying the tape. Wrap the tape several times, covering the hole completely. Press firmly to seal gaps and prevent water from escaping. This tape works best for small cracks and slow leaks.
Applying Epoxy Putty
Epoxy putty hardens quickly to stop leaks. Cut a piece and knead it until soft and uniform. Press the putty on and around the leak tightly. Hold it in place for a few minutes to set. Once hardened, it creates a strong, waterproof patch. This fix can last longer than tape.
Wrapping With Rubber And Hose Clamps
Use a piece of rubber, like an old inner tube, to cover the leak. Place it over the damaged area of the pipe. Secure the rubber tightly with hose clamps on each side. Tighten clamps to stop water flow through the leak. This method works well for larger holes or cracks.
Preventing Future Leaks
Preventing future leaks under your kitchen sink is essential to avoid costly repairs and water damage. Taking simple, consistent steps can save you from the hassle of dealing with unexpected drips and puddles. Let’s look at practical ways you can keep your plumbing dry and trouble-free.
Regular Inspections
Checking under your sink regularly helps catch small leaks before they become big problems. Look for signs like damp spots, mold, or corrosion on pipes and fittings. You don’t need special tools—just a flashlight and a quick peek every few weeks can make a huge difference.
Ask yourself: When was the last time you inspected your sink plumbing? Setting a reminder can keep this task from slipping your mind.
Proper Maintenance Tips
Maintaining your sink plumbing means tightening loose connections and cleaning out debris that could cause clogs. Use plumber’s tape on threaded joints to ensure a tight seal and prevent leaks. Avoid pouring grease or harsh chemicals down the drain, as these can damage pipes over time.
Simple habits like wiping up spills immediately and checking the water pressure can extend the life of your plumbing. Have you tried using strainers on your drains to catch food particles?
Upgrading Old Plumbing
Old pipes, especially those made of galvanized steel or worn-out plastic, are more prone to leaks. Upgrading to modern materials like PVC or PEX can improve durability and reduce leak risks. Consider consulting a plumber if you notice frequent leaks despite regular maintenance.
Investing in new plumbing parts might seem costly upfront, but it often saves money in the long run by preventing repeated repairs. What’s the age of your kitchen sink plumbing? Upgrading could be the smartest choice you make.
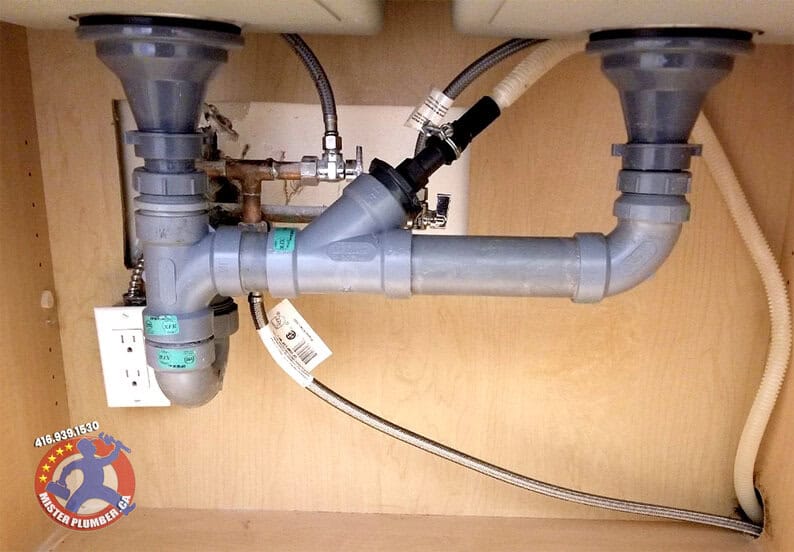
Credit: www.misterplumber.ca
When To Call A Professional
Knowing when to call a professional for a leaking pipe under the kitchen sink saves time and prevents damage. Some problems need expert tools and skills to fix correctly. Acting early can stop small leaks from turning into costly repairs.
Signs Of Major Plumbing Issues
- Water pooling under the sink that won’t dry
- Constant dripping sound without stopping
- Visible rust or corrosion on pipes
- Foul odors coming from the drain
- Water damage on cabinet walls or flooring
- Low water pressure or slow drainage
Complex Repairs Beyond Diy
Some leaks require pipe replacement or tightening in hard-to-reach areas. Broken seals, cracked pipes, or worn-out fittings need tools professionals have. Electrical wiring near plumbing adds risk for injury. Professionals ensure repairs meet safety codes.
Ensuring Long-term Solutions
Temporary fixes often fail after a short time. Professionals identify the root cause of leaks and fix them fully. Proper repair prevents mold growth and structural damage. Regular inspections by experts keep your plumbing healthy and reliable.

Credit: www.misterplumber.ca
Frequently Asked Questions
What Causes A Leaking Pipe Under The Kitchen Sink?
Leaking pipes under kitchen sinks are usually caused by loose connections, worn-out washers, or corroded pipes. Sometimes, cracks or damage in the pipe material also lead to leaks. Regular wear and tear or improper installation can contribute to these issues.
How Can I Fix A Leaking Pipe Under My Sink?
To fix a leaking pipe, first turn off the water supply. Tighten loose connections or replace damaged washers and pipes. Use plumber’s tape for sealing threads. If unsure, call a professional plumber to avoid further damage.
How Do I Prevent Future Leaks Under My Kitchen Sink?
Regularly inspect pipes and connections for wear or corrosion. Avoid using harsh chemicals that can damage pipes. Tighten fittings periodically and replace old washers promptly. Proper maintenance helps prevent leaks and costly repairs.
When Should I Call A Plumber For A Leaking Pipe?
Call a plumber if the leak is extensive, persistent, or you cannot locate the source. Also, seek professional help if the pipe is severely corroded or damaged. A plumber ensures safe and lasting repairs.
Conclusion
A leaking pipe under the kitchen sink can cause many problems. Water damage and mold can harm your home and health. Catching leaks early saves money and stress. Fixing a leak quickly keeps your kitchen safe and dry. Regular checks help find issues before they grow.
Simple tools and steps can stop leaks fast. Don’t wait for small drips to turn into big floods. Stay alert and act fast to protect your space.

Hi, I’m Daniel Harper, a senior editor here at KitchenBucks.com. For over 10 years, I’ve been exploring kitchen gadgets and appliances to help people find tools that truly add value without breaking the bank. I love simplifying product choices so you can focus more on cooking and less on worrying about what to buy. When I’m not reviewing the latest gadgets, you’ll usually find me experimenting with coffee brewing or firing up the grill for a weekend barbecue.