Are you dealing with a Whirlpool dishwasher that just won’t heat up? If so, you’re not alone.
Many homeowners face this issue, but the good news is that you might be able to fix it yourself by changing the heating element. This simple repair can save you the hassle of calling in a professional and spending extra money.
In this guide, we’ll walk you through the straightforward steps to replace the heating element in your Whirlpool dishwasher. Imagine the satisfaction of solving this problem on your own, restoring your dishwasher’s performance, and getting those sparkling clean dishes once again. So, let’s dive in and get your dishwasher back in top shape!
Credit: www.partselect.ca
Tools And Materials Needed
Gather a screwdriver, a multimeter, and a replacement heating element. Ensure you have pliers and safety gloves. These items are essential for changing the heating element in your Whirlpool dishwasher.
Changing the heating element in your Whirlpool dishwasher might sound daunting, but with the right tools and materials, you can tackle this task efficiently. Whether you’re a seasoned DIYer or a complete novice, having the correct items at your disposal makes all the difference in ensuring a smooth and successful replacement process. Let’s dive into what you’ll need to confidently change the heating element in your dishwasher.
Tools Needed
A few essential tools will make your task easier and quicker. A Phillips screwdriver is your go-to for removing screws that secure various parts of the dishwasher. You might also need a flathead screwdriver to gently pry open panel seams. An adjustable wrench will be helpful for disconnecting any nuts or bolts during the process. Don’t forget a pair of needle-nose pliers; they are great for reaching into tight spaces or pulling out small connectors.
Safety Equipment
Safety should always be a priority. Wearing gloves will protect your hands from sharp edges and provide a better grip. Make sure you have safety goggles to shield your eyes from any flying debris or accidental splashes. Always have a towel on hand to wipe up any spills or to dry your hands during the process.
Materials Required
Aside from tools, you’ll need specific materials. The new heating element is the star of the show make sure it’s compatible with your Whirlpool model. A sealant or gasket might be necessary if the original one is worn out or damaged. You’ll also want to have a multimeter on hand to test electrical connections and ensure everything is working correctly once installed.
Preparation Supplies
Before starting, gather some preparation supplies. A flashlight can be invaluable when you need to illuminate hard-to-see areas inside your dishwasher. Have a clean cloth ready for wiping down surfaces before and after the installation. A small container or tray can help you organize screws and smaller parts, so you don’t lose them.
Do you feel ready to tackle this project? With the right tools and materials, you can save money and avoid the hassle of scheduling service appointments. Remember, the key is preparation and safety. What’s the most challenging repair task you’ve completed at home? Share your stories in the comments below!

Credit: www.youtube.com
Safety Precautions
Ensure safety by unplugging the dishwasher before starting. Use gloves to protect hands from sharp edges. Keep a towel nearby to catch any water spills during the process.
Changing the heating element in your Whirlpool dishwasher can be a rewarding DIY project, but it’s crucial to prioritize safety. Before diving into the task, understand that you’re dealing with electrical components. This means taking certain precautions to protect yourself and your appliance. Safety isn’t just a checklist; it’s your path to a successful repair. Let’s make sure you’re well-prepared and safe.
Turn Off The Power
Begin by switching off the power to your dishwasher. Locate the circuit breaker and flip it to the ‘off’ position. This step is non-negotiable. Even if you’re a DIY enthusiast, working with live electrical connections can be dangerous. Have you ever faced an unexpected electric shock? It’s not something you want to experience.
Unplug The Dishwasher
After ensuring the power is off, unplug the dishwasher from the wall outlet. This adds an extra layer of safety. It’s easy to forget, but keeping appliances unplugged prevents any accidental power surge.
Use Protective Gear
Wearing the right gear can prevent injuries. Rubber gloves and safety goggles are your best friends here. They shield you from electrical hazards and protect your eyes from potential debris. Have you ever thought about how simple gear can save you from complex problems?
Check For Water Leaks
Before starting, inspect your dishwasher for any leaks. Water and electricity are a dangerous mix. If you notice any water pooling, dry the area thoroughly. This step is crucial for avoiding short circuits.
Ensure Adequate Lighting
Proper lighting is essential to see what you’re doing. A well-lit workspace reduces errors and mishaps. Use a flashlight if necessary to illuminate the dishwasher’s interior. Can you recall a time when a small oversight caused a big problem? Adequate lighting helps avoid that.
Keep Your Work Area Clear
A clutter-free workspace enhances safety. Ensure that tools and parts are organized and easily accessible. This minimizes the risk of tripping or knocking over items. An organized space reflects a safe and efficient work environment. These safety precautions not only protect you but also ensure the longevity of your Whirlpool dishwasher. Are there any additional safety tips you’d consider essential for this task?
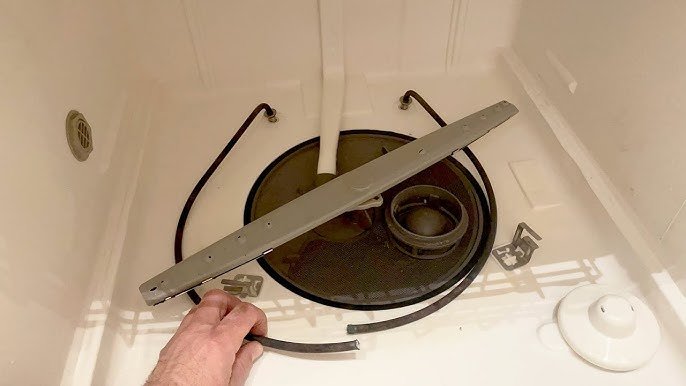
Locating The Heating Element
Locate the heating element at the bottom of your Whirlpool dishwasher. It’s a thin, round metal bar. Make sure the dishwasher is unplugged before touching it.
Changing the heating element in your Whirlpool dishwasher can seem daunting at first, especially if you’re not familiar with the inner workings of your appliance. However, identifying the heating element is the first crucial step in the process. Once you know where it is, replacing it becomes a manageable task, even for those who aren’t typically handy around the house. So, where exactly is the heating element located in your Whirlpool dishwasher? Let’s dive in.
Understanding The Layout Of Your Dishwasher
Before you begin searching for the heating element, it’s essential to familiarize yourself with the layout of your dishwasher. The heating element is typically located at the bottom of the dishwasher tub, where it plays a critical role in drying your dishes and heating the water during cycles. Knowing this not only speeds up the process but also helps you avoid unnecessary dismantling.
Spotting The Heating Element
Look inside the dishwasher, and you’ll notice a metal coil or rod, often resembling a snake. This coil is the heating element. It usually runs parallel to the base of your dishwasher tub. Seeing it might remind you of the warm glow of a toaster element, but it’s not designed for visual appeal—it’s all about function.
Easy Tips For Accessing The Heating Element
To access the heating element, you’ll often need to remove the lower dish rack. This provides a clear view and allows you to reach the element without obstruction. Make sure the dishwasher is unplugged for safety. With the rack out of the way, you can inspect the element closely for any signs of damage or wear, such as cracks or discoloration.
Signs Your Heating Element Needs Replacing
If you notice your dishes aren’t drying properly or the water isn’t heating during cycles, these are telltale signs that the heating element may need replacing. A visual inspection can confirm its condition. Is it showing signs of corrosion or damage? If yes, then it’s time for a replacement.
Safety First: Precautions To Take
Always prioritize safety when working with electrical components. Ensure the dishwasher is disconnected from power before you start. This simple step can prevent accidents and ensures you can work confidently as you proceed with your task. — Changing a heating element may seem intimidating, but with the right approach, it becomes straightforward. Have you ever tackled a home repair that seemed overwhelming at first? How did you overcome it? Share your thoughts!
Removing The Old Heating Element
Ready to tackle the task of changing the heating element in your Whirlpool dishwasher? Removing the old heating element is a crucial step in ensuring your appliance runs efficiently. Let’s dive into the process with clear, actionable steps to make your repair smooth and successful. Whether you’re a DIY enthusiast or a first-timer, these steps will guide you through the process.
Disconnecting Power Supply
Safety first! You don’t want any surprises while working on your dishwasher. Start by disconnecting the power supply. Locate the plug and remove it from the socket. If your dishwasher is hardwired, turn off the circuit breaker to avoid any electrical mishaps. It’s a simple precaution that can save you from potential hazards.
Accessing The Bottom Panel
Next, you need to access the bottom panel of your dishwasher. This is where the heating element resides. Remove the screws securing the panel. Keep them in a safe spot; you’ll need them later. Gently lift off the panel, revealing the inner workings of your appliance. It’s like opening a treasure chest, uncovering the secrets of your dishwasher!
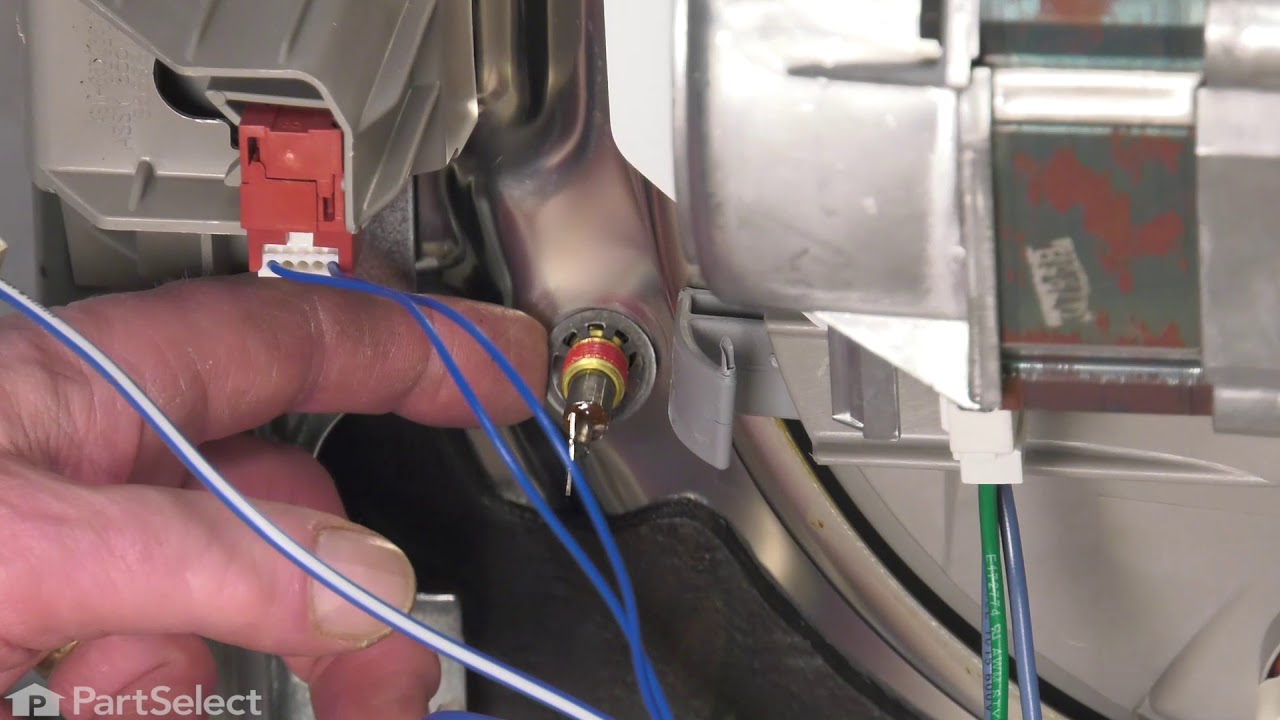
Detaching The Element
With the panel removed, the heating element is now visible. To detach it, locate the nuts or screws holding it in place. Use a wrench or screwdriver to carefully remove them. Be cautious not to damage the surrounding wires or components. Once loosened, gently pull out the old heating element. You’ve reached a pivotal point in your repair journey!
Changing a heating element can seem daunting, but each step is manageable. Have you encountered any unexpected challenges during a home repair? Share your experiences to help others navigate similar tasks. Remember, patience and attention to detail are your best allies!
Installing The New Heating Element
Replacing the heating element in a Whirlpool dishwasher is straightforward. First, disconnect power and water. Unscrew the bottom panel to access the element, then detach the wires. Remove the old element and install the new one by securing wires and screws.
Installing a new heating element in your Whirlpool dishwasher might sound daunting, but with a bit of guidance, it becomes a straightforward task. Whether you’re tackling this repair due to a cold rinse cycle or simply upgrading, understanding each step ensures efficiency and safety. Dive into positioning and securing the new element to ensure your appliance runs smoothly.
Positioning The New Element
Begin by carefully aligning the new heating element with the designated slots inside the dishwasher. Tip: Ensure the element matches the shape and size of the old one—this guarantees a snug fit. Slide the element into place. You might feel a bit of resistance, but that’s normal. Just ensure it’s securely seated without forcing it. Imagine how satisfying it is when everything fits perfectly—like a well-tailored suit.
Securing The Connections
Once the element is positioned, it’s time to secure the connections. Check: Are the terminals clean and free from debris? This prevents any electrical issues. Connect the wires to the terminals, ensuring each one clicks into place. Don’t underestimate the importance of a solid connection; it’s the lifeline for your dishwasher’s heating function. Tighten the screws firmly, but be cautious not to overdo it. Have you ever had a screw slip because it was too tight? It’s not just frustrating; it can damage components. Aim for secure, not strained.
Remember, a successful installation is about attention to detail and patience. Consider this: How often do you check the efficiency of your appliances? A well-maintained dishwasher not only cleans better but saves energy something to think about next time you tackle repairs.
Reassembling The Dishwasher
Reassembling your Whirlpool dishwasher is a crucial step. After replacing the heating element, it’s essential to ensure everything fits properly. This process involves careful attention to detail. Follow these steps to complete the reassembly seamlessly.
Replacing The Bottom Panel
First, locate the bottom panel of your dishwasher. Align it with the base of the appliance. Ensure all screw holes line up. Secure the panel by tightening the screws with a screwdriver. Double-check that the panel is firmly attached. A loose panel can cause problems later.
Reconnecting Power Supply
Ensure the dishwasher power cord is easily accessible. Plug it back into the outlet. Confirm the power switch is in the ‘on’ position. This step restores electricity to the appliance. Test the dishwasher by running a short cycle. Verify that it powers on and operates correctly.
Testing The New Heating Element
Discover how to replace the heating element in a Whirlpool dishwasher. Ensure safety by disconnecting power first. Carefully remove the old element and install a new one for optimal performance.
Testing the new heating element in your Whirlpool dishwasher is crucial. It ensures your appliance functions properly. After installing the new element, you need to check its performance. This step confirms the replacement was successful. Here’s how you can test the new heating element effectively.
Running A Test Cycle
Start by running a test cycle in your dishwasher. Ensure the dishwasher is empty. Select a cycle that uses hot water. This helps in checking the heating element’s functionality. Observe if the water heats up during the cycle. The heating element should warm the water efficiently. Listen for unusual noises. These could indicate improper installation. If the cycle completes without issues, the element works fine.
Checking For Leaks
After running the test cycle, inspect the dishwasher for leaks. Look around the base and sides of the dishwasher. Ensure there is no water pooling on the floor. Check the connections to the heating element. Tighten any loose connections to prevent leaks. Address any leaks immediately. This prevents further damage to your appliance. A leak-free dishwasher indicates a successful installation.
Credit: twincitiesappliance.com
Troubleshooting Common Issues
Changing the heating element in a Whirlpool dishwasher can be tricky. You might face common issues after installation. Solving these problems ensures your dishwasher works perfectly. This section guides you through addressing installation errors and dealing with persistent problems.
Addressing Installation Errors
Incorrect installation is a frequent problem. Check the connections of the heating element. Loose wires can disrupt functioning. Ensure the element is secure. Inspect the mounting brackets. They should hold the element firmly. Use a multimeter to check electrical continuity. It helps verify proper installation. If the element shows no continuity, it might be faulty. Replace it if necessary.
Dealing With Persistent Problems
Sometimes, issues persist after installation. The dishwasher might not heat properly. Check if the heating element is getting power. Inspect the control panel. It may have a malfunction. Resetting the dishwasher often solves minor glitches. Persistent problems may need professional help. Consider calling a technician if issues continue. Regular maintenance prevents future problems.
Maintenance Tips For Longevity
Changing the heating element in a Whirlpool dishwasher can extend its life. Start by unplugging the dishwasher and removing the lower panel. Disconnect the old element and connect the new one, ensuring a secure fit. Regular maintenance keeps your dishwasher running efficiently.
Maintaining your Whirlpool dishwasher is crucial to ensure its longevity and efficient performance. A simple routine can prevent unexpected breakdowns and costly repairs. Regular maintenance can also improve the overall lifespan of your appliance, saving you time and money in the long run.
Inspect Regularly
Frequent inspections can help you catch potential issues before they become major problems. Look for any signs of wear and tear on the heating element, such as discoloration or corrosion. A quick glance during your cleaning routine can save you from a surprise cold rinse cycle.
Clean The Heating Element
Keeping the heating element clean is essential for optimal performance. Mineral deposits and food debris can accumulate over time, reducing its efficiency. Use a damp cloth to gently wipe away any residue. You might be surprised at how much grime can build up unnoticed!
Avoid Overloading
Overloading your dishwasher can cause strain on the heating element. Ensure that you load dishes according to manufacturer guidelines. Proper spacing allows hot water to circulate effectively, preventing the element from overworking. How often do you find yourself cramming that last plate in?
Use Recommended Detergents
Using the right detergent can make a significant difference. Some detergents contain harsh chemicals that can damage the heating element over time. Opt for those specifically formulated for dishwashers, ensuring they won’t corrode parts. What brand have you found works best for your dishwasher?
Check Water Temperature
The water temperature setting plays a role in the heating element’s efficiency. Make sure your water heater is set to the recommended temperature for your dishwasher model. This ensures the element isn’t working overtime to heat water. Do you ever wonder if your dishwasher is running at its best temperature?
Regular maintenance not only extends the life of your Whirlpool dishwasher but also enhances its performance. By adopting these simple practices, you can enjoy a seamless dishwashing experience. Remember, a little care goes a long way in ensuring your appliance serves you well for years to come.
Frequently Asked Questions
Is It Worth Replacing The Heating Element In A Dishwasher?
Replacing the heating element can restore dishwasher efficiency. It’s cost-effective compared to buying a new appliance. Ensure the replacement fits your model. Consider professional help if unsure. Regular maintenance extends appliance lifespan and prevents future issues. Evaluate repair costs versus replacement benefits to make an informed decision.
How Do I Know If My Whirlpool Dishwasher Heating Element Is Bad?
Check if the dishes are still wet after a cycle. Listen for unusual noises. Inspect for visible damage or discoloration on the element. Use a multimeter to test for continuity. A lack of heat or uneven heating indicates a faulty heating element.
Can You Replace A Dishwasher Heating Element Yourself?
Yes, you can replace a dishwasher heating element yourself. Ensure the dishwasher is unplugged. Remove the bottom panel, disconnect the old element, and install the new one. Follow the manufacturer’s instructions carefully. Always prioritize safety by wearing protective gear and turning off the power supply.
How Do I Reset The Heating Element In A Whirlpool Dishwasher?
To reset the heating element in a Whirlpool dishwasher, unplug the appliance. Wait for 10 minutes, then plug it back in. If issues persist, consult the user manual or contact Whirlpool support for assistance. Ensure the dishwasher door is securely closed during operation to avoid heating problems.
Conclusion
Changing the heating element in your Whirlpool dishwasher is straightforward. Follow the steps carefully to ensure safety. Regular maintenance boosts your dishwasher’s efficiency. A well-functioning heating element ensures clean dishes. Always consult your dishwasher’s manual for specific guidance. Consider professional help if unsure about any step.
With these tips, you can save money on repairs. A working dishwasher is crucial for a hassle-free kitchen routine. Keep your appliance in top shape for optimal performance. Remember, maintaining your dishwasher extends its lifespan. Enjoy clean dishes with a properly functioning heating element.
