Have you ever wondered what controls the flow of water right under your kitchen sink? Those small, often overlooked water valves play a big role in your daily life.
Knowing how they work and when to use them can save you from costly repairs and unexpected water leaks. You’ll discover everything you need to know about the water valves under your kitchen sink—how to identify them, when to turn them off, and simple tips to keep them in good shape.
Keep reading, because understanding these hidden valves could be the key to avoiding a kitchen disaster.
Common Types Of Kitchen Sink Valves
Understanding the common types of water valves under your kitchen sink can save you time and frustration. Each valve type controls water flow differently, affecting how you manage repairs or replacements. Knowing which valve you have helps you act quickly during leaks or maintenance.
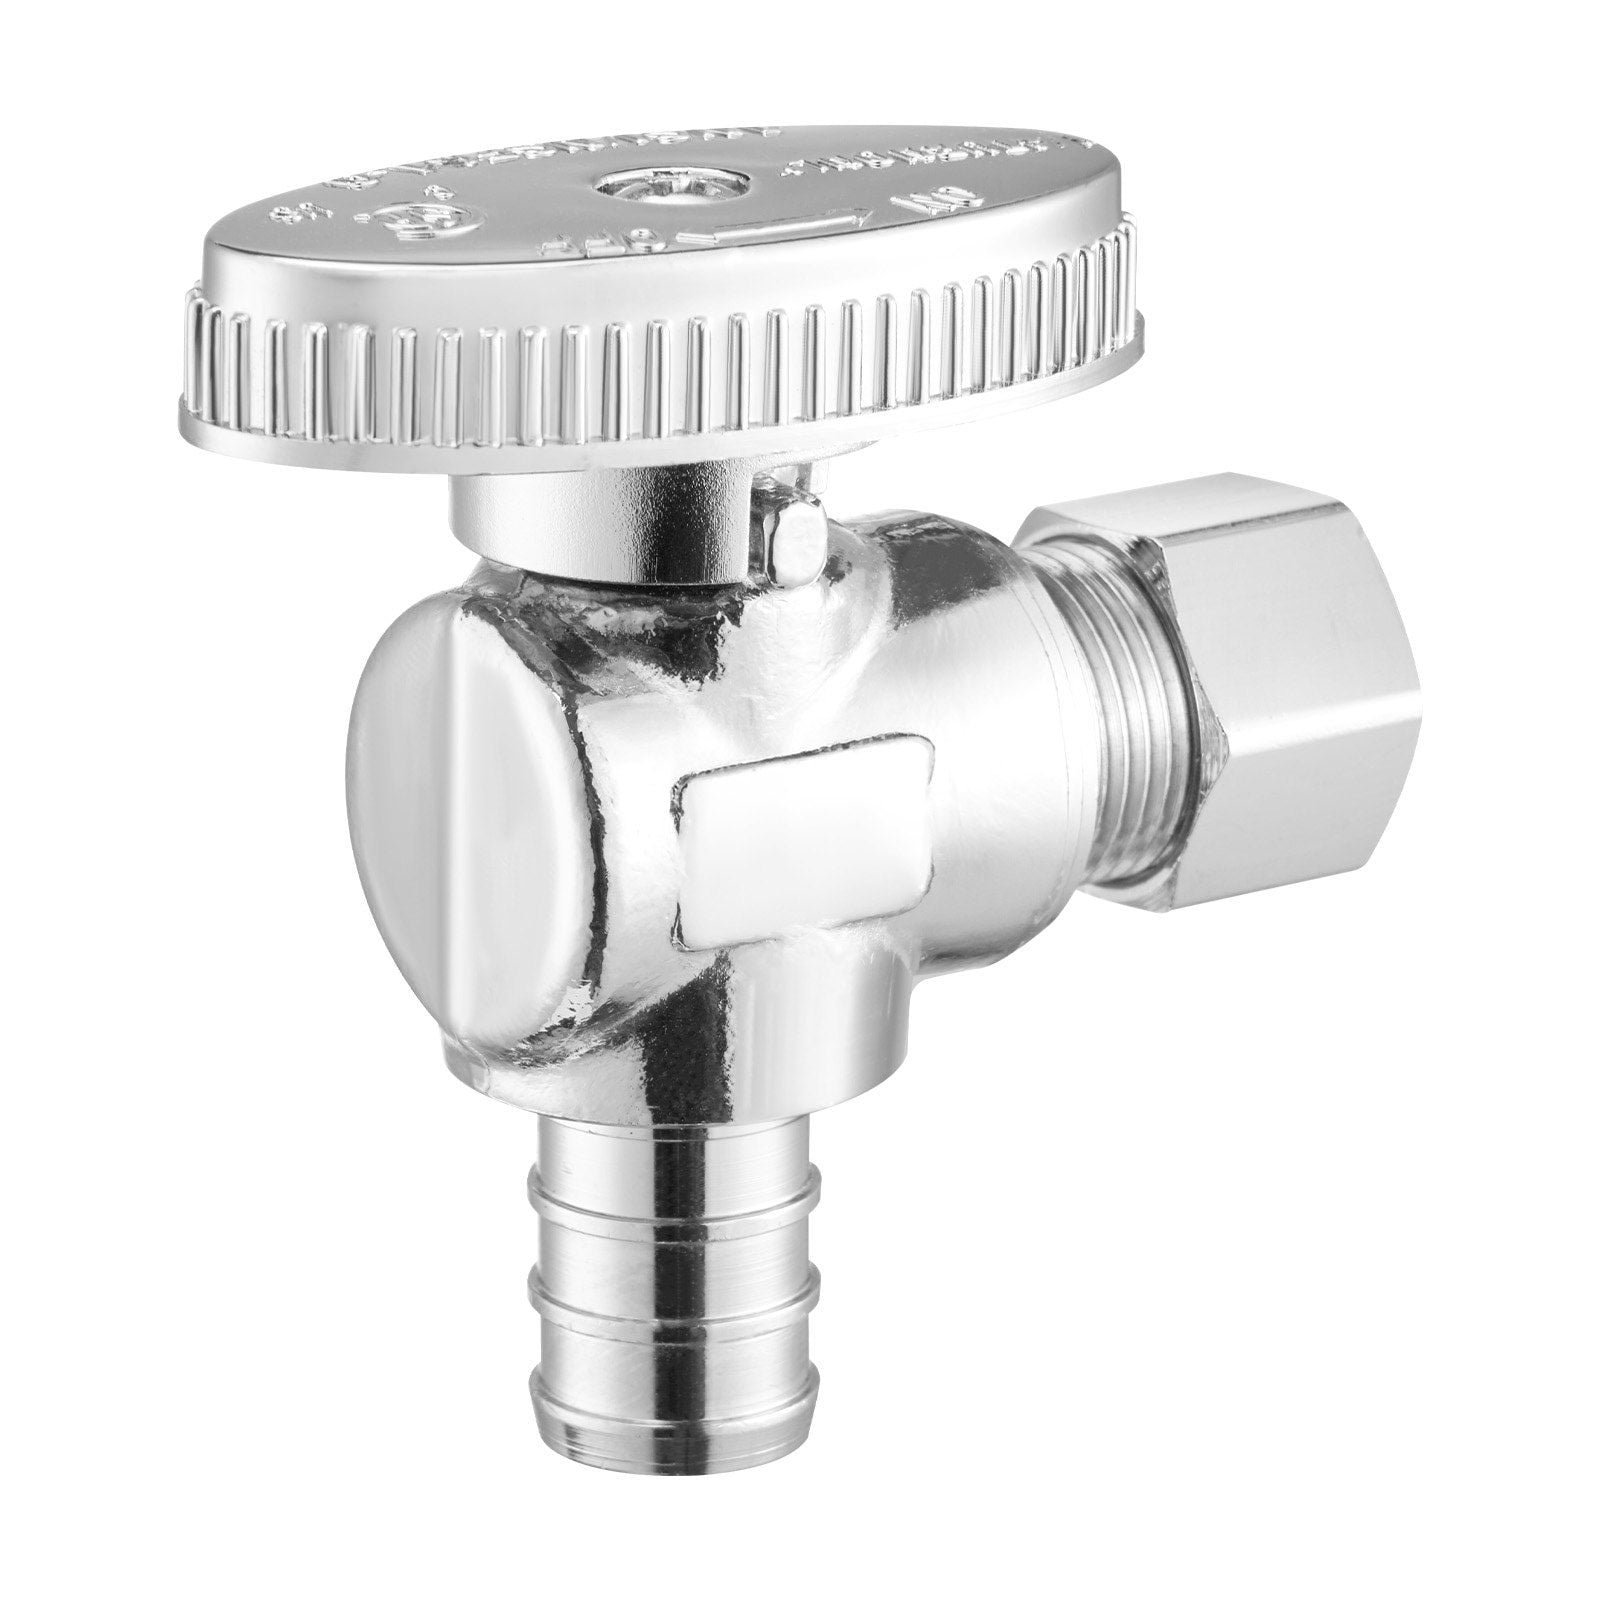
Compression Valves
Compression valves are the most traditional type found under kitchen sinks. They work by tightening a screw to compress a rubber washer, stopping water flow.
These valves are easy to identify by their round handles that you turn clockwise to shut off water. However, they can wear out over time, causing leaks if the washer fails.
If you’ve ever had to tighten a valve that kept dripping, you’ve dealt with a compression valve. They’re simple but sometimes require regular maintenance.
Ball Valves
Ball valves use a rotating ball with a hole through it to control water flow. Turning the handle 90 degrees quickly opens or closes the valve.
These valves offer a reliable seal and are less prone to leaks compared to compression valves. You’ll often find a lever handle that snaps on or off, making them easy to operate.
Do you prefer a fast shut-off during emergencies? Ball valves respond instantly, which makes them a favorite for many homeowners.
Gate Valves
Gate valves control water flow by lifting or lowering a gate inside the valve body. Turning the handle raises or lowers the gate to allow or block water.
They’re less common under kitchen sinks but still useful for fine control of water flow. Gate valves are slower to operate because you need multiple turns to fully open or close them.
If precision matters to you, gate valves offer smooth control but might not be ideal when you need a quick shut-off.
Butterfly Valves
Butterfly valves use a rotating disc to regulate water flow. The disc turns inside the pipe, allowing water to flow or stopping it completely.
These valves are compact and offer fast operation with a simple quarter-turn of the handle. However, they are less common in residential kitchen plumbing.
Have you ever noticed a valve that feels lighter to turn? Butterfly valves require less effort, making them user-friendly in tight spaces.

Credit: www.facebook.com
Signs Of Valve Problems
Recognizing the early signs of water valve problems under your kitchen sink can save you from costly repairs and water damage. These valves control the flow of water to your faucet and appliances, so any issue can disrupt your daily routine. Paying attention to subtle changes can help you act quickly and maintain smooth water flow.
Leaks And Drips
One of the most obvious signs of valve trouble is leaks or drips under the sink. Even a small drip can waste gallons of water over time and increase your utility bills. If you notice puddles, wet spots, or corrosion around the valve, it’s a clear indicator that the valve seal or connection might be failing.
Have you ever found water pooling unexpectedly beneath your sink? That’s a sign you shouldn’t ignore. Tightening fittings or replacing washers might fix minor leaks, but persistent dripping usually means the valve needs professional attention.
Difficulty Turning
If you struggle to turn the valve handle, it could be rusted or clogged with mineral deposits. Valves should open and close smoothly; any stiffness might prevent you from shutting off water quickly during an emergency. This problem often develops silently until you need to act fast, which can be frustrating.
Try gently moving the valve handle occasionally to keep it from seizing up. If it feels stuck or requires excessive force, it’s time to inspect or replace it. Have you ever been caught off guard because a valve refused to budge when you needed it most?
Low Water Pressure
When your kitchen faucet suddenly delivers weak water flow, the valve could be partially blocked or failing. Sediment buildup inside the valve can restrict water passage, causing low pressure. This can make simple tasks like washing dishes or filling pots take longer and become annoying.
Check if the problem persists even when other faucets in your home work fine. If the valve is the culprit, cleaning or replacing it often restores full water pressure. How long would you tolerate weak water flow before investigating the cause?
No Water Flow
Complete loss of water flow from your kitchen faucet often points to a valve that is stuck closed or broken. This issue can stop your kitchen activities abruptly and leave you searching for the shut-off valve under the sink. Sometimes, debris or corrosion can block the valve entirely, cutting off water supply.
Before calling a plumber, make sure the valve handle is fully open. If water still doesn’t flow, the valve might need replacement. Have you tested your under-sink valves recently to ensure they’re working properly?
Tools Needed For Troubleshooting
Troubleshooting water valves under your kitchen sink requires having the right tools at hand. Without them, even a simple fix can turn into a frustrating task. Knowing what to gather before you start can save you time and prevent unnecessary damage.
Wrenches And Pliers
Adjustable wrenches and slip-joint pliers are essential for loosening or tightening valve nuts and fittings. These tools give you the grip and leverage needed to handle stubborn parts without stripping them.
Choosing tools with comfortable handles helps you work longer without hand strain. Have you ever struggled with a nut that won’t budge? The right wrench can make all the difference.
Teflon Tape
Teflon tape, also known as plumber’s tape, is crucial for sealing threaded pipe connections. It prevents leaks by filling in small gaps and ensuring a tight fit.
Wrap the tape clockwise around the threads before reconnecting parts to avoid water drips. You might underestimate this simple item until you experience a drip-free fix thanks to it.
Bucket And Towels
Water valves often hold residual water that can spill during repairs. A bucket placed under the valve catches water, protecting your cabinets and floors from damage.
Keep towels nearby to wipe up any unexpected leaks quickly. Have you ever had a minor leak turn into a puddle? These simple items help keep your workspace clean and safe.
Replacement Parts
Having replacement washers, O-rings, and valve cartridges ready can speed up the repair process. These small parts wear out over time and often cause leaks.
Check your valve model before buying parts to ensure compatibility. Being prepared with the right replacements means you won’t have to pause your repair to run to the store.

Credit: www.amazon.com
Step-by-step Valve Inspection
Inspecting the water valves under your kitchen sink is vital for preventing leaks and water damage. A careful check can extend the valve’s life and ensure smooth operation. Follow simple steps to inspect the valves safely and thoroughly.
Shutting Off The Water Supply
Start by turning off the main water supply to the kitchen sink. This stops water flow and prevents spills during inspection. Locate the shutoff valves under the sink and turn them clockwise until tight. Double-check by opening the faucet to confirm no water flows out.
Checking For Visible Damage
Look closely at each valve for cracks, rust, or corrosion. Check the valve body, handle, and nearby pipes. Damage or wear signs may indicate leaks or future failure. Note any discoloration or buildup around connections and joints.
Testing Valve Operation
Turn each valve handle slowly to test its movement. It should turn smoothly without resistance or grinding noises. The valve must fully open and close without leaks. If the handle is stiff or loose, repair or replacement may be needed.
Examining Valve Connections
Inspect all valve connections for tightness and leaks. Use a flashlight to see hard-to-reach spots. Look for water stains or moisture around fittings. Tighten loose connections with an adjustable wrench, but avoid overtightening to prevent damage.
Fixing Common Issues
Fixing common issues with water valves under your kitchen sink can save you from costly repairs and water damage. These valves control the flow of water to your faucet and appliances, so keeping them in good shape is essential. Let’s look at how you can tackle typical problems yourself with simple, effective solutions.
Stopping Leaks
Leaks around water valves often start as small drips but can quickly become a bigger problem. Check the valve connections for any visible signs of water. Tightening the nuts with a wrench can sometimes stop leaks immediately.
If the leak persists, the washer inside the valve might be worn out. Replacing it is usually straightforward and requires just a few tools. Think about whether the valve has been leaking for a while—delaying repair could cause damage to your cabinetry.
Tightening Loose Valves
Loose valves can cause rattling noises and may lead to leaks. Use an adjustable wrench to gently tighten the valve handle and the connection nuts. Don’t overtighten; this can damage the valve or the pipes.
If the handle feels wobbly, it might need a new packing nut or a fresh washer inside. You might be surprised how a small adjustment can restore proper function and save you the hassle of replacing the entire valve.
Replacing Faulty Valves
Sometimes, valves become faulty due to age or corrosion. If a valve won’t shut off water completely or leaks despite tightening, replacement is your best option. Turn off the main water supply before removing the old valve.
Use a pipe wrench to unscrew the faulty valve and install a new one that fits your plumbing. You’ll want to test the new valve carefully to make sure it operates smoothly and stops leaks entirely.
Cleaning Mineral Buildup
Mineral deposits from hard water can clog valves and reduce their efficiency. You might notice the valve becoming stiff or leaking as minerals accumulate. Soaking the valve parts in vinegar can dissolve mineral buildup effectively.
After soaking, scrub gently with a soft brush and rinse thoroughly before reassembling. Regular cleaning can prevent buildup and keep your valves working smoothly longer. Have you checked your valves for mineral buildup recently?
Preventive Maintenance Tips
Maintaining water valves under the kitchen sink prevents leaks and costly repairs. Simple care keeps valves working smoothly for years. Small checks save time and money later.
Regular Valve Checks
Look at valves monthly for leaks or corrosion. Turn valves on and off to ensure smooth operation. Catch problems early to avoid water damage.
Avoiding Over-tightening
Tighten valves gently to stop leaks without damage. Over-tightening can crack valves or strip threads. Use just enough force for a snug fit.
Using Quality Parts
Choose durable valves and fittings made from strong materials. Cheap parts wear out quickly and cause leaks. Quality parts last longer and reduce maintenance.
Flushing The Lines Periodically
Open valves fully to flush out debris and buildup. This clears blockages and improves water flow. Do this every few months to keep lines clean.
When To Call A Professional
Knowing when to call a professional for water valve issues under your kitchen sink can save time and prevent damage. Some problems require expert skills and tools. Trying to fix these issues alone might cause more harm.
Persistent Leaks
Leaks that continue despite your efforts need professional help. A plumber can find hidden problems causing the leak. They have tools to fix leaks properly. Ignoring persistent leaks can lead to water damage and mold.
Complex Valve Systems
Some kitchen sinks have complicated valve setups. These systems need special knowledge to handle. Professionals understand different valve types and how they work. Incorrect repairs might cause bigger plumbing issues.
Lack Of Proper Tools
Fixing water valves often requires specific tools. Without them, repairs can be difficult or unsafe. Professionals come equipped with the right gear to do the job well. Using wrong tools can damage pipes or valves.
Safety Concerns
Water valves connect to your home’s water supply. Mistakes can cause flooding or water damage. Professionals know how to work safely with plumbing systems. Protect your home and yourself by calling a plumber for risky repairs.

Credit: www.workshop.bunnings.com.au
Frequently Asked Questions
What Are The Main Types Of Water Valves Under Kitchen Sinks?
The main types include angle stop valves, ball valves, and gate valves. Angle stop valves are most common for kitchen sinks. They control water flow to the faucet and allow easy shutoff during repairs or emergencies.
How Do I Identify The Water Valves Under My Kitchen Sink?
Look for two small valves connected to the water supply lines. One controls hot water, the other cold. They usually have a round or lever handle and are located near the wall beneath the sink.
Why Do Water Valves Under My Kitchen Sink Leak?
Leaks often occur due to worn-out washers, loose fittings, or corrosion. Regular use and age can cause valves to degrade. Tightening connections or replacing faulty parts usually stops leaks effectively.
How Do I Shut Off Water Using Valves Under The Sink?
Turn the valve handles clockwise until they stop. This action closes the valve and stops water flow. Always test by turning on the faucet to ensure water is fully shut off.
Conclusion
Water valves under the kitchen sink control water flow to your taps. Knowing their location helps in quick repairs and maintenance. Always check valves for leaks or damage regularly. Tightening or replacing faulty valves keeps your plumbing safe. Simple care can prevent bigger water problems later.
Understanding these valves saves time and money. Keep your kitchen running smoothly with basic valve knowledge. Small steps make a big difference in home care.
