Imagine the satisfying aroma of a sizzling stir-fry or the comforting scent of freshly baked cookies wafting through your kitchen. But what happens when those delicious smells linger too long, accompanied by unwanted smoke or steam?
This is where a range hood comes to the rescue, ensuring your kitchen remains fresh and inviting. However, simply installing a range hood isn’t enough; you need to vent it properly to the outside to truly enjoy its benefits. You’ve probably noticed how crucial ventilation is for maintaining a clean and healthy kitchen environment.
Without proper venting, grease, smoke, and odors can build up, affecting not just your kitchen’s air quality but also its aesthetics. Venting your range hood to the outside is the best way to keep your kitchen air pristine and protect your home from excess moisture and heat. Are you ready to transform your cooking space into a breath of fresh air? In this guide, you’ll learn how to vent a range hood to the outside effectively, ensuring that every culinary adventure leaves your kitchen as inviting as ever. From understanding the tools you’ll need to mastering the steps involved, you’ll gain the confidence to tackle this essential home improvement project. Keep reading to discover how you can enhance your kitchen’s functionality and atmosphere today!

Credit: www.homedepot.com
Choosing The Right Range Hood
Vent your range hood outside for better air quality and kitchen safety. Direct the duct through an exterior wall. Ensure proper sealing to prevent leaks and maintain efficiency.
Choosing the right range hood is crucial for effective kitchen ventilation. It ensures smoke, odors, and grease exit your home efficiently. To make the best choice, consider various types and factors that suit your kitchen needs.Types Of Range Hoods
There are several types of range hoods available. Wall-mounted hoods attach directly to the wall above the stove. They are ideal for kitchens with no cabinets above the cooking area. Under-cabinet hoods fit beneath kitchen cabinets. They save space and provide a sleek look. Island hoods hang from the ceiling over a kitchen island. They work well in open kitchen layouts. Downdraft hoods are installed in the countertop. They pull air downwards, away from the cooktop.Factors To Consider
Consider the size of the range hood. It should match the size of your cooktop. A larger hood captures more smoke and steam. Check the hood’s ventilation power, measured in CFM (cubic feet per minute). Higher CFM is better for heavy cooking. Look at noise levels. Quieter hoods are more pleasant to use. Evaluate the installation process. Some hoods are easier to install than others. Consider your kitchen’s design and style. A hood should complement your kitchen’s aesthetics. Look at the price and ensure it fits your budget.Planning The Venting Route
Planning the venting route for your range hood is essential for efficiency. The right path ensures the removal of smoke and odors effectively. It also prevents potential damage to your kitchen walls and ceiling. A well-planned route avoids unnecessary bends and long ducts. This makes the venting process smooth and cost-effective.
Assessing Your Kitchen Layout
Your kitchen layout plays a crucial role in venting. Identify where your range hood is installed. Check the proximity to external walls. Consider the cabinetry and other fixtures that might obstruct the path. Understand the dimensions of your kitchen space. This helps in determining the most straightforward venting route.
Determining The Best Path
The shortest path to the outside is always preferable. It reduces the risk of air leaks and maintains efficiency. Inspect possible routes for the ductwork. Look for existing wall openings or vents. These can simplify the venting process. Avoid cutting through structural elements like beams. This can compromise the integrity of your home.
Consider potential obstacles like electrical wiring or plumbing. Plan to avoid these areas during installation. Ensure the path chosen allows for easy access to the ductwork. This will make future maintenance easier. A clear route ensures better air flow and reduces noise. Proper planning will save you time and effort.
Gathering Necessary Tools And Materials
Venturing into a DIY project like venting a range hood outdoors requires preparation. Gathering the right tools and materials ensures smooth progress. With everything ready, the task becomes less daunting. You’ll feel confident and ready to tackle the installation.
Essential Tools List
Start with a reliable drill. Ensure it has the right bits for metal and wood. A tape measure helps with accurate dimensions. Having a level ensures your ductwork stays straight. Snips are necessary for cutting sheet metal. A screwdriver set is essential for securing components. Don’t forget a pencil for marking measurements.
Required Materials
Purchase a range hood vent kit, including a wall or roof cap. Duct tape helps seal joints and prevent leaks. Get a backdraft damper to stop air from flowing back in. Aluminum or galvanized steel ducting is necessary for the vent path. Ensure you have screws and brackets for securing the ductwork. Insulation helps reduce noise and maintain efficiency.

Credit: basc.pnnl.gov
Preparing The Installation Area
Ventilation is crucial for a range hood to perform effectively. Preparing the installation area is the first step. It ensures a seamless setup and optimal function. Proper preparation prevents future issues and guarantees safety.
Clearing The Space
Begin by removing any items blocking the installation area. Ensure the area is free of clutter. This provides ample working space. A clear area improves focus and efficiency. It reduces the risk of accidents.
Ensure the ceiling and walls are accessible. Check for any obstructions. This includes furniture, decor, or appliances. Remove these items temporarily. This allows easy access to the space.
Marking The Vent Path
Decide the path for the vent. Consider the shortest route to the outside. This minimizes the duct length. A shorter duct improves airflow efficiency. Use a measuring tape for accuracy.
Mark the path with a pencil. Ensure the path avoids electrical wiring or plumbing. Double-check your measurements. Precision is key for a successful installation. This step lays the foundation for the project.
Installing The Range Hood
Installing a range hood is an essential step for ensuring your kitchen remains smoke-free and your air stays fresh. It’s a task that might seem daunting, but with a little guidance, you can do it yourself. Whether you’re upgrading your kitchen or setting up for the first time, knowing how to properly install and vent your range hood to the outside is crucial.
Mounting The Hood
Before you start, make sure you have all the necessary tools and equipment. You’ll need a drill, screws, a screwdriver, and a measuring tape. Check that the range hood is the right size for your stove. There should be at least 24 to 30 inches of space between the stovetop and the bottom of the hood.
Locate the studs in your wall. This step is vital as mounting the hood on drywall alone could lead to accidents. Using a stud finder, mark the positions where you’ll place the screws. Secure the range hood to the wall by drilling into these marked spots. A personal tip: double-check the hood’s level before tightening the screws completely. It ensures your hood looks straight and functions effectively.
Securing The Vent Duct
Once the hood is mounted, the next step is to connect the vent duct. This part ensures that smoke and odors are efficiently expelled outside. Use a rigid duct for durability and efficiency. Flexible ducts might seem easier to install, but they can trap grease and decrease airflow.
Attach one end of the duct to the range hood’s vent outlet. Secure it tightly with duct tape or clamps to prevent air leaks. Run the duct to the outside wall, ensuring a straight path for optimal performance. A pro tip: use a wall cap to finish off the outside opening, keeping pests and moisture at bay.
Have you considered how a well-installed range hood could improve your cooking experience? With cleaner air and less lingering odors, you might find yourself more inspired to try new recipes. Plus, a properly vented kitchen can be a selling point if you ever decide to move.
Taking the time to install your range hood correctly pays off in the long run. It not only enhances your kitchen’s functionality but also contributes to a healthier home environment. So, grab your tools, follow these steps, and enjoy the benefits of a well-ventilated kitchen!
Connecting The Vent Duct
Venting your range hood outside is a crucial step. It ensures smoke and odors leave your kitchen. Connecting the vent duct properly is vital.
Start by gathering all necessary tools and materials. Ensure you have a duct, tape, and screws. These will secure the connection effectively.
Attaching Duct To Hood
Align the duct with the hood’s outlet. Ensure it fits snugly. Use screws to fasten the duct to the hood. Tighten them securely to avoid leaks.
Seal the connection with duct tape. This prevents air from escaping. Check for gaps and cover them well.
Running Duct Through Wall Or Ceiling
Plan the path for the duct. Decide if it goes through the wall or ceiling. Mark the spots where the duct will pass.
Cut holes for the duct. Use a saw for precise cuts. Ensure the holes are the right size. Insert the duct carefully through these openings.
Fasten the duct to the wall or ceiling. Use brackets for support. Secure them tightly to prevent movement. Cover any gaps with tape.
Creating An Exterior Wall Opening
Creating an exterior wall opening is crucial for venting a range hood. This step ensures proper airflow and removes kitchen odors effectively. Let’s explore how to cut the wall and install the vent cap.
Cutting The Wall
First, locate the ideal spot on your exterior wall. Use a stud finder to avoid cutting into wall studs. Once you’ve marked the area, drill a pilot hole through the wall. This helps guide your saw blade. Next, use a reciprocating saw to cut out the marked section. Keep your cuts straight and precise. Remove the cut-out section carefully to avoid damaging the surrounding wall.
Installing The Vent Cap
Place the vent cap over the hole. Ensure it fits snugly against the wall. Secure it using screws provided with the vent cap. Apply a bead of exterior caulk around the edges. This seals gaps and prevents moisture entry. Check that the vent flap moves freely. This ensures proper airflow. Finally, paint the vent cap to match your home’s exterior for a seamless look.
Securing The Vent Cap
Securing the vent cap is an essential step in ensuring the efficiency of your range hood system. It’s not just about functionality; it’s about preserving your home’s integrity against the elements. Picture this: you’ve installed the perfect vent cap, but a poor seal allows rainwater to seep in, causing damage over time. Nobody wants that headache! So, how can you secure it properly? Let’s break it down.
Sealing The Edges
Once you’ve installed the vent cap, attention to detail is key. Use high-quality caulk to seal the edges around the cap. This prevents air leaks and keeps unwanted moisture out.
Choose a weather-resistant caulk for long-lasting protection. Apply it evenly, ensuring no gaps are left. Think of it as adding a protective barrier to your home.
Don’t rush the process. A careful application can save you from future repairs. Have you ever tried sealing something in a hurry? It usually ends up messy, right?
Ensuring Weather Resistance
Your vent cap faces the wrath of Mother Nature. From heavy rain to snow, it needs to withstand it all. Consider installing a vent cap with built-in weather resistance features.
Some vent caps come with flanges or weather hoods. These additions deflect water and shield against wind. A small investment here can mean big savings later.
Think about it: how often do you want to climb up and fix a faulty vent cap? Probably never. Choose wisely to avoid frequent maintenance.
Securing the vent cap not only enhances the efficiency of your range hood but also protects your home from potential water damage. Have you secured yours properly? If not, now’s the time to act!
Testing The Ventilation System
Ensure proper kitchen ventilation by guiding your range hood’s exhaust outside. This involves installing ductwork through walls or ceilings, ensuring fumes and odors are effectively removed. Secure fittings and check for leaks to maintain efficient airflow.
Testing the ventilation system of your range hood is a crucial step in ensuring that your kitchen remains fresh and free from lingering odors. It’s not just about installation; it’s about making sure the system is functioning efficiently. When I first installed my range hood, I was eager to test it out. It wasn’t until I noticed a slight draft in the kitchen that I realized the importance of thorough testing. You might be wondering, how do you ensure the ventilation is doing its job? Let’s break it down.Checking Airflow
Begin by turning on the range hood and feeling the airflow. Stand beneath it and sense the strength of the air being pulled. Is it effective enough to remove smoke and smells? You can also use a piece of tissue paper to check this. Hold the tissue near the vent; if it’s pulled towards the hood, your airflow is likely strong. A weak pull indicates a problem that needs addressing. Consider using an anemometer, a device that measures airflow speed. It can provide precise data on whether your system is working optimally.Identifying Potential Leaks
Leaks can undermine the efficiency of your ventilation system. Inspect the ductwork for any visible gaps or cracks. Can you spot areas where air might escape? A simple way to test for leaks is by using a smoke pencil or incense stick. Hold it along the duct joints and watch the smoke’s path. If it wavers, you’ve identified a potential leak. Pay attention to unusual noises. Whistling or rattling sounds might indicate gaps in the ductwork. These need immediate attention to prevent energy loss. Testing your ventilation system is not just a technical task; it’s about ensuring comfort in your home. Have you ever noticed stale air lingering despite a high-tech range hood? That’s often due to overlooked testing. Engage with your system, feel the airflow, and identify leaks to ensure your kitchen is a haven of fresh air.Maintenance Tips
Ensure proper ventilation by directing your range hood’s exhaust outside. Install ductwork to guide fumes outdoors. Secure connections to prevent leaks and enhance air quality.
Maintaining your range hood is crucial for ensuring its efficiency and longevity. Without proper care, the vent can become clogged, reducing its ability to expel smoke and odors from your kitchen. Regular maintenance ensures your home remains a fresh and pleasant place to cook. Let’s dive into some essential maintenance tips for your range hood venting system.Cleaning The Vent Duct
Regular cleaning of the vent duct is necessary to prevent buildup of grease and debris. If left unattended, these can lead to blockages, reducing the effectiveness of the vent. Use a long brush or vacuum attachment to remove any dust or grease from the duct. A friend once shared how his range hood stopped working efficiently, only to discover a nest of lint in the duct. Now, he makes it a habit to clean the duct every few months. Consider setting a reminder on your phone to stay on top of this task.Regular Inspection
Inspect your range hood system regularly to catch issues early. Look for signs of wear and tear, such as rust or loose fittings. Ensure the fan is working properly and that the filters are not clogged. During one inspection, I noticed a small crack in the vent hood, which could have led to bigger problems if ignored. Addressing it promptly saved me from a costly repair. What small issues might you be overlooking in your kitchen? Taking these steps will keep your range hood venting efficiently and help avoid bigger problems down the road. Remember, a well-maintained range hood not only keeps your kitchen air clean but also extends the life of your appliance. Have you checked your vent duct lately?
Credit: www.lilyanncabinets.com
Frequently Asked Questions
How Does A Range Hood Vent Outside?
A range hood vents outside through ductwork that carries kitchen air to an external vent. Fans in the hood expel smoke, odors, and grease outside, maintaining indoor air quality. Proper installation ensures efficient ventilation, reducing pollutants effectively. Regular maintenance helps optimize performance and extends the range hood’s lifespan.
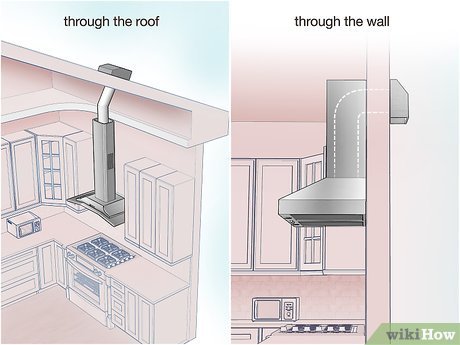
Is It Better To Vent A Range Hood Through A Wall Or Roof?
Venting a range hood through the wall is often more efficient and cost-effective. Roof venting can be challenging due to roof penetrations. Wall venting minimizes duct length and improves airflow. Choose based on your home’s layout and climate conditions to ensure optimal performance.
What Are The Different Venting Options For Range Hoods?
Range hoods have three venting options: ducted, ductless, and convertible. Ducted hoods vent air outside through ducts. Ductless hoods use charcoal filters to recirculate air. Convertible hoods can be used as either ducted or ductless, providing flexibility based on installation preferences.
Choose based on kitchen layout and personal needs.
Can You Have A Range Hood That Doesn’t Vent Outside?
Yes, you can have a range hood that doesn’t vent outside. These are called recirculating or ductless range hoods. They filter air through charcoal filters and release it back into the kitchen. They are ideal for apartments or places where external venting isn’t possible.
Conclusion
Vent your range hood to the outside for better kitchen air. Clean air means a healthier home. Proper venting reduces smoke and odor. Follow the steps carefully. Safety first! Use correct tools and materials. Check local codes and guidelines. Improper venting can cause problems.
A well-vented kitchen improves cooking experience. Enjoy fresh air while you cook. Regularly check and maintain your vent system. Clean filters and ducts as needed. Keep your kitchen safe and efficient. Venting is a worthwhile home project. Happy cooking and fresh breathing!
