Are you tired of cooking smells lingering in your kitchen long after you’ve finished your meal? Installing a range hood exhaust vent might just be the solution you’ve been searching for.
Not only does it help in clearing out unwanted odors, but it also improves air quality by removing smoke, steam, and airborne grease. Imagine a kitchen where the air stays fresh, no matter what you’re cooking. This guide will walk you through the simple steps of installing a range hood exhaust vent yourself, saving you time and money.
So, if you’re ready to transform your cooking space into a fresher, more pleasant environment, keep reading. Your kitchen’s air quality is about to get a major upgrade.
Tools And Materials Needed
Ensure success by gathering essential tools such as a drill, screwdriver, and measuring tape. Have materials like duct tape, vent pipe, and screws ready.
When you’re about to install a range hood exhaust vent, gathering the right tools and materials is crucial for a smooth and efficient process. Without the correct items, you might find yourself halfway through the installation only to realize you’re missing something essential. This can turn a straightforward task into a frustrating ordeal. So, let’s ensure you have everything you need before you start.
Tools You’ll Need
Having the right tools at your disposal makes all the difference. Start with a drill; it’s indispensable for creating holes for screws and venting. A tape measure is another must-have to ensure precise measurements and prevent any misalignment. An adjustable wrench will help you tighten or loosen nuts and bolts with ease. If you’ve ever tried to install anything without one, you know how crucial it is.
A screwdriver set is essential for both installing and securing the hood. Make sure to have both flat-head and Phillips-head screwdrivers. An electric stud finder will help you locate wall studs, ensuring your range hood is securely mounted. Lastly, a level is crucial to make sure everything is perfectly straight. No one wants a lopsided hood!
Materials Required
Before you begin, make sure you have all the materials lined up. You’ll need ductwork that matches the diameter of your range hood’s outlet. This will guide the exhaust out of your kitchen. Duct tape is essential for sealing the joints and ensuring no air escapes. Have some wood screws handy, especially if you’re mounting the hood to a wooden surface. These provide a firm hold. If mounting to a wall, you’ll need toggle bolts for a secure attachment. For those unexpected surprises, caulk can be used to seal around the vent cap, keeping moisture and pests out. It’s always better to be prepared for any gaps or uneven surfaces.
Safety Gear
Safety should be your top priority. Always wear safety goggles to protect your eyes from dust and debris. If you’re working with power tools, gloves can prevent cuts and blisters. And, if you’re sensitive to dust, a mask will keep your lungs clear.
Personal Tips
Having installed a range hood myself, I learned the hard way that having a helper can make the job much easier. Holding the hood in place while securing it is no easy feat. So, ask a friend or family member to lend a hand. Preparation is key. Lay out all your tools and materials before you start. This will save you from running back and forth, keeping your focus on the task at hand. Have you ever started a project only to realize you were missing a critical tool or material? Double-check your list, and you’ll avoid the same frustration. Now, with everything prepared, you’re ready to tackle the installation confidently!
Choosing The Right Location
Choosing the right location for your range hood exhaust vent is crucial. Proper placement ensures efficient removal of smoke and odors. It also enhances kitchen air quality and comfort. Let’s explore key factors to consider in selecting the ideal spot.
1.
Proximity to Cooking Area
Position the vent close to your cooking area. This captures smoke and steam effectively. The shorter the distance, the better the performance. Ensure easy access for maintenance and cleaning.
2.
Direct Outdoor Access
Choose a location with direct access to the outdoors. This minimizes ductwork and reduces installation complexity. Shorter ducts improve airflow and efficiency. Consider wall or ceiling options based on your kitchen layout.
3.
Avoiding Obstructions
Avoid placing the vent near tall cabinets or other obstructions. These can block airflow and reduce effectiveness. Ensure there is enough clearance for optimal performance. A clear path enhances the hood’s ability to vent air efficiently.
4.
Considering Building Codes
Check local building codes and regulations. They may dictate specific requirements for vent placement. Complying with these ensures safety and legality. Consult a professional if uncertain about code requirements.
5.
Analyzing Kitchen Layout
Analyze your kitchen layout to determine the best vent location. Consider the placement of other appliances and fixtures. Ensure the vent complements the overall kitchen design. A well-integrated vent enhances both function and aesthetics.
Preparing The Area
Preparing the area for your range hood exhaust vent is crucial. A clean, organized space ensures a smooth installation process. Proper preparation saves time and avoids frustration. Follow these steps to get your area ready.
Removing Existing Fixtures
Begin by removing any existing fixtures. Clear away old vents or covers. Use a screwdriver or drill for this task. Wear gloves to protect your hands. Disconnect any electrical connections safely. Store removed parts out of the way. Ensure the area is free of debris and dust.
Marking The Vent Path
Next, mark the path for your new vent. Measure the range hood’s location carefully. Use a pencil to mark the vent path on the wall. Ensure the path is straight and level. Check for any obstructions in the wall or ceiling. Adjust your markings if needed. Double-check measurements before proceeding.
Cutting The Vent Hole
Cutting the vent hole for your range hood exhaust is a crucial step in ensuring effective ventilation in your kitchen. It’s not just about getting the job done, but doing it safely and accurately. This part of the installation can feel daunting, but with the right approach, you can tackle it confidently and efficiently. Let’s dive into the essentials of this process, starting with safety precautions and tool selection.
Safety Precautions
Before you start, think about safety first. Wearing protective gear like goggles and gloves is essential. You never know when debris might fly in unexpected directions. A dust mask can be handy too, especially if your kitchen is prone to dust.
Consider your surroundings. Are there electrical wires or plumbing lines near the area you plan to cut? Double-check to prevent any unexpected mishaps. It’s always better to be safe than sorry.
Also, ensure your working area is well-lit. You want to see clearly when you’re making precise cuts. A small flashlight can be a lifesaver if you’re working in a dim corner.
Using The Right Tools
Choosing the right tools makes all the difference. A jigsaw with a fine blade is often recommended for cutting through drywall or wood. It provides the precision needed to make neat cuts. If you’re dealing with tougher materials, a reciprocating saw might be a better option.
Measure twice, cut once. Using a tape measure and pencil to mark your vent hole dimensions is key. You might be tempted to eyeball it, but precise measurements prevent costly mistakes. A level can help ensure your markings are straight.
Finally, keep a drill on hand. You’ll need it to create a starting point for your saw. Remember, the drill bit should be slightly larger than your saw blade for a smooth entry.
Are you feeling ready to tackle the vent hole? With these tips, you can make the process smoother and safer. What are your thoughts on DIY installations? Share your experiences below!
Installing The Ductwork
Installing the ductwork is a crucial step in setting up your range hood. This process ensures proper ventilation and keeps your kitchen air clean. Properly installed ductwork helps in efficiently removing smoke and odors. Let’s dive into the steps involved in assembling and securing the ducts for your range hood.
Assembling The Duct Pieces
Start by gathering all the required duct pieces. Ensure you have the right size and type for your range hood. Use a measuring tape to confirm dimensions before assembly. Connect the pieces together using duct connectors. Ensure each joint is tightly sealed. This prevents any air leaks during operation.
Use duct tape to secure the joints. Make sure there are no gaps or openings. Check all connections twice. A tightly assembled ductwork ensures optimal performance. Take your time with this step for best results.
Securing The Ducts
Once assembled, it’s time to secure the ducts in place. Use brackets or straps to hold the ducts firmly. Attach them to the wall or ceiling. Ensure the ducts are straight and aligned. Avoid any bends or kinks. This helps in maintaining smooth airflow.
Double-check the tightness of all fasteners. Ensure the ducts are stable and do not move. Stability is key for efficient ventilation. Perform a final inspection of the entire setup. Confirm all parts are securely in place.
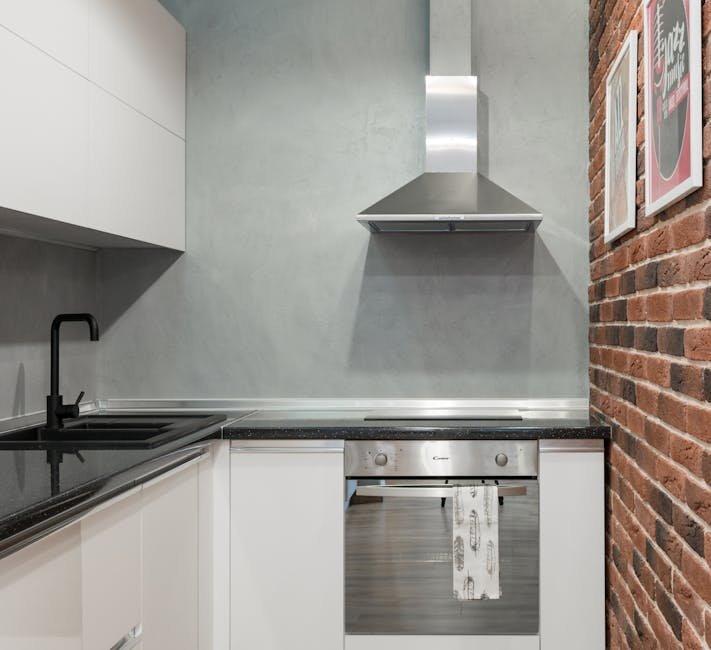
Mounting The Range Hood
Installing a range hood exhaust vent is crucial for a functional kitchen. The mounting process is an essential step. Proper installation ensures effective ventilation and safety. Follow these steps for a smooth setup.
Aligning The Hood
Correct alignment is key. Begin by measuring the space above your stove. Make sure the hood fits perfectly in the designated area. Use a level tool to guarantee straight placement. This prevents uneven extraction of fumes.
Securing With Screws
Once aligned, secure the hood with screws. Choose screws that match the material of your wall. Drill pilot holes to ease screw placement and prevent splitting. Tighten each screw firmly. This ensures the hood stays in place.
Connecting The Exhaust Vent
Connecting the exhaust vent is a crucial step in installing a range hood. A properly installed exhaust vent ensures that cooking fumes are effectively expelled, keeping your kitchen fresh and clean. Taking the time to carefully connect the exhaust vent can make a significant difference in your kitchen’s air quality. Let’s dive into the process, starting with attaching the vent cap and then sealing the connections.
Attaching The Vent Cap
First, locate the exterior wall where your exhaust vent will exit. This is usually the side of your home, but it could also be the roof. The vent cap is designed to prevent debris and moisture from entering the vent system.
Secure the vent cap to the exterior wall using screws. Make sure it’s level and tightly fastened. You don’t want it coming loose during a storm. A sturdy attachment ensures longevity and proper function.
Double-check that the vent flap or louvers are moving freely. They should open easily when air flows out and close when not in use. This prevents birds or other critters from making a home in your vent system.
Sealing The Connections
Once the vent cap is securely attached, focus on sealing the connections. This step is crucial for preventing air leaks, which can reduce the efficiency of your exhaust system.
Use high-quality caulk or sealant around the edges of the vent cap. This creates a tight seal that keeps your kitchen air flowing smoothly. A good seal also prevents moisture from seeping into the walls, which can cause mold and damage.
Inspect all joints and seams along the exhaust vent path. If you notice any gaps, fill them with sealant. This attention to detail ensures that your range hood operates at peak performance.
Have you ever noticed drafts in your kitchen when the range hood is on? Proper sealing can eliminate this issue, making your kitchen more comfortable. Taking the extra time to ensure everything is sealed can save you headaches down the road.
By carefully attaching the vent cap and sealing connections, you are not only improving your kitchen’s air quality but also contributing to the overall energy efficiency of your home. Ready to breathe easier?
Testing The Installation
After installing your range hood exhaust vent, testing it is crucial. This ensures everything functions properly. A well-installed vent improves air quality. It also enhances kitchen safety. Let’s explore how to test the installation.
Checking For Leaks
Inspect the duct connections for leaks. Use a flashlight to look closely. Feel for any air escaping. You can also use a smoke pen. Pass it near the joints. If smoke wavers, there might be a leak. Seal any leaks with duct tape. This prevents air loss and improves efficiency.
Ensuring Proper Airflow
Start the range hood to check the airflow. Place a piece of paper near the vent. The paper should stick to the vent. This means airflow is sufficient. If it falls, the airflow might be weak. Check for blockages in the duct. Clean the filters to improve performance. Regular maintenance keeps airflow optimal.
Maintenance Tips
Installing a range hood exhaust vent enhances kitchen ventilation. Begin by selecting the right vent location and size. Securely attach the ductwork, ensuring proper alignment.
Maintaining your range hood exhaust vent is crucial for ensuring its efficiency and longevity. Regular upkeep prevents unpleasant odors and keeps the air in your kitchen fresh. Let’s dive into some essential maintenance tips that will keep your range hood in top shape.
Cleaning The Filters
Your range hood filters are the front line in capturing grease and debris. Clean them regularly to maintain optimal performance. Metal filters can often be washed in warm, soapy water or even placed in the dishwasher. If you’re like me, setting a monthly reminder on your phone for filter cleaning helps keep you on track. Fabric filters, however, might need replacing instead of cleaning. A clean filter not only improves air quality but also reduces fire hazards. Ever notice a greasy smell lingering in your kitchen? That could be your range hood filter begging for attention.
Inspecting The Ducts
Ducts play a crucial role in venting air outside your home. Inspecting them helps identify blockages or damage that could hinder performance. Check the ducts twice a year for any buildup or obstructions. You might find leaves or debris clogging the exterior vent, especially if your vent leads outside. Ensure the ducts are properly sealed. Leaky ducts can reduce efficiency and lead to increased energy costs. Have you ever wondered why your kitchen feels stuffy despite the range hood running? Inspecting the ducts might give you the answer. Regular maintenance of your range hood exhaust vent not only saves you money but also enhances your cooking experience. What steps will you take to keep your range hood in perfect condition?
Frequently Asked Questions
How To Install Venting For A Range Hood?
To install venting for a range hood, first measure and mark the duct path. Cut the vent hole, attach ductwork, and secure it. Connect the duct to the hood, ensuring tight seals. Finish by installing the exterior vent cap and testing the system for proper airflow.
Do Range Hoods Have To Be Vented Outside?
Range hoods can be vented outside or use recirculation. Venting outside removes smoke and odors effectively. Recirculating hoods filter air and release it back indoors. Choose vented systems for better air quality and efficiency. Consult professionals for installation to ensure proper ventilation and compliance with local regulations.
What Is The Code For Range Hood Venting?
The code for range hood venting typically follows local building codes. Ensure proper duct size, material, and external venting. Check specific requirements in the International Residential Code (IRC) or local regulations for details. Proper installation ensures efficiency and safety.
Do You Need An Electrician To Install A Rangehood?
You need an electrician to install a rangehood for proper wiring and safety compliance. DIY can be risky without expertise. Electricians ensure correct installation, preventing electrical hazards and ensuring optimal performance. Choose a licensed professional for peace of mind and adherence to local regulations.
Conclusion
Installing a range hood exhaust vent is now within reach. Follow each step carefully. Ensure tools are ready before starting. Safety gear is important. Double-check your measurements for accuracy. Connect the ductwork securely. Verify the vent leads outside properly. Test the fan to confirm functionality.
Regular maintenance keeps it efficient. Clean filters to avoid clogs. Enjoy fresh air in your kitchen. Your cooking space will feel pleasant. A well-ventilated kitchen boosts comfort. You did it—your vent is installed. Let your kitchen shine with clean air.
Share this guide with friends who need help.