
A dishwasher rack that won't slide turns a five-minute job into a wrestling match. If you want to know how to fix a dishwasher rack that won't slide, the good news is that the cause is almost always small, visible, and cheap. Most of the time it's a worn wheel, a missing clip, or a track packed with mineral scale.
You don't need a technician for any of those.
In our research across manufacturer parts catalogs, a replacement roller kit typically costs between $5 and $30, while a service call starts around $100 before parts. Manufacturer specifications put the actual repair time at 10 to 30 minutes for wheels and clips. So the real work isn't the fix.
It's figuring out which part failed. Here's how to do both.
How to Fix a Dishwasher Rack That Won’t Slide
To fix a dishwasher rack that won't slide, find the cause first. Empty the rack and slide it slowly to feel where it binds. Check the wheels for cracks, flat spots, or missing pieces.
Inspect the clips, rails, and end caps next. Replace the failed part, clean the track, and retest.
Why Your Dishwasher Rack Won't Slide (And Why the Cause Matters)
Almost every stuck rack comes down to one of four failure families. The wheels and their axles. The retaining clips that hold those wheels on.
The rails or tracks the wheels ride in. Or the rack structure itself, which includes height adjusters, end caps, and the frame.
Knowing which family you're in changes everything about the repair. A cracked wheel is a $10 fix you can do while the kettle boils. A bent tub-side rail or a snapped mounting point is a different job entirely, and forcing it can crack the tub liner.
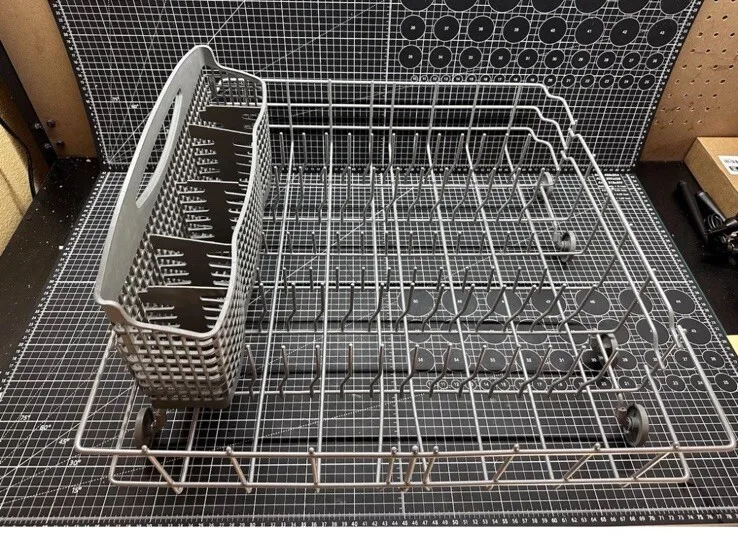
Image source: Bing (Web (fair-use with source credit))
Here's the logic in plain terms. If the rack binds on one side only, suspect a wheel or a clip on that side. If it drags evenly across the whole travel, suspect the rails or the rack frame.
If it drops suddenly or tilts, suspect a derailment, a broken end cap, or a failed height adjuster.
That distinction matters because racks carry real weight. A lower rack loaded with cast iron, casserole dishes, and stockpots puts constant load on four small nylon wheels. Those wheels are designed to fail before the rack frame does.
That's good news for you.
Material choice explains a lot of the wear you'll see. Most modern rollers are molded from acetal (POM) or nylon because those plastics resist hot water and alkaline detergent. Underwriters Laboratories evaluates dishwasher construction against UL 749, the standard for household dishwashers.
That's one reason OEM parts fit to tight tolerances and generic wheels often don't.
There's a second reason to diagnose properly. A rack that drags or sits crooked can drop low enough to clip the spray arm. You'll hear a rhythmic thud or grind mid-cycle.
Keep running it like that and you're risking a cracked spray arm on top of a broken wheel.
The Four Causes, Ranked by How Often They Happen
If you only have time to check one thing, check the wheels. In our review of owner reports, repair threads, and manufacturer parts catalogs, wheel and clip failures account for the clear majority of stuck-rack complaints.
| Rank | Cause | Rough share of cases | Tell-tale sign | Typical part cost |
|---|---|---|---|---|
| 1 | Worn, cracked, or missing wheels | About 50 to 60% | Wheel loose in tub, flat spot, wobble | $5 to $30 |
| 2 | Clips, push-nuts, or axles gone | About 15 to 20% | Wheel slides off its post by hand | $4 to $35 |
| 3 | Rails scaled, greasy, or rusted | About 15 to 20% | Drags evenly across the whole travel | Under $5 to clean |
| 4 | Bent rail, end cap, or tub mount | About 5 to 10% | Rack tilts, derails, or catches one spot | $5 to $400 |
Treat those percentages as an editorial read of patterns, not a lab measurement. The point is the shape of the problem. Causes one and two are both cheap and both DIY, which means most people reading this will fix their rack for under $40.
The expensive causes are also the rarest.
Before You Touch Anything: Find Your Model Number and Pull the Parts Diagram
Stop before you order anything. Dishwasher rack hardware is model-specific, and the same brand will change roller designs between production years. A wheel that fits a 2016 Whirlpool won't necessarily fit the 2019 version of the same model line.
Your first job is finding the model and serial plate. On most machines it's on the inner edge of the door, on the tub frame just inside the door opening, or on the side of the door panel. Some Beko and Electrolux units tuck it behind the lower kickplate.
| Brand family | Usual plate location |
|---|---|
| Bosch, Miele | Inner door edge or tub frame, right side |
| Whirlpool, Maytag, KitchenAid | Inner door edge, top left or right |
| GE Appliances | Tub frame inside the door opening |
| Samsung, LG | Inner door edge or left tub wall |
| Beko, Electrolux, AEG | Door edge or behind the lower kickplate |
Once you have the full model number, pull the manufacturer's exploded parts diagram. Every major brand publishes these on their support site, and they show the exact wheel, clip, axle, end cap, and rack assembly for your build. That diagram is the single most useful document in this whole repair.
Now decide between OEM and aftermarket. OEM parts cost more but match the original axle diameter, wheel profile, and clip tension. Aftermarket kits are cheaper and often sold in multipacks, but universal roller kits are the number one cause of repeat failures in our research.
If the axle diameter is off by even a millimeter, the wheel wobbles and cracks early.
Two checks before you spend money:
- Confirm the part number against the diagram, not against a marketplace listing title.
- Check for recalls or service bulletins on your model through the Consumer Product Safety Commission database, especially if the rack failure came with cracking or heat damage elsewhere.
If you're already thinking about replacing the machine because the rack keeps failing, swapping out a hardwired unit brings its own electrical considerations. Sort those before you shop.
Diagnose It in Two Minutes: The Slide Test That Narrows It Down
The slide test is exactly what it sounds like, and it beats guessing every time. Pull the rack all the way out, then push it back in slowly with one hand while watching both sides. You're listening and feeling for the exact point where resistance starts.
Run it empty first. A loaded rack hides the symptom and adds weight that muddies the diagnosis. Then follow the branches below.
If it binds on one side only
Suspect a wheel or clip on that side. Look for a wheel that's cracked, flattened, or sitting at an angle. Check whether the wheel is actually riding in the channel or has jumped out of it.
If it drags evenly across the whole travel
Suspect the rails. Run a finger along the inside of the channel. Grit, hardened detergent film, or rough scale means the track is the problem, not the hardware.
Clean it and retest before buying anything.
If it drops, tilts, or falls out completely
Suspect a derailment, a missing end cap, or a broken height adjuster. On adjustable racks, the plastic adjuster housing often cracks and lets one corner sag. That corner then catches on everything.
If it grinds or pops mid-cycle but slides fine by hand
Suspect spray arm interference. A rack sitting too low, or a spray arm with a damaged bearing, can clip on each rotation. Check rack height position and look for scuff marks on the arm.
If it slides but feels rough and noisy
Suspect wear rather than failure. Flattened wheel profiles, a rough rail surface, or corrosion on coated steel tracks all produce that gritty feel. This is the stage where a cheap fix still works.
| What you notice | Most likely cause | Typical fix |
|---|---|---|
| One side catches | Cracked wheel or missing clip | Wheel or clip kit |
| Whole travel feels stiff | Scale, grease, or detergent film on rails | Deep clean the track |
| Rack tilts or drops | Height adjuster or end cap failure | Adjuster housing or end cap |
| Wheel found loose in tub | Broken axle pin or lost clip | Axle post, wheel, and clip |
| Grinding during the cycle | Spray arm interference | Rack height reset or arm repair |
One practical note. The slide test is much easier with the rack removed and reinstalled once, because you'll immediately feel whether the wheels seat properly in the channel. If a wheel won't sit flat in the rail, you've found your problem.
Condition 1: Cracked, Flat, or Missing Wheels
Worn wheels are the most common cause of a rack that won't slide, full stop. They're small, they carry the whole load, and they live in hot soapy water for a decade. Something has to give first, and it's always them.
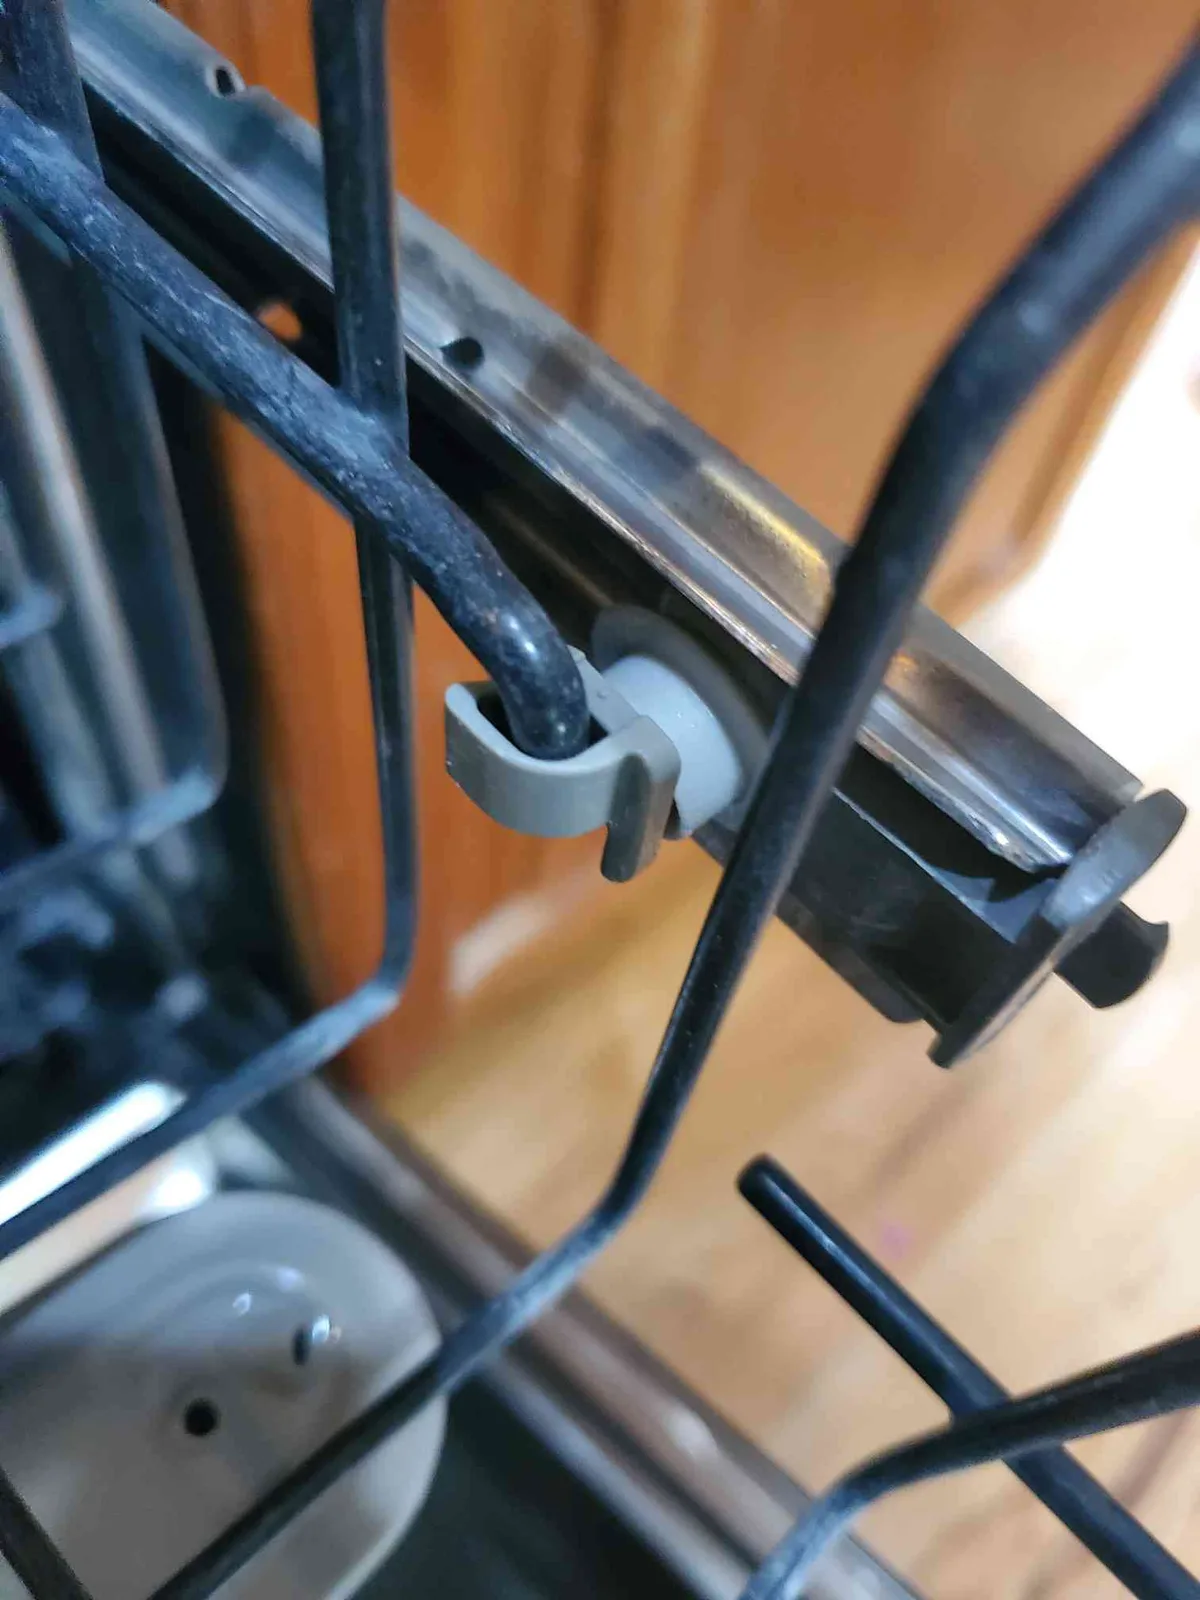
Image source: Bing (Web (fair-use with source credit))
You're looking for three specific failure modes. Cracking, where the plastic splits from the axle outward. Flat spotting, where the wheel has worn into a D shape from sitting under a heavy load.
And total loss, where the wheel has crumbled or fallen off entirely.
How to Check the Rollers
Take the rack out of the machine and flip it onto a towel. Now inspect every wheel individually, not just the ones on the side that seems stuck. Racks often fail on a wheel you'd never suspect.
- Spin each wheel by hand. It should rotate freely with no wobble and no grinding.
- Check the profile. Hold the wheel edge-on. A worn wheel looks flattened on one side, not round.
- Flex the plastic. A healthy acetal wheel gives slightly. One that's brittle or chalky is on its way out.
- Look at the axle hole. An elongated hole means the wheel is riding sloppy and will crack soon.
- Check the axle pin itself. Bend or shear here is common on rack designs with molded stub axles.
If one wheel is bad, replace all the wheels on that rack. The remaining wheels are usually the same age and the same amount of wear, so a single-wheel swap usually means you'll be back in there within a year. Kits come in sets of four or six for exactly this reason.
Swapping a Wheel or a Full Roller Kit
The job is genuinely simple. Kill the power at the breaker first, even though you're not touching wiring. Water and appliances don't reward shortcuts.
- Empty and remove the rack. Lift the front edge, release the rack stop or end cap, and pull it clear of the tub.
- Lay the rack upside down on a towel so you don't scratch the coating or lose small parts down the drain.
- Pop the old wheel off. A flathead screwdriver behind the wheel usually does it. Work gently and don't lever against the rack wire.
- Inspect the axle pin. If it's bent, straighten it or replace the post before fitting anything new. A new wheel on a bent axle will fail fast.
- Snap the new wheel on. Push until it clicks or seats fully flat against the frame. It should spin freely with zero wobble.
- Fit the retaining clip if your design uses one, and make sure it's fully seated.
- Clean the rail channel before reinstalling. There's no point putting fresh wheels into a gritty track.
- Reinstall and run the slide test empty, then loaded.
Most wheel swaps take under 20 minutes. If it's taking longer, you're probably forcing a wheel that's the wrong size, so stop and recheck the part number.
When the Axle Pin Has Snapped
A snapped axle pin changes the job slightly but not dramatically. Some racks use molded plastic stub axles that are part of the rack frame. If one shears off, you have three routes.
- Replace the affected rack section or the full rack if the axle is integral to the frame.
- Fit a repair axle kit if the manufacturer offers one, which some do for common failures.
- Replace the whole rack assembly if the frame itself is warped or rusted at the joint.
Don't try to glue or drill a replacement axle into a molded frame. The load path is exactly where you're adding material, and the repair won't hold through hot cycles.
One last thing worth flagging. Racks that keep eating wheels usually have a second problem upstream, like a rough rail surface or a habit of overloading. Fix the wheels, then check the track and think about how much cast iron you're stacking on the bottom basket.
If the lower rack is permanently full of heavy cookware, loading large pots and awkward dishes more carefully will save you repeat repairs.
Condition 2: The Clip Is Gone and the Wheel Fell Off
A clip failure looks alarming and costs almost nothing. The wheel itself is usually fine, sitting somewhere in the bottom of the tub or wedged near the filter. What failed is the small retainer that stops the wheel walking off its axle.
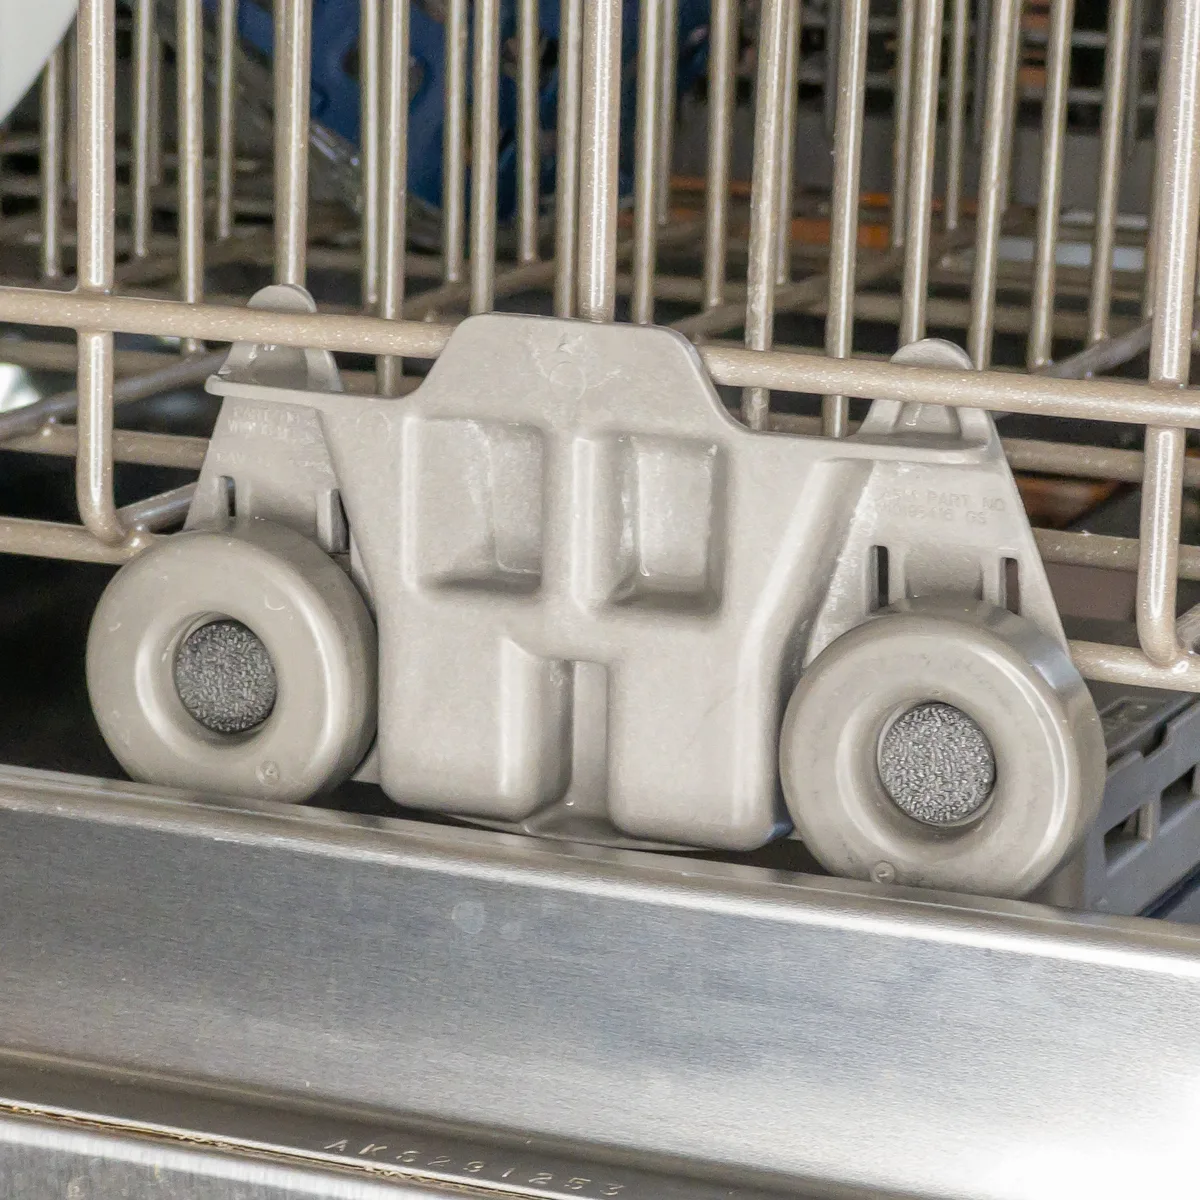
Image source: Bing (Web (fair-use with source credit))
Manufacturers use a few different designs here. Push-nuts are pressed onto a plastic post and grip by friction. C-clips and split retaining clips snap into a groove and hold the wheel at a fixed depth.
Some racks use a press-fit wheel with an integral hub, in which case there's no separate clip at all and the whole wheel is the wear item.
First, find the loose part. Check the bottom of the tub, the filter basket, the sump area, and the gap behind the lower rack channel. A stray clip or wheel fragment that reaches the pump can score an impeller, so don't run a cycle with hardware rattling around in there.
If the wheel is intact and the clip is missing, then buy the clip. Retaining clips typically run $4 to $12 for a multipack, which makes this the cheapest fix in this entire guide. Fit it and you're done in five minutes.
If the wheel is intact but slides off the post by hand, then either the clip groove is worn or the wheel hub has opened up. Replace both the wheel and the clip in that case. A worn hub will keep shedding retainers no matter how many you fit.
If the axle post itself is cracked or snapped, then you're into one of the frame repairs covered above. Don't substitute a cable tie, a split pin, or a screw for the proper retainer. Those solutions either fall out in hot water or chew into the rack coating.
One thing people mix up. End caps and clips aren't the same part. End caps sit at the front of the rail to stop the whole rack rolling out.
Retaining clips hold a wheel on its axle. Order the right one, and check the exploded diagram before you commit.
Clips also go missing for a reason. Repeated hard loading knocks them loose, and racks that carry a lot of heavy cookware lose them fastest. That's a loading habit worth changing rather than a reason to keep buying clips.
Condition 3: Rails That Are Gunked, Scaled, or Rusted
If the wheels and clips are healthy but the rack still drags, the rail is your problem. The channel that a rack wheel rides in needs to be smooth, clean, and straight. Anything else adds friction, and friction feels exactly like a broken wheel from the handle end.
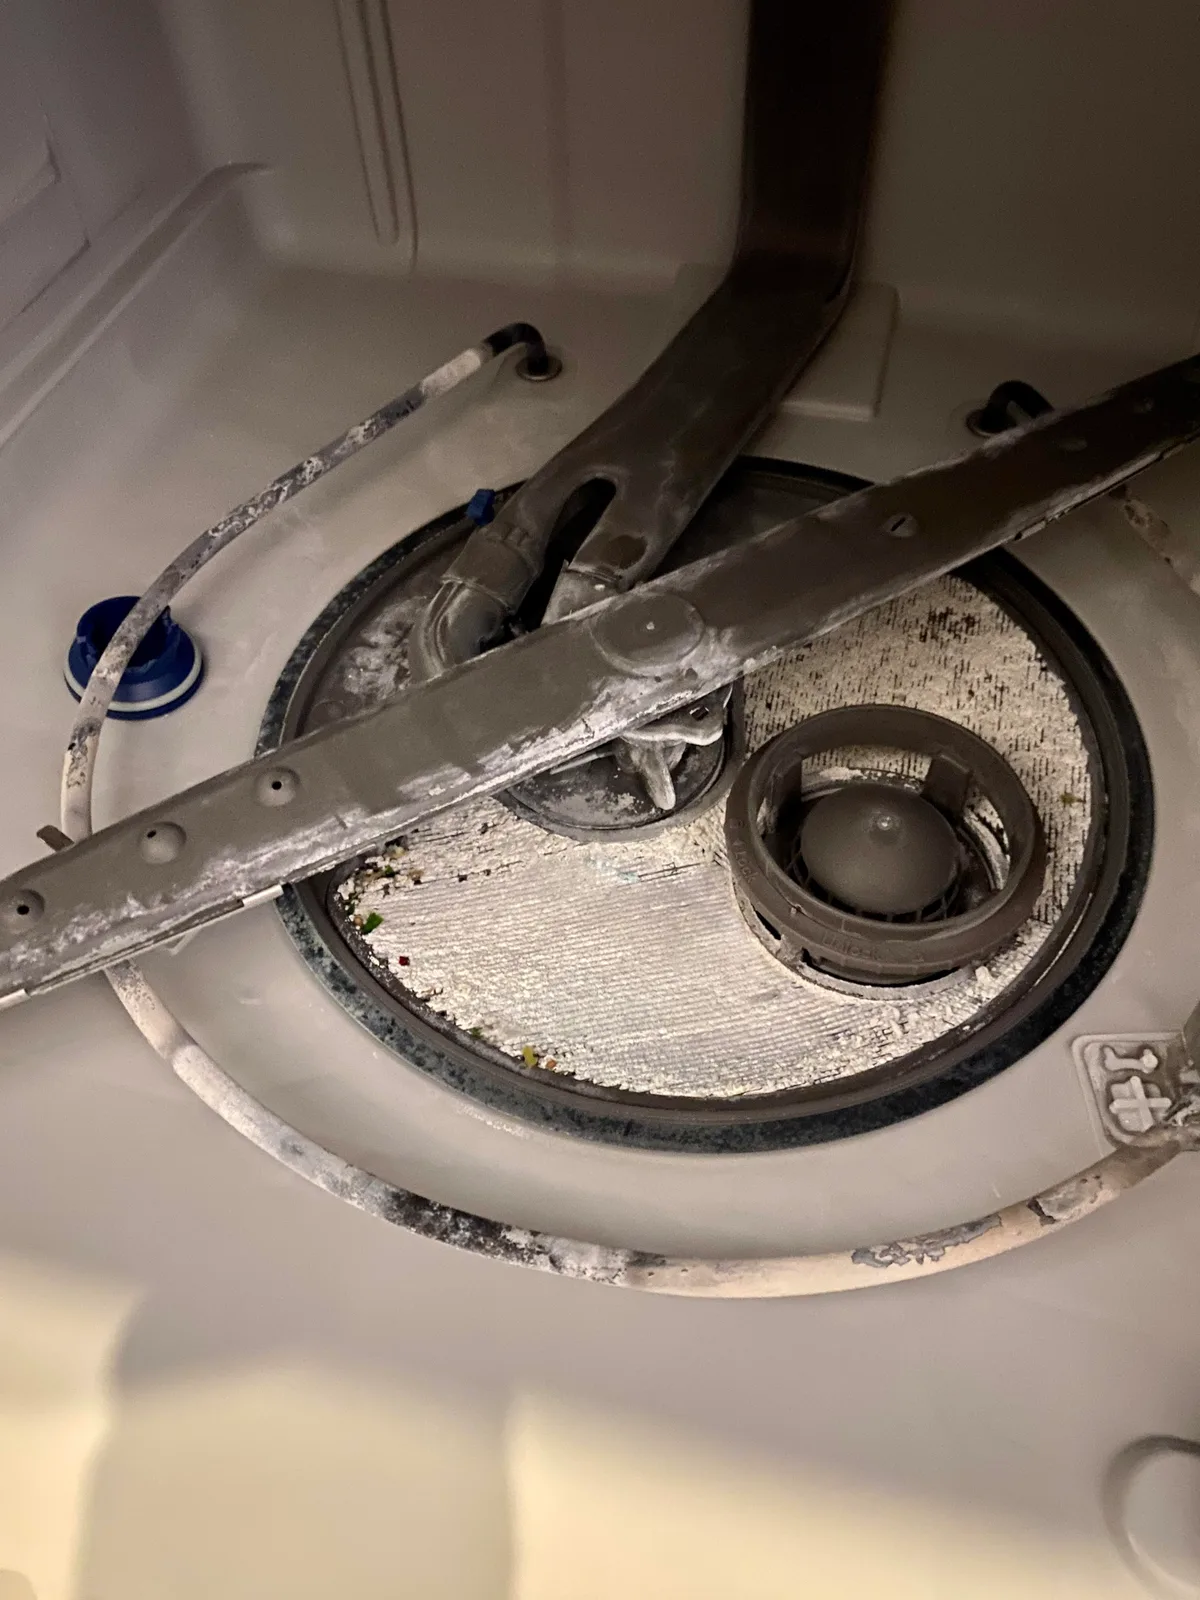
Image source: Bing (Web (fair-use with source credit))
Four things build up inside a rail channel. Detergent film and rinse aid residue leave a sticky, slightly tacky layer. Grease from heavy loads collects on that layer.
Food particles work their way in and harden. And in hard-water areas, calcium carbonate scale forms a crust that genuinely grips the wheel.
Rust is the fourth and most serious. Coated steel rails and lower-end wire racks lose their coating over time, and once bare metal is exposed, it corrodes. Surface rust is fixable.
Rust that has eaten through the coating and pitted the metal means replacement, not cleaning.
Cleaning Plastic and Nylon Rails Safely
The right approach is gentle, warm, and slightly acidic. Aggressive cleaning damages the very surface you're trying to smooth.
- Remove the rack first. Cleaning a rail with the rack in place means you can't reach the full channel.
- Wipe out loose debris with a dry cloth or a soft brush before wetting anything.
- Wash with warm water and a drop of dish soap, using a nylon brush or an old toothbrush along the channel.
- Soak a scale-crusted rail in a citric acid solution or a 50/50 white vinegar and water mix for 15 to 30 minutes.
- Rinse thoroughly and dry completely before reinstalling. Leftover acid sitting in a channel is not your friend.
- Never use steel wool, scouring pads, oven cleaner, or heavy bleach solutions on plastic or coated rails. They scratch the surface and leave it rougher than before.
If you've cleaned it and the rack still catches at one spot, run a fingertip along the channel. A burr, a crack, or a lifted edge of coating will catch your skin before it catches the wheel.
Hard-Water Scale on the Track
Hard water is the single biggest environmental factor in rack binding. The US Geological Survey classifies water above 180 mg/L of calcium carbonate as very hard, and at that level you'll see scale on rails, wheels, and heating elements within months.
| Water hardness (mg/L as CaCO3) | Classification | Rail scaling risk |
|---|---|---|
| Under 60 | Soft | Low |
| 61 to 120 | Moderately hard | Modest |
| 121 to 180 | Hard | Noticeable within a year |
| Over 180 | Very hard | Frequent descaling needed |
If you're in a hard-water area, descale the rails every three to six months rather than waiting for a binding symptom. It takes ten minutes and prevents most of the drag complaints we see in owner feedback.
Hard water also accelerates wheel wear, because scale grit acts like sandpaper between the wheel and the channel. That's why hard-water households often replace wheels more often than the manufacturer's typical timeline suggests.
Long term, deal with the cause as well as the symptom. Rinse aid helps water sheet off surfaces and reduces the film scale builds on. Machines with a built-in softener and a salt reservoir need that reservoir topped up monthly, and the hardness setting in the menu should match your local water report.
US models rarely have that feature, so descaling and rinse aid are your main tools unless you treat the supply.
What to Use as Lubricant and What Never to Put in the Tub
Does a rack rail need lubricant at all? Usually no. A clean, smooth channel with healthy wheels should glide on its own.
Lubricant is a fix for a rough surface, not a routine step.
If you do lubricate, use a small smear of food-grade silicone grease on the wheel axles only. Silicone is compatible with acetal, nylon, and polypropylene, and it doesn't wash away instantly in hot water.
Never put these anywhere inside a dishwasher:
- WD-40 or penetrating oils, which leave residue on dishes and can degrade some plastics.
- Cooking oil or olive oil, which turns gummy and feeds odor-causing bacteria.
- Petroleum jelly or mineral oil, which can craze and soften certain plastics over time.
- Graphite powder, which migrates onto dishes and racks.
- Any grease applied to the rail channel itself, since it captures food particles and makes the problem worse.
If cleaning plus a touch of silicone grease on the axles doesn't restore smooth travel, the rail surface is damaged. That's a replacement job, covered next.
Condition 4: A Bent Rail, Missing End Cap, or Derailed Rack
This is the branch where DIY stops being the obvious answer. A bent rail, a broken rack stop, or a rack that has dropped off its track all involve geometry, and geometry is unforgiving.
A bent rail usually happens in one of three ways. Someone leans on an open rack while loading. A rack gets forced back in after jumping its channel.
Or a heavy pan lands on the rail on the way in. The rail itself may be a plastic channel, a coated steel angle, or a stainless track, and only the plastic and coated types can be gently straightened.
Reseating a Rack That's Dropped Off the Track
This one is genuinely fixable in minutes. Pull the rack fully out, tilt it so both sets of wheels sit below the rail entry point, and slide it back in level. Both sides must engage at the same time.
If you push one side first, the other side drops below the channel and you're right back where you started.
If the rack keeps derailing, then look for the reason rather than repeating the reseat. The usual suspects are a missing front end cap, a cracked rail entry, or a wheel that's riding outside the channel because its axle is bent.
When a Bent Rail or Cracked Tub Mount Means Stop DIYing
Here's the honest line. If the rail is bent beyond a couple of millimeters, or if the rail's mounting point on the tub wall is cracked, stop.
A tub-side mount is part of the tub structure. Levering on it, drilling it, or forcing a screw into cracked plastic risks a leak that writes off the whole machine. That's a technician job, often involving a rail bracket replacement or, on some models, tub component access from underneath.
Bent plastic rail channels can sometimes be warmed gently and coaxed back, but be careful. Overheating a rail with a heat gun or hairdryer softens it into a shape it won't hold. If it springs back, replace it.
Also rule out spray arm interference before you replace anything with a tub mount. If the rack rolls smoothly by hand but grinds during a cycle, the arm is catching it. Check the rack height setting first.
One more scenario worth naming. Adjustable height racks fail at the adjuster housing, not the wheels. The rack sags on one corner, catches, and won't slide level.
If one corner sits visibly lower than the other with the rack empty, suspect the adjuster rather than the rollers.
Decision Table: Match the Symptom, Get the Fix, Know the Cost and Time
Use this table as your quick reference. Costs reflect typical US retail as of 2026, and times assume a reasonably confident DIYer.
| Symptom | Likely cause | Fix | Typical part cost | Time | DIY? |
|---|---|---|---|---|---|
| Binds on one side | Cracked or flat wheel | Wheel kit | $5 to $30 | 10 to 20 min | Yes |
| Wheel loose in tub, rack drops | Missing clip or push-nut | Retaining clip set | $4 to $12 | 5 to 10 min | Yes |
| Wheel won't stay on post | Worn hub or broken axle | Wheel plus axle repair | $8 to $35 | 15 to 30 min | Yes |
| Stiff across full travel | Scale, grease, detergent film | Deep clean rails | Under $5 | 20 to 40 min | Yes |
| Rust through the coating | Corroded rail or rack | Rail or rack replacement | $40 to $200 | 30 to 60 min | Yes |
| Rack rolls past the stop | Missing end cap | End cap pair | $5 to $15 | 5 min | Yes |
| One corner sits low | Failed height adjuster | Adjuster housing | $10 to $40 | 20 to 40 min | Yes |
| Grinding during cycle only | Spray arm interference | Rack height reset | $0 | 5 min | Yes |
| Rack catches on bent rail | Deformed rail channel | Rail replacement | $30 to $150 | 30 to 60 min | Usually |
| Cracked tub mount or leak risk | Structural tub damage | Technician repair | $150 to $400 | Service call | No |
A few things to read from that table. The two most common failures, wheels and clips, land under $30 combined. If your quote from a technician is over $150 for either of those, you're paying for a van and a half hour of labor.
The one row where DIY gets risky is the last. Any repair that touches the tub wall itself carries a leak risk, and leaks in a dishwasher usually show up as damaged flooring or a failed control board, not a puddle you spot immediately.
If your symptom doesn't match any row cleanly, go back to the slide test and split the problem further. Does it bind in both directions? Only on the way out?
Only when loaded? Those answers point to different branches.
Repair or Replace? Wheels, Full Rack Assembly, or a New Dishwasher
Three repair levels exist here, and the right one depends on what's actually broken, how old the machine is, and whether parts are still available.
| Option | Typical cost | Best for | Watch out for |
|---|---|---|---|
| Wheels and clips only | $5 to $30 | Healthy rack, worn hardware | Buy the full set, not one wheel |
| Rail, end cap, or adjuster | $5 to $60 | Localized hardware failure | Confirm part number by year |
| Full rack assembly | $60 to $200 | Warped frame, rust, multiple failures | Check fitment against serial number |
| Technician tub repair | $150 to $400 | Cracked mount, leak risk | Ask for a fixed quote first |
| New dishwasher | $450 to $1,200 plus fitting | Structural failure on an old machine | Not justified for a $10 wheel |
Start at the top and work down only as far as you need to. Replacing a whole rack because one wheel cracked is a waste of $100 or more. Replacing a whole dishwasher because the rack is worn is a bigger waste.
When replacing the whole rack makes sense
Full rack assemblies are the right call when the frame is warped, when rust has spread through several joints, when the coating is peeling across the whole basket, or when three or more hardware pieces have failed at once. At that point you're rebuilding a rack part by part, and the total cost creeps toward a new assembly anyway.
Check availability before you commit. Rack assemblies are model-specific and often discontinued after seven to ten years. If your machine is older than that and the rack is failing broadly, a new machine may genuinely be the better financial path.
When a new dishwasher makes sense
A new machine is justified in a narrow set of cases. The tub mount is cracked and the repair quote exceeds roughly half the price of a replacement. Parts are discontinued.
The machine is over 12 years old with multiple failures stacking up. Or the rack problem is the latest in a long line of faults.
When you should just call someone
Call a technician if the rack failure came with water on the floor, a burning smell, or damage to the tub wall. Call them too if your machine is still under warranty, because DIY disassembly can void coverage. And call them if you've replaced wheels and clips and the rack still won't glide, which points to something structural you can't see.
Households running full loads every day wear racks far faster than occasional users, so ignore the calendar and count cycles instead. A busy family kitchen can put three years of wear on a rack in eighteen months.
Removing and Refitting a Rack Without Breaking Anything
Most rack damage happens during removal, not during the repair itself. People yank, twist, or lever the basket past its stops, and a cracked end cap or bent channel turns a $10 job into a $150 one.
Start by emptying the rack completely. A loaded rack is heavier than it looks, and one-handling a full basket is how frames get twisted. Remove the cutlery basket too, since it shifts the balance.
Then find the rack stops. On most lower racks, these are plastic end caps or small stop tabs at the front of each rail. On upper racks, the stops are usually release levers or clips near the rail entry, and some models require you to lift the front of the rack at a specific angle before it releases.
| Rack type | Removal method | Common mistake |
|---|---|---|
| Standard lower rack | Lift front edge, clear the stops, pull straight out | Twisting it sideways and bending the rail entry |
| Standard upper rack | Squeeze or release the stop clips, then lift and pull | Forcing it past a stop that hasn't released |
| Height-adjustable rack | Lower to bottom position first, then release stops | Removing it in the raised position and cracking the adjuster |
| Telescopic glide rack | Release the front locking tabs, then slide out fully | Lifting the basket off the runners and bending them |
Once the front is clear, pull the rack out in a straight line. Don't angle it toward yourself, and don't drag one side ahead of the other. Both sets of wheels need to leave their channels at the same moment.
If a rack won't come out at all, stop pulling. Something is still engaged, and the usual culprits are a hidden rear stop, a screw-mounted rail retainer, or a spray arm blocking the path underneath. Look along the rail with a torch before you apply more force.
Putting it back is the reverse, with one important difference. Both sides must enter the rails at the same height. Tilt the rack so the rear wheels line up first, then lower the front gently and slide it in.
If it stops halfway, pull it back out and start again rather than shoving it home.
Lubricate nothing on installation day except the axles if you've had a rough-glide complaint. A clean channel and sound wheels need no help. If it still catches after a careful refit, go back to the diagnosis branch rather than repeating the install.
The upper rack feed tube
Every upper rack gets its water through a feed tube, sometimes called a conduit or supply hose. It runs from the tub up to the rack, and it's usually attached somewhere on the rack itself. Pull the rack carelessly and you can crack the connection without noticing.
The symptom shows up a cycle later. The upper rack cleans poorly, the top spray arm barely turns, and water drips in odd places. Nothing about it looks like a rack problem, which is why people chase the wrong fault for weeks.
| Feed tube type | Where it connects | Common failure |
|---|---|---|
| Flexible hose with push-fit connector | Rear tub wall to rack inlet | Connector cracks or O-ring perishes |
| Rigid telescoping conduit | Tub base to rack manifold | Seal dislodges or conduit splits |
| Mid-rack mounted tube | Center of the tub to rack | Tube detaches when the rack is yanked |
| Built into the rail assembly | Along the rail itself | Cracked at the flex point |
Before you slide the rack back in, confirm the connector is seated squarely, the O-ring or seal is present, and the tube isn't kinked against the rack frame. Then push the rack in slowly and watch the connection. If the tube strains, the rack is pushing it somewhere it doesn't want to go.
Twist the top spray arm by hand with the machine empty. If it turns freely, the feed tube is probably fine. If it feels stiff or won't turn at all, check the connector, then the seal, then the tube itself.
Mistakes That Turn a Ten-Minute Fix Into a Service Call
We've seen every one of these in owner reports and repair threads. Each one starts as a shortcut and ends as a bigger bill.
- Forcing a stuck rack. If it won't move, something is binding. Pushing harder bends rails and snaps end caps.
- Levering against the tub wall. The tub is a sealed component. Crack it and you're looking at a machine replacement, not a repair.
- Fitting universal roller kits. A wheel that's 1 mm off on axle diameter wobbles, then cracks.
- Replacing one wheel out of four. The rest are the same age with the same wear. Do the set while you're in there.
- Gluing or taping a snapped axle. Hot water and detergent defeat every adhesive. It will fail within a few cycles.
- Spraying WD-40 into the rails. It leaves an oily film that ends up on your dishes and can soften some plastics.
- Running the machine with loose hardware inside. A stray wheel or clip that reaches the pump can score the impeller.
- Skipping the rail clean before refitting new wheels. Fresh nylon wheels in a gritty channel wear at double the rate.
- Overloading the lower rack with cast iron. Small nylon wheels have a load limit. Constantly exceeding it is a choice, not bad luck.
- Ignoring the model year. The same brand changes roller design between production runs, and the wrong-year part won't fit.
- Working on a live machine. Repairs don't need power. Flip the breaker and remove the temptation.
There's a pattern in that list. Almost every expensive outcome comes from applying force to something that's still held by a fastener or a clip. Rack hardware is designed to be serviced.
Tubs are not.
One more mistake worth naming separately, because it's the most common of the lot. People buy a new dishwasher when the actual fault is a $10 wheel and a dirty rail. Before you spend four figures, price the parts.
The repair parts for this job almost always come in under the cost of a service call, let alone a new appliance.
And if the machine is noisy as well as stiff, don't assume the rack is the whole story. Noise and drag are sometimes the same fault, sometimes not, and it's worth ruling out other causes before you order parts. Owners of certain brands chase this constantly, and the same diagnostics come up in complaints about a Kenmore machine running loud or an Electrolux model that won't settle down.
Safety, Small Parts, and Warranty Warnings
None of this work is dangerous if you respect three things. Electricity, sharp edges, and chemistry.
Electricity first. Flip the breaker or unplug the machine before you put a hand inside the tub. Dishwashers have wiring near the door latch and in the base, and standing water plus a live circuit is the one scenario where this job could actually hurt you.
Sharp edges next. Damaged wire rack frames, bent coated steel rails, and cracked plastic housings all produce burrs. Wear gloves when you're running a finger along a channel or handling a broken wheel.
Eye protection is sensible if you're snapping brittle plastic or brushing out a crusted rail.
Small parts deserve a mention too. Clips, push-nuts, and wheel fragments are a genuine choking hazard for toddlers and pets. Sweep up and bin everything as you go, and don't leave a half-finished repair overnight with loose hardware on the floor or in the tub.
Then chemistry. Citric acid and diluted white vinegar are the right descalers. Never mix them with chlorine bleach or a bleach-based cleaner, because that combination releases chlorine gas.
Keep the room ventilated while you work, and rinse every surface thoroughly before the machine runs again.
Warranty is the last thing to check before you pick up a screwdriver. Manufacturer terms vary, but most allow basic maintenance while excluding disassembly or unauthorized part fitting. If your machine is under two years old, call the manufacturer first.
A covered repair shouldn't cost you anything.
Household dishwashers are built to UL 749 in the US and IEC 60335-2-5 internationally. That's why OEM parts fit to tight tolerances and why tolerances matter when a rack starts binding.
The Tools and Materials You Actually Need
This repair doesn't need a toolbox full of specialist gear. Most households already own everything except the replacement parts.
| Item | What it's for | Needed? |
|---|---|---|
| Flathead screwdriver | Popping wheels off axles, releasing stop clips | Yes |
| Needle-nose pliers | Retrieving clips, holding push-nuts | Yes |
| Old toothbrush or nylon brush | Cleaning rail channels | Yes |
| Soft cloths and a towel | Drying rails, protecting the rack | Yes |
| Small container or tub | Holding clips and wheels so nothing rolls away | Yes |
| Work gloves | Sharp edges on damaged wire racks | Yes |
| Citric acid or white vinegar | Descaling rails | Yes, in hard water |
| Food-grade silicone grease | A touch on wheel axles only | Optional |
| Torch or phone light | Looking down rail channels | Optional |
Total spend on the consumables, excluding parts, is usually under $15. A tub of citric acid lasts years and doubles as a dishwasher cleaner, so it's the one purchase worth making before you have a problem.
The thing people forget is a container for small parts. Clips and push-nuts are tiny, they bounce, and they disappear under appliances faster than anything else in the kitchen. Use a mug or a takeaway tub and put every piece in it as you remove it.
Skip the specialist appliance tool kits, the penetrating oils, and the universal roller multipacks. None of them help, and two of them actively cause repeat failures.
How to Test a Repair Before You Call It Done
A repair isn't finished when the part clicks on. It's finished when the rack glides loaded, through a full cycle, with no new noises. Run these checks in order.
- Empty slide test. With the rack empty, push it in with one finger. It should travel smoothly with no tight spot.
- Loaded slide test. Load it normally and repeat. Resistance should increase slightly, not jump.
- Full extension test. Pull it right out. The stops must engage and hold.
- Flat check. Look at the rack side-on. It should sit level, with no corner lower than the others.
- Arm clearance check. Watch the spray arm as the rack passes. Nothing should touch.
- Dry run cycle. Close the door and run a short cycle with nothing in the machine. Listen for clicks and thuds.
- Post-cycle inspection. Open up and check the new parts are still seated and nothing has shifted.
A healthy rack moves with light, even pressure and no lateral wobble. If you need two hands, something is still wrong. Stop and recheck rather than loading it and hoping.
A rhythmic click during the cycle means the spray arm is contacting the rack. A single sharp snap when you pull it out means the stops aren't engaging. A scrape on one side means a wheel is riding outside the channel.
Those three symptoms account for most repeat jobs, and all three are visible before you run a full load.
The Root-Cause Audit: Why the Same Part Keeps Failing
If you're replacing the same wheel twice in two years, the part isn't the problem. Something upstream is wearing it out faster than designed. Run this audit before you buy another kit.
| Repeated failure | Likely root cause | What to change |
|---|---|---|
| Same wheel, same position | Overloading that corner | Redistribute weight |
| Same side, different wheels | Bent rail or rough channel | Replace the rail |
| All four wheels within a year | Hard water grit | Descale and treat the water |
| Clip loss on one axle | Worn hub or bent post | Replace wheel and post |
| Upper rack keeps sagging | Cracked adjuster housing | Replace the housing |
| Rack derails repeatedly | Missing end cap or cracked entry | Fit new stops |
Start with the loading pattern. Look at which wheel failed. Front left, front right, rear left, rear right.
That position tells you what's been sitting above it. Heavy cookware parked over the same corner for years is a root cause, not bad luck.
Then check the rail surface. Run a fingertip along the whole channel, both directions. Any roughness means the rail is grinding the new wheels down.
Cleaning fixes mild cases and replacement fixes rough ones, but nothing fixes putting fresh wheels into a rough channel.
Then check the water. Repeated early failures across both racks usually point to hard water grit acting as an abrasive.
Keeping It Gliding: Maintenance That Actually Helps
A rack that's maintained properly lasts the life of the machine. One that isn't starts eating wheels every couple of years. The difference comes down to a handful of small habits.
| Task | How often | Time | Why it matters |
|---|---|---|---|
| Clean the filter | Monthly, or weekly in heavy-use homes | 5 min | Loose particles recirculate and jam rails and wheels |
| Wipe rail channels | Every 3 months | 10 min | Removes detergent film and grease before it hardens |
| Descale rails in hard water | Every 3 to 6 months | 20 min | Prevents calcium crust gripping the wheels |
| Check wheels and clips | Every 6 months | 5 min | Catches a cracked wheel before it fails mid-load |
| Inspect rack stops and end caps | Every 6 months | 2 min | Prevents derailment and rail damage |
| Light silicone grease on axles | Only if a glide feels rough | 5 min | Extends wheel life without attracting grit |
Notice what's not on that list. No oil in the tub, no lubricant sprayed along the tracks, and no harsh cleaners. The routine is clean, check, and occasionally lubricate the axles.
Filter cleaning is the one that gets skipped and matters most. A clogged filter means food particles keep circulating through the wash water and settle into rail channels, wheel hubs, and door seals. Manufacturer manuals for nearly every major brand specify regular filter cleaning for exactly this reason.
Load distribution is the invisible maintenance task. Spread weight across the rack instead of stacking it over one set of wheels. Put heavy cast iron and stockpots toward the middle and rear rather than over the front rollers.
That single habit slows wheel wear more than anything else you can do.
Water hardness drives your descaling schedule, so test it once. A basic test strip or your local water authority's report gives you a number. Above 180 mg/L of calcium carbonate, rail descaling should be routine, not reactive.
Finally, note your part numbers somewhere before you need them. Model number, wheel part, clip part, end cap part. When a wheel fails in three years, you won't want to repeat the whole discovery process.
For a broader routine across the whole appliance, our kitchen upkeep notes cover filters, seals, and spray arms as well.
Rack Hardware by Brand: What Fails First
Every brand has one part that fails before the rest. Learn yours from the table below and you'll skip most of the diagnosis.
| Brand family | First part to fail | Second most likely |
|---|---|---|
| Bosch | Front rail end cap or lower push-nut | Upper roller |
| Whirlpool, Maytag, KitchenAid | Height adjuster housing | Snap-on lower wheel |
| GE Appliances | Molded stub axle | Loose rail screws |
| Samsung, LG | Lower rack clip | Adjuster release lever |
| Miele | Wheel | Glide contamination |
| Electrolux, AEG, Beko | Rail coating at entry point | Rack end cap |
| Fisher & Paykel | Drawer slide | Wheel on standard racks |
Bosch. Upper racks often use a plastic roller riding in a coated steel channel, and the front rail end caps are the weak point. When an end cap snaps, the rack rolls out past its stop and drops one corner. Premium models with telescopic rails usually fail through debris in the runner rather than worn plastic.
Whirlpool, Maytag, and KitchenAid. These share a lot of platform hardware, so the diagnostics overlap. Adjustable upper racks are common, and the height adjuster housing is the part that cracks. A failed adjuster lets one corner sag, and the sagging corner catches on everything.
GE Appliances. GE racks tend to use molded stub axles that are part of the rack frame rather than separate posts. When a stub shears, you can't swap just a wheel. The other common failure is rail mounting screws working loose over years of use.
Samsung and LG. Both lean toward plastic channel rails with push-fit end caps, and both see frequent clip loss on the lower rack. Height-adjustable upper racks use release levers that crack at the pivot, which lets the rack sit at an angle and drag along one side.
Miele. Racks are generally the most durable in our research, with stainless components where other brands use plastic. When they do fail, it's usually the wheels rather than the rails. Their glide systems are excellent when clean and extremely intolerant of grit.
Electrolux, AEG, and Beko. This family shares European platform hardware, and the recurring issue is coated steel rails losing their coating at the front entry point. Once bare metal is exposed, rust pits the channel and chews through wheels.
Fisher & Paykel. A mix of standard rollers and glide systems depending on the model line. DishDrawer units use a different runner system entirely, so a standard wheel kit won't fit.
Shared platforms and cross-brand parts
Plenty of dishwashers aren't what they appear to be. Appliance groups build one platform and sell it under several badges, so a rack part that fits one brand often fits three others.
| Platform family | Badges that often share rack hardware |
|---|---|
| BSH | Bosch, Siemens, Neff, Constructa |
| Electrolux Group | Electrolux, AEG, Zanussi, John Lewis own-brand |
| Whirlpool Group | Whirlpool, Bauknecht, Indesit, IKEA appliances |
| Haier Europe | Haier, Candy, Hoover |
| Arçelik | Beko, Blomberg, Grundig |
Confirm a shared platform by comparing tub shape, rail channel profile, and rack frame geometry side by side. Identical rail spacing and wheel position is the giveaway. When a part is discontinued for one badge, the sibling brand often still stocks it under a different number.
Upper Rack Versus Lower Rack: Why They Fail Differently
The two racks live in the same tub, but they fail for different reasons. Understanding that split saves you from fixing the wrong basket.
Lower racks carry the weight. Cast iron skillets, stockpots, roasting tins, and casserole dishes all land on the bottom basket, and the wheels under it absorb every kilogram. That's why cracked wheels, flattened profiles, and snapped axles cluster on the lower rack.
Upper racks deal with a different kind of stress. They're lighter, they carry mugs, glasses, and bowls, but they also move. Most adjustable designs slide up and down on a track, and that adjustment mechanism is a moving part with a limited life.
The height adjuster housing and the release levers fail long before the wheels do.
| Factor | Lower rack | Upper rack |
|---|---|---|
| Load weight | High, pots and cookware | Low to moderate |
| Most common failure | Wheels, clips, axles | Height adjuster, release lever |
| Rail contamination | Food particles and grit | Detergent film and scale |
| Spray arm interference risk | Moderate | Higher when set too low |
| Typical repair cost | $5 to $35 | $10 to $40 |
If both racks bind at once, look at the water and the filter before you look at the hardware. Simultaneous problems on two baskets usually mean an environmental cause rather than two separate failures. Descaling both rail sets and cleaning the filter resolves a surprising share of these complaints with zero parts cost.
Telescopic Glides Versus Standard Rollers: Two Different Repair Paths
Not every dishwasher uses the same rack system, and the difference changes the entire repair. You need to identify which one you have before you touch anything.
| Feature | Standard rollers | Telescopic glides |
|---|---|---|
| What moves | Wheel rolls in a channel | Rail slides on ball bearings |
| Typical repair part | Wheel, clip, axle | Glide assembly or runner |
| Typical part cost | $5 to $30 | $40 to $120 |
| Common failure | Cracked or flat wheel | Contamination, bent runner |
| Cleaning sensitivity | Moderate | Very high |
| DIY difficulty | Easy | Moderate |
| Lubrication | Light silicone on axles only | None, per manufacturer guidance |
Standard roller racks ride on small plastic or nylon wheels in an open channel. The whole repair chain in this guide applies to them. Everything is accessible, everything is cheap, and a competent DIYer finishes in under half an hour.
Telescopic glide racks use a metal rail that extends like a drawer runner. Contamination is the dominant failure mode. A single grain of grit in the runner makes the whole glide feel rough, and forcing it spreads the ball bearings.
Don't lubricate a ball-bearing glide either, since grease traps particles and turns a smooth runner into a grinding one. When one genuinely fails, you buy the glide set.
To tell them apart, pull the rack out slowly and look at the rail. A small wheel inside a plastic or coated steel channel means standard rollers. A metal runner extending from the tub with the basket fixed to it means telescopic glides.
Glide racks also extend almost completely out of the tub and feel smooth through the whole arc, while roller racks have a slight rattle and a small amount of lateral play.
When the Rack Problem Is Really a Loading Problem
Some racks don't need a single part. They need to be loaded differently. This is the cheapest branch of the entire diagnosis, and it's the one most people skip.
A rack that's overloaded or badly packed flexes under its own weight. The flex pushes wheels sideways in the channel, which wears the wheel edge and the rail surface. Do that daily for three years and you've manufactured a hardware failure out of thin air.
| Loading mistake | What it does to the rack | How to fix it |
|---|---|---|
| Heavy cookware over the front rollers | Flattens front wheels fastest | Spread weight toward middle and rear |
| Nesting bowls tightly | Traps water, adds unbalanced load | Leave gaps between bowls |
| Blocking the spray arm path | Arm contacts rack during rotation | Keep the arm sweep clear |
| Overloading until the rack flexes | Side-loads wheels in the channel | Load to the rack's capacity |
| Hanging items over the tines | Snags the rail on closing | Keep items inside the basket footprint |
| Loading while the rack is extended | Levers the rail entry point | Push the rack in before loading |
Load the rack the way you normally do, then pull it out and look at it side-on from floor level. If the frame visibly bows in the middle, you're overloading it. Empty half of it and look again.
A rack that sits flat when half full tells you the answer without a single part purchase.
The rack must also clear the spray arm through its full rotation. That means two things. The rack height needs to be set correctly for your dish sizes, and nothing should hang below the basket.
If you've ever heard a rhythmic click during a cycle, that's the arm hitting something. Checking whether your dishes actually fit is a thirty-second job that prevents a much more expensive repair.
One honest note on load. Small nylon wheels in a standard roller rack are not designed to carry a cast iron Dutch oven and three stockpots every single day. They'll survive it for a while, then they won't.
Treat the rack like a shelf with a limit, and accept that wheel replacement is a periodic maintenance item rather than a fault.
Rust, Peeling Coating, and Corroded Racks
Rust is the one rack problem that changes the answer from repair to replace. Surface rust is cosmetic and manageable. Rust that has eaten through the coating and pitted the metal underneath is not.
Most rack frames are steel wire with a protective coating, either nylon, epoxy, or a vinyl dip. Rails can be plastic, coated steel, or stainless steel. The coating keeps water off bare metal, and once it's breached, corrosion starts in that spot and spreads along the wire.
You'll see it first at the joints, the welds, and the points where hardware clips on.
| Rust severity | What it looks like | What to do |
|---|---|---|
| Surface rust, coating intact | Orange bloom on the coating itself | Wipe off, clean, monitor |
| Coating breached, no pitting | Small chip or blister with rust inside | Dry thoroughly, seal the spot |
| Pitting visible | Rust eating into the metal surface | Plan a replacement |
| Rust at joints and welds | Structural corrosion, wire thinning | Replace the rack |
| Flaking coating across the basket | Widespread failure | Replace the rack |
To treat a small breach, dry the area completely. Remove loose rust with a fine abrasive pad, working gently so you don't widen the breach. Clean off the residue, dry again, and apply a food-safe coating designed for appliance use.
Don't use ordinary paint, varnish, or automotive products inside a dishwasher. Heat, detergent, and water break them down, and whatever comes off ends up on your dishes.
Replace the rack when corrosion has reached the joints, when more than a couple of spots have failed, or when the wire itself is thinning. A rack with structural rust can snap under a heavy load mid-cycle, and a collapsing rack can damage the spray arm on the way down.
There's a hygiene argument too. Pitted, rusting wire holds food residue and stays damp, which is a poor combination in a warm, wet environment.
Bent and broken tines
Tines bend far more often than people expect. A roasting tin lands on them sideways, someone leans on the rack while loading, or a heavy pan gets shoved into place. Once a tine is out of line, plates lean and the rack loads badly.
| Damage | Can you fix it? | Method |
|---|---|---|
| Slight bend in a tine | Yes | Gentle hand pressure, slow correction |
| Sharp bend, coating intact | Usually | Warm slightly, straighten with cloth-wrapped pliers |
| Coating cracked at the bend | Partly | Straighten, then dry and seal the spot |
| Broken tine at the base | No | Accept the gap or replace the rack |
| Missing tine tip cap | Yes | Fit a replacement tip |
| Multiple bent tines | Rarely | Replace the rack section or assembly |
A gentle bend in a coated wire tine can often be worked back with hand pressure alone. Warm the area slightly first and move slowly. Don't heat a coated tine aggressively.
A hairdryer on low is the limit. Heat guns and open flames soften the coating into a shape it won't hold, and they can crack the protective layer off the wire.
Wrap pliers jaws in cloth before you grip a coated tine. Bare metal jaws scratch the coating, and every scratch is a future rust spot. A broken tine at the tip can be capped with a replacement tip.
A break at the base where the wire joins the frame is usually a replacement job.
Rack Part Names in Plain English: US and UK Terminology
Ordering the wrong part is often a language problem rather than a measurement problem. The same component has different names on either side of the Atlantic, and listings mix them freely.
| Part | US term | UK term | What it is |
|---|---|---|---|
| The whole sliding tray | Rack | Basket | The frame holding dishes |
| The small plastic disc | Roller, wheel | Runner, roller | What rolls in the channel |
| The retainer | Clip, push-nut | Clip, retaining clip | Holds the wheel on its axle |
| The channel | Rail, track | Runner, rail | What the wheel rolls in |
| The front stop | End cap, rack stop | End cap, stop | Prevents the rack rolling out |
| The prongs | Tines | Prongs | Uprights holding plates |
| The cutlery holder | Silverware basket | Cutlery basket | Removable holder for utensils |
| Top tray | Upper rack | Top basket | The higher sliding tray |
| Bottom tray | Lower rack | Bottom basket | The lower sliding tray |
| Height control | Adjuster | Height selector | Sets rack position |
| The rotating arm | Spray arm | Wash arm | Sprays water onto dishes |
| Premium sliding system | Telescopic glide | Extending runners | Ball-bearing rail system |
A search for "dishwasher basket runners" in the UK returns the wheels. The same phrase in the US returns almost nothing useful. Search both terms when you're trying to find a part for an imported or European-brand machine.
Two phrases cause confusion. "Rack adjuster" sometimes refers to the height mechanism and sometimes to the wheel assembly that carries the rack, and on most modern machines those are separate parts. "Rack runner" can mean the wheel or the rail depending on the brand, so check the photo before you buy.
Part numbers are the reliable identifier, not the name. Once you have the number from the manufacturer's diagram, the terminology stops mattering.
Sourcing Discontinued Rack Parts Without Getting Fleeced
Rack assemblies and specific wheel designs get discontinued after seven to ten years, sometimes sooner. When the part you need is gone, you have more options than you'd think.
| Source | Best for | Cost | Risk |
|---|---|---|---|
| Manufacturer portal | Current production parts | Low to mid | Low |
| Authorized distributor | Superseded and cross-referenced parts | Mid | Low |
| Local parts counter | Fast matching and advice | Mid | Very low |
| Breaker yard | Discontinued racks | Low | Moderate, unknown wear |
| Universal kit | Emergency only | Low | High, repeat failure |
Start with the manufacturer. The parts portal is the most reliable source and usually the cheapest route when the part is still in production. Search by the full model and serial number, not by the model name.
Then try authorized parts distributors. They carry current stock, have cross-reference tools, and can tell you whether a part has been superseded by a newer revision. Superseded parts are common in rack hardware, and the replacement usually fits fine.
The parts counter is still the fastest shortcut. Staff there match parts for a living. Bring the model number and photographs of the failed part, and they'll spot a year mismatch in seconds.
Breaker yards and appliance recyclers are a genuine source for discontinued racks. You get an original part at a low price, but you also get unknown hours. Inspected the wheels, the frame, and the coating before you hand over money.
What to avoid
- Universal roller kits. The diameter mismatch is the number one cause of repeat failure in our research. Fine as an emergency, not as a fix.
- Marketplace listings with no part number. If the listing won't name the model, it's a gamble.
- 3D-printed wheels. Some hobbyists print replacements and some work briefly. Acetal and nylon behave better than common filament in hot alkaline water, so treat printed parts as a temporary stopgap.
- Gluing or drilling a broken mount. Tub structure repairs don't tolerate improvisation.
Reading an exploded parts diagram
An exploded parts diagram is a line drawing of the machine with every component numbered and listed in a table alongside. The table is the part that matters. It gives you the item number, the manufacturer's part number, a short description, and sometimes a quantity per assembly.
Start at the assembly level. Most diagrams break the machine into sections like tub, door, racks, spray arms, and pump. Find the rack section, then the sub-assembly that matches your fault.
Diagrams usually show the wheel, the axle, and the retaining clip as separate numbered items, which tells you whether they're sold individually or as a kit.
Manufacturers revise parts constantly. A superseded part number means the original has been replaced by an updated version that fits the same application. If your original number returns nothing, search the superseded chain before assuming the part is gone.
A distributor's cross-reference tool does this in seconds and is usually free to use.
Confirm three things before you buy. The part number matches the diagram. The diagram matches your full model and serial number.
The quantity column says how many the assembly uses. Get those three right and the wrong-part problem disappears.
Inspecting a secondhand rack before you buy it
A used rack from a breaker yard is a genuine option when the part is discontinued. It's also a part with unknown hours on it, so inspect it properly.
| Check | What you're looking for | Walk away if |
|---|---|---|
| Wheels | All present, round, spin freely | Any crack, flat spot, or wobble |
| Clips and axles | Seated, intact, matching design | Missing clips or bent posts |
| Coating | Continuous, no chips or blisters | Rust at joints or welds |
| Frame | Straight, level on a flat surface | Visible bow or twist |
| Tines | Upright, coating intact | Multiple broken at the base |
| Rail fittings | End caps present | Cracked entry points |
Lay the rack on a level floor and look along the frame from the side. A straight rack sits flat with all four contact points touching. A twisted one rocks.
Twist is the one defect you can't fix at home, and it's the reason a used rack fails after a month.
Ask which model the rack came from and check it against yours. Rack width, rail spacing, and wheel position vary between model years, and a near-fit rack will bind from day one. Ask whether the price includes clips and end caps too, since those are the parts that go missing in a stripped machine.
Deep Cleaning a Rack Properly
Wiping a rail channel in place only reaches the parts you can see. A rack that's been dragging for months needs a proper soak, and that means taking it out and putting it somewhere it can be fully submerged.
| Soak method | Mix | Time | Best for |
|---|---|---|---|
| Citric acid solution | 2 to 4 tbsp per tub of warm water | 30 to 60 min | Scale and mineral crust |
| White vinegar and water | Equal parts | 15 to 30 min | Light scale, detergent film |
| Warm water and dish soap | A few drops | 20 min | Grease and food residue |
| Baking soda paste | Paste on spots | 10 min | Localized grime |
A bathtub, a large sink, or a plastic storage tub all work. You need enough depth to cover the rails completely, because the channels hold air and resist water getting in.
- Remove the rack and take out the cutlery basket.
- Fill the tub with warm water and add your chosen descaler.
- Submerge the rack completely and weight it down if it floats.
- Soak for the listed time, then work a nylon brush through every channel.
- Rinse thoroughly under running water until no acid or soap remains.
- Dry completely with a towel and leave it to air somewhere warm.
- Inspect every wheel and clip while the rack is dry and empty.
Drying fully is the step people rush. Trapped moisture in a channel is where corrosion starts. Fit a rack back into a machine while it's still wet and you've created the exact conditions that rust coated steel rails.
Leave it to air until every joint feels dry to the touch.
Don't soak what can't take it. Telescopic glide assemblies generally shouldn't be submerged. Check your manual before you dunk anything.
Biofilm and odour in rack hardware
A musty smell often traces back to the small gaps where wheels, clips, and tines meet the frame. Those gaps hold moisture and food residue, and that combination grows biofilm, the slick layer that forms on wet surfaces.
| Where biofilm hides | How to reach it | What clears it |
|---|---|---|
| Rail channels | Remove the rack, brush along the channel | Warm soapy water, then citric acid |
| Wheel hubs and axles | Pop the wheels off | Soak in warm soapy water |
| Tine tip caps | Remove or lift the caps | Soak, scrub, dry fully |
| Frame joints and welds | Toothbrush into the corner | Soap, then rinse thoroughly |
| Cutlery basket base | Turn upside down, look for trapped film | Soak and scrub |
A soak alone doesn't shift biofilm because the layer sticks to the surface. You need mechanical agitation, which means a brush and some pressure. Soak fifteen to twenty minutes to soften the film, scrub with warm soapy water, then rinse.
Citric acid afterwards handles the mineral component.
Drying fully matters more than the cleaning product. A rack that goes back in damp restarts the cycle. If the racks are clean and the smell persists, look at the filter, the sump, and the door seal.
Those three host more biofilm than rack hardware in our research.
Cleaning Products That Work on Rack Plastic
Not all cleaning products behave the same on acetal, nylon, and polypropylene. Some help. Some quietly make things worse.
The difference comes down to pH and solvent content.
| Product type | Good for | Safe on rack plastic? |
|---|---|---|
| Warm water and dish soap | Grease, food film | Yes |
| Citric acid solution | Scale, mineral crust | Yes |
| White vinegar, diluted | Light scale | Yes |
| Baking soda paste | Localized grime | Yes, brief contact |
| Oxygen bleach cleaner | Organic staining | Usually, follow the dose |
| Chlorine bleach, concentrated | Nothing here | No, degrades and discolors |
| Oven cleaner | Nothing here | No, attacks plastics and coatings |
| Solvent-based degreasers | Nothing here | No, crazes and softens plastic |
Even a safe product can cause problems if you leave it on too long. Citric acid is safe in a thirty to sixty minute soak. Left on for a full day, it starts to dull and etch some plastic surfaces.
Rinse thoroughly and dry completely.
Oven cleaner is the worst choice you could make here. It's strongly alkaline and designed for enamel and stainless steel. On acetal wheels and coated rails it causes crazing, discoloration, and brittleness.
What Detergent and Rinse Aid Do to Rack Hardware
Your detergent choice affects rack longevity more than you'd think, and not always in the way you'd expect.
| Product | Effect on rack hardware | Practical advice |
|---|---|---|
| Powder detergent | Rinses fairly clear | Dose to water hardness |
| Gel detergent | Rinses clear, low residue | Fine for most homes |
| Tablets | Can leave film in low-flow areas | Rinse rails occasionally |
| Too much detergent | Leaves residue film | Use the recommended dose |
| Rinse aid | Reduces standing water and scale | Keep the reservoir filled |
| Dishwasher salt | Reduces scale at source | Top up monthly on models that use it |
Powder and gel dissolve predictably and rinse clear of rails in most machines. Tablet detergents can leave residue in low-flow areas, and rail channels are exactly that. Build up enough undissolved tablet film and the channel becomes tacky and grabs the wheels.
Too much detergent is a common error. It doesn't clean better and it leaves more residue behind, including in rails and wheel hubs. Follow the dose on the pack and adjust for hardness rather than adding extra.
To compensate for a heavy load, select a heavier cycle. That's the correct tool for the job.
After a cycle, rub a finger inside a rail channel. If it feels slick or slightly tacky, you're leaving detergent residue. If it feels chalky, the problem is scale, not detergent.
Why the Rack Problem Is Sometimes a Spray Arm Problem
A huge share of complaints that get blamed on the rack trace back to the spray arm. The symptoms overlap, and the arm is easier to inspect once the rack is out of the way.
| Rack symptom | Might actually be |
|---|---|
| Grinding or clicking during cycle | Spray arm hitting rack |
| Poor cleaning on the lower rack | Blocked spray arm jets |
| Dishes chipped at the edges | Arm contacting load or rack |
| Water pooling in the bottom | Blocked filter, not rack |
| Rack doesn't reach full extension | Arm misaligned or bracket bent |
| Loud squeal with clean glide | Spray arm bearing failure |
Pull the rack out and look at the spray arm underneath. Turn it by hand through a full rotation. It should spin freely with no wobble and no contact with anything below.
If it catches anything, the rack position is the first thing to fix.
Then look along the length of the arm. Every jet hole should be clear. Food particles and scale commonly plug the end jets, which reduces coverage in exactly the area that struggles to clean.
Once the arm is clear and rotating freely, the rack often stops catching.
How to Tell Rack Noise From Everything Else
Not every noise coming from a dishwasher is a rack fault. Sorting the sounds saves you from replacing wheels that were never the problem.
| What you hear | When it happens | Likely source |
|---|---|---|
| Quiet scrape, one side only | Sliding the rack by hand | Wheel, clip, or rail friction |
| Sharp click at full extension | Rack reaching its stop | Missing or cracked end cap |
| Rhythmic click or thud | During the wash cycle | Spray arm hitting the rack |
| Low hum, constant | Throughout the cycle | Circulation pump, normal |
| Grinding during drain | End of cycle | Drain pump or obstruction |
| Rattle, whole machine | Fill and wash | Loose panels or rack hardware |
Pull the rack in and out slowly with the machine off. Any noise you can reproduce by hand is rack hardware, plain and simple. If the rack glides silently but the machine grinds during a cycle, the problem is elsewhere.
This single test resolves most misdiagnoses. People replace wheels because the machine is noisy, then discover the noise was the spray arm or the pump all along. If your rack glides smoothly by hand and the machine still sounds rough, look at spray arms, pump assemblies, and panel fixing points instead.
Owners of certain brands chase this for months, and it shows up in complaints about a Beko unit running loud just as often as anywhere else.
Before you decide a rack is beyond repair, remove it, clean it, refit it, and listen to it on its own. It should move freely, sit flat, and show no wobble at any wheel. If it passes that test, your problem was never the rack.
Same Parts, Different Formats: Slimline, Compact, and Drawer Machines
Full-size machines get all the attention, but smaller formats have their own rack failures. If your dishwasher isn't a standard 60 cm or 24 inch unit, the diagnosis changes.
| Format | Typical width | Rack type | Most common failure |
|---|---|---|---|
| Full size | 60 cm / 24 in | Two racks on rollers | Wheel, clip, adjuster |
| Slimline | 45 cm / 18 in | Two racks, shorter rails | Wheel wear, rail scale |
| Compact and tabletop | Under 45 cm | One basket, simple slides | Slide friction, rust |
| Drawer | Varies | Basket on drawer slide | Contaminated bent slide |
Slimline machines squeeze the same rack design into a narrower tub. The rails are shorter, the wheels are the same size, and the load lands on fewer of them. That means slimline racks wear faster under the same weight, so check all wheels early rather than replacing the noisy one.
Compact and tabletop models often use a single pull-out basket on drawer-style slides. There's no upper rack to adjust, so height adjuster failure doesn't apply. Drawer dishwashers use a manufacturer slide with a fixed travel, and grit is the usual culprit.
Clean the slide tracks with a nylon brush and warm soapy water, dry them fully, and don't grease a drawer slide unless the manual says to.
Load Ratings: How Much Weight a Rack Can Really Take
Dishwasher manuals rarely state a load rating, and that omission leads people to assume the rack can take anything. It can't. The wheels are small plastic components with a finite working load.
| Rack design | Approximate working load | Weak point at overload |
|---|---|---|
| Four small nylon rollers | 15 to 20 kg | Front rollers flatten first |
| Six rollers, mid-support | 20 to 25 kg | Rail channel wear |
| Telescopic glide system | 25 to 35 kg | Runner contamination and bearing wear |
| Slimline four-roller design | 12 to 18 kg | Faster wear than full-size equivalents |
Treat those figures as a practical read of the design, not a manufacturer guarantee. Brands don't publish rack load ratings. What matters is the principle.
Weight concentrated in one corner wears the two nearest wheels faster than weight spread across the frame.
Put the heaviest items over the middle of the rack, close to the rear, where the frame is strongest. Keep the front rollers lighter, because they carry the load of everything you push and pull. That one habit is the difference between replacing wheels every eighteen months and every four years.
Heat Damage, Warping, and the Heating Element
Heating elements sit at the base of the tub, and the plastic nearest them takes more heat than the rest of the machine. Wheels, clips, and lower rack frame sections in that zone can warp, soften, or become brittle over years of exposure.
| Heat damage sign | Where it appears | What it means |
|---|---|---|
| Oval or distorted wheels | Lower rack, near the element | Plastic softened and re-set |
| Brittle clips that snap on fitting | Lower rack | Plastic has lost flexibility |
| Bowed coated frame | Lower rack edge | Coating and wire have deformed |
| Discoloured or whitened plastic | Near the element | Thermal exposure |
| Warped cutlery basket base | Lower rack | Close to the heat source |
If wheels are deforming rather than cracking, replacing them fixes the symptom for a while but the new parts will distort too. Look for a cause before you fit a third set. Check whether the rack is sitting lower than designed, whether an oversized load is pressing it down towards the element, or whether the element itself is running hot.
If the element shows visible damage, scorch marks, or the machine leaves dishes cold on a heated dry cycle, that's an electrical fault. Stop using it and get it checked. Don't test an element with a screwdriver and hope.
If you're not confident with a multimeter and the wiring diagram, call a technician.
Machine Level and Door Clearance: Causes Nobody Checks
Some racks bind because the machine isn't sitting level. A dishwasher out of level tilts the tub, which tilts the rails, which means one rack rolls uphill on part of its travel. On a slightly sloped floor, that's enough to make the rack feel stiff with no hardware fault at all.
Grab a spirit level and check front to back and side to side. Adjust the levelling feet until the machine is flat. Most machines have two adjustable front feet and a rear foot or pair that adjusts from the front.
A door that falls open on its own or slams shut is telling you the same thing. Fix the level and the rack problem often resolves alongside it. Over-tightened fixing screws against an uneven cabinet run can also distort the tub slightly, and that distortion transfers straight to the rails.
Door travel matters too. The door needs to drop close to horizontal for the rack to clear its rails. A weak spring, a sagged hinge, or an adjacent cabinet blocking the swing all change the geometry.
| What you notice | Likely cause | Check |
|---|---|---|
| Door stops partway down | Weak springs or hinge wear | Open by hand, feel for resistance |
| Door falls open fast | Springs over-tensioned or broken | Door behaviour at rest |
| Rack catches on the door lip | Door not reaching horizontal | Measure door angle at full open |
| Door hits the cabinet | Installation clearance | Look at the gap to the adjacent unit |
| Rack clears but tilts | Machine out of level | Spirit level front to back |
Open the door fully and look at it from the side. The inner panel should be low enough for the rack to slide out without catching on the lip. If it's clearly short of horizontal, fix the door and the rack slides freely.
Check the toe kick or plinth panel too, since a proud panel can catch the door as it opens.
Pets, Pests, and Chemicals: Unusual Causes of Rack Damage
Most rack failures come from wear. A small number come from causes you'd never guess until you rule everything else out.
| Cause | Tell-tale sign | What to do |
|---|---|---|
| Rodent damage | Chew marks, droppings, damaged wiring nearby | Call pest control before reusing |
| Pet interference | Localized damage near the door | Replace the affected parts |
| Caustic chemical exposure | Softening, whitening, or crazing on plastic | Replace affected hardware |
| Extreme heat exposure | Warped plastics near the heater | Check heater function |
| Impact damage | Shattered or cracked in one spot | Replace the part |
Rodents are a genuine one. In garages, basements, and rural properties, mice sometimes enter through gaps around the plumbing and chew wiring, insulation, and occasionally plastic rack hardware. If a wheel is missing with clean bite marks, that's what happened.
Don't just replace the hardware, since the same animal has been near wiring, and damaged wiring next to water is a safety issue.
Pets sometimes investigate an open dishwasher, and a curious paw can snap a tine or dislodge a wheel. The damage is minor but the pattern is distinctive, usually confined to one area near the door. People occasionally use drain cleaner in the tub, and afterwards notice softening or discoloration in rack plastics.
Caustic drain cleaners will attack acetal and polypropylene, and once the material has changed, cleaning won't fix it.
Temporary Fixes While You Wait for Parts
A wheel kit usually takes two to five days to arrive. You still have dishes to wash in the meantime, and there are safe workarounds that won't make the repair worse.
- Move the rack by the frame, not the front edge. Handles flex, frames don't.
- Keep the failing rack lightly loaded. Shift heavy cookware to the working rack.
- Hand wash anything that won't fit safely. A leaning rack lets dishes touch the spray arm.
- Don't run a cycle with loose hardware in the tub. Find the fallen clip or wheel first.
- Never tape or wedge the rack into position. Adhesive fails in hot water and leaves residue on dishes.
If the rack won't stay on its rails at all, pull it out and wash by hand until the part arrives. A rack that keeps derailing can drop onto the spray arm mid-cycle, which turns a cheap repair into a moderate one. If only one side is affected, slide the rack in at an angle so the healthy side carries the load, but don't force it.
Moving House: What to Check on Racks After a Move
Dishwashers moved to a new home often develop rack problems in the first month. The appliance itself wraps and travels fine, but the racks don't always survive the journey.
| After a move, check | What to look for | Fix |
|---|---|---|
| All wheels present and straight | Missing or bent | Replace wheels and clips |
| Rail channels aligned | Binding or grinding | Realign rails, clean channels |
| End caps fitted | Missing or cracked | Replace end caps |
| Height adjusters latched | Rack sagging | Reset or replace adjuster |
| Frame flat and true | Twisted or bowed | Replace rack |
| Filter present | Missing or dislodged | Refit or replace |
Racks are often left in place while the machine is tilted on its side or stood on its end. The weight shifts, the wheels take the strain, and one or two axles bend or snap. Check every wheel before the first load in the new house.
If the model and serial plate came loose in transit, tape it back down. Without it, your parts search is impossible. And check the level in your new kitchen, because a new floor often means the machine no longer sits flat.
Repairing a Rack When Parts Are Truly Unobtainable
There's a small percentage of cases where no genuine part exists. The machine is old enough, the manufacturer has stopped stocking rack hardware, and the breaker yards have nothing.
| Stopgap | Effective duration | Risk |
|---|---|---|
| 3D-printed wheel (nylon) | Months, light load only | Cracks early under weight |
| Generic clip matched by diameter | Weeks to months | Can dislodge and reach the sump |
| Wire tie as end cap stop | Days | Blocks rack travel |
| Silicone tubing on axle | Weeks | Loses grip gradually |
A few improvisations genuinely work as stopgaps. A 3D-printed wheel in nylon or PETG can last months in a light-load rack. A generic clip matched by diameter works if it grips the axle securely.
Food-grade silicone tubing over a worn axle post can restore enough grip to stop a wheel walking off.
Every improvised repair introduces a part that wasn't designed for that environment, and hot water, alkaline detergent, and mechanical load defeat almost every substitute eventually. Rail brackets, tub mounts, and axle posts that are integral to the frame shouldn't be improvised at all.
If you're relying on a stopgap, start planning the replacement. A breaker yard rack from the same platform is the best realistic route. If even that's gone, the practical choice is a compatible machine.
Writing a Repair Log
A repair log sounds fussy until the third fault. Then it becomes the document that tells you whether to keep the machine or replace it.
| What to record | Why it matters |
|---|---|
| Date of the fault | Reveals wear intervals and patterns |
| Symptom in your own words | Helps diagnose the next related fault |
| Part replaced and part number | Avoids searching for the number again |
| Cost of parts | Feeds the repair-versus-replace decision |
| Whether it was DIY or technician | Tells you where the spending went |
| Anything else noticed at the time | Catches developing faults early |
Three wheel replacements in three years on the same corner is a loading problem, not a parts problem. Two adjuster housings in eighteen months means the rack height is being changed constantly, and something structural is straining it. The log makes those patterns obvious.
Without it, each repair feels like bad luck.
Add up the parts and labour over the last two years and compare that to the price of a comparable new machine. If the repairs exceed roughly half the replacement cost and the machine is over ten years old, replacement starts to look reasonable. That's a rough rule, not a formula, but it's a useful check when emotion says keep and the numbers say go.
Renters, Landlords, and Warranty: Who Pays for the Repair
If you rent, the answer is straightforward in most cases. Report it to your landlord or agent and let them decide how to handle it. A dishwasher is part of the fixtures in most tenancies, and repairs are usually the landlord's responsibility unless the damage came from misuse.
| Situation | Who usually pays | What to do |
|---|---|---|
| Rack fails through normal wear in a rented home | Landlord | Report with photos, don't DIY |
| Damage from overloading or misuse | Often the tenant | Report anyway, be upfront |
| Machine under manufacturer warranty | Manufacturer | Call them first |
| Repair involves the tub structure | Owner or landlord | Professional repair |
| DIY repair causes a leak | Owner or tenant | This is the risk to avoid |
Document everything before you touch anything. Photograph the rack, the failed part, and the model plate, then send those photos with your report. It's much harder to argue about who caused a failure when the evidence is timestamped.
Most manufacturer warranties allow basic maintenance while excluding disassembly or unauthorized parts. Fitting a $10 wheel is rarely a problem in practice, but if your dishwasher is under two years old, make the call before you pick up a screwdriver. The Consumer Product Safety Commission's recall database is worth a check too if your model has known issues.
Home Warranty and Extended Cover
Appliance cover is one of those products people buy and forget. When a rack fails, it's worth knowing whether it applies before you start.
| Cover type | Typically covers | Often excludes | Rack fault verdict |
|---|---|---|---|
| Manufacturer warranty | Manufacturing defects | Wear, misuse, cosmetic damage | Wheel failure often excluded |
| Extended warranty | Mechanical and electrical faults | Consumables, cosmetic wear | Depends on the wording |
| Home appliance cover | Breakdowns after a qualifying period | Wear and tear, pre-existing faults | Read the small print |
| Buildings or contents insurance | Sudden damage, water escape | Gradual wear, maintenance failures | Only if a leak caused damage |
Ring the provider first and ask one direct question: is a rack roller or clip covered? Get the answer before you spend anything. Read the exclusion for wear and tear specifically, because that's where most rack claims die.
Expect a wheel to be refused as a consumable and a cracked tub bracket to be accepted as mechanical.
When the Rack Fault Is Actually a Feed Tube or Third Rack
Cutlery baskets and third racks have their own hardware, and it fails differently from the main racks.
| Component | How it moves | Typical failure | Typical cost |
|---|---|---|---|
| Cutlery basket on runners | Slides a short distance | Runner wear, cracked base | $10 to $30 |
| Cutlery basket hooked over tines | Lifts out entirely | Hooks snapped or splayed | $10 to $25 |
| Third rack on rollers | Slides on short rails | Wheels lost, rail clips snapped | $8 to $25 |
| Third rack on glides | Slides on ball bearings | Grit in the runner | $40 to $90 |
Cutlery baskets don't roll, they lift. The failures are split handles, cracked bases, and hooks that no longer grip the tine they hang from. If the hooks are splayed, the basket drops and slides around during the cycle, knocking against the lower rack and adding wear to both.
Replace the basket or the hooks rather than bending them back repeatedly.
Third racks ride on their own short rails with the smallest wheels in the machine. Check for lost wheels first, then confirm the rail clips are seated at both ends. On glide versions, clean the runners thoroughly and expect grit rather than a worn part.
If you've added or replaced a third rack, recheck the upper rack height, because a third rack takes vertical space from the rack below it.
End of Life: Salvaging Rack Parts Before You Scrap a Machine
When a dishwasher reaches the end of its life, the racks usually go with it. That's a waste, because rack hardware is often fully interchangeable with other machines on the same platform.
| Part worth keeping | Why | Condition to check |
|---|---|---|
| Wheels | Most common failure across the platform | Round, spin freely, no cracks |
| Clips and push-nuts | Cheap and easy to lose | Intact, not splayed |
| End caps | Prevent derailment | Not cracked |
| Height adjuster housing | Expensive when new | Pivot intact, latches properly |
| Whole rack assembly | Useful if the frame is straight | Flat, coating intact, no rust |
Keep the small hardware even if the rack frame is scrap. Wheels, clips, and end caps are the parts you'll actually need, and a rusted or twisted frame isn't worth storage space. Label the bag with the model number it came from, because hardware from a different platform will look similar and won't fit.
Dishwashers contain steel, plastic, and electronic components, and most municipal recycling centres accept them. Remove the racks if you're keeping parts, then take the rest to the household waste site. Don't put one out with general rubbish.
If you don't want the spares, offer them on a local freecycling group with the model number and someone on the same platform will take them.
Frequently Asked Questions
How much does it cost to fix a dishwasher rack that won't slide?
Most fixes cost between $5 and $30 for parts. A wheel and clip kit is usually under $30, an end cap set under $15, and a full rack assembly between $60 and $200. A professional call-out typically adds $100 to $200 in labor.
Can I fix a dishwasher rack without buying new parts?
Sometimes. If the cause is mineral scale, detergent film, grease, or a derailed rack, cleaning and reseating costs nothing. If a wheel is cracked, a clip is missing, or an axle has snapped, you'll need replacement hardware because those parts can't be reliably repaired.
Why does my dishwasher rack keep falling off the track?
A rack usually derails because a front end cap is missing, the rail entry is cracked, or a wheel is riding outside the channel on a bent axle. Reseating it repeatedly without fixing the stop or axle problem won't hold for long.
Is it safe to run the dishwasher with a broken rack wheel?
It's not advisable. A loose wheel or clip can migrate to the filter or pump and damage the impeller, and a rack sitting low can clip the spray arm during rotation. Remove the loose hardware and fix the rack before running another cycle.
How long does a dishwasher rack repair take?
Wheel and clip swaps take about 10 to 30 minutes for a confident DIYer. Rail cleaning and descaling runs 20 to 40 minutes including soak time. A full rack assembly replacement is typically 30 to 60 minutes.
When should I replace the whole rack instead of a single wheel?
Replace the assembly when the frame is warped, rust has spread through several joints, the coating is peeling across the basket, or three or more hardware pieces have failed at once. A single cracked wheel on an otherwise sound rack never justifies a new assembly.
