
There's water creeping across the kitchen floor and the machine just keeps running. Learning how to fix a dishwasher that won't turn off starts with one question: is it filling, pumping, sitting lit with dead buttons, or restarting itself? That answer points at a single part almost every time.
Most machines need Cancel held for 3 to 5 seconds before the abort registers, based on the owner's manuals we reviewed. The cancel and drain sequence then runs for another 60 to 90 seconds. Bosch ships its AquaStop flood protection and Miele ships its Waterproof System, and both keep the pump running on purpose.
Here's why the symptom matters far more than the brand badge.
How to Fix a Dishwasher That Won’t Turn Off
Press and hold Cancel for 3 to 5 seconds. If it still runs, shut the water supply valve under the sink. Then cut power at the breaker and wait five minutes.
Restore power and watch for ten minutes. If it keeps filling, the inlet valve or float switch has failed. Call a technician if water is sitting in the base pan.
Why Your Dishwasher Won't Turn Off, and Why the Symptom Decides the Fix
A dishwasher isn't a light switch. It's a small computer running a sequence, and the sequence has to be told to stop. That's the part most people miss when the machine appears to ignore them.
The control board (sometimes called the main control module or timer board) holds the cycle in memory. It sends power to the water inlet valve, the circulation pump, the drain pump, and the heating element in a specific order. When you press Cancel, you're asking the board to abort that sequence and pump out whatever water is left.
So "won't turn off" splits into two very different problems. Either the board isn't receiving your stop command, or a component downstream is stuck on and the board can't shut it down. Those need completely different repairs.
The stop command has to travel through three layers
First your finger hits the interface, which is either a membrane keypad or a set of tactile buttons. That sends a signal through a ribbon cable to the control board. The board then decides whether to obey.
If any layer in that chain fails, the machine looks like it's ignoring you. A control lock bumped by a child produces the same symptom as a burned-out keypad. A wet ribbon connector produces the same symptom as a dying board.
Some machines that won't turn off are working correctly
This trips up more people than any actual fault. A dishwasher in the middle of a cancel and drain cycle will not respond to button presses. It has to finish pumping first.
Likewise, a machine that beeps and shows a lock icon isn't broken. It's locked. And a unit that sits with the display lit for a few minutes after finishing is running a cooling or drying timer, not refusing to die.
Here's the quick sorting table we use to separate normal behavior from a real fault.
| What you see | What's usually happening | Actual fault? |
|---|---|---|
| Panel lit, every button dead | Control lock engaged | No |
| Pump humming after the cycle ends | Cancel or drain sequence finishing | No |
| Display lit a few minutes after finish | Drying or cooling timer | No |
| Fills past the normal level and keeps going | Inlet valve, float switch, or board relay | Yes |
| Restarts itself minutes after finishing | Door latch switch or control board | Yes |
| Runs with the panel off but the breaker on | Welded relay on the control board | Yes |
Why the symptom, not the brand, drives the diagnosis
A Bosch with a stuck inlet valve and a Frigidaire with a stuck inlet valve have the same problem. The parts differ. The test procedure doesn't.
That's why this whole guide is built as a decision tree. You watch what the machine does, match it to one of four branches, then test the two or three parts that branch points to. No guessing, no parts cannon.
Manufacturer specifications confirm the water inlet valve should only receive power during the fill phase. If it's getting voltage when the machine is off, that's your fault. And it's usually not the valve's fault at all.
First 60 Seconds: How to Stop the Water and Cut the Power Safely
Water plus mains voltage is the only thing here that can genuinely hurt you. Everything else is money and inconvenience. So the first minute is about stopping the water and killing the power, in that order.
Work fast but don't improvise. Towels on the floor come after the supply is closed, not before.
Step by step, in order
- Open the door. Most machines abort the cycle the moment the latch releases. That alone kills the spray and often stops the fill.
- Hold Cancel for the full 3 to 5 seconds. Don't tap it. Count it out. Plenty of "it won't stop" calls end right here.
- Close the water supply valve. It's usually a quarter-turn valve under the sink, on the same branch feeding the faucet. If you can't find it, our walkthrough of the shutoff layout under your counter shows the common arrangements.
- Kill power at the breaker. Not just the panel button. Find the circuit labeled for the dishwasher and switch it fully off.
- Pull the kickplate and check the base pan. If there's standing water down there, soak it up with towels before going further.
- Do not restore power until the base pan is dry and you've found where the water came from.
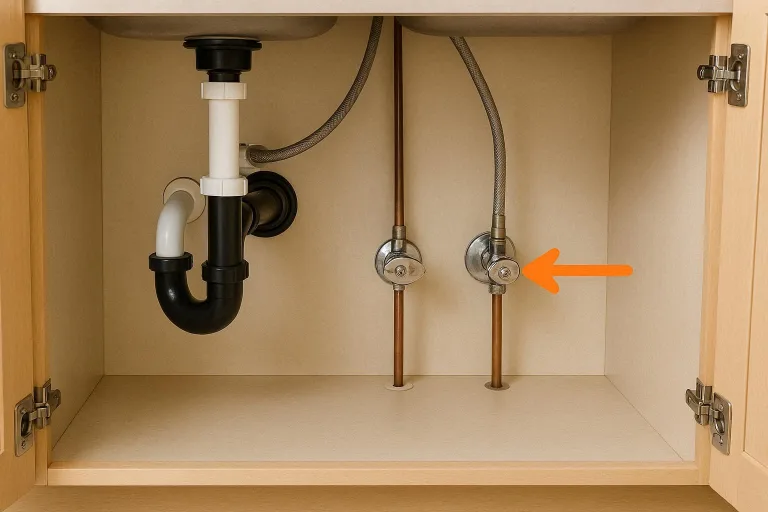
Image source: Bing (Web (fair-use with source credit))
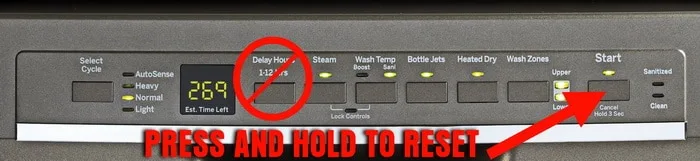
Image source: Bing (Web (fair-use with source credit))
Why the breaker matters more than the plug
Many dishwashers are hardwired into a dedicated circuit rather than plugged into a socket. You can't just yank a cord. On those, the breaker is your only isolation point.
Even on plug-in models, the outlet usually sits behind the cabinet next to the machine. Reaching it means pulling the unit out, which is exactly what you don't want to do with water on the floor.
Kitchen appliance circuits also need ground-fault protection in most US jurisdictions under the National Electrical Code. A GFCI that keeps tripping after a flood event is telling you something is wet inside the machine. Listen to it.
How much water is actually a problem
A dishwasher fill runs roughly 1 to 3 gallons depending on the model and cycle. That doesn't sound like much until it's spread across a subfloor.
The base pan holds only a few cups before the flood switch should trip. If your machine kept filling past that point, the flood protection failed too. Now you're looking at a two-part repair.
Water damage restoration routinely runs into four figures. An inlet valve costs $20 to $60. That gap is the entire argument for closing the supply valve first and asking questions later.
What not to do in the first minute
- Don't unplug the machine by pulling the cord while standing in water.
- Don't open the control panel to "have a look" before the power is off.
- Don't mop through the base pan with the machine still energized.
- Don't restart it to see if it does it again while water is still entering.
- Don't assume the flood switch saved you. Test it after everything dries.
If the machine is a rental, photograph everything before you clean up. Documenting the floor and cabinet is what gets the repair covered.
Four Free Fixes to Try Before You Touch a Screwdriver
A big share of machines described as "stuck on" in owner forums aren't broken at all. They're mid-sequence, locked out, or holding a stale state in memory. Four free actions clear most of those.
Try them in this order. Each one takes under ten minutes and costs nothing.
Fix 1: The long press on Cancel
Hold the Cancel, Start/Cancel, or Reset button for a full 3 to 5 seconds. Some European machines want Start and Cancel pressed together. Check your manual, because the exact combo varies.
A proper abort triggers the drain pump and runs it for 60 to 90 seconds. You'll hear the pump working. Let it finish and don't press anything else.
If the machine goes quiet after the drain cycle, you're done. That was a control logic hiccup, not a hardware failure.
Fix 2: Unlock the control panel
Look for a padlock symbol or a button with a key icon. Hold it for 3 to 5 seconds. Most machines beep twice and the lock indicator disappears.
This is the most common false alarm in households with young children. A small hand presses the lock combo and the panel goes dead for everyone.
If the padlock won't clear, the keypad membrane may be shorted from steam ingress. That's a real fault, covered further down in the dead panel branch.
Fix 3: The hard reset at the breaker
Switch the circuit off. Wait a full five minutes, not thirty seconds. The board needs time for its capacitors to discharge and any residual logic state to clear.
Then restore power and watch the machine for ten minutes without touching it. If the panel comes up normal and stays idle, the fault was a frozen control state. If it immediately starts filling or pumping, you have a hardware fault and you're heading into the symptom branches.
Fix 4: The door cycle
Open the door fully. Leave it open for 30 seconds. Close it firmly until the latch clicks, then do nothing.
Many machines use the door switch as a secondary abort signal. A latch that's slightly out of alignment can leave the board convinced the door is still closed mid-cycle. If the machine settles after a firm close, inspect the latch striker for wear.
| Fix | What you do | Time | What it clears |
|---|---|---|---|
| Long press | Hold Cancel 3 to 5 seconds | 2 min | Aborted or stuck cycle |
| Control unlock | Hold the lock key 3 to 5 seconds | 30 sec | Dead panel, lit display |
| Hard reset | Breaker off for 5 minutes | 6 min | Frozen board logic |
| Door cycle | Open 30 sec, close firmly | 1 min | Stuck cycle state, latch misread |
When the free fixes fail
If all four change nothing, stop pressing buttons. Repeated attempts to abort a machine that's actively filling just put more water on the floor.
Close the supply valve and move to the symptom branch that matches what you're seeing. If you're hearing a pump that never shuts up, our notes on when the noise is the symptom cover the sound side of that failure.
The Symptom Fork: Which of These Four Is Your Machine Doing?
Watch the machine for two full minutes with the door closed and power on. Don't intervene. Then match what you observed to one of four descriptions.
Each branch points at a different set of parts. Getting the branch right saves you from buying a control board you didn't need.
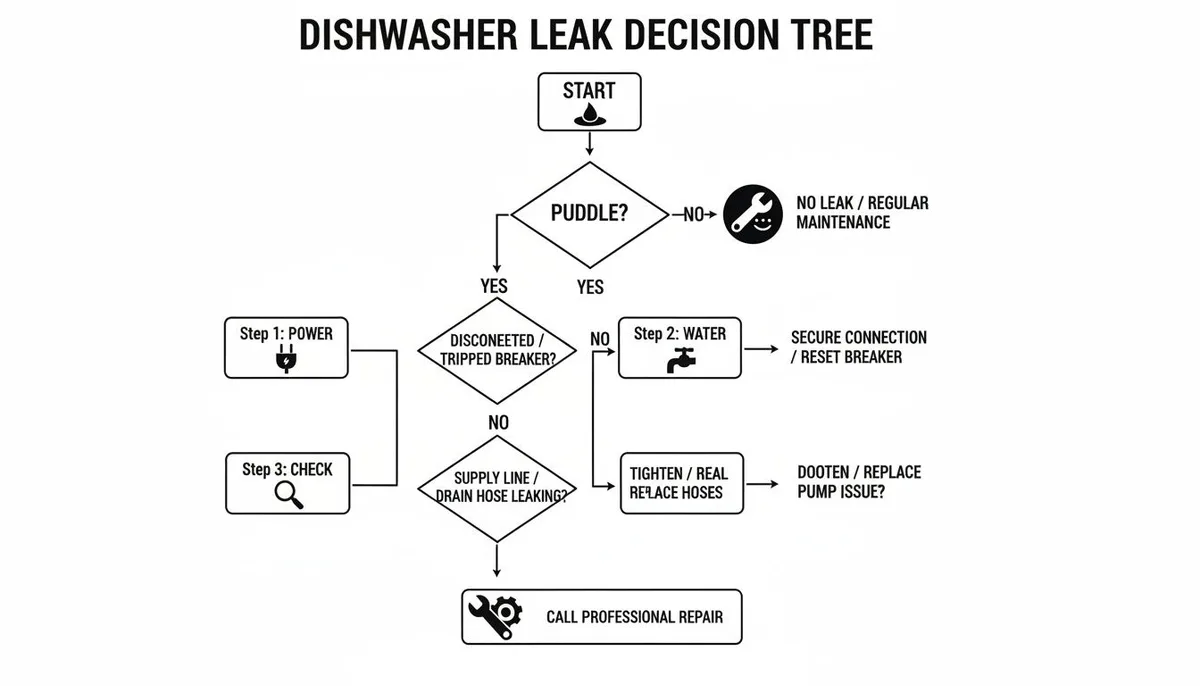
Image source: Bing (Web (fair-use with source credit))
It Keeps Filling and Won't Stop
Yes, this is the flooding branch, and it's the urgent one. The machine is taking in water past the normal fill level, either continuously or in bursts that never end.
Three suspects fit here: a perforated diaphragm in the water inlet valve, a float switch stuck in the down position, or a relay on the control board welded shut and feeding the valve constant power. The tell-tale sign is whether water enters with the machine switched off at the panel. If it does, the valve itself is passing water mechanically.
The Pump Runs With No Water in the Tub
No water, but the drain pump won't quit. That's a different fork entirely, and it's rarely an emergency.
Usually the pressure switch or water level sensor is reporting a false "still full" condition, so the board keeps commanding a drain. Less often, the drain pump relay on the board has welded closed and the pump runs on permanent power.
If the machine has had a hard life, check the filter housing first. Food scraps jammed in the sump can hold the float or pressure port in the wrong position. Kitchens that cook a lot see this more often, which is why food scraps that jam the float come up in our cleaning guides too.
The Panel Is Lit but Every Button Is Dead
The display glows, the machine hums, and nothing you press does anything. This is the electronics branch.
Nine times out of ten it's the control lock. The tenth time it's a moisture-damaged membrane keypad, a loose ribbon connector between panel and board, or a failed board. The order matters.
Unlock, then dry, then inspect the connector, then condemn the board.
Machines installed under a worktop with a steam-producing kettle nearby fail this way more often. If the panel has been off before, check that the ribbon is seated fully at both ends.
The Cycle Ends, Then It Restarts Itself
The machine finishes, goes quiet, then starts washing again five or ten minutes later. That's a restart loop.
The door latch switch is the usual culprit. If the switch doesn't report "door open" cleanly, the board can read the pause as an unresolved state and resume. A tired control board with failing logic does the same thing.
This branch is annoying rather than dangerous, but it wastes water and electricity on every loop. On units wired straight into the circuit rather than plugged in, testing the latch means isolation at the breaker, and our guide to units wired straight into the circuit covers what to expect when you open things up.
Symptom 1: Continuous Filling. Inlet Valve, Float Switch, or Welded Board Relay?
The machine fills, the water level climbs, and nothing stops it. You've already closed the supply valve if you were paying attention in the first section. Now you want to know which of three parts to order.
Work through them in this order: valve, float, board. That's roughly cheapest to most expensive and most likely to least likely.
Start with the valve, because it fails most often
The water inlet valve is a solenoid with a rubber diaphragm inside. Power opens the solenoid, the diaphragm lifts, water flows. Power off, a spring closes it.
Age, hard water, and grit wear that diaphragm down. When it perforates, water trickles through even with no power applied. That's why the classic test is so simple: switch the machine off at the panel, leave the supply valve open, and watch the tub for ten minutes.
If the level rises, the valve is passing water mechanically and needs replacing.
The valve sits behind the lower kickplate, usually on the left or right of the fill hose. Shut the supply, kill the breaker, disconnect the wires, and remove the two mounting screws. Replacements run $20 to $60 depending on brand.
Then test the float switch by hand
The float is a small plastic dome or arm inside the tub, usually at the front corner. It rides up as water fills and trips a switch that tells the board to stop filling.
Lift the float manually while the machine is trying to fill. If the water stops, the switch is working and your problem is elsewhere. If nothing changes, the switch is stuck or the arm is jammed.
Scale and food debris are the usual causes. In hard water areas, the float guide gets crusted and the float can't rise. A descale and some manual working of the arm sometimes saves the part.
If the plastic is cracked, or the switch shows no continuity through its travel, replace it. Parts run $15 to $40.
The welded relay is the one people miss
Here's the scenario worth knowing. You shut the machine off, the water keeps coming, you replace the valve, and it keeps coming. That's the board.
A relay is an electromechanical switch on the control board. When its contacts weld shut from arcing, it feeds constant power to the inlet valve regardless of what the board wants. The valve isn't faulty.
It's just doing what it's told by a relay that can't let go.
The test is a voltage check at the valve connector, machine switched off at the panel but breaker on. Any reading at the solenoid means the board is supplying power when it shouldn't. That's a board replacement, and boards run $150 to $300.
| Cause | How to confirm it | Typical part cost |
|---|---|---|
| Perforated valve diaphragm | Tub fills with the panel switched off | $20 to $60 |
| Stuck float switch | Lift the float, fill continues anyway | $15 to $40 |
| Welded relay on the board | Voltage present at the valve with machine off | $150 to $300 |
The anti-flood system should have caught this
Branded flood protection on Bosch and Miele machines includes a base pan sensor that cuts the supply when water collects underneath. Per manufacturer documentation, these systems are designed to trigger long before a full flood develops.
If yours kept filling, that sensor either failed or your model doesn't have one. As of 2026, base pan flood protection still isn't universal on budget models. Check the spec sheet before assuming you're covered.
Once you've replaced the faulty part, dry the base pan completely. Then run a short cycle with the water valve open and watch the first fill. If the level stops where it should, you're done.
Any recall notices tied to your model are worth a look on the CPSC recall database before you spend money on parts.
Symptom 2: Pump Won't Stop. Drain Pump, Pressure Switch, or Stuck Relay Contact
The tub is empty and the pump is still running. That's the good news branch, because nothing is flooding.
Still, a drain pump running for hours will burn itself out. It's built for 60 to 90 second bursts, not continuous duty. So the fix matters, even if the urgency doesn't.
Three things hold a drain pump on: a pressure switch or water level sensor reporting a false full condition, food debris jamming the float or sensor port, or a welded relay contact on the control board. Test in that order.
First, rule out the obvious: is it actually finishing?
Listen for 90 seconds after you press Cancel. If the pump stops on its own, the machine was mid-drain and behaving correctly.
Some models also run the drain pump during drying in short pulses. If you hear rhythmic on-off cycling rather than a continuous drone, you're listening to normal operation.
The fault pattern to watch for is a pump that runs indefinitely, well past two minutes, with no change in pitch and no water moving.
Check the filter and sump before anything electrical
This is the cheapest fix and it solves more cases than people expect. Pull the lower rack, unscrew the filter basket, and look into the sump.
Food scraps, broken glass, a rogue bottle cap, or a wad of grease can block the pressure sensor port. The sensor then reads "water still present" and the board keeps commanding a drain that never resolves.
Clean the filter housing with hot soapy water and a soft brush. Reassemble and run a rinse cycle. If the pump now shuts off normally, you've fixed it for free.
Homes that cook heavily see this more often, and our notes on machines built for messy loads explain which designs tolerate debris better than others.
How the pressure switch actually works
The pressure switch is a small air chamber connected to the sump by a thin tube. Rising water pushes air up the tube and flexes a diaphragm, which trips the switch.
If that tube is blocked by gunk, or the chamber has lost its air pocket, the switch sticks in the "full" position. The board obeys the switch and keeps draining.
You can often clear the tube by disconnecting it and blowing through it gently. If the switch itself shows no continuity change under light pressure, replace it. They typically run $20 to $50.
The welded relay, again
Same failure mode as the fill relay, different output. A relay contact welds shut and the drain pump gets permanent voltage.
Test it with the machine disconnected from power. If the pump still runs when you restore power with the board's pump output unplugged, the pump is being fed from elsewhere. That's a board fault, not a pump fault.
One caveat. Some machines run a self-test pump pulse at power-up. Give it ten seconds before drawing conclusions.
| Cause | How to confirm it | Typical part cost |
|---|---|---|
| Clogged filter or sensor port | Clean it, retest the drain cycle | $0 |
| Blocked pressure switch tube | Blow through the tube, check continuity | $0 to $20 |
| Failed pressure switch | No continuity change under pressure | $20 to $50 |
| Welded drain relay on board | Pump runs with pump output disconnected | $150 to $300 |
When it's the pump itself
If the pump hums but doesn't move water, or if it grinds, the impeller may be jammed or the motor winding may be failing. That's a pump replacement, usually $40 to $120 for the part.
Here's the distinction that matters. A failing pump usually causes "won't drain," not "won't stop." If your machine is genuinely running forever, look at the sensor and board path first.
Symptom 3: Lights On, Buttons Dead. Control Lock, Membrane Keypad, or Ribbon Connector
The display glows and the machine hums, but nothing you press responds. If that's you, unlock the panel first. Hold the button with the padlock or key icon for a full 3 to 5 seconds.
That single action clears the majority of dead-panel complaints. Households with young children run into it constantly, and it looks exactly like a catastrophic electronics failure.
If the lock won't clear, work through the remaining three causes in order: moisture in the keypad, a loose ribbon connector, then a failed control board.
Why control lock exists and how brands differ
Manufacturers added the lock to stop kids and cleaning cloths from starting cycles. The implementation varies more than you'd expect.
On many Bosch and Siemens models the lock is a long press on a dedicated key. Whirlpool and KitchenAid frequently use Start plus another button combination. Samsung and LG often show a padlock icon that flashes when you press a locked key.
Some machines make no sound at all, just a dead panel. That silence is what convinces people the board has died.
Moisture ingress is the second most likely cause
A membrane keypad is a thin plastic sheet with conductive traces printed on it. Steam from a nearby kettle, a spill down the front of the door, or years of condensation behind the fascia can short those traces.
A shorted trace registers as a permanently pressed button. The board sees a continuous input and ignores everything else, which feels like a dead panel.
The cheap test: leave the door open with power off for 24 to 48 hours and let it air dry completely. If the panel comes back to life, moisture was the culprit and you should check the door seal for a leak path.
If it works for a day and dies again, the membrane has degraded. Keypad assemblies usually run $60 to $200 depending on the model.
The ribbon connector that worked itself loose
Between the control panel and the main board runs a flat ribbon cable. It carries every button signal.
Vibration from years of cycles, a door slam, or a factory connector that was never fully seated can leave it half-engaged. The result is partial or total loss of input.
If you're comfortable opening the panel, kill the breaker and check both ends. Reseat the cable firmly and inspect the gold contacts for corrosion. A greenish tint means moisture reached it, so clean the contacts with isopropyl alcohol.
Condemning the control board
Only after the lock is cleared, the panel is dry, and the ribbon is seated should you suspect the board. It's the most expensive part and the least likely single cause, which is why technicians hate throwing one at the problem.
Signs that point to the board: the panel lights behave erratically, some buttons work and others don't, or the machine responds to inputs it shouldn't. Visible burnt traces or bulging capacitors confirm it.
| Cause | Confirming test | Typical cost |
|---|---|---|
| Control lock engaged | Hold lock key 3 to 5 seconds | $0 |
| Moisture in keypad | 24 to 48 hour dry-out | $0 |
| Degraded membrane keypad | Fault returns after drying | $60 to $200 |
| Loose ribbon connector | Reseat both ends | $0 |
| Failed control board | Erratic inputs, visible damage | $150 to $300 |
A note for steam-heavy kitchens
Dishwashers installed directly under a kettle station or next to a boiling water tap see more keypad failures than average. If yours sits in that spot, wiping the panel dry after cooking is genuinely worth the ten seconds.
Symptom 4: Restarting After the Cycle. Door Latch Switch, Timer Logic, or Control Board
The cycle finishes, the machine goes quiet, then it starts washing again. That loop is the machine's way of saying it never got a clean "cycle complete" signal.
Start with the latch. The door switch has to report two clear states: closed during the cycle, open when you release the latch. If it sticks in a middle position, the board reads an unresolved state and resumes.
Open and close the door firmly five times. If the machine settles, the latch striker needs adjustment or the switch is on its way out.
Testing the latch switch properly
With power isolated, remove the inner door panel or the latch assembly screws. The switch is a small microswitch, usually with two or three terminals.
Push the latch into the closed position with your finger while checking continuity across the terminals. It should click audibly and change state cleanly. Any flicker, or continuity in both positions, means replace it.
Latch switches are cheap, typically $15 to $45. It's the labor that costs, because reaching them means opening the door panel on most machines.
The tricky one: a slow leak corrupting the board
A machine that restarts randomly but otherwise works can have a tiny leak dripping onto the control board. Water plus voltage equals unpredictable logic, and it doesn't always trip anything.
Pull the kickplate and look for water staining, white mineral deposits, or corrosion on the board's edge. Our breakdown of what the plumbing underneath should look like helps you spot the difference between normal and a failing connection.
If you find corrosion, the board is on borrowed time. Dry it, clean the contacts, and budget for a replacement.
Power interruptions and stale memory
A brief power cut, a brownout, or a GFCI trip mid-cycle can leave the board holding an aborted state it never clears. The machine then loops on restart because its stored logic says the cycle isn't finished.
A full breaker-off reset for five minutes clears that. If the looping returns, it wasn't a one-off event.
Homes on older wiring, or where the dishwasher shares a circuit with a high-draw appliance, see this more often. Kitchen circuits should be dedicated.
When it's genuinely the timer logic
Older mechanical-timer machines can develop a stuck cam or a worn motor in the timer assembly. The timer never advances to the off position, so the machine keeps cycling.
Replacing a mechanical timer is usually straightforward, but the parts are getting scarce. On a machine past ten years, price the timer before you commit.
| Cause | Confirming test | Typical cost |
|---|---|---|
| Latch switch stuck mid-position | Continuity check through travel | $15 to $45 |
| Latch striker misaligned | Visual inspection, adjust and retest | $0 |
| Water on the control board | Look for staining or mineral deposits | $150 to $300 |
| Stale state after power cut | Breaker off for 5 minutes | $0 |
| Worn mechanical timer | Does not advance to off | $80 to $250 |
The safety angle here
A machine that restarts itself overnight isn't just wasting water. It's running unattended with a heating element and a pump. If you can't stop the loop, isolate it at the breaker until it's repaired.
Then check whether your model appears on the official recall listings for your region.
Testing Each Part With a Multimeter: Valve Resistance, Float Continuity, and Board Inspection
A basic digital multimeter costs $20 to $40 and turns guesswork into a diagnosis. You need three functions: resistance, continuity, and AC voltage.
None of these tests need special tools beyond the meter, a screwdriver set, and a torch. All of them need the breaker off unless the specific test says otherwise.
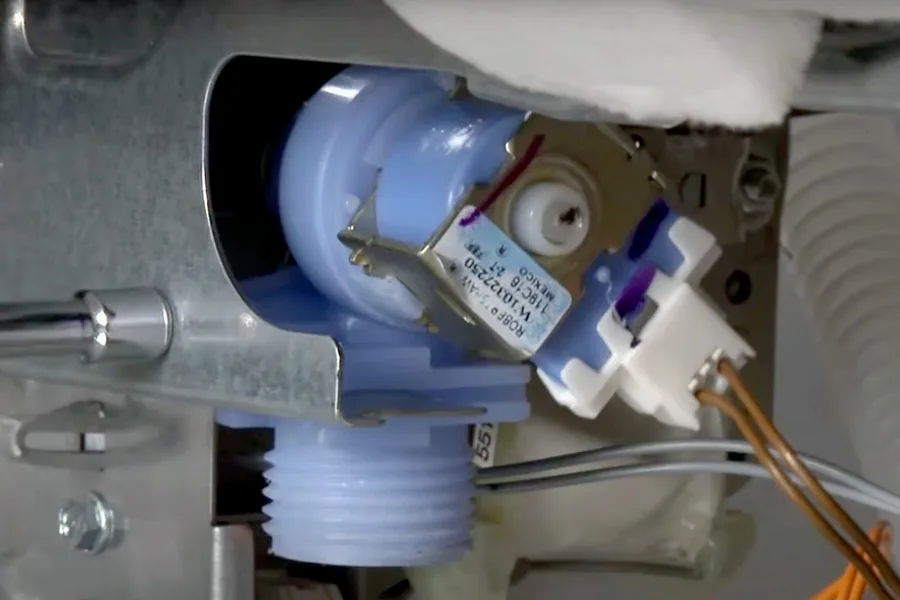
Image source: Bing (Web (fair-use with source credit))
Safety first, every single time
Kill the breaker. Confirm dead with the meter before touching anything. Let the board discharge for five minutes after power off.
Water and electricity in the same cabinet is why this section sits apart from the rest. If you're not comfortable working inside an appliance with a meter, skip to the cost section and call a tech. That's a legitimate choice, not a failure.
Water inlet valve resistance test
Disconnect the two wires from the solenoid coil. Set the meter to resistance and measure across the coil terminals.
A healthy coil reads somewhere between 200 Ω and 1,500 Ω depending on the model. Zero means a shorted coil. Infinite means an open coil, and the valve will never open.
The resistance test doesn't prove the valve holds water when closed. For that, use the live fill test described earlier: supply valve open, machine off at the panel, watch the tub for ten minutes.
Float switch continuity test
Locate the float in the tub, usually front-left or front-right. Lift it manually through its full travel while the meter, set to continuity, is connected across the switch terminals.
You should hear a clear beep in one position and silence in the other. No change at all means the switch is stuck, and you should check the float arm for scale or debris jamming it.
On electronic flood sensors rather than mechanical switches, there's no continuity to test. These show up as a fault code in service mode, so check the manual for the entry sequence.
Board inspection without a schematic
You don't need to understand the circuit to spot damage. Look for four things.
- Burnt or blackened traces near the relay outputs.
- Bulging or leaking capacitors, which look like a swollen can top.
- Brown scorch marks around relay solder joints.
- Green corrosion along the board edges, which signals a slow leak.
Any of those means the board is suspect. Combine that with a live voltage test at the valve or pump connector and you've got a solid case for replacement.
Live voltage testing, done carefully
This is the one test with power on, and it's the one that identifies a welded relay definitively. With the machine switched off at the panel but the breaker on, measure AC voltage at the inlet valve connector.
Zero volts is normal. Anything above a few volts means the board is feeding the valve when it shouldn't. That's your welded relay.
Do the same at the drain pump connector. Same logic applies. Given the shock risk, treat this test as optional.
The resistance and continuity tests cover most diagnoses, and a tech can run the live test in minutes.
| Test | Meter setting | Expected reading | Points to |
|---|---|---|---|
| Valve coil resistance | Ω | 200 to 1,500 Ω | Shorted or open coil |
| Valve live voltage, machine off | AC V | 0 V | Welded relay on board |
| Float switch travel | Continuity | State change | Stuck or failed switch |
| Latch switch travel | Continuity | State change | Worn latch switch |
| Pump live voltage, machine off | AC V | 0 V | Welded drain relay |
Service mode and fault codes
Most modern boards store fault codes. Entry sequences differ by brand and are listed in service manuals, which are often available from the manufacturer's technical literature site.
Reading a stored code can save you an hour of testing. A "fill timeout" code combined with a slow fill points at the valve. A "water level sensor" code points at the pressure switch.
What the Repair Really Costs. Parts, Service Calls, and the Repair-vs-Replace Line
Parts for this family of faults are cheap. Labor is what hurts, and the call-out fee is charged whether or not the technician finds anything.
Here's the honest range based on manufacturer parts pricing and typical service rates in the US and UK.
| Item | US range | UK range |
|---|---|---|
| Diagnostic call-out | $100 to $200 | £60 to £120 |
| Water inlet valve (part) | $20 to $60 | £15 to £45 |
| Float switch (part) | $15 to $40 | £12 to £35 |
| Pressure switch (part) | $20 to $50 | £15 to £40 |
| Drain pump (part) | $40 to $120 | £30 to £90 |
| Door latch switch (part) | $15 to $45 | £12 to £35 |
| Membrane keypad (part) | $60 to $200 | £50 to £160 |
| Control board (part) | $150 to $300 | £120 to £250 |
| Typical full repair, parts plus labor | $150 to $400 | £100 to £320 |
The repair-versus-replace calculation
Dishwashers last roughly 9 to 12 years according to industry lifecycle data. The usual rule of thumb is to replace when a repair costs more than half the price of a new machine, or when the unit is past eight years old.
A $40 inlet valve on a six-year-old Bosch is a straightforward yes. A $300 control board on an eleven-year-old budget model is a harder call.
Weigh three more factors before deciding. Parts availability on older or discontinued models gets scarce fast. Water damage to the cabinet or subfloor is a separate cost a new machine won't fix.
And if the real complaint is poor cleaning rather than a stuck cycle, our notes on machines that cope with caked-on loads are the better starting point.
What the warranty covers and what it doesn't
Most dishwashers carry a one-year full warranty. Many brands extend coverage on the tub and door liner to five or ten years. Some cover the control board longer.
Water damage from a failed inlet valve usually isn't covered under the appliance warranty. That falls to home insurance, which is why documenting everything matters.
If the machine is under warranty, don't open the panel. DIY disassembly commonly voids coverage, and a technician visit costs you nothing under a full warranty.
When the smart move is a technician
Call it in if any of these apply. You're not confident with a multimeter around water. The machine is hardwired and you can't isolate it safely.
You've found water in the base pan and can't trace the source. Or the diagnosis points at the board and you want a second opinion before spending $300.
A qualified appliance technician also has service manuals and brand-specific diagnostics that aren't published publicly. That's worth the call-out fee on a complicated fault.
Red flags in a quote
Ask for the parts price separately from labor. A quote that lumps everything into one number is harder to sanity-check.
Be wary of anyone who diagnoses a control board without testing the valve and float first. Same for a technician who won't hand back the old part. And if the quote exceeds 60% of a new machine, get a second opinion before signing anything.
When to Stop and Call a Tech: Shock Risk, Warranty Voiding, and Flood Damage
There's a line in every repair where the smart move is to put the screwdriver down. Cross it and you risk a shock, a voided warranty, or a floor repair that dwarfs the cost of the appliance.
Four situations put you past that line. Water in the base pan you can't trace. A burning smell or visible scorch marks.
A breaker that trips the moment you reset it. Or any sign of water touching the control board.
Scorched wiring and the burning smell
A relay that's welding shut often arcs first. That arcing produces a hot electrical smell, like burning plastic with a metallic edge.
If you catch that smell, isolate the machine at the breaker and leave it off. Don't cycle it again to "check." Repeated arcing on a board can escalate from a $300 part to a fire risk inside a timber cabinet.
Look along the harness for discolored insulation or brittle, hardened wire. Any of that means the wiring needs replacing as well as the board.
A breaker or GFCI that keeps tripping
Ground-fault protection is doing exactly what it should. Moisture has reached a live conductor.
Resetting a tripping GFCI over and over isn't troubleshooting. It's repeating an experiment you already know the answer to.
Isolate the machine and let it dry for 48 hours before you test again. If it still trips when dry, a heating element or motor winding has failed to earth. That's a technician job.
Water in the base pan that won't stop
The base pan is meant to hold a few cups before the flood switch cuts everything off. If yours flooded past that, the flood protection failed as well as the original fault.
Now you're chasing two problems, and one of them lives in a part most people never touch. Water under the machine also keeps the anti-flood sensor triggered, which means it may refuse to run at all until it's bone dry.
Warranty voiding is real, and it's quiet
Most dishwashers carry a one-year full warranty, and many brands extend structural coverage much longer.
Opening the control panel to investigate usually voids that. Some manufacturers accept DIY work on external parts but not on electronics.
If your machine is under warranty, make the call. A technician visit costs you nothing, and you keep the coverage intact.
Hardwired machines and no safe isolation
Some dishwashers are wired straight into a junction box rather than plugged into a socket. With no plug to pull and no isolator within reach, your only option is the breaker, and sometimes that breaker feeds more than the dishwasher.
If you can't confirm the machine is dead with a meter, stop. An electrician can fit an isolator for a modest fee, and it makes every future repair safer.
Rental properties change the equation
In the UK, appliances supplied as part of a furnished let are generally the landlord's responsibility to repair. In the US, it depends on state law and the tenancy agreement.
Either way, photograph the flooding and report it in writing the same day. Replacing a valve yourself in a rented property muddies who pays for the floor.
| Situation | Do it yourself | Call a tech |
|---|---|---|
| Control lock won't clear | Yes, try first | Only if the panel stays dead |
| Inlet valve passing water, meter available | Reasonable | Fine to delegate |
| Water found in the base pan | Only to dry it out | Yes, for the source |
| Burning smell or scorch marks | No | Yes, immediately |
| GFCI trips after drying | No | Yes |
| Machine under warranty | No | Yes |
| Hardwired with no isolator | No | Yes |
The Mistakes That Turn a $30 Inlet Valve Into a $1,200 Floor Repair
An inlet valve costs between $20 and $60. A subfloor replacement, cabinet rebuild, and ceiling repair can run from $700 to well over $1,800.
The gap between those numbers is almost always one of these mistakes. None of them are exotic.
Mistake 1: Standing there watching it fill
This is the big one. Every minute of an uncontrolled fill adds roughly 1 to 3 gallons to the floor.
Close the supply valve before you diagnose anything. It's a quarter turn and it ends the emergency.
Mistake 2: Tapping Cancel instead of holding it
A single tap often does nothing. The board needs a sustained input, typically 3 to 5 seconds, to accept an abort command.
People then conclude the panel is dead and start pricing control boards. Count the seconds out loud. It sounds silly and it saves money.
Mistake 3: Buying a board before testing the valve
A welded relay mimics a failed valve perfectly. Both cause continuous filling. Only one costs $40.
Test the valve first with the machine off at the panel and the supply open. If the tub fills, the valve is passing water. Then do the live voltage check to see whether the board is commanding it.
Mistake 4: Ignoring the base pan
Water under the machine keeps the flood sensor wet, and a wet sensor keeps the machine locked out. You'll replace a good part and still have a machine that won't start.
Pull the kickplate, towel it dry, and aim a fan at it for a few hours. Then reassemble.
Mistake 5: Skipping the little mesh screen
There's a fine mesh strainer inside the inlet valve connection, where the supply hose screws on. It catches grit and protects the valve.
If yours is clogged, the machine fills slowly, throws a fill timeout code, and behaves erratically. Cleaning it takes two minutes and costs nothing.
Mistake 6: Leaving the old flood switch in place
If the base pan flooded, the flood switch saw water. Some are reusable once dry, some aren't. Check continuity through its full travel before you button everything back up.
Mistake 7: Not photographing the wiring
Three wires come off a solenoid and four come off a latch. Get them back in the wrong order and you've added a fault to the one you were fixing.
Take photos at every stage with your phone. It's the cheapest insurance in the toolbox.
Mistake 8: Kinking the drain hose on reassembly
A kinked or low-hanging drain hose causes backflow into the machine. The next symptom is standing water in the tub and a pump that runs too long.
Drain hoses need a high loop, or an air gap where local plumbing code requires one. Check that the loop is still in place before you push the machine back.
Mistake 9: Testing while everything is still wet
A wet board can behave like a failed board. Dry it first, then test. Condemning a component that was only damp is how people end up replacing two boards.
Mistake 10: Assuming a new machine fixes a plumbing fault
If the supply valve under the sink is passing water, a new dishwasher floods too. If the drain is partially blocked, a new machine backs up just like the old one.
Fix the plumbing first. Then decide about the appliance.
How to Prevent the Next One: Filter, Float, Keypad, and Drain Maintenance
Every fault in this guide has a maintenance habit that makes it less likely. None of them take long.
The trick is doing them on a schedule instead of waiting for the smell of burning plastic.
Clean the filter monthly, not annually
The filter basket in the sump catches food, grease, and grit. A loaded filter raises the pressure on the pump and pushes debris into the sensor ports.
Twist out the basket, rinse it under hot water, and brush the mesh. Wipe out the sump with a paper towel.
That single habit prevents a large share of the "pump won't stop" cases. If the lower rack fights you on the way out, our guide to checking how the racks are laid out explains how to lift it clear without forcing it.
Work the float by hand every few months
Push it up and let it drop a few times. You'll feel immediately whether it moves freely or sticks.
In hard water areas, the float guide gets crusted with scale. A soft brush and a vinegar wipe keep it sliding.
Dry the control panel after cooking
Steam is what kills membrane keypads. If your machine sits near a kettle, a hob, or a boiling water tap, wipe the panel dry at the end of the evening.
Leave the door slightly ajar between uses in humid weather. That lets residual moisture out of the tub instead of into the fascia.
Exercise the supply valve twice a year
Shutoff valves seize when they're never turned. One day you'll need it in a hurry and the handle won't budge.
Turn it fully closed and fully open twice a year. It takes ten seconds and it's the difference between a controlled shutdown and a flood.
Check the drain hose high loop
Look behind the machine where the hose exits. It should rise before it drops to the waste connection.
If it's sagging, dirty water sits in the hose and creeps back into the tub. That's backflow, and it's a plumbing code issue as well as a smell issue.
Descale once a year in hard water
Limescale coats heating elements, jams floats, and blocks pressure switch ports. Run a hot cycle with a citric-acid based dishwasher cleaner, no dishes, once a year.
If your area is very hard, do it every six months. Hard water is the biggest accelerant of every failure in this guide.
Look under the sink twice a year
A slow drip at the supply connection or the waste trap is exactly how boards end up corroded. It's a two-minute check with a torch.
| Task | How often | Time |
|---|---|---|
| Filter rinse | Monthly | 5 min |
| Float workout | Every 3 months | 1 min |
| Keypad dry | Weekly in steam-heavy kitchens | 10 sec |
| Supply valve exercise | Twice a year | 10 sec |
| Drain hose loop check | Twice a year | 2 min |
| Descale cycle | Yearly, twice in hard water | 1 cycle |
| Under-sink leak check | Twice a year | 2 min |
Brand-Specific Reset and Diagnostic Sequences: Bosch, Whirlpool, GE, Samsung, LG, and Miele
Brands don't agree on how to cancel a cycle, and the differences are big enough to waste an evening. Here's the pattern that applies to most current models.
Treat this as a starting point, not gospel. Manuals change between series, and your model's book always wins.
| Brand family | Typical cancel action | Typical lock action | Notes |
|---|---|---|---|
| Bosch, Siemens, Neff | Hold Cancel/Reset 3 sec, or Start plus Cancel | Hold the key icon 3 to 5 sec | Cancel starts a drain sequence first |
| Miele | Hold Start/Stop or the cancel symbol 3 sec | Hold the lock key | Flood protection may keep it running while it drains |
| Whirlpool, KitchenAid, Maytag, IKEA | Hold Cancel/Drain 3 to 5 sec | Hold Control Lock 3 sec | Some need Cancel then Start |
| GE, GE Profile | Press Start/Reset once to cancel, hold to reset | Hold Control Lock 3 sec | Codes display as numbers |
| Samsung | Hold Cancel 3 sec | Hold Child Lock 3 sec | Leak and overflow codes are common |
| LG | Hold Start 3 sec | Hold Control Lock 3 sec | Long press needed after a power cut |
| Frigidaire, Electrolux | Hold Cancel or Start/Cancel | Hold lock key | Some use a dial to cancel |
| Beko | Hold Start/Pause 3 sec | Hold the key lock combo | Older models want a full power cycle |
Finding your model's exact sequence
The model and serial plate usually sits on the inner edge of the door, or on the side of the tub behind the door. Photograph it.
Take that number to the manufacturer's own literature site. Every major brand publishes owner's manuals, and many publish technical service documentation too.
If the manufacturer doesn't publish it, an appliance parts retailer's model lookup often lists parts diagrams. Those show the layout without giving away the reset sequence.
Fault codes worth knowing
These are the codes most commonly reported for faults that keep a machine running. They point at a system, not a specific part.
| Code | Brand family | What it usually means |
|---|---|---|
| E15 | Bosch, Siemens | Water in the base pan, flood protection triggered |
| E24 | Bosch, Siemens | Drain problem, blocked filter or pump |
| OE | Samsung, LG | Overflow or overfill condition |
| LC | Samsung | Leak detected |
| FE | LG | Overflow error |
| IE | LG | Inlet or supply problem |
| 4E | Samsung | Water supply fault |
An overfill or overflow code is genuinely useful. It confirms you're on the continuous-filling branch and narrows things to the valve, the float, and the board relay.
Don't read a code as a parts order
A drain code can mean a blocked filter, a jammed impeller, a failed pump, or a wiring fault. The code tells you which system to test.
Use the code as a shortcut into the decision tree, then test the parts in cheapest-first order.
When brand behavior looks like a fault
Two brand habits look broken but aren't. Bosch and Miele machines often continue running after you press Cancel while they finish pumping. And several brands light the display for a few minutes after the cycle ends.
Both are normal. Give them 90 seconds before you conclude the panel is ignoring you.
Frequently Asked Questions
Why won't my dishwasher turn off even when I hold Cancel?
The cancel command may not have registered, or the button is being held too briefly. Hold it for a full 3 to 5 seconds and wait 90 seconds for the drain sequence. If it still runs, the fault is downstream: a stuck inlet valve, a jammed float switch, or a welded relay on the board.
Is it dangerous to leave a dishwasher running all night?
Normally no, since machines are built for unattended cycles. It becomes a risk when the machine is stuck filling or won't stop. An appliance cycling continuously with a heating element running is worth isolating at the breaker until it's repaired.
Can a dishwasher flood the kitchen if it won't turn off?
Yes. A perforated inlet valve diaphragm lets water through even with the machine switched off. Most machines have base pan flood protection, but it isn't universal and it can fail.
Close the supply valve under the sink first, then cut the power.
How much does it cost to fix a dishwasher that won't turn off?
A water inlet valve runs $20 to $60 and a float switch $15 to $40. A control board costs $150 to $300. Add a diagnostic call-out of $100 to $200 if you use a technician.
Most complete repairs land between $150 and $400.
Why does my dishwasher keep filling with water when it's switched off?
That points squarely at a mechanical failure in the water inlet valve. The solenoid isn't energized, so the diaphragm is passing water on its own. The alternative is a welded relay feeding the valve constant power.
A live voltage check at the valve connector separates the two.
Should I replace the control board or the whole dishwasher?
Replace the board only after testing the valve, float, and wiring. If the machine is under eight years old, a board is usually worth it. Past ten years, or when the repair exceeds half the price of a new machine, replacement makes more sense.
