
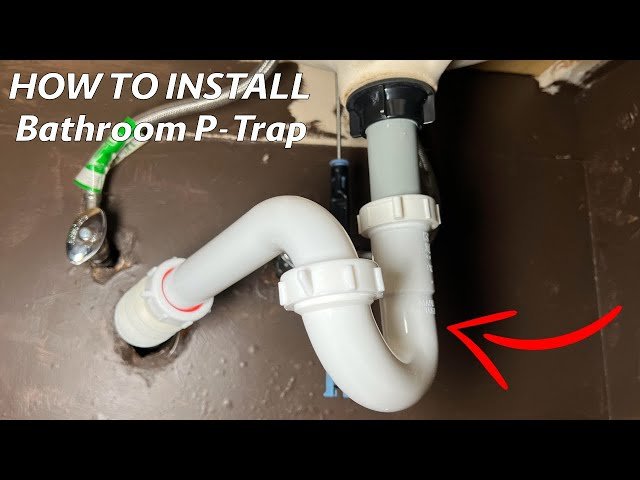
A leaking or missing P-trap is one of the most common sources of kitchen sink odors, slow drainage, and even water damage. Yet installing one yourself takes less than an hour, costs under $20, and requires only basic tools. Whether you’re replacing a corroded trap or installing one for the first time, this guide walks you through every step with clarity and precision. By the end, you’ll have a watertight seal that blocks sewer gas and keeps your sink draining perfectly.
What a P-Trap Does and Why It Matters
The curved pipe under your sink—shaped like the letter P on its side—holds a small pocket of water after every drain. That water creates a barrier that prevents sewer gases from rising into your kitchen. Without it, you’d smell methane, hydrogen sulfide, and other foul gases daily.
A P-trap also catches solid debris (food scraps, grease, hair) before they travel deeper into your plumbing, making clogs easier to clear. Every sink, tub, and shower legally requires a trap under the Uniform Plumbing Code. The standard liquid seal depth must be at least 2 inches. If you’re dealing with persistent odors or slow drainage, the problem often traces back to a dry, cracked, or poorly installed trap.
Tools and Materials You’ll Need
Gather everything before you start. Having the right items within reach turns a messy job into a clean one.
| Category | Item | Purpose |
|---|---|---|
| Tools | Adjustable wrench | Tighten slip nuts without stripping |
| Tools | Pipe wrench (optional) | Extra grip on stubborn fittings |
| Tools | Slotted or Phillips screwdriver | Remove hose clamps or brackets |
| Tools | Hacksaw or PVC cutter | Trim pipes to exact length |
| Tools | Bucket (at least 2-gallon) | Catch water when disconnecting |
| Tools | Flashlight | See into dark cabinet corners |
| Tools | Old towels or rags | Soak up spills |
| Materials | P-trap kit (PVC or brass) | Includes trap bend, trap arm, nuts, and washers |
| Materials | Slip-joint washers (spare) | Extra seals in case originals are brittle |
| Materials | Plumber’s tape (PTFE) | Wrap threaded joints for leak prevention |
| Materials | Plumber’s putty (optional) | Seal sink basket drain if replacing that too |
| Safety | Work gloves | Protect hands from sharp edges and grime |
| Safety | Safety glasses | Shield eyes from splashing dirty water |
Pro tip: Buy a kit rather than individual parts—they come pre-sized to fit standard kitchen drains (1½-inch diameter). Avoid buying a cheap plastic kit with thin washers; spend a few extra dollars for a PVC kit with thick, flexible rubber gaskets.
How to Choose the Right P-Trap for Your Sink
Not all traps are universal. You need the correct style, material, and size.
Style: P-trap vs. S-trap vs. Bottle trap
- P-trap – The standard for kitchen sinks. It connects the tailpiece (vertical pipe from sink basket) to a horizontal wall drain via a curved U-bend. It requires a vent pipe to function correctly.
- S-trap – Now prohibited by most plumbing codes because it lacks venting and can siphon dry. If you have an older home with an S-trap, replace it with a P-trap and add an air admittance valve (AAV) if needed. For details on ventilation, see our guide on the vent under kitchen sink.
- Bottle trap – Compact and decorative, often used on pedestal sinks. It’s harder to clean and more prone to clogs, so it’s not recommended for a kitchen sink that handles food waste.
Material: PVC vs. Brass vs. Chrome-plated brass
- PVC – Most common. Affordable, easy to cut, and non-corrosive. White or gray. Best for do-it-yourselfers.
- Brass (chrome-plated) – More durable and looks better if visible, but harder to cut and more expensive. Prone to pitting over time if you have hard water.
Diameter
Standard kitchen sink drains use 1½-inch pipe. Measure the diameter of your existing tailpiece or sink basket outlet to confirm. A 1¼-inch trap will not seal properly.
Step-by-Step Installation Guide
Follow these steps in order. Rushing or skipping the cleaning phase is the number one cause of post-installation leaks.
1. Shut Off Water and Place Bucket
Turn both hot and cold water valves under your sink clockwise until snug. If the valves are stuck, see our article on water valves under kitchen sink for replacement tips. Place the bucket directly under the trap area and lay towels around it.
2. Remove the Old Trap
Loosen the slip nuts that connect the trap to the tailpiece (top) and the wall pipe (trap arm). Use your hands first; if they’re stuck, use an adjustable wrench gently. Do not over-torque—PVC threads can crack. Once the nuts are loose, pull the trap down and let any water drain into the bucket.

The right technique: turn the nut counter-clockwise by hand first, then use a wrench only if needed.
3. Clean Pipe Ends and Inspect
Wipe off old plumber’s tape, mineral buildup, and rubber gasket residue from both the tailpiece and the trap arm. Use a rag or fine steel wool. Look for cracks or corrosion. If the tailpiece or trap arm is damaged, you’ll need to replace them too—see our guide on how to install pipes under kitchen sink for those repairs.
4. Dry-Fit the New Trap
Assemble the new P-trap kit without tightening anything. Slide the trap arm into the wall fitting first, then attach the U-bend to the trap arm and the tailpiece. The trap arm should slope slightly downward (¼-inch per foot) toward the wall. If the trap arm is too long, mark it and cut with a hacksaw or PVC cutter. If it’s too short, you’ll need a longer trap arm or an extension piece.
5. Apply Plumber’s Tape and Tighten
Wrap two layers of PTFE tape clockwise onto any threaded connections (some plastic slip joints don’t require tape, but it never hurts). Slide the slip nuts and washers over each pipe end in the correct order: first the nut, then the washer with the tapered side facing the pipe. Hand-tighten all nuts until snug, then give each an extra quarter-turn with the wrench. Do not overtighten—this warps the washer and causes leaks.
6. Run Water and Check for Leaks
Turn the water supply back on slowly. Let the sink fill to about halfway, then pull the plug and watch the entire trap assembly as water drains. Use a dry paper towel to wipe each joint and check for moisture. Heavy flow often reveals leaks that a slow trickle won’t. A small drip usually means the washer is misaligned or the nut isn’t snug enough.

This diagram shows the standard connection order: tailpiece → slip nut + washer → trap bend → slip nut + washer → trap arm → wall drain.
7. Tighten or Adjust as Needed
If you see a drip, tighten the nut an additional ⅛ rotation. If the drip continues, remove the joint, check the washer for damage, and reinstall. If the trap arm is too short or angled upward, you may need to adjust the wall connection or add a longer arm. For complex alignment issues, consult the under the kitchen sink plumbing diagram to understand all connecting parts.
Common Mistakes to Avoid
Even experienced DIYers make these errors. Watch out for:
- Overtightening plastic nuts – They crack under too much torque. Stop as soon as you feel resistance.
- Using old washers – Always use the new washers from the kit. Old ones have permanent compression marks.
- Forgetting the order of parts – Put the nut on the pipe first, then the washer. Reversing them guarantees a leak.
- Ignoring the vent – A P-trap needs a vent to prevent siphoning. If your setup gurgles or drains slowly, check the vent. Our article on the vent under the sink explains how to add an air admittance valve if missing.
- Cutting the trap arm too short – Leave at least 1 inch of engagement inside the wall fitting. Measure twice, cut once.
Maintenance Tips to Extend P-Trap Life
A P-trap requires little upkeep, but regular care prevents smell and clogs.
- Flush with hot water weekly – Run hot water for 30 seconds to flush grease before it solidifies.
- Use a sink strainer – Catch food scraps and pour them in the trash, not down the drain. It’s the single best step to avoid clogs.
- Clean the trap every 6–12 months – Remove the trap and rinse it in the yard or over a bucket. Most smell issues come from slime buildup inside the bend. For persistent odors, see our guide on musty odor under kitchen sink.
- Never pour harsh chemical drain cleaners – They erode plastic and rubber seals. Use baking soda and vinegar instead for light clogs.
Troubleshooting Common Issues
Odors after installation – The most likely cause is a dry trap. Run water for 10 seconds to refill the seal. If the smell returns after not using the sink for a few days, you may have a leak allowing gases to bypass the water seal. Check all joints with a paper towel.
Slow drainage – Remove and clean the trap. Food debris often collects in the bottom curve. If the problem persists, the main line may be clogged. A flexible drain snake can help.
Leak at the wall connection – The slip nut or trap arm may be too short. Add a longer trap arm or use a union fitting. If the wall pipe itself is damaged, you’ll need to repair that section first. For step-by-step leak fixes, read about how to repair leaking pipe under kitchen sink.
Gurgling noise when draining – Indicates a venting problem. Without proper venting, the trap can siphon dry. Install an air admittance valve if your plumbing code allows.
Frequently Asked Questions
Can I install a P-trap without professional help?
Yes. Most homeowners with basic tool skills can complete this in 30–60 minutes. The key is careful measurement and hand-tightening.
What if my sink drain is 1¼ inch instead of 1½ inch?
You can still use a 1½-inch trap kit with a reducing washer, but a 1¼-inch kit is available at hardware stores. Measure your tailpiece diameter first.
How do I know if my P-trap is the right size?
Standard kitchen sinks take 1½-inch diameter pipe. Bathroom sinks often use 1¼-inch. Check your sink basket outlet—it will match the size.
Is it normal for the trap arm to be higher than the tailpiece?
No. The trap arm must slope downward toward the wall. If the arm is higher, water won’t drain, and debris will accumulate.
Can a P-trap cause mold?
Leaks or condensation from a poorly sealed trap can create moisture that promotes mold growth. Fix drips immediately and consider adding insulation if you see sweating pipes. For mold issues, read about mold smell under kitchen sink.
Final Checklist Before You’re Done
- All slip nuts are hand-tight plus a quarter turn—no cracks.
- No drips after two minutes of full-flow water.
- Trap arm slopes downward toward the wall.
- Trap holds a visible water seal (pour a cup of water and watch it settle).
- No unusual gurgling sounds during drainage.
Conclusion
Installing a P-trap under your kitchen sink is one of those jobs that looks intimidating until you do it once. With the right tools, a few simple measurements, and patience with the slip nuts, you can finish in less than an hour. You’ll save the cost of a plumber’s visit and gain the confidence to handle future plumbing projects. If you run into a stubborn leak or a corroded wall fitting, the linked guides above walk you through those exact fixes. Start your project today—your nose and your wallet will thank you.
