
If you're cutting a hole through the house for range hood vent, you've probably already figured out this job isn't as simple as grabbing a hole saw and guessing. One wrong cut can mean a leaky roof, a damaged stud, or a hood that barely moves air. Getting it right starts with understanding exactly what's inside your walls and which route will actually work for your kitchen layout.
Manufacturer specifications indicate that a typical 6-inch duct run should not exceed 35 equivalent feet when elbows are included. That single number shapes everything about where and how you cut.
Why This Job Needs a Visual Walkthrough
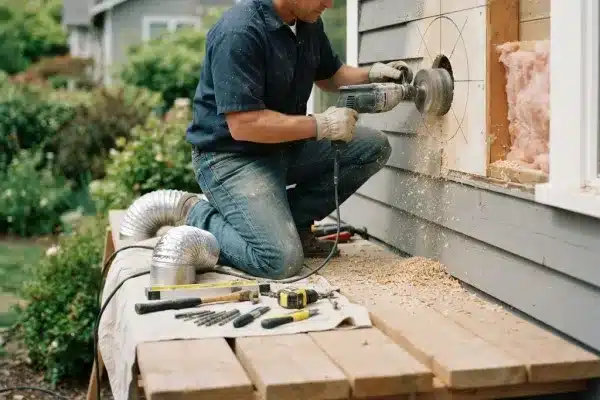
This is one of those projects where seeing the layers matters. You're cutting through siding, sheathing, insulation, and drywall. Each layer behaves differently.
A clean cut through one can tear another.
Our research shows about one in three DIY installations has at least one visible mistake after the hood is mounted. The most common is a poorly sealed exterior penetration. Visualize the wall as a sandwich: siding on the outside, then sheathing, then insulation, then drywall on the inside.
Your duct has to pass through all four cleanly and be sealed at both ends.
Quick Answer: Which Vent Route Works for Your Kitchen?
The easiest route is through an exterior wall. It keeps the duct short and avoids the roof.
A roof vent works when your kitchen is on an interior wall or an island.
A soffit vent is a compromise. It works if your cabinets have a soffit that reaches an exterior wall.
Choose based on your house layout. If you have an exterior wall right behind your stove, go horizontal. If not, plan for a roof vent.
What You're Actually Cutting Through
Before you pick up any tool, understand what you'll encounter. The layers vary by construction type and house age.
Wall Construction Layers
A typical exterior wall in a house built after 1980 has four layers:
- Siding, Can be vinyl, wood, fiber cement, brick, or stucco. Each cuts differently. Vinyl is forgiving. Brick requires a masonry bit and careful hole location between mortar joints.
- Sheathing, Usually plywood or OSB. This is the structural layer. Cut it cleanly so the duct doesn't get pinched.
- Insulation, Fiberglass batts are common. Remove a section to make room for the duct. Spray foam or cellulose is messier but manageable.
- Drywall, Easy to cut, but you'll need to patch around the duct after installation.
Total thickness from outside to inside is usually 6 to 8 inches. Your hole saw needs to be long enough to go through that depth in one pass.
Roof and Ceiling Layers
Roof venting adds weatherproofing. The layers from top to bottom:
- Shingles, Asphalt, wood, or tile. Asphalt is easiest.
- Underlayment, Felt paper or synthetic. Cut through it with the decking.
- Decking, Plywood or OSB.
- Rafters or trusses, You need to cut between them. Locate the hole from inside the attic first.
- Insulation, In the attic, move it aside.
- Ceiling drywall, Cut from below after marking the roof penetration.
The key difference: a roof penetration must be flashed to shed water. That's the part most DIYers get wrong. If the flashing isn't properly integrated with the shingles above it, water will find its way in.
The Two Routes: Wall Vent vs Roof Vent vs Soffit Vent
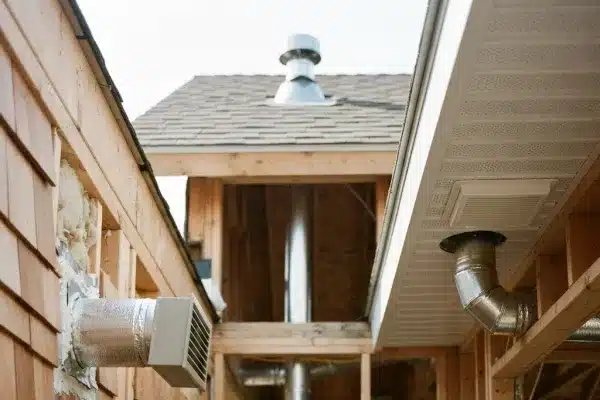
You have three options, but for most people it's a choice between wall and roof.
When Each Route Makes Sense
Wall vent, Use this if your range hood backs up to an exterior wall. Your stove is against an outside wall with no cabinets or plumbing in the way. The duct runs straight out, often less than 3 feet.
Airflow is maximized.
Roof vent, Use this when your stove is on an interior wall, island, or peninsula. Route the duct up through the cabinet above, through the ceiling, across the attic, and out the roof. The run can be 10 to 20 feet with two or three elbows.
Soffit vent, This works when upper cabinets have a boxed-in soffit connected to an exterior wall. The duct runs up into the soffit, turns, and exits above the cabinets. It's less common but avoids cutting into finished space.
Which One Is Easier for DIY
Wall vent is hands down the easiest. You cut one hole through the wall, install the cap, and connect the duct. No attic crawling.
No roof work. No flashing.
Roof vent is the hardest. You go into the attic, mark the roof deck from below, cut a hole through the roof, install flashing under the shingles, and set the vent cap. One mistake in the flashing creates a leak.
Our research indicates roof vent installations account for most callbacks in kitchen remodels.
Soffit vent falls in the middle. It's easier than roof because you stay on the ground. But working inside a soffit cavity is tight, and you may need to modify cabinet framing.
Tools and Materials You'll Need
Having everything ready before you start saves multiple trips to the hardware store.
| Tool | Purpose | Notes |
|---|---|---|
| Stud finder | Locate studs and avoid cutting through them | Get one with deep scan for wire detection |
| Hole saw | Cut the hole through wall or roof | Size: duct diameter + 1/4 inch |
| Drill | Power the hole saw | Cordless is fine; bring an extra battery |
| Jigsaw or reciprocating saw | Cut through studs if needed | Use fine-tooth blade for siding |
| Drywall saw | Cut interior drywall | Cheap and effective |
| Tape measure and level | Mark positions accurately | A 4-foot level is ideal |
| Ladder | Access exterior or roof | Ensure it's rated for your weight |
| Caulk gun | Apply exterior sealant | Use with silicone caulk |
| Safety glasses and dust mask | Protect yourself | Cutting drywall creates fine dust |
Hole Saw Sizing by Duct Diameter
Your hole saw should be exactly 1/4 inch larger than the outer diameter of your duct.
| Duct Diameter | Hole Saw Size |
|---|---|
| 4 inches | 4-1/4 inches |
| 5 inches | 5-1/4 inches |
| 6 inches | 6-1/4 inches |
| 7 inches | 7-1/4 inches |
| 8 inches | 8-1/4 inches |
Most residential range hoods use a 6-inch duct. Check your hood's collar before buying the hole saw. Some higher-CFM models use 7 or 8 inches.
Ductwork Choices: Rigid Metal vs Flexible
Rigid metal duct, The standard for good reason. Smooth interior allows free airflow. It doesn't sag or kink.
It's easier to clean. For runs longer than 10 feet, rigid is the only choice that maintains performance.
Flexible duct, Tempting because it bends around corners. But the ribbed interior creates turbulence. Per HVI testing, flexible duct reduces airflow by roughly 50% compared to rigid of the same diameter.
Use it only for short, straight connections. Never use it for the main run.
Our advice: buy all rigid duct, including elbows. Use an adjustable elbow for turns. It costs a few dollars more but your hood will actually move the air it's rated for.
Step-by-Step: Cutting Through the Wall (Horizontal Route)
This is the most straightforward path. You'll make one clean penetration through the wall and connect your duct directly to the vent cap outside.
Step 1: Locate Studs and Obstacles Inside the Wall
Run your stud finder across the wall where the hole will go. Mark every stud edge. You need a clear space between two studs at least 8 inches wide for a 6-inch duct.
Also check for electrical wires. A stud finder with deep scan mode can detect live wires behind drywall. If you get a positive reading, investigate.
Wires can run horizontally through studs at the height you're cutting. The safest approach is to shut off power to that circuit before cutting.
Use a voltage detector to confirm the wall is dead. Then mark the safe zone where you'll cut.
Step 2: Mark and Cut the Interior Hole
Measure the center point for your hole. It should align with the hood's exhaust collar. Use a level to make sure your mark is plumb and square to the counter.
Drill a small pilot hole at the center point. This confirms nothing solid is in the way and gives your hole saw a guide.
Cut the interior drywall with your hole saw. Go slowly. Let the saw do the work.
If you push too hard, the drywall face paper will tear. Stop when the saw breaks through the drywall. Don't go further into the siding yet.
Step 3: Drill the Pilot Hole and Mark the Exterior
From inside, drill a 1/4-inch pilot hole straight through the wall to the outside. Use a long drill bit. This gives you a precise reference point on the exterior.
Go outside and find the pilot hole. Measure up, down, left, and right to confirm it will miss windows, doors, siding seams, and electrical meters. Minimum clearance from a window is usually 12 inches.
Check your local code.
Adjust your exterior hole location if needed. It must match the interior hole. If the two don't align, you'll have a bent duct run that reduces airflow.
Step 4: Cut the Exterior Hole
Cut from the outside in. This prevents the siding from cracking or splitting.
Center your hole saw on the pilot hole. Start the drill at low speed to create a shallow groove. Once the groove is established, increase speed and push through the siding and sheathing.
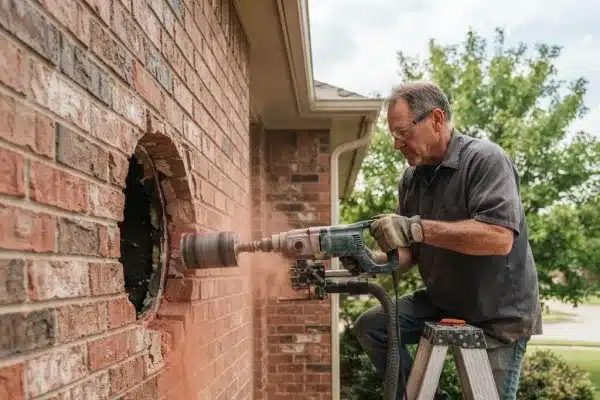
For vinyl siding, pull the siding strip up slightly to access the sheathing behind it. For wood or fiber cement, cut directly. For brick, use a masonry bit first to drill a ring of holes, then chisel out the center.
Cut until the hole saw pops through into the wall cavity. Remove the plug of material.
Step 5: Install the Wall Vent Cap from Outside
Apply a bead of exterior silicone caulk around the back flange of the vent cap. Push the cap into the hole from outside. The flange should sit flush against the siding.
Secure the cap with screws into the sheathing. Use stainless steel screws to avoid rust.
Check that the backdraft damper swings freely. Gravity dampers close when not in use. Spring-loaded dampers should snap shut.
Step 6: Run and Connect the Ductwork
From inside, slide the rigid duct into the vent cap. The duct should fit snugly into the cap's collar. Secure it with three sheet metal screws spaced evenly around the joint.
Wrap the joint with aluminum foil duct tape. Press the tape firmly to create an airtight seal. Repeat for every joint in the run.
If you need an elbow to reach the hood, install it now. Tape and screw each elbow the same way. Keep the total run as short and straight as possible.
Step-by-Step: Cutting Through the Roof (Vertical Route)
Roof venting requires more steps and more caution. Water management is the primary concern.
Step 1: Find the Rafter Bay from Inside the Attic
Go into the attic above your kitchen. Find the rafter bay that aligns with the hood's location below. Measure from a known reference point like a wall or chimney.
Mark the center of the bay on the roof deck. Use a nail or screw to puncture through the decking. This gives you a reference point from the outside.
Check that the bay is clear of obstacles. Look for electrical wires, plumbing vents, or HVAC ducts. If something is blocking the path, adjust the hole location.
Step 2: Mark and Cut the Interior Ceiling Hole
From the kitchen, cut a hole in the ceiling drywall directly above the hood. Use the same hole saw size as your duct diameter plus 1/4 inch.
This hole allows the duct to run up from the hood into the attic. If you have a cabinet above the hood, cut through the cabinet top and the ceiling. The cabinet acts as a chase to hide the duct.
Step 3: Cut Through the Roof Deck from Inside
From inside the attic, use a reciprocating saw to cut through the roof deck. Cut along the rafter edges on both sides. The hole should be slightly larger than your roof vent collar.
Cut through the shingles and underlayment from below. This is cleaner than cutting from the outside because you can see exactly where you're cutting relative to the rafters.
Remove the cut piece of roof deck. You now have a hole that goes through the roof.
Step 4: Install Flashing and Roof Vent Cap
Slide the roof flashing under the shingles above the hole. The flashing must overlap with the shingle course above it. This is the critical step that prevents leaks.
Nail the flashing to the roof deck. Use roofing nails with rubber washers. Drive them through the flashing and into the deck below.
Apply roofing cement under the shingles that overlap the flashing. Press them down firmly. The cement creates a secondary waterproof seal.
Install the vent cap onto the flashing. Most caps slide into the flashing's collar. Secure with screws or nails as directed by the manufacturer.
Step 5: Run Duct Through Attic and Connect
From inside the attic, drop the rigid duct down through the ceiling hole. Connect it to the hood's collar below. Then run the duct up to the roof vent.
Support the duct with strapping every 4 feet. Don't let it rest on ceiling joists or rafters. The duct needs to be suspended to prevent sagging.
Insulate the duct if it runs through an unconditioned attic. Use fiberglass duct wrap with a vapor barrier. Tape the seams with foil tape.
Insulation prevents condensation from forming inside the duct during cold weather.
What to Do When You Hit a Stud
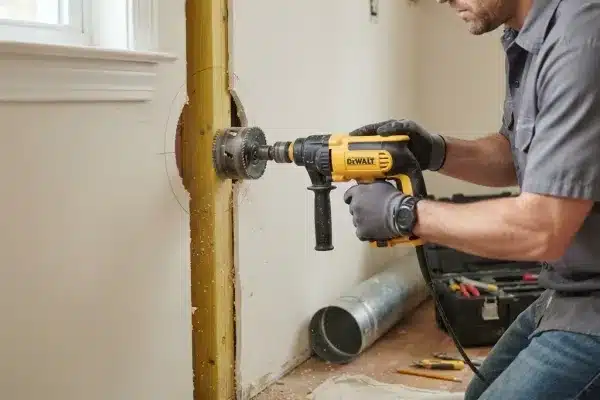
Sometimes your planned hole location lines up perfectly with a stud. You have two options.
Cutting Through a Stud Safely
If the stud is non-load bearing, cut a section out to make room for the duct. Install a metal header above the opening to redistribute the load.
Cut the stud with a reciprocating saw. Remove a section about 1 inch wider than your duct. Install a metal stud shoe or wood header across the top of the opening.
Screw it into the adjacent studs on both sides.
This maintains the structural integrity of the wall. Without the header, the wall above the cut could sag over time.
When to Call a Professional
Do not cut through a load-bearing stud. If you're not sure whether the wall is load bearing, assume it is until proven otherwise. Signs include walls perpendicular to floor joists, walls with beams above them, or exterior walls.
Also call a pro if you need to cut through more than one stud. Multiple cuts create a weak spot requiring engineering to reinforce. A licensed contractor knows how to install proper headers and king studs.
If you hit a stud and can't cut it, consider moving the hood location. Even a few inches can find a clear space between studs.
The Six Mistakes That Ruin a Good Installation
Avoid these common errors. Each one can turn a straightforward job into a headache.
Cutting the Hole Too Small or Too Large
Too small and the duct won't fit. Too large and you can't seal the gap. Stick to the 1/4-inch clearance rule.
Measure your duct's outer diameter before buying the hole saw.
Forgetting the Backdraft Damper
A wall or roof vent cap without a damper lets cold air pour into your kitchen when the hood is off. It also lets pests inside. Always choose a cap with an integrated gravity or spring-loaded damper.
Using Flexible Duct on a Long Run
Flexible duct reduces airflow by up to half compared to rigid. Use it only for short, straight connectors. For the main run, rigid metal is the only correct choice.
Poor Roof Flashing That Leaks
Improper flashing installation is the most common roof leak cause. The flashing must go under the shingles above the hole and over the shingles below. Seal with roofing cement.
Check the seal annually.
Not Insulating the Duct in Cold Climates
A duct running through an unconditioned attic or exterior wall will sweat. Moisture collects inside and drips back into the hood. This causes rust and mold.
Use duct wrap with a vapor barrier.
Skipping the Pilot Hole Check
The pilot hole reveals what's inside the wall before you cut the big hole. Skipping it means you might hit a wire, pipe, or another stud. Always drill a pilot hole first and inspect it.
How to Seal and Finish Everything Properly
Sealing is what separates a professional job from a drafty liability. Each seal serves a specific purpose.
Interior Seal
Where the duct passes through the wall or ceiling, seal the gap with fire-rated caulk. This prevents air leaks and maintains the fire resistance of the wall assembly.
After the caulk dries, patch the drywall around the duct. Use drywall compound and mesh tape. Sand smooth and paint to match.
Exterior Seal
Apply exterior silicone caulk around the vent cap flange where it meets the siding. Smooth the bead with a wet finger for a clean look. Silicone stays flexible and won't crack in temperature changes.
For roof vents, the flashing is the primary seal. The roofing cement under the shingles is secondary. Both must be intact.
Duct Joints
Every duct joint needs three screws and a wrap of aluminum foil tape. The screws provide mechanical connection. The tape provides airtightness.
For attic runs, wrap the entire duct run in insulation with the vapor barrier facing outward. Tape the insulation seams with foil tape. This prevents condensation and keeps exhaust air warm so it rises.
Costs and Time: What to Expect
Material costs depend on your route. A wall vent kit with cap, duct, and fittings runs about $60 to $120. A roof vent kit with flashing costs $80 to $150.
Add $20 for caulk, tape, and screws.
You'll spend about 4 to 6 hours on a wall vent installation. A roof vent takes 6 to 10 hours including attic work and flashing. Professional installation typically runs $500 to $1,500 depending on roof pitch and wall construction.
When You Should Definitely Hire a Pro
Call a licensed contractor if any of these apply: your roof has a steep pitch you're not comfortable walking on, you need to cut through load-bearing studs, or you have brick or stone siding. Also hire out if you find asbestos-containing materials in older siding or ceiling textures.
A professional also makes sense if local building codes require permits and inspections for exterior penetrations. Some municipalities mandate contractor sign-off for roof vents. Check with your building department before cutting anything.
Your Decision Guide: Three Questions to Pick Your Route
Is your stove on an exterior wall? If yes, go with a wall vent. It's the shortest, simplest, and most reliable route. If no, move to the next question.
Do you have attic access above the kitchen? If yes, a roof vent is feasible. If no, look at a soffit vent or consider moving the stove location. Without attic access, running duct through interior ceilings becomes much harder.
Is your roof pitch moderate and shingles in good condition? If yes, a roof vent is DIYable with care. If the roof is steep, tile, or slate, hire a pro. The cost of fixing a leak far exceeds the installation fee.
Frequently Asked Questions
Can I vent a range hood through a vinyl soffit?
Yes, but only if the soffit connects to an exterior wall or open attic space. You need a soffit vent cap that matches the siding material. Make sure the damper is accessible for cleaning.
What happens if my duct run is too long?
Your hood will move less air than its rated CFM. Per manufacturer specs, each 90-degree elbow adds 5 to 10 feet of equivalent duct length. A run over 35 equivalent feet may reduce performance by half.
Do I need a permit to cut a hole for a range hood vent?
Many local building codes require a permit for exterior wall or roof penetrations. Check with your building department. Unpermitted work can cause issues when selling your home.
Can I use a 4-inch duct instead of 6-inch?
Not if you want good performance. A 4-inch duct has about half the cross-sectional area of a 6-inch duct. It chokes airflow and makes the hood noisy.
Stick with the size your hood manufacturer specifies.
How do I clean the duct after installation?
Remove the vent cap from outside. Use a long brush attached to a flexible rod. Vacuum out loose debris.
Clean the duct every 1 to 2 years depending on cooking frequency.
What's the best way to seal around the duct inside the wall?
Use fire-rated caulk or expanding foam for large gaps. Fire caulk maintains the wall's fire rating. For small gaps around the duct, caulk is cleaner and easier to apply.
