
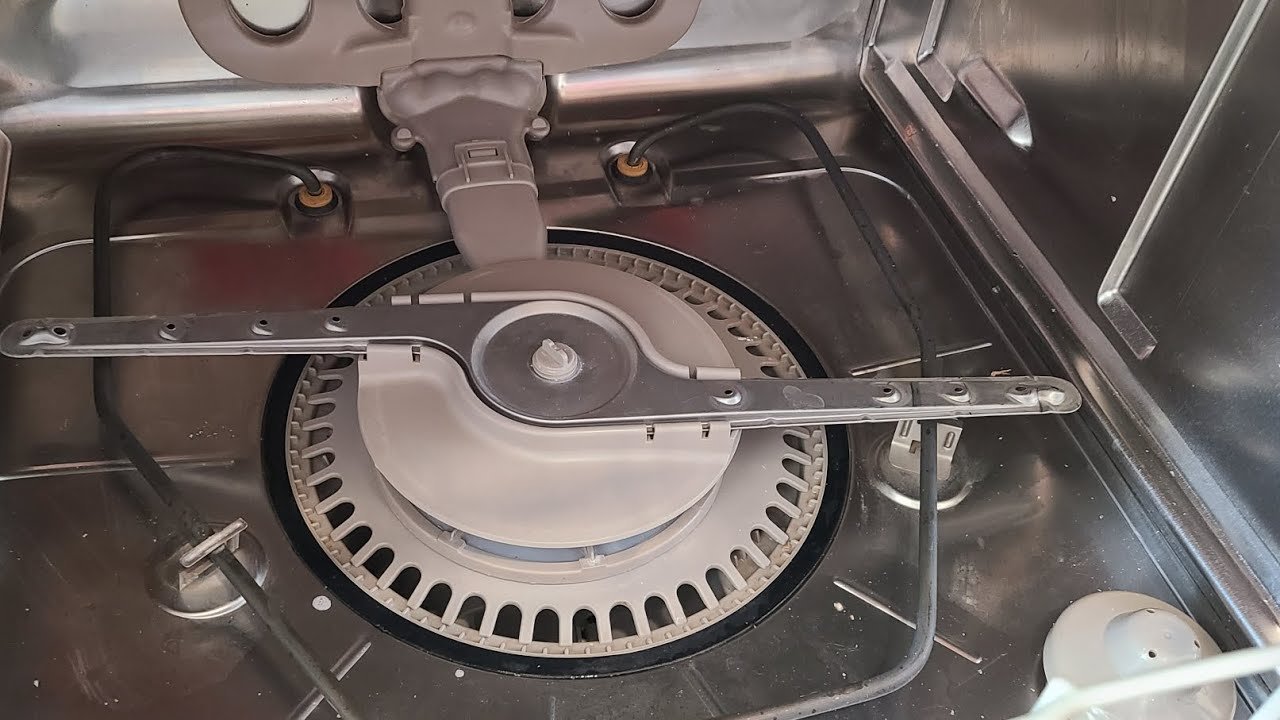
If your Kenmore dishwasher leaves dishes spotted, greasy, or still dirty after a full cycle, the most likely culprit is a clogged filter. That small mesh component traps food particles, soap scum, and debris—when it’s blocked, water can’t circulate properly and soil gets redeposited on your glassware. The good news? Cleaning the filter takes under 15 minutes and requires no special skills or expensive tools. In this guide you’ll learn exactly where the filter lives, how to remove and clean it safely, and how to keep it working optimally for years to come. And if you want to complement filter maintenance with a deep clean of your appliance, a separate routine can help too.
 The filter sits at the bottom of the dishwasher, often near the spray arm.
Why Cleaning the Filter Matters
Neglecting the filter doesn’t just mean dirtier dishes. A clogged filter forces the pump to work harder, which can shorten the dishwasher’s lifespan and increase energy consumption (Energy Star‑rated dishwashers lose efficiency when water flow is restricted). Food buildup also creates a breeding ground for bacteria and mold, leading to musty odors. Regular cleaning—every four to six weeks—keeps water pressure high, prevents drain clogs, and ensures every wash leaves your dishes sparkling.
Tools and Materials You’ll Need
Having the right supplies on hand makes the job quick and damage‑free.
| Tool / Material | Purpose |
|---|---|
| Soft‑bristle brush or old toothbrush | Gently scrubs mesh without tearing |
| Microfiber cloth | Wipes housing and dries the filter |
| Mild dish soap (no bleach or citrus) | Cuts grease safely |
| Small bowl or container | Soaks the filter for stubborn debris |
| Phillips‑head screwdriver (for some models) | Removes screws securing the filter cover |
| Flashlight | Helps see the filter location clearly |
A soft‑bristle brush works well—similar to one you might use for cleaning a ceramic cooktop—but an old toothbrush is just as effective.
Safety Precautions
Before you start, consider a few basic safety steps:
- Unplug the dishwasher or flip the circuit breaker – eliminates any risk of electrical shock while your hands are in the wet cavity.
- Turn off the water supply – look for the shut‑off valve under the sink (often a small lever or knob). This prevents accidental water spills if you dislodge a hose.
- Wear rubber gloves – filters can have sharp edges from food debris or metal mesh.
- Keep young children and pets away – the open dishwasher contains sharp parts and cleaning solution residue.
- Read your model’s user manual – Kenmore has produced hundreds of models; the manual gives exact filter part numbers and installation torque.
Where Is the Filter Located?
On the vast majority of Kenmore dishwashers, the filter sits inside the tub at the very bottom, directly under the lower spray arm. To access it:
- Pull out the bottom dish rack entirely.
- Look at the center or rear of the tub floor. You’ll see a circular or rectangular plastic piece (about 3–4 inches in diameter) with a mesh screen inside. That’s the filter.
- Some models have a flat, round twist‑cap; others have a screw‑down ring with one or two recessed screws.
If your Kenmore was manufactured after 2010, it almost certainly has a manual‑clean filter (not a self‑cleaning one). Older models (pre‑2005) sometimes used a self‑cleaning system that still has a coarse strainer that needs occasional rinsing. If you can’t find a removable filter, check the underside of the lower spray arm—it may conceal a fine‑mesh screen.
Removing the Filter
Once you’ve located the filter, removal is straightforward.
- Twist‑cap models – Grasp the cap and turn it counter‑clockwise about a quarter turn. Lift straight up.
- Screw‑down models – Use a Phillips‑head screwdriver to remove any screws, then lift the assembly.
- Snap‑on models – Press a small tab or latch on the side of the housing and pull upward.
Set the filter aside. Also remove the coarse strainer (the larger plastic basket that catches big food chunks) if it lifts out separately. Inspect the filter housing cavity with a flashlight—check for stuck fragments or broken glass that could damage the pump.
Cleaning the Filter
With the filter in hand, follow these steps:
Rinse Under Warm Water
Hold the filter under a strong stream of warm tap water. Rotate it to flush food particles from both sides. For heavy buildup, let it soak in a bowl of warm, soapy water for 10 minutes.
Scrub Gently
Use your soft‑bristle brush or toothbrush to loosen debris from the mesh. Scrub in a circular motion, paying extra attention to the outer rim and any crevices. Avoid steel wool or abrasive pads—they can tear the fine mesh and create holes that let dirt pass through.
Tackle Stubborn Grease
If soap scum or grease remains, add a drop of mild dish soap to the brush and work it in. Rinse thoroughly. Do not use bleach or harsh kitchen degreasers—they can damage rubber gaskets in the filter housing.
 A soft‑bristle brush is ideal for cleaning the mesh without shredding it.
Inspecting for Damage
A clean filter is useless if it’s cracked, warped, or has torn mesh. Before reinstalling, check for:
- Cracks in the plastic frame – even hairline cracks can allow bypass of debris.
- Warped or misshapen edges – a filter that doesn’t sit flat may let unfiltered water escape into the spray arms.
- Torn or stretched mesh – hold the filter up to a light. If you see pinprick holes, replace it.
- Worn or missing gasket – many Kenmore filters have a rubber seal around the rim. If it’s brittle or cracked, order a replacement (part numbers are usually printed on the filter itself).
If damage is present, the filter is cheap to replace—typically $15–30 online or at an appliance parts store. Running a dishwasher with a damaged filter can lead to pump failure, which costs far more to repair. Checking the filter is as straightforward as inspecting a range hood filter for tears—do it while you’re already in maintenance mode.
Reinstalling the Filter
Make sure the filter is completely dry (or at least drip‑free) before putting it back.
- Align the filter tab or notch with the corresponding slot in the housing. Most Kenmore filters will only fit one way.
- Press down firmly so the filter sits flush against the bottom of the tub.
- Twist clockwise (or replace screws) until you feel a solid lock. The cap should not wobble.
- Gently tug upward—if it comes loose, it wasn’t fully locked.
Pro tip: If you have a screw‑down model, tighten screws just until snug; overtightening can crack the plastic base.
Maintaining Cleanliness
A monthly cleaning schedule prevents buildup before it becomes a problem. Add a reminder on your phone or calendar.
Signs Your Filter Needs Cleaning
- Dishes come out with a gritty film.
- Water pools in the bottom of the dishwasher after a cycle.
- Unpleasant musty or sour odors.
- The dishwasher runs longer than usual or makes gurgling sounds.
Preventative Habits
- Scrape, don’t rinse – large food chunks should go in the trash, but a brief scrape is enough. Modern dishwashers rely on some food soil to help the detergent work.
- Run a hot‑water maintenance cycle once a month – place a cup of white vinegar on the top rack and run a normal cycle. This flushes out grease and mineral deposits from the filter housing and spray arms.
- Check the drain basket – also empty the coarse strainer after each load if your model has one; it’s the large plastic cup under the filter.
Keeping the filter clean is just one part of overall appliance health—ensuring your kitchen sink plumbing remains unobstructed and the water valves work properly also prevents backflow issues.
Troubleshooting Common Issues
Even with a clean filter, you may encounter problems. Here’s what to check next:
Poor Cleaning / Spots
- Spray arms blocked – remove the lower spray arm and rinse the holes with a toothpick or pipe cleaner. Ensure they spin freely when water is running.
- Water temperature too low – your dishwasher needs an incoming hot water supply of at least 120°F (49°C). Run the kitchen faucet until hot before starting the cycle.
- Detergent issues – use fresh detergent, and fill both the main cup and the pre‑wash cup if your dishwasher has one.
Noisy Operation
- Foreign object in pump – check the filter housing for small items (broken glass, twist ties, bone fragments). Remove them carefully with tweezers.
- Loose filter – a filter that isn’t locked can rattle. Re‑seat it firmly.
- Worn bearings – if the noise persists, the pump or motor may need professional diagnosis.
Water Not Draining
- Check the drain hose – look under the sink for kinks or clogs. If the hose loops too low, water can siphon back in.
- Clean the air gap (if present) – the small cap on your sink countertop may be clogged with debris.
- Verify the garbage disposal plug – if your dishwasher drains into a disposal, make sure the knockout plug was removed during installation.
Frequently Asked Questions
How often should I clean the filter in my Kenmore dishwasher?
Every 4 to 6 weeks for average household use. If you run three or more loads daily, clean it every two weeks.
Can I clean the filter in the dishwasher itself?
No—the filter needs manual scrubbing. Running it through a cycle won’t remove trapped grease and fine particles.
What if my Kenmore dishwasher doesn’t have a removable filter?
Some older models have a self‑cleaning filter system that uses a food grinder. Even those have a coarse strainer that should be rinsed occasionally. Check your manual for model‑specific guidance.
Do I need to use a special cleaner after scrubbing?
No. A mild dish soap rinse is enough. For deeper deodorizing, you can run a cycle with baking soda as described in our separate guide for cleaning a dishwasher with baking soda.
Conclusion
Cleaning the filter in your Kenmore dishwasher is one of the simplest yet most effective kitchen maintenance tasks you can perform. It takes less time than loading the dishwasher itself, and the payoff—sparkling dishes, fresher odors, and a longer‑lasting machine—is immediate. Set a recurring monthly reminder, gather the brush and soap, and make filter cleaning part of your regular appliance care routine. For other kitchen‑upkeep tasks such as cleaning aluminum pots and pans or maintaining your cooktop, a similar hands‑on approach keeps everything running at its best. Your dishwasher works hard for you—give it the simple care it deserves.
