
A puddle under the kitchen sink rarely announces itself politely. By the time you spot water stains on the cabinet floor or a warped particleboard base, the leak has likely been dripping for days. The good news is that most leaks under the kitchen sink are simple to diagnose and fix yourself, often in under an hour and for less than $20 in parts.
This guide walks you through every common cause, the exact tools you need, and step-by-step repairs—from tightening a loose slip nut to replacing a worn faucet cartridge. You will learn how to identify the source of the leak, fix it properly the first time, and prevent future problems. No prior plumbing experience required.
 Water pooling on the cabinet floor is usually the first visible sign of a leak.
Locate the Exact Source of the Leak
Before reaching for any tools, you need to pinpoint where the water is coming from. Leaks rarely announce themselves from a single obvious spot. Water can travel along a pipe, drip from a fitting, and pool somewhere completely different.
Turn Off the Water Supply First
Locate the shut-off valves under the sink—usually two small valves, one for hot and one for cold. Turn both clockwise until they stop. If your sink lacks individual shut-offs, close the main water valve for the house. Open the faucet to relieve pressure and let any remaining water drain into a bucket. This prevents an accidental spray when you begin inspecting.
Use the Dry-Cloth Test
Wipe all pipes, fittings, and the drain assembly completely dry with a clean cloth. Place a few paper towels or a dry rag under each connection point. Then, turn the water supply back on briefly (just a few seconds) and watch where moisture appears first. This method is far more reliable than trying to trace active drips in a cramped, dark cabinet.
A common mistake is assuming the leak is at the highest wet spot. In practice, water often runs down a pipe and drops off at a low point that looks unrelated. Always start the test with everything bone-dry.
Check These Five Common Leak Zones
| Leak Source | What to Look For | Typical Cause |
|---|---|---|
| Slip nuts on P-trap | Water at the bottom curve of the pipe | Hand-tightened nuts work loose over time |
| Faucet supply lines | Dampness where braided hoses connect to shut-off valves | Rubber gasket inside the nut has dried out |
| Drain flange (top of sink) | Water dripping from under the sink rim | Plumber's putty or sealant has cracked |
| Shut-off valve stem | Small drip at the valve handle itself | Worn packing nut or O-ring |
| Dishwasher connection | Water at the hose clamp or wye branch | Loose clamp or misaligned hose |
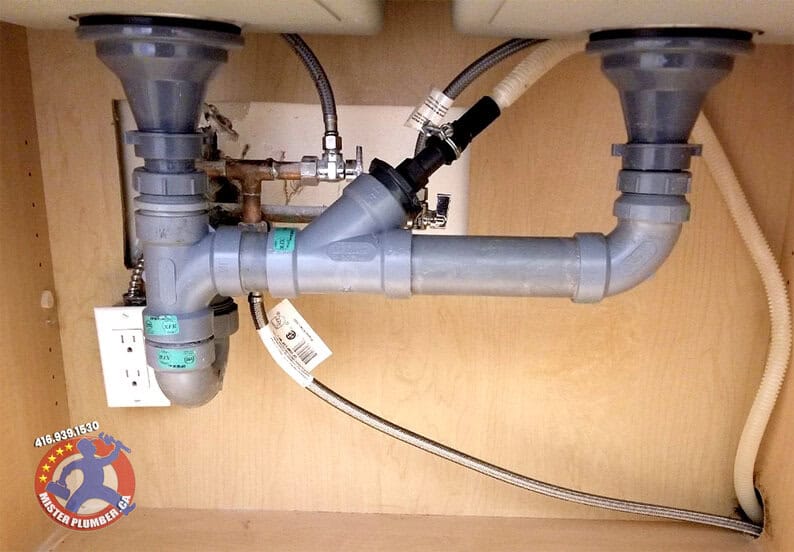
If you have a dishwasher connected under the sink, pay special attention to that junction. The drain hose often shares a wye fitting with the sink drain, and that joint is a frequent leak spot. For a visual breakdown, our detailed plumbing under kitchen sink diagram with dishwasher shows exactly how these connections should look.
Look for Hidden Damage
Shine a flashlight on the cabinet floor and back wall. Stains, soft spots, or warped wood indicate a slow leak that has been active for weeks. Musty odors and small black mold spots are also red flags. If you find significant water damage, fix the leak first, then address the cabinet repair once everything is dry.
Essential Tools and Materials
Having everything within arm's reach makes the job faster and less frustrating. Most of these items cost under $10 and you may already own several.
Basic Toolkit
- Adjustable wrench (8-10 inch) or a pair of channel-lock pliers
- Bucket (2-3 gallon) to catch water from disassembled pipes
- Flashlight or headlamp — you cannot work in the dark under a sink
- Work gloves to protect your hands from sharp pipe edges and grime
- Rags or old towels for cleanup
Sealing and Replacement Supplies
- Plumber's tape (Teflon tape) — wraps around threaded pipe connections to create a watertight seal
- Plumber's putty — a soft, clay-like sealant used under faucet bases and drain flanges
- Silicone caulk (optional) — for sealing around the sink rim where it meets the countertop
- Assorted rubber washers and O-rings — cheap insurance; a small variety pack costs about $5
If you are dealing with a drain leak, you will also need a pipe cutter or fine-tooth hacksaw if a section of PVC pipe needs replacing. For stubborn slip nuts, a plumber's multitool can help loosen tight plastic nuts without cracking them.
Understanding the basic layout of your plumbing is also helpful. Our plumbing under the kitchen sink diagram illustrates the standard arrangement of traps, drain lines, and supply lines so you can identify each part by name.
Fixing a Loose or Leaky P-Trap
The P-trap is the curved section of pipe under the drain. It holds water to block sewer gases from entering your home. It is also the most common source of under-sink leaks.
Tighten the Slip Nuts
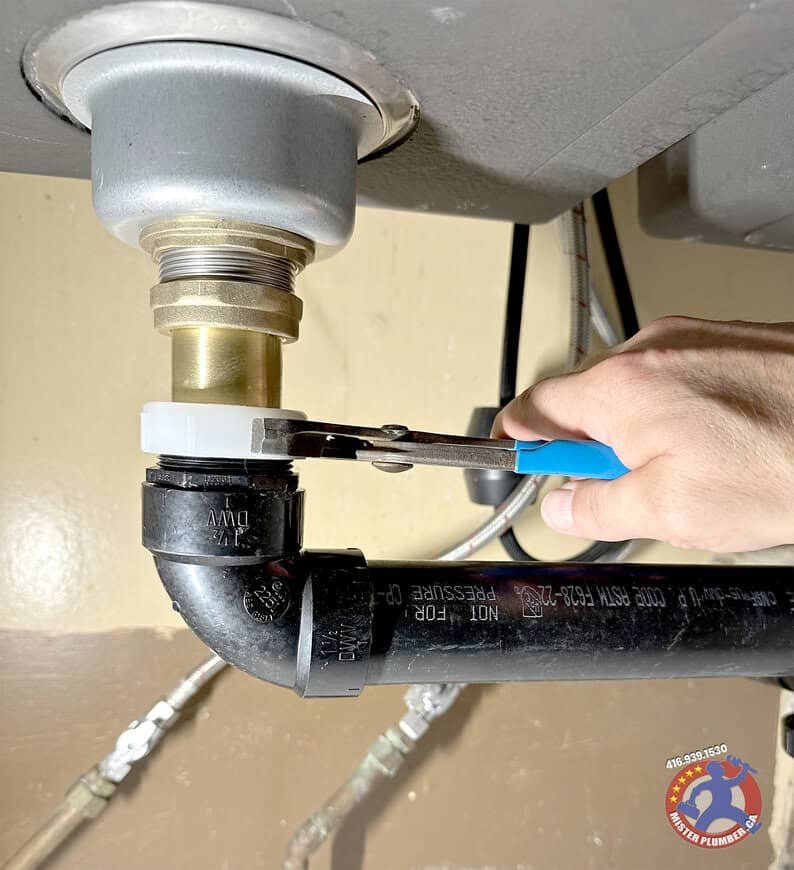
Slip nuts are the large plastic or metal nuts where pipe sections join. They are designed to be hand-tightened, but they can vibrate loose over time. Tighten each slip nut clockwise by hand first. If it still feels loose, use channel-lock pliers to give it another quarter-turn. Do not overtighten—plastic nuts crack easily, and overtightened metal nuts can strip the threads.
After tightening, run water for 30 seconds and check for drips. If the leak stops, you are done. If it continues, the rubber washer inside the slip nut has likely degraded.
Replace the Washer Inside the Slip Nut
- Place a bucket under the P-trap.
- Loosen both slip nuts and remove the trap curve.
- Slide the old rubber washer off the pipe and inspect it. If it feels hard, cracked, or misshapen, it needs replacing.
- Take the old washer to a hardware store for an exact match, or buy an assorted washer kit.
- Slide the new washer onto the pipe (flat side facing the nut), reassemble, and hand-tighten the nuts.
- Run water and check for leaks.
This simple fix resolves about 70% of P-trap leaks. Keep in mind that the washers are inexpensive, so there is no reason to reuse a worn one.
Clear a Clog Before Reassembling
While the trap is off, shine a flashlight inside the drain pipe. If you see a buildup of grease, food particles, or debris, now is the perfect time to clear it. Run hot water through the pipe and use a drain snake or bent wire to pull out clogs. A clear drain reduces pressure on the trap and prevents future leaks caused by backups.
Repairing Leaks at the Drain Flange
The drain flange is the metal or plastic ring visible inside the sink basin where water flows down. If the seal between the flange and the sink bottom fails, water seeps underneath and drips onto the cabinet below.
Check the Plumber's Putty
Plumber's putty is the standard sealant used under drain flanges. Over time, it dries out and cracks, especially in sinks that handle hot water daily. To test, press down gently on the drain flange. If it moves or rocks, the putty has failed.
Replace the Drain Flange Seal
- Disconnect the P-trap from the drain tailpiece (the straight pipe running down from the sink).
- Loosen the large nut holding the flange from underneath the sink.
- Push the flange up and out through the sink hole.
- Scrape away all old putty from both the sink surface and the underside of the flange.
- Roll a new string of plumber's putty into a rope about the thickness of a pencil.
- Press the putty rope around the underside lip of the flange.
- Reinsert the flange through the sink hole from above.
- From underneath, tighten the retaining nut by hand, then finish with pliers.
- Scrape away excess putty that squeezes out from the top of the flange.
Run water and check from below. If you see no drips, the seal is restored. Plumber's putty remains flexible, so it adapts to minor movement over time.
Fixing Faucet Supply Line Leaks
The braided stainless steel hoses that connect your faucet to the shut-off valves can develop leaks at either end. The connection point at the faucet is especially prone to loosening.
Tighten the Supply Line Nuts
Use an adjustable wrench to gently tighten the nut where the supply line meets the faucet shank underneath the sink. Turn clockwise only. If the nut is plastic, do not overtighten—hand-tight plus just a tiny nudge with a wrench is sufficient.
Replace a Leaking Supply Line
If tightening does not stop the drip, the rubber O-ring inside the supply line fitting has failed. Replace the entire hose—they are not designed to be repaired.
- Turn off the water supply and place a bucket under the connection.
- Use a wrench to loosen the nut at both ends: the shut-off valve and the faucet.
- Remove the old hose and take it to the hardware store to match the length and fitting type.
- Wrap the threads of both connection points with plumber's tape (two to three wraps clockwise).
- Attach the new hose, tighten both nuts firmly, and turn the water back on.
Standard braided supply lines cost under $10 and last 5-10 years. If your home has old chrome or plastic supply lines, upgrading to braided stainless steel is a worthwhile improvement. You can learn more about the shut-off valves involved in our guide to water valves under kitchen sink.
Addressing Faucet Body Leaks
Sometimes the leak is not at a connection but inside the faucet itself. Water drips from the spout or from the base of the faucet where it meets the sink.
Replace the Faucet Cartridge or Washer
A dripping faucet spout usually means a worn cartridge (for single-handle faucets) or a worn rubber washer (for two-handle faucets).
- Turn off the water supply.
- Pry off the decorative cap on the handle (often marked H or C) and remove the screw underneath.
- Lift the handle off to expose the cartridge or valve stem.
- Use a wrench to unscrew the retaining nut and pull out the old cartridge or washer.
- Take the old part to a hardware store for an exact match. Cartridges vary widely between brands.
- Install the new part, reassemble the handle, and test.
If water is leaking from the base of the faucet (where it passes through the sink deck), the O-rings on the faucet body have worn out. You will need to remove the entire faucet to replace those rings—a more involved job that may justify calling a professional if you are not comfortable.
When to Call a Professional
Do-it-yourself repair works for the vast majority of kitchen sink leaks. However, certain situations require a licensed plumber.
Signs You Need Expert Help
- Leaks return immediately after repair — this indicates a damaged pipe section, not just a loose fitting.
- Water is coming from inside the wall — the leak may be in the supply pipe behind the cabinet rather than in the visible connections.
- You find extensive mold or rot — mold remediation requires specialized handling and protective equipment.
- The shut-off valves will not close or are stuck — replacing valves often involves soldering, which is hazardous for beginners.
- The leak is at a garbage disposal or dishwasher connection — these appliances have electrical components and specific gasket requirements.
Professionals cost between $100 and $300 for a standard under-sink repair, but they also carry insurance for any accidental damage. If your home was built before 1986, old galvanized or lead pipes may be involved, and those should always be handled by a licensed plumber.
Some fixtures carry manufacturer warranties that require professional installation or repair. Attempting DIY work can void that coverage, so check your paperwork before proceeding. If you plan to replace any major components, our guide on changing pipes under kitchen sink covers the full process step by step.
Prevent Future Leaks
A few minutes of preventive care every few months can prevent the vast majority of under-sink leaks.
Monthly Quick Checks
- Open the cabinet doors and look for moisture, stains, or drips.
- Hand-tighten any slip nuts that feel loose.
- Run the garbage disposal and dishwasher simultaneously to stress-test the drain connections.
- Wipe down the cabinet interior to prevent moisture buildup from normal condensation.
Upgrade Old Parts Before They Fail
- Replace chrome or plastic supply lines with braided stainless steel. These resist pinhole leaks and last longer.
- Swap old compression-style shut-off valves for quarter-turn ball valves. They are more reliable and easier to operate.
- Use silicone caulk to seal the gap between the sink rim and the countertop. This prevents water from seeping into the cabinet from above.
For a complete overview of the pipes that run under your sink, including tips on material selection, refer to our article on kitchen pipes under sink.
Frequently Asked Questions
How do I find a leak under my kitchen sink if nothing is dripping?
Wipe everything dry, place paper towels under all connections, and run the water for 30 seconds. The first towel to get wet shows you the source. Also check for condensation on cold water pipes—it can mimic a leak.
Can I use duct tape to stop a pipe leak temporarily?
Duct tape will not hold water pressure. For an emergency temporary fix, use epoxy putty designed for plumbing or a rubber patch wrapped tightly with a hose clamp. Replace the damaged pipe section as soon as possible.
Why does my sink leak only when the dishwasher runs?
The dishwasher drain hose connects to the sink drain system. A loose clamp or a clogged wye fitting causes water to back up and leak at the connection. Check the hose clamp first, then inspect the air gap (the small cylinder mounted on the countertop near the faucet).
How tight should slip nuts be?
Hand-tight plus a quarter-turn with pliers is usually enough. If you need to force a nut, you are overtightening. Plastic nuts will crack, and metal nuts can strip the threads.
Is it safe to use chemical drain cleaners on a leaky pipe?
No. Chemical drain cleaners can damage PVC pipes and rubber gaskets, making leaks worse. They also create hazardous fumes in an enclosed cabinet. Use mechanical methods like a plunger or drain snake instead. For general kitchen maintenance tips, the blog features regular updates on keeping your fixtures in good condition.
Conclusion
A leak under the kitchen sink is almost always fixable with basic tools, a small handful of inexpensive parts, and about an hour of your time. Start by pinpointing the exact source using the dry-cloth test—do not guess. Tighten loose fittings first, replace worn washers and supply lines as needed, and use plumber's tape or putty to restore seals. If the leak reappears or involves components inside the wall, call a professional.
The real cost is not the repair itself—it is what happens if you ignore the drip. Water damage spreads silently, warping cabinets, fostering mold, and eventually requiring expensive restoration. A few minutes of attention today will keep your sink dry, your kitchen safe, and your wallet intact.
