
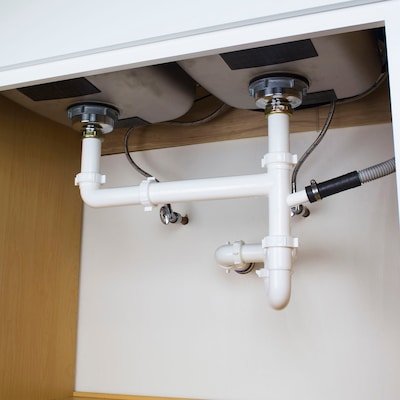
Every kitchen sink hides a network of pipes that work silently—until they don’t. A slow drain, a mysterious puddle, or a foul smell under the cabinet signals trouble that can escalate fast. Understanding how these kitchen pipes under sink work, what goes wrong, and how to fix small issues before they become emergencies saves time, money, and frustration. This guide covers everything from the anatomy of your plumbing to maintenance routines, upgrades, and when to pick up the phone for a professional.
Understanding the Plumbing Under Your Sink
Before you can troubleshoot, you need to know what you’re looking at. The pipes under your sink form a simple but critical system.
Key Components
- Supply lines – Flexible braided hoses that carry hot and cold water from the shutoff valves to the faucet. Most modern homes use braided stainless steel, which resists bursting far better than old rubber hoses. Each line typically has a diameter of ⅜ inch.
- Shutoff valves – Small valves mounted on the wall or floor beneath the sink that control water flow to the faucet. One for hot, one for cold. Quarter-turn ball valves are easier to operate and less prone to seizing than older multi-turn compression valves. Knowing how to quickly shut these off is the most important emergency skill.
- Drain pipe – The vertical pipe that carries wastewater from the sink basin downward into the P-trap. It connects directly to the sink strainer assembly. Standard diameter is 1½ inches in most residential kitchens.
- P-trap – The curved section of pipe that holds a small amount of water at all times. That standing water creates an airtight seal that blocks sewer gases from rising into your kitchen. A faulty or missing P-trap is almost always the culprit behind unpleasant smells.
- Trap arm – The horizontal pipe that connects the P-trap to the wall, leading into the main drain line. Proper slope (¼ inch per foot) on this arm is essential for good drainage. Too flat, and debris settles; too steep, and water runs off before solids clear.
Common Pipe Materials
The material your pipes are made from affects their lifespan, durability, and how you should maintain them.
| Material | Pros | Cons | Typical Lifespan |
|---|---|---|---|
| PVC | Lightweight, corrosion-resistant, inexpensive | Brittle in extreme cold, not for hot water supply | 25–40 years |
| ABS | Tough, impact-resistant, often black | Can warp under high heat | 30–50 years |
| Copper | Heat-resistant, naturally antimicrobial, long-lasting | Expensive, can corrode in acidic water | 50–70 years |
| PEX | Flexible, freeze-resistant, easy to install | Not suitable for outdoor use, UV-sensitive | 40–50 years |
| Galvanized steel | Very strong | Prone to rust and mineral buildup over time | 20–30 years |
In practice, most modern kitchen plumbing uses PVC for drain lines and braided stainless steel for supply lines. If your home has old galvanized steel pipes, replacement should be a priority—rust buildup narrows the interior diameter and causes chronic slow drainage.
Why Layout Matters
A well-designed pipe layout keeps water flowing in one direction with consistent slope (at least ¼ inch per foot of horizontal run). Sharp bends, excessive length, or dips in the pipe create spots where debris settles. A common mistake during DIY installation is using too many fittings or failing to support the pipes properly, which leads to sagging and eventual clogs. A clean, straightforward layout also makes routine inspections and your own replacement work much easier. For a visual reference, our detailed plumbing diagram under kitchen sink shows the exact positioning of each component.
 The curved P-trap and connecting pipes typical under most kitchen sinks.
How to Spot Trouble Before It Escalates
Pipes rarely fail without warning. Learning to read the signs keeps you ahead of damage.
Slow Drainage
If water pools in the sink or drains in a sluggish spiral, something is blocking the flow. Partial clogs often start with a single culprit: grease poured down the drain that coats pipe walls, catching food particles and soap scum. Over weeks, the layer thickens. A monthly check is simple—fill the sink with hot water, pull the plug, and time how fast it empties. If it takes noticeably longer than it did last month, you have buildup forming.
Leaks and Water Damage
A drip under the cabinet may seem minor, but over time it warps cabinet bases, breeds mold, and can damage flooring. Check these spots regularly:
- Where supply lines connect to shutoff valves
- Around the slip nuts on the P-trap
- Where the drain pipe meets the sink strainer
- On the underside of the shutoff valves themselves
If you see white or green crusty deposits on copper fittings, that’s corrosion—a sure sign a leak is forming or already active. For a step-by-step fix, our guide on a pipe under kitchen sink leaking walks through diagnosing and tightening connections.
Unpleasant Odors
A musty or rotten-egg smell coming from the drain usually means the P-trap has lost its water seal, or trapped organic matter is decomposing inside the pipe. Start by running hot water for 30 seconds; if the smell returns quickly, the trap may be dry (common in unused sinks) or the pipe interior needs cleaning. Persistent odors that resist cleaning point to a deeper issue like a partial clog or a vent problem.
Gurgling Sounds
Air bubbles fighting their way past a clog create a gurgling noise when water drains. This often accompanies slow drainage. If you hear gurgling in other fixtures when you run the kitchen sink, the problem may be in the main vent stack rather than the pipe under the sink itself. Checking your home’s basic venting setup can help you distinguish between the two.
DIY Maintenance That Actually Works
Keeping pipes clear doesn’t require harsh chemicals or expensive tools. A few consistent habits make a real difference.
Weekly Hot Water Flush
Once a week, boil a full kettle of water and pour it down the drain in two or three stages, letting the water work for a few seconds between pours. This melts grease that hasn’t fully hardened and flushes loose debris. For plastic pipes, let the water cool for 30 seconds after boiling to avoid softening joints.
Monthly Baking Soda and Vinegar Treatment
This classic method works because the fizzy reaction dislodges soft buildup without damaging pipes.
- Pour ½ cup baking soda down the drain.
- Follow with ½ cup white vinegar.
- Immediately cover the drain with a plug or cloth to contain the fizz.
- Wait 10–15 minutes.
- Flush with boiling water.
If you haven’t done this in months, you may see foam bubbling back up—that’s normal and means the reaction is penetrating buildup.
Clean the Sink Strainer Often
The strainer basket catches large debris before it enters the pipe, but only if it’s clean. Remove it weekly, scrape off trapped food, rinse it in hot soapy water, and snap it back into place. A clogged strainer forces water to overflow around it, carrying food directly into the drain.
Snake the Trap When Needed
For clogs that hot water and baking soda can’t shift, a simple hand-crank drain snake or a straightened wire coat hanger can reach into the P-trap. Remove the trap by unscrewing the slip nuts at both ends—place a bucket underneath first. Clear the debris, rinse the trap in the bucket, and reassemble. Before you start, make sure you know how to shut off the water—our guide on turning off water under kitchen sink covers the quick steps.
Preventing Clogs Before They Start
Most blockages are avoidable with consistent habits.
What Not to Put Down the Drain
- Cooking grease and oil—pour into a can, let it solidify, and toss it in the trash
- Coffee grounds—they clump together and form dense obstacles
- Fibrous vegetables like celery, corn husks, and potato peels
- Pasta and rice—they expand with water and lodge in narrow spots
- Eggshells—the thin membrane sticks to pipe walls
Use a Mesh Drain Guard
A fine-mesh stainless steel guard catches particles that standard strainers miss. For about five dollars, it’s the cheapest insurance against clogs. Empty it into the trash every time you wash dishes.
Run Cold Water When Using the Disposal
If you have a garbage disposal, always run cold water while it’s operating and for 30 seconds after it stops. Cold water keeps grease solidified so it gets chopped and flushed rather than melting and coating the pipe further down.
Schedule Monthly Visual Checks
Pop open the cabinet door once a month. Shine a flashlight on every fitting and joint. Look for dampness, discoloration, or small puddles. Tighten any slip nuts that feel loose—hand-tight only, never over-torque with a wrench. This five-minute habit catches problems when they’re still simple to fix.
When to Replace Components
No pipe lasts forever. Knowing when to replace rather than repair prevents sudden failures.
Signs Replacement Is Due
- Visible corrosion or rust flakes on metal pipes
- Frequent clogs in the same spot
- Cracks or hairline fractures (common on old PVC)
- Water stains on the cabinet floor that return after drying
- Pipes that are more than 30 years old (especially galvanized steel)
Replacing a section of pipe is a straightforward weekend project for most homeowners. If you’re tackling it yourself, make sure you have a clear diagram of your current layout to avoid mistakes.
Upgrading to Modern Materials
If your kitchen still has old copper supply lines or galvanized drain pipes, upgrading pays off quickly. PEX supply lines are flexible, resistant to freezing, and simple to connect with push-fit fittings. For drain lines, PVC remains the most practical choice for its combination of low cost and corrosion resistance.
One upgrade many homeowners overlook is installing accessible shutoff valves. Older homes often have stuck or seized valves that won’t close fully in an emergency. Replacing them with quarter-turn ball valves gives you positive shutoff with a simple 90-degree twist.
Tackling Persistent Odors
Even with regular cleaning, some sinks develop stubborn smells. Here’s how to eliminate them for good.
Clean the P‑Trap
If odors persist after baking soda treatments, the P-trap itself may be harboring sludge. Place a bucket under the trap, unscrew the slip nuts at both ends, and remove the curved section. Dump the contents into the bucket, scrub the inside with a bottle brush and dish soap, rinse thoroughly, and reinstall. This direct approach works better than any liquid cleaner.
Check the Vent Stack
Every drain pipe needs air behind it to flow freely. If your kitchen sink gurgles when draining or the smell is accompanied by slow drainage, the vent stack on your roof might be blocked by leaves, debris, or even a bird’s nest. Clearing the vent is a job for a professional, but knowing it’s the likely cause saves you from repeatedly cleaning the wrong part of the system.
Address the Musty Cabinet Smell
Sometimes the smell isn’t from the drain at all but from moisture trapped in the cabinet. A small leak that evaporates quickly can still create a persistently damp environment. Use a dehumidifier bag or silica gel container under the sink to keep the air dry. If the musty odor continues, our practical suggestions for dealing with a musty odor under kitchen sink can help you isolate the source.
 This standard P-trap traps water to block odors.
When to Call a Professional
Some problems are best left to a licensed plumber. Recognizing that line keeps small issues from becoming expensive disasters.
Situations That Need a Pro
- Persistent leaks you can’t stop—if tightening slip nuts doesn’t work and you see water dripping continuously, a worn gasket or cracked fitting needs expert attention
- Corroded or frozen shutoff valves—forcing a stuck valve can snap the pipe behind the wall
- Main drain clogs—if multiple fixtures drain slowly or backup into each other, the blockage is past the point where you can reach it
- Pipe replacement in tight spaces—some under-sink layouts leave no room for DIY tools
- Water damage to cabinetry—mold remediation and cabinet repair may require professional drying and replacement
What to Expect from a Service Call
A good plumber will arrive with a camera inspection tool, proper wrenches, and replacement parts. They should provide a written estimate before starting work and explain the problem in plain terms. Reputable professionals offer warranties on both parts and labor, typically 30 days to a year depending on the repair.
Choosing the Right Plumber
- Verify licensing and insurance for your state
- Read recent reviews, not just overall ratings
- Ask specifically about experience with kitchen sink plumbing—some plumbers focus on bathroom and main line work
- Get three estimates for larger jobs
- Confirm they will clean up the work area after completion
Upgrading Your Under‑Sink Plumbing
If you’re renovating or simply tired of recurring problems, upgrading the entire under-sink system brings noticeable improvements.
Modern Materials and Better Flow
Replacing old supply lines with braided stainless steel eliminates the risk of burst rubber hoses. Swapping a plastic P-trap for a metal one adds durability in high-use kitchens. Using wider diameter drain pipes (2 inches instead of 1½ inches) improves flow and reduces clogs. These upgrades are inexpensive relative to the peace of mind they provide.
Adding a Cleanout
Installing a threaded cleanout plug on the trap arm or near the wall gives you direct access for snaking. Without one, you have to disassemble the trap every time. A cleanout costs a few dollars and takes 15 minutes to add during a pipe replacement.
Improving Accessibility
Reorganizing pipes to leave clearance under the trap makes future maintenance easier. If you store cleaning supplies under the sink, consider a sliding organizer that moves out of the way when you need to access plumbing. A well-organized cabinet also makes it easier to spot leaks early.
Common DIY Mistakes to Avoid
Even experienced homeowners make errors when working under the sink. Here are the most frequent ones and how to avoid them.
Over‑Tightening Connections
Plastic slip nuts strip easily. Tighten them hand-tight plus a quarter turn with a wrench—no more. If it still leaks, replace the washer rather than cranking harder.
Mixing Pipe Materials Without Adapters
Copper and galvanized steel touching each other create a chemical reaction that accelerates corrosion. Always use a dielectric union when connecting dissimilar metals.
Forgetting to Support Horizontal Runs
Long horizontal sections of drain pipe need hangers every 36 inches to prevent sagging. Unsagged pipes collect water and debris, leading to clogs.
Not Checking Local Codes
Drain pipe slope, venting requirements, and approved materials vary by location. Before starting a replacement, check with your local building department or refer to guidelines from the International Association of Plumbing and Mechanical Officials for general code standards. University extension services like University of Minnesota Extension also offer reliable home maintenance advice.
Frequently Asked Questions
How often should I inspect the pipes under my kitchen sink?
At minimum once a month. A quick visual check for leaks, rust, and dampness takes less than a minute and catches problems early.
Can I use chemical drain cleaners for maintenance?
Avoid them. Harsh chemicals damage pipe seals and corrode metal fittings over time. Stick to mechanical cleaning methods and natural solutions like baking soda and vinegar.
Why does my kitchen sink smell even after I clean it?
The odor is likely trapped in the P-trap or further down the drain pipe. Remove and clean the trap directly. If that doesn’t fix it, check for a dry trap (common in guest houses or seasonal kitchens) or a blocked vent.
How do I know if my pipes need replacement?
Visible rust, frequent clogs in the same spot, water damage on cabinet floors, or pipes older than 30 years are strong indicators. A professional inspection can confirm.
 A strainer basket catches food scraps before they reach the drainpipe.
Conclusion
Your kitchen pipes under the sink work hardest when you’re not thinking about them. A little regular attention—monthly checks, smart disposal habits, and prompt fixes for minor leaks—keeps them running smoothly for decades. Understanding what each part does, recognizing warning signs early, and knowing when to call a professional turns a potential plumbing disaster into a manageable household task. Start with a quick look under your sink today. Tighten anything loose, clear any debris, and flush those drains with hot water. That small effort pays off in reliable flow tomorrow. For more home maintenance tips, browse our blog for guides on everything from cleaning appliances to installing fixtures.
