
You’ve got the Broan BTX1 series 30 range hood mounted above the stove, and now you’re staring at a handful of wires wondering how to connect them. It’s a standard three-wire hookup. But one wrong move can cause a short, a tripped breaker, or worse.
As of 2026, the National Electrical Code still requires hardwired kitchen appliances to have a dedicated 15- or 20-amp circuit with proper grounding. The BTX1 is no different. Let’s walk through exactly what goes where, so you finish the job safely and get back to cooking.
Quick Answer: The Color-to-Color Wiring Rule
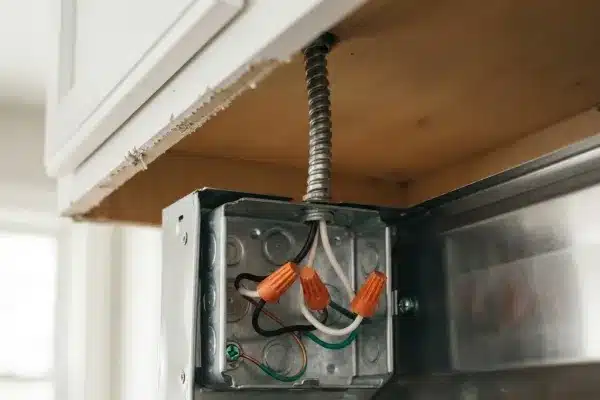
Black wire on the hood connects to black house wire. White connects to white. Green or bare copper connects to ground.
Twist each pair together with a wire nut. That’s the whole job.
But only after you turn off the breaker. Use a non-contact voltage tester to confirm zero power. Then match the colors, cap them tight, and tuck the wires into the junction box.
Replace the cover. Flip the breaker back on. Test the fan and light.
Done.
Before You Touch Wires – Why This One Job Matters
This isn’t swapping a light switch. A range hood sits above your cooking surface, drawing steam, grease, and heat. If the wiring connection is loose or reversed, the metal hood can become energized.
That’s an electrocution risk every time someone touches it.
The Broan BTX1 series 30 is UL-listed. That means it meets safety standards only when installed per the manufacturer’s instructions. One common mistake is skipping the strain relief fitting on the cable entry.
Without it, the wire insulation can chafe against the metal edge of the junction box over time. That leads to a short or a ground fault.
If you’re in the middle of a full kitchen remodel, this is a good time to think about other electrical work too. Many homeowners time their appliance installations to coincide with planned purchases.
What’s Inside the Broan BTX1 Wiring Box
Open the wiring compartment on the hood. It’s a small metal box held shut by one or two screws. Inside, you’ll find three pre-stripped wires coming from the hood’s motor and light assembly.
They’re color-coded and clearly labeled on the wiring diagram printed inside the cover.
| Wire Color (Hood) | Purpose | Connects To (House) |
|---|---|---|
| Black | Hot (120V) | Black (hot) |
| White | Neutral | White (neutral) |
| Green or bare | Ground | Green or bare copper (ground) |
The house side should come from a 14- or 12-gauge NM cable (Romex) entering through a strain relief connector. If your house wiring has a different color scheme, stop and verify with a voltage tester. The BTX1 expects standard colors.
Never assume.
If you have aluminum wiring common in homes built between 1965 and 1973 you must use special AL-CU rated connectors. This is a code requirement. Copper and aluminum expand at different rates.
A plain wire nut can start a fire.
Step-by-Step: Connecting the Three Wires Safely
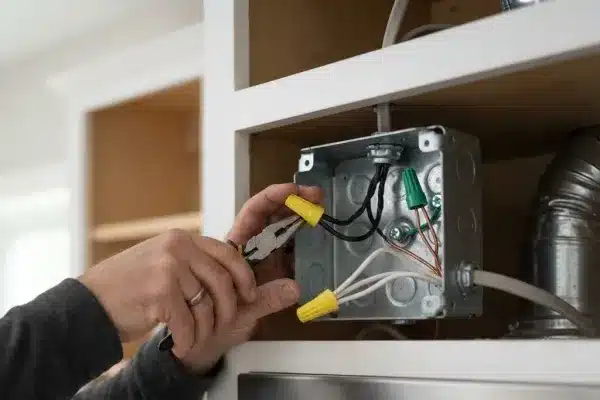
Follow these five steps in order. Rushing any of them invites trouble.
Step 1 – Kill the Circuit and Verify
Go to your breaker panel. Find the breaker that controls the circuit feeding the hood. Flip it to OFF.
If you don’t know which breaker it is, turn off the main breaker for the house. Then use a non-contact voltage tester at the junction box. Touch the tester to each wire.
If it beeps or lights up, you still have power. Do not proceed until the tester shows nothing.
Step 2 – Prep the Junction Box and Cable
Make sure the house cable is secured at the box with a strain relief fitting. The fitting should be tight enough that the cable can’t be pulled out by hand. Strip about ½ inch of insulation from each house wire using wire strippers.
Do not nick the copper strands.
Step 3 – Strip, Twist, and Cap Each Pair
Hold a hood wire and its matching house wire side by side. Twist them clockwise with pliers about three full turns. Screw a wire nut onto the twisted pair until it’s snug.
Give a gentle tug to confirm it’s locked. No bare copper should be visible below the wire nut. If any shows, trim the wires back and re-strip.
Repeat for all three connections. Do not mix up hot and neutral. If you reverse them, the hood may still work but the chassis could become energized when the switch is off.
Step 4 – Secure the Ground Wire
The green or bare ground wire from the hood needs to connect to the house ground. If your junction box is metal, there should be a green grounding screw inside. Wrap the ground wire around it and tighten.
If the box is plastic, just twist the two ground wires together with a wire nut.
Step 5 – Tuck, Cover, and Restore Power
Fold the connected wires neatly into the junction box. Make sure no wire nuts are pressing against the cover. Replace the wiring compartment cover and tighten the screws.
Flip the breaker back on. Test the fan and light.
If the breaker trips immediately, turn it off and re-check your connections. A short is likely caused by a loose wire nut or a bare hot wire touching the metal box.
Common Wiring Mistakes That Trip Breakers or Create Fire Hazards
People make the same errors repeatedly. Here’s what to watch for.
- Polarity swap. Black to white and white to black. The hood may run but the metal frame becomes a shock hazard.
- Loose wire nut. Vibration from the fan motor can wiggle a nut off over time. Always use pliers to tighten and pull-test.
- No strain relief. If the cable passes through a knockout hole without a clamp, any tug can pull a connection apart or strip insulation.
- Pinched wires. When you close the compartment cover, make sure no wire is caught between the lid and the box. That creates a short or ground fault.
- Over-tightening screws. On the strain relief or the ground screw, too much force strips the threads or breaks the wire.
- Using the wrong wire nut size. Gray wire nuts for 14-12 AWG work for most hoods. Blue nuts fit 12-10 AWG. Too large a nut won’t grip properly.
If you catch any of these issues after powering on, kill the breaker immediately and fix them. No shortcut is worth a house fire.
How to Test Your Connection Before Buttoning Everything Up
You don’t want to find out something is wrong after the hood is fully assembled. A quick pre-test saves that headache.
Before you tuck the wires and screw the cover on, do this:
- Turn the breaker back on.
- Stand to the side of the junction box.
- Flick the hood’s fan switch to ON.
If the fan runs smoothly and the light comes on, kill the breaker again, then close everything up. If nothing happens, you likely have a loose wire nut or a bad connection. If the breaker trips instantly, you have a short.
For the short scenario, check that no bare hot wire is touching the metal box or the ground wire. Also make sure the wire nuts are tight. A loose connection can arc and trip an AFCI breaker even without a direct short.
Once the hood passes this test, you can safely restore power and finish the installation. Test all fan speeds and both light settings if your model supports them.
When to Call an Electrician Instead of Doing It Yourself
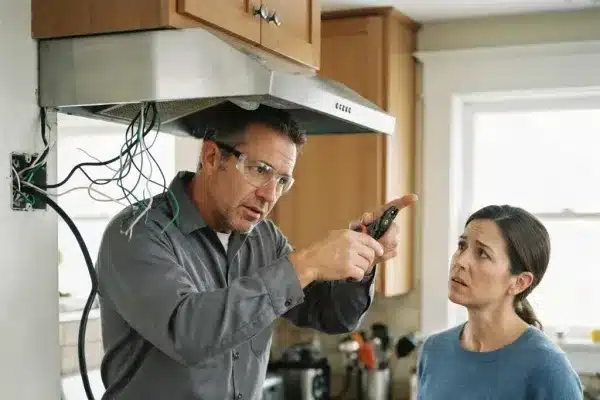
Wiring a range hood is one of the simpler electrical jobs. But not everyone should do it. Here are the clear lines.
Call a pro if:
- You have aluminum wiring in your home.
- Your junction box has wires that aren’t standard colors and you can’t identify them.
- You don’t own a voltage tester or aren’t sure how to use one.
- The breaker keeps tripping after you’ve checked your connections.
- You’re uncomfortable working inside a live panel.
- Local code requires a permit for this work.
You can DIY if:
- You have copper wiring in standard colors.
- You own basic tools and a voltage tester.
- You’re comfortable following a step-by-step process.
- You’re willing to turn off the main power and verify it’s dead.
If you’re planning a full kitchen renovation, this is a good time to coordinate appliance purchases with electrical work. Having everything wired at once saves money and avoids multiple service calls.
What About Older Homes or Non-Standard Wire Colors?
Older homes come with quirks. If your house wiring doesn’t match the standard black-white-green scheme, you need to identify each wire before connecting anything.
Common older wiring scenarios:
| What You See | What It Likely Is | How to Confirm |
|---|---|---|
| Two black wires | One is hot, one is switched hot | Use voltage tester with switch on/off |
| Black and red | One hot, one switched (fan/light separate) | Check with switch positions |
| No ground wire | Ungrounded circuit (pre-1960s) | Run new ground wire or install GFCI breaker |
| Wires wrapped in cloth | Old NM cable (pre-1965) | Handle carefully; insulation may be brittle |
If you find cloth-insulated wiring or a missing ground, stop. Those situations require modern code compliance that goes beyond a simple color match. A licensed electrician is the right call.
Many homeowners assume an ungrounded circuit is safe because their old hood worked fine. That old hood may have been self-grounding through the metal mounting screws. The BTX1 requires a dedicated ground connection per the National Electrical Code.
Tools and Supplies You'll Actually Need
You don’t need a lot for this job. But using the right tool matters.
| Tool / Supply | Purpose | Notes |
|---|---|---|
| Non-contact voltage tester | Confirm power is off | Test on a known live circuit first |
| Wire strippers | Strip house wires | Adjustable gauge setting |
| Wire nuts | Connect wire pairs | Gray for 14 AWG, blue for 12 AWG |
| Flathead and Phillips screwdrivers | Open/close compartments | One of each size |
| Pliers | Twist wires together | Lineman’s pliers work best |
| Strain relief connector | Secure cable entry | Must match cable diameter |
| Electrical tape | Backup for wire nuts (optional) | Use only as secondary security |
The voltage tester is non-negotiable. Do not trust the breaker label alone. Breakers can be mislabeled.
Someone may have added a tap to your circuit without updating the panel schedule.
If you discover you’re missing the strain relief connector, don’t skip it. A bare knockout hole with a cable passing through is a code violation and a safety hazard.
Your Wiring Diagram Cheat Sheet (What the Manual Shows)
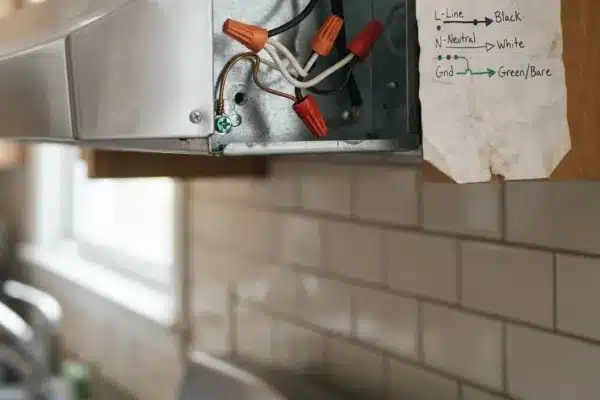
Every Broan BTX1 series 30 hood includes a wiring diagram printed inside the wiring compartment cover. It’s usually a small sticker or a label directly on the metal.
The diagram is simple. It shows three labeled terminals: L (line/hot), N (neutral), and G (ground). These correspond exactly to the black, white, and green wires.
What the diagram tells you:
- L terminal connects to the black (hot) wire.
- N terminal connects to the white (neutral) wire.
- G terminal connects to the green (ground) wire.
Some diagrams include a dotted line showing the internal connection to the fan motor and light assembly. That’s just for reference. You don’t touch those internal connections.
If your hood’s sticker is faded or missing, Broan publishes the same diagram in the product manual. The wiring has not changed across BTX1 production runs, so the information is consistent.
Keep this reference handy while you work. It’s your single source of truth for the hood side of the connection.
Final Check: A Safe, Working Installation
Before you declare the job done, run through this quick checklist. It takes two minutes and catches nearly every common mistake.
- Breaker is OFF when you closed the compartment.
- Wire nuts are tight. No bare copper visible below any nut.
- Strain relief is clamped firmly around the cable.
- Wires are tucked in without touching the cover.
- No pinched insulation anywhere.
- Cover screws are snug but not stripped.
- Breaker back ON. Hood fan runs on all speeds.
- Light turns on and off correctly.
- No buzzing, humming, or flickering from the hood.
- No heat or burning smell after five minutes of running.
- Hood is securely mounted to the cabinet or wall.
If everything checks out, you’re done. If anything fails, kill the breaker and investigate. A small issue now is a big problem later.
Keep the wiring diagram sticker visible. If you sell the house or pass the hood to someone else, that label saves the next person time and confusion.
Frequently Asked Questions
Can I use a plug and cord instead of hardwiring the BTX1?
The Broan BTX1 series 30 is designed for hardwiring only. It has no factory power cord. Adding a plug yourself voids the UL listing and may violate local code.
If you need a plug-in hood, look for a model designed for that installation type.
What gauge wire does the BTX1 require?
The hood works with 14 AWG wire on a 15 amp circuit or 12 AWG wire on a 20 amp circuit. Check your breaker rating to confirm which you have. Never use a larger breaker than the wire is rated for.
My hood has a red wire. What do I do with it?
Some BTX1 variants include a red wire for separate fan and light control. If you see four wires instead of three, check the wiring diagram inside the compartment. That red wire typically connects to a separate switch leg for independent control.
Can I wire the hood to an existing outlet circuit?
You can, but only if the circuit has enough capacity and the breaker is correctly sized. A kitchen should have at least two dedicated small-appliance circuits per code. Adding the hood to a countertop outlet circuit could overload it.
A dedicated circuit is safer and meets current NEC recommendations.
What if my ground wire is too short?
If the ground wire from the hood won’t reach the junction box ground, add a short length of bare copper wire using a wire nut. This is called a pigtail. It’s a standard technique and perfectly safe as long as the connection is tight.
