
A persistent drip, a slow-draining basin, or that musty smell every time you open the cabinet door—these are the early warnings your kitchen sink plumbing is failing. Replacing the pipes under a kitchen sink is one of the most satisfying DIY projects for any homeowner. It saves you $200–$500 in plumber fees, teaches you how your home's drainage actually works, and gives you the confidence to handle future plumbing issues yourself. This guide walks you through every stage, from choosing the right materials to pressure-testing your work, with the kind of practical detail that turns a daunting task into a straightforward weekend project.
Understanding Your Kitchen Sink Plumbing Basics
Before you pick up a wrench, take time to understand what you are working with. The plumbing under a kitchen sink consists of two separate systems: the drain-waste system and the water supply system. Knowing how they work together helps you diagnose problems accurately and choose the right replacement parts.
The Drain System Explained
The drain system is gravity-fed and consists of several key components:
Tailpiece – The vertical pipe that drops straight down from the sink strainer (the metal basket in the sink bottom).
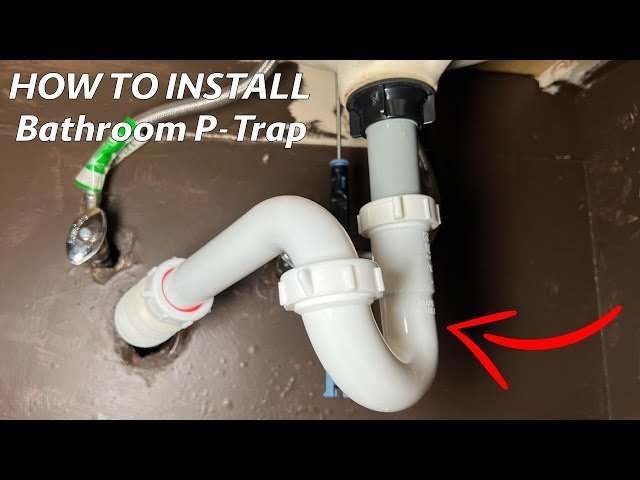
P-trap – The curved U-shaped pipe that holds a small amount of standing water to block sewer gases from rising into your kitchen.
Trap arm (or waste arm) – The horizontal pipe that connects the P-trap to the drain line inside your wall.
Slip joints – Threaded connections with rubber washers that allow you to disassemble the drain system by hand or with light tools.
A common mistake DIYers make is assuming all drain pipes are the same diameter. Kitchen sink drains typically use 1½-inch pipe, but some older homes or double-basin setups may use 1¼-inch for branch lines. Measure your existing pipe diameter before buying replacements. A detailed look at a plumbing under a kitchen sink diagram can clarify the layout before you begin disassembly.
The Water Supply System
The supply system brings fresh water to your faucet and sometimes to a dishwasher or instant hot water dispenser. These lines are under pressure (typically 40–60 PSI) and require different handling than drain pipes:
Shut-off valves – Small valves mounted on the wall or floor beneath the sink. Each valve controls hot or cold water independently.
Supply tubes – Flexible braided stainless steel or corrugated copper lines that connect the shut-off valves to the faucet tailpieces.
Faucet connections – Threaded nuts that attach the supply tubes to the faucet shanks.
If you have never located your shut-off valves before, take a moment to find them now. Knowing how to turn off water under kitchen sink is the single most important safety skill for this project—and for any future plumbing emergency.
Tools and Materials You Will Need
Gathering everything upfront prevents the frustration of stopping mid-job to hunt for a missing tool. Here is a complete checklist organized by category.
Essential Tools
| Tool | Purpose |
|---|---|
| Adjustable wrench (two, ideally) | Tightening and loosening nuts on slip joints and supply lines |
| Slip-joint pliers | Gripping slip nuts and stubborn fittings |
| Pipe cutter or fine-tooth hacksaw | Cutting PVC, ABS, or copper pipe cleanly |
| Bucket (at least 2-gallon capacity) | Catching water from old pipes and the P-trap |
| Plumber's tape (PTFE tape) | Sealing threaded connections on supply lines |
| Putty knife | Scraping old plumber's putty from sink strainer |
| Flashlight or headlamp | Lighting the dark, cramped space under the sink |
| Safety glasses | Protecting eyes from debris and drips |
| Work gloves | Preventing cuts from sharp metal edges or old pipe |
Material Choices for Replacement Pipes
Selecting the right pipe material depends on your existing system, local building codes, and your comfort level with different joining methods.
PVC (Polyvinyl Chloride) – The most common choice for modern drain systems. It is lightweight, inexpensive, and joins with solvent cement after priming. PVC is white and readily available at any hardware store. One drawback: it becomes brittle in very cold environments, though this rarely matters under a heated kitchen.
ABS (Acrylonitrile Butadiene Styrene) – A black plastic pipe often found in older homes. It is slightly more impact-resistant than PVC but must be joined with ABS-specific cement. Mixing ABS and PVC fittings is not code-compliant in many areas, so check local regulations if you are transitioning between materials.
PEX (Cross-linked Polyethylene) – The modern standard for water supply lines. It is flexible, freeze-resistant, and can be connected with push-to-connect fittings that require no special tools. For DIYers, PEX with shark-bite style fittings is the easiest option for replacing corroded copper supply tubes.
Copper – Traditional for supply lines but rarely used by DIY beginners due to the soldering skill required. If your existing setup is copper, consider adapting to braided stainless steel supply lines instead, which are simpler to install.
Additional Supplies
- Plumber's putty (for sealing the sink strainer flange)
- Silicone caulk (for sealing around escutcheon plates and trim rings)
- Pipe strap hangers (to secure horizontal drain runs to the cabinet floor or wall)
- Rags and old towels
- A small mirror (useful for seeing behind pipes in tight corners)
Preparing Your Workspace for a Smooth Job
The confined space under a sink can turn a simple task into a backache. Take these steps to set yourself up for success.
Empty and Protect the Cabinet
Remove everything stored under the sink—cleaning bottles, trash bins, sponges, anything that might get wet or fall on you. Lay down an old towel or a plastic tarp across the cabinet floor. Tuck the edges up the sides of the cabinet walls to catch splashes and drips. If your cabinet has a particleboard floor (common in modern kitchens), one puddle can cause permanent swelling damage; a towel barrier is cheap insurance.
If you already notice that the area smells musty, take time to address that issue. A routine dealing with an under kitchen sink smells musty can prevent mold growth and make your workspace more pleasant.
Shut Off the Water Supply Correctly
Locate the two shut-off valves under the sink—one for hot water (usually on the left) and one for cold (on the right). Turn each valve clockwise until it stops. Do not overtighten; the valve seats are soft and can be damaged with excessive force. Once closed, open the kitchen faucet to relieve pressure and drain any water still in the supply lines. If no water comes out of the faucet, your shut-off valves are working properly.
If your sink lacks dedicated shut-off valves, you will need to shut off the main water supply to the house. This is rare in modern homes but common in older properties. Locate your main shut-off valve (usually near the water meter or where the main line enters the house) before starting.
Position Your Bucket Strategically
Place your bucket directly under the P-trap. Even after draining the faucet, the P-trap holds several cups of standing water. When you loosen the slip nuts, that water will dump out. Having a bucket in exactly the right spot—and a rag wrapped around the loosened joint—saves you from messy surprises.
Removing the Old Pipes Step by Step
With your workspace prepared, removal is a systematic process. Work slowly and pay attention to how each piece connects—you will need to replicate the layout with your new parts.
Disconnecting the Drain Assembly
Begin with the P-trap, since it is the lowest point in the drain system. Loosen the two slip nuts holding the P-trap in place—one where it connects to the tailpiece above and one where it connects to the trap arm leading to the wall. Most slip nuts can be turned by hand; if they are stuck, use slip-joint pliers with a gentle grip (overtightening can crack plastic nuts).
As the P-trap comes free, tilt it into your bucket to dump the standing water. Set it aside. Next, loosen the slip nut at the top of the tailpiece where it connects to the sink strainer. The entire tailpiece should slide off. Finally, loosen the slip nut where the trap arm enters the wall fitting. Pull the trap arm free.
If any of these connections are glued rather than threaded (common in ABS systems), you will need to cut the pipe with a hacksaw or pipe cutter. Measure carefully and cut at a point where you can add a coupling to extend the remaining pipe later.
Detaching the Water Supply Lines
Use an adjustable wrench to unscrew the nuts connecting the supply tubes to the shut-off valves. Hold the valve body steady with a second wrench to avoid twisting the pipe. Then unscrew the nuts connecting the supply tubes to the faucet tailpieces. Again, hold the faucet shank with a wrench if it spins.
Inspect the shut-off valves while they are accessible. If the valves feel stiff, leak when turned, or are more than 15 years old, replacing them at the same time is a smart upgrade that prevents future emergencies.
Inspecting What You Removed
Before discarding the old pipes, lay them out on your tarp and study the configuration. Note the lengths, the angles of elbows, and the types of fittings used. Take a photo with your phone for reference. Look for signs of what caused the original problem—mineral buildup inside the P-trap, cracks at threaded joints, or a rubber washer that had disintegrated. Understanding the failure mode helps you avoid repeating it with your new installation.
Installing the New Pipes: A Detailed Walkthrough
This is where patience and precision matter most. Measure twice, cut once, and dry-fit everything before applying any glue or tightening any nuts permanently.
Measuring and Cutting Drain Pipes
For the drain system, you will typically need:
- A new tailpiece (usually 6–8 inches long, adjustable with a telescoping section)
- A new P-trap assembly (comes as a kit with two slip nuts and washers)
- A new trap arm (length depends on distance from P-trap to wall fitting)
Measure the distance from the sink strainer outlet to the center of the wall drain opening. Subtract the height of the P-trap (typically 3–4 inches) to get your tailpiece length. Most tailpieces are adjustable—you cut off the bottom section to achieve the right height.
Cut PVC or ABS pipe with a pipe cutter or fine-tooth hacksaw. For the cleanest cut, score the pipe all around with the cutter blade, then snap it. If using a hacksaw, wrap sandpaper around the cut end to remove burrs. A smooth edge ensures the rubber washer seats properly.
Assembling the Drain System
Dry-fit all components before applying any cement. Start from the top:
- Slide the tailpiece into the sink strainer outlet and secure it with the slip nut and washer. Hand-tighten only.
- Attach the P-trap to the tailpiece, again hand-tightening the slip nut.
- Connect the trap arm to the other side of the P-trap and to the wall fitting.
Check the slope: the horizontal trap arm must have a downward gradient of at least ¼ inch per foot toward the wall. Use a small level to verify. If the slope is flat or reversed, adjust the length of the tailpiece or the position of the P-trap.
Once the dry-fit looks correct, disassemble, apply primer and solvent cement to all socket joints (for PVC/ABS), and reassemble quickly. For slip joints, tighten hand-tight plus a quarter turn with pliers—do not overtighten or you will crush the rubber washer.
Connecting the Water Supply Lines
If you are replacing the supply tubes, choose braided stainless steel lines—they are flexible, durable, and far easier to install than copper or rigid plastic. Measure the distance from the shut-off valve to the faucet shank and buy lines that are slightly longer than needed (extra length can be coiled neatly).
Wrap plumber's tape clockwise around the threads of the shut-off valve outlet (3–4 wraps). Screw the supply line nut onto the valve and tighten with a wrench until snug. Repeat for the faucet connection. Do not use plumber's tape on the faucet side if it uses a compression seal with a rubber gasket.
Securing Pipes to Prevent Movement
Loose pipes vibrate, sag, and eventually leak. Use pipe strap hangers to secure horizontal drain runs to the cabinet floor or wall at intervals of no more than 4 feet. For shorter runs under a sink, one strap near the wall fitting is usually sufficient. Make sure the strap does not compress or deform the pipe—just hold it firmly in place.
Testing Your New Plumbing Setup
Testing is not optional. A slow drip behind a closed cabinet door can cause significant structural damage before you notice it.
Restoring Water and Checking for Immediate Leaks
Turn the shut-off valves slowly—a quarter turn at a time. Listen for hissing or sputtering, which indicates air in the lines. Once the valves are fully open, turn on the faucet and let it run for 30 seconds. Check every connection with your fingers (dry hands feel moisture better than eyes see it). Pay special attention to:
- The connection between supply lines and shut-off valves
- The connection between supply lines and faucet shanks
- The slip nuts on the tailpiece and P-trap
- The wall fitting where the trap arm enters
If you spot moisture at any point, do not panic. Most leaks at slip joints just need a gentle extra quarter-turn of the nut.
The Paper Towel Test
This is a trick professional plumbers use. Place dry paper towels or a piece of cardboard under every connection and joint. Let the water run for 2–3 minutes, then turn the faucet off. Leave the paper towels in place for 15 minutes. Return and check each one. Any dampness—even a tiny spot—tells you exactly where a leak is forming.
Adjusting Tight Connections
If you find a drip at a slip nut, tighten it by another eighth to quarter turn. If the drip persists, you may have a damaged washer or the pipe is not seated fully. Disassemble, inspect the washer, and reassemble. For threaded connections (supply lines at the valve), try tightening slightly more—but if the nut feels resistant, back it off, reapply plumber's tape, and try again.
For solvent-welded joints, there is no tightening fix. A leak at a glued joint means the joint failed and must be cut out and replaced. This is rare if you used primer before cement and held the joint together for 15–20 seconds after insertion.
Common Problems and How to Fix Them
Even experienced DIYers hit snags. Here is how to handle the most frequent issues.
Persistent Leaks at Slip Joints
Slip joint leaks are almost always caused by one of three things: a missing or damaged rubber washer, a crooked pipe that pulls the nut out of alignment, or overtightening that has deformed the washer. Disassemble the joint, replace the washer (buy a pack of assorted sizes—they are cheap), and reassemble with the pipe aligned straight.
If you find that a pipe under kitchen sink leaking persists despite your efforts, check for hairline cracks in the pipe itself—these can develop in old plastic fittings and are easy to miss.
Slow Drainage After Installation
If water drains slowly, check the slope of the trap arm first. A flat or uphill section will cause pooling. Also confirm that no excess solvent cement has dripped inside the pipe and formed a ridge that catches debris. If the slope is correct and the interior is clean, the problem may be further down the line—in the wall drain. Try snaking the drain or use a drain auger to clear blockages beyond your reach.
Gurgling Sounds or Sewer Smells
Gurgling when water drains suggests a venting problem. The drain system needs air to flow freely behind the water; if the vent is blocked, water creates a siphon that pulls air through the P-trap, allowing sewer gas to enter. Check that your P-trap is properly installed (the curve should be oriented downward, not sideways) and that no pipe is partially blocked. If the problem persists, the vent stack on your roof may need clearing.
Water Hammer (Loud Banging When Faucet Shuts Off)
Water hammer occurs when high-pressure water slams into a closed valve. This is more common with quick-shutoff faucets. Install a water hammer arrestor on the hot and cold supply lines near the faucet. These devices absorb the shock and are easy to add with compression fittings.
Preventive Maintenance for Long-Lasting Pipes
Your new plumbing will last for decades with minimal care. A few simple habits keep it running smoothly.
Monthly Quick Checks
Once a month, open the cabinet and visually inspect all visible pipes. Look for any signs of moisture, corrosion, or mineral deposits. Run the faucet on full hot for 30 seconds and listen for unusual sounds. Catching a problem early means a five-minute fix instead of a full replacement.
Drain Cleaning That Actually Works
Never use chemical drain cleaners in a kitchen sink. They degrade rubber washers and can weaken PVC over time. Instead, use a drain snake or a Zip-It tool to remove hair and food debris. For odor prevention, pour a cup of baking soda followed by a cup of white vinegar down the drain once a month. Let it fizz for 10 minutes, then flush with boiling water.
When to Call a Professional
Some situations warrant a licensed plumber. If you encounter galvanized steel pipes (common in pre-1970 homes), corrosion may have created thin spots that crumble when disturbed. If your sink lacks proper venting and you are considering adding an air admittance valve (AAV) or a vent pipe through the roof, local code often requires professional installation. And if after three attempts you cannot stop a leak, swallowing your pride costs less than water damage to your subfloor and cabinets.
For homeowners planning broader kitchen upgrades, knowing the steps for a range hood duct installation or how to install a range hood under cabinet can be equally empowering—and each project builds confidence for the next.
Frequently Asked Questions
How long does it take to replace kitchen sink pipes?
For a first-time DIYer, budget 2–3 hours from start to finish. Most of that time goes to careful measuring and testing. Experienced homeowners can finish in under an hour.
Do I need a plumbing permit for this project?
In most jurisdictions, replacing existing pipes with like-for-like materials does not require a permit. However, if you are moving drain locations, adding new fixtures, or changing from copper to PEX on a main supply line, check with your local building department. Failing to permit a significant plumbing change can cause issues when selling your home.
Can I use a dishwasher drain hose with my new setup?
Yes. Most kitchen sink drain systems include a dishwasher drain port—a small threaded inlet on the tailpiece or the side of the disposal unit. If your sink has a dishwasher, make sure the new tailpiece you buy includes this port. The dishwasher drain hose attaches with a hose clamp and must be looped up high (secured under the countertop) to prevent backflow, as recommended by the International Residential Code (IRC) standards from the International Code Council.
What should I do if the old pipes were lead?
Lead pipes were used in homes built before 1930. If you find a soft, gray pipe that scratches easily with a key, stop work immediately. Lead poses a serious health risk, especially in water supply lines. Contact a certified plumber who specializes in lead remediation. Do not attempt to cut or handle lead pipes yourself.
How much does this project cost?
A DIY pipe replacement under a kitchen sink costs between $20 and $60 for materials—pipe sections, fittings, solvent cement, and supply lines. Compare that to $200–$500 for a professional plumber, and the savings are clear. The investment in a quality adjustable wrench and pipe cutter (about $40 total) pays for itself on the first job.
Conclusion: A Dry, Functional Sink Starts With You
Replacing the pipes under your kitchen sink is the kind of project that builds real homeownership skills. You learn to read your plumbing system, handle tools with confidence, and diagnose problems that would otherwise require a service call. More than that, you gain the satisfaction of knowing that the pipes under your sink are installed correctly—by you.
Take your time with each step. Measure carefully. Test thoroughly. And if something does not look right, stop and re-evaluate before moving forward. The extra ten minutes you spend double-checking a joint now saves you from coming home to a puddle on the kitchen floor next month.
Your kitchen sink is the workhorse of your home. Give it the plumbing it deserves, and it will reward you with years of trouble-free service. Start your project this weekend—your future self will thank you.
