
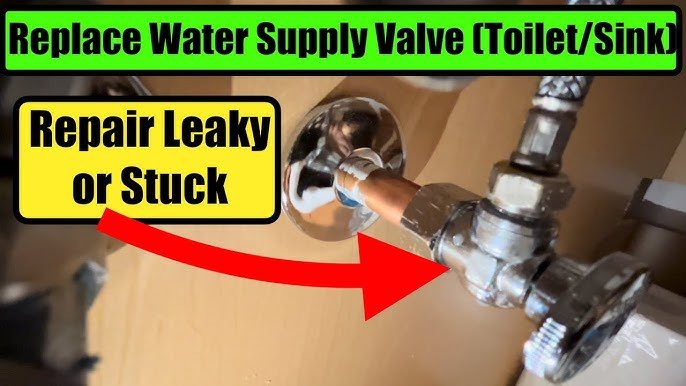
A dripping shut-off valve under your kitchen sink is more than an annoyance—it's a slow threat to your cabinet floor and plumbing integrity. Replacing it yourself takes less than an hour and requires only basic tools. This guide walks you through every step, from identifying your valve type to leak-testing the new installation, so you can fix the problem with confidence and avoid a costly service call.
What You Need Before You Start
Gathering the right tools and materials beforehand prevents mid-job frustration. Most items are inexpensive and available at any hardware store.
Tools
- Adjustable wrench (two if possible—one to hold, one to turn)
- Pipe wrench for stubborn compression nuts
- Tubing cutter if you're replacing a copper sweat valve
- Utility knife
- Bucket (at least 2-gallon capacity)
- Towels or rags
Materials
- New shut-off valve matched to your pipe type:
- Compression valve for copper or CPVC (most common in newer homes)
- Sweat (solder) valve for copper pipes if you own a propane torch
- Push-to-connect (SharkBite-style) valve for the easiest DIY option
- Plumber's tape (PTFE tape)
- Pipe joint compound (optional, for threaded fittings)
- New flexible supply line if the old one shows cracks or corrosion
Safety Gear
- Safety glasses to protect against debris and splashes
- Work gloves for grip and protection from sharp pipe edges
Identify Your Valve Type Before You Remove Anything
Not all shut-off valves come off the same way. Look at the connection where the valve meets the supply pipe.
- Compression valve: A brass nut compresses a ring (ferrule) onto the pipe. You loosen this nut with a wrench.
- Sweat (soldered) valve: Copper pipe goes directly into the valve body. You must cut the pipe or melt the solder.
- Push-to-connect valve: A collar holds the pipe with internal gripping teeth. A plastic release tool or the collar itself removes it.
- Threaded valve: The valve screws onto a male pipe thread. You turn it counterclockwise to remove.
Knowing your valve type determines which tools you need and how much effort the removal will take. In practice, compression and push-to-connect valves are the easiest for a first-time DIYer.
Turn Off the Water Supply Correctly
One mistake here can flood your kitchen. Do not rely solely on the valve you are replacing—it may already be faulty.
- Locate your home's main water shut-off valve. It is typically near the water meter, in the basement, or on an exterior wall.
- Turn the main valve clockwise (right) until it stops.
- Open the kitchen faucet to relieve pressure and drain any water left in the lines.
- Open the cabinet doors and place a bucket under the pipes you will work on.
Why this matters: Even after shutting off the main, water trapped in horizontal pipe runs can spill out when you disconnect the valve. Draining the faucet first reduces this to a few drips.
Remove the Old Shut-Off Valve
For Compression Valves
- Hold the pipe steady with one wrench on the larger hex body near the wall.
- Use a second wrench to turn the compression nut counterclockwise.
- Slide the nut and the old ferrule off the pipe. If the ferrule is stuck, cut it off carefully with a tubing cutter or use a ferrule puller tool.
For Sweat (Soldered) Valves
This method requires a propane torch. If you are uncomfortable with open flame near wood cabinetry, choose a push-to-connect replacement instead.
- Cut the copper pipe about ½ inch behind the old valve body using a tubing cutter.
- Clean the cut end with emery cloth.
- Apply flux to the pipe end, slide on the new sweat valve, heat the joint with the torch, and apply solder until it flows completely around.
For Push-to-Connect Valves
- Push the release collar toward the valve body.
- Pull the pipe out while holding the collar depressed.
- Inspect the pipe end for scratches or burrs and trim if needed.
A common mistake is twisting the pipe instead of pulling straight—this can damage the O-ring seals inside the valve.
Prepare the Pipe for the New Valve
The pipe surface determines whether your new valve seals properly.
- Wipe the pipe clean with a dry rag.
- Remove old plumber's tape or debris from the threads (if threaded).
- Sand or emery-cloth the pipe end lightly to remove oxidation—especially important for compression and push-to-connect fittings.
- Cut the pipe squarely if you removed a sweat valve or damaged the end. Use a tubing cutter for a clean, straight cut.
Install the New Valve
Compression Valve Installation
- Slide the compression nut and then the brass ferrule onto the pipe (in that order).
- Push the valve body onto the pipe until it seats fully.
- Hand-tighten the compression nut, then tighten ¼ to ½ turn with a wrench. Over-tightening crushes the ferrule and causes leaks.
Push-to-Connect Installation
- Mark the insertion depth on the pipe using the gauge built into the valve packaging.
- Push the pipe firmly into the valve until it clicks. Tug gently to confirm it is locked.
- No tools are needed, and you can reuse the valve later if you disconnect it properly.
Threaded Valve Installation
- Wrap plumber's tape clockwise around the male pipe threads 4–6 wraps.
- Screw the valve on by hand until snug.
- Tighten with a wrench one full turn—no more. Over-tightening can crack the valve body.
Reconnect the Supply Line and Test
Attach the flexible supply line to the new valve outlet. Tighten the connection nut by hand, then give it a ¼-turn with a wrench. Now the critical test:
- Slowly turn the main water supply back on.
- Check the new valve connections with a dry paper towel. Look for any moisture.
- Open the new valve fully by turning the handle counterclockwise.
- Run the faucet for 30 seconds, then check again for drips.
If you see a leak at the valve-to-pipe connection, tighten the nut one small click further. If the leak persists, disassemble, check the ferrule or O-ring for damage, and reassemble. A damaged ferrule must be replaced—never reuse a crushed one.
Troubleshooting Common Issues
Valve Won't Stop Dripping
- The valve seat may have debris. Open and close the valve fully several times to clear it.
- If dripping continues, the rubber washer inside may be worn. Some valves allow washer replacement; others must be swapped entirely.
Compression Nut Strips
- This happens when you use the wrong size wrench or overtighten. Cut the pipe behind the damaged nut, remove the old ferrule, and install a push-to-connect valve instead.
Pipe Is Too Short After Cutting
- Extend the pipe using a coupling and a short pipe stub, or switch to a push-to-connect angle valve that positions the outlet closer to the wall.
Water Pressure Drops After Installation
- The valve may not be fully open. Turn the handle counterclockwise until it stops. If pressure remains low, check the supply line for kinks.
When to Call a Professional
- You find galvanized steel pipes that are corroded or reduced to a pinhole leak.
- The pipe moves or feels loose inside the wall when you apply torque.
- You cannot shut off the main water supply because the valve itself is broken.
In these cases, the underlying pipe condition is the real problem, not just the valve. A licenced plumber has the tools and insurance to handle wall repairs and repiping safely. For most other scenarios, the DIY approach works perfectly.
Preventative Maintenance for Long Life
A new shut-off valve should last 15–20 years with minimal care. To extend its lifespan:
- Open and close the valve fully twice a year to prevent mineral buildup from seizing the stem.
- Check for small drips after any major plumbing work elsewhere in the house—pressure fluctuations can disturb old seals.
- Replace flexible supply lines every 5–7 years as part of routine home maintenance. Cracking rubber is a hidden flood risk.
Understanding the full layout of your under-sink plumbing helps you spot potential problems early. Reviewing a plumbing under kitchen sink diagram with dishwasher connections can clarify how each component fits together, especially if you also need to replace pipes later.
Final Checklist
- Main water supply turned off
- Faucet drained
- Old valve removed without pipe damage
- Pipe end cleaned and square
- New valve installed with correct technique for your pipe type
- Supply line reconnected and snug
- Water restored and all connections dry
Replacing an under-sink shut-off valve ranks among the most useful home-repair skills you can learn. The job takes under an hour, costs under $20 for parts, and eliminates the risk of a slow leak ruining your cabinet base. Once you have done it successfully, you will feel far more confident tackling other sink-related repairs like installing a fresh P-trap under kitchen sink or replacing the supply lines entirely.
Image source: Reddit (public DIY forum) Replacing the shut-off valve is often the first step toward a deeper understanding of how your kitchen plumbing works. Once you master this repair, tasks like changing the pipes under a kitchen sink or understanding the full water valve layout become far less intimidating.
FAQ
How do I know what size valve to buy?
Measure the outside diameter of your supply pipe. Common residential sizes are ½ inch for copper and ⅜ inch for the compression outlet that connects to the faucet supply line. Most hardware store valves list both measurements on the package—for example, "½" x ⅜" compression angle stop."
Can I replace a valve without shutting off the main water?
No. Even if the old valve appears closed, it may not seal completely. A failed valve under pressure will spray water, not just drip. Always shut off the main supply before removing any valve.
What if the old valve is soldered but I don't own a torch?
Use a tubing cutter to cut the pipe just behind the old valve body, then install a push-to-connect valve. No soldering required. This is the safest route for anyone without experience brazing copper near wood cabinetry.
Do I need to replace both hot and cold valves at the same time?
Not necessarily, but it is wise. If one valve has failed, the other is likely the same age and condition. Replacing both now saves you a second repair later. The additional cost is only the valve itself—you already have the tools and know the steps.
Why does my new valve whistle when the faucet is open?
A high-pitched whistle usually means the valve is not fully open. Turn the handle counterclockwise until it stops. If the noise continues, the valve may have a restricted internal passage—swap it for a different brand.
When to Replace Instead of Repair
Some situations call for full replacement of the pipe assembly rather than just the valve:
- The pipe behind the valve is corroded or pitted
- The compression ferrule has been crushed so badly that the pipe surface is gouged
- You find multiple layers of old plumber's tape and sealant suggesting repeated failed repairs
In these cases, cutting back to fresh pipe or replacing a section of line is the only reliable fix. The techniques are similar to what you have already learned here, just applied to a longer section of pipe.
A secure, leak-free shut-off valve is one of those small victories that makes your entire kitchen feel more reliable. You have now saved yourself a plumbing bill and gained a skill you will use again. Keep a spare valve and a length of supply line in your home toolkit, and you will be ready for the next drip before it becomes a problem.
