
Learning how to take apart under sink waste pipes starts with identifying your specific trap configuration before applying any force. Most modern assemblies use hand-tightened slip joints that yield to gentle pressure when approached correctly.
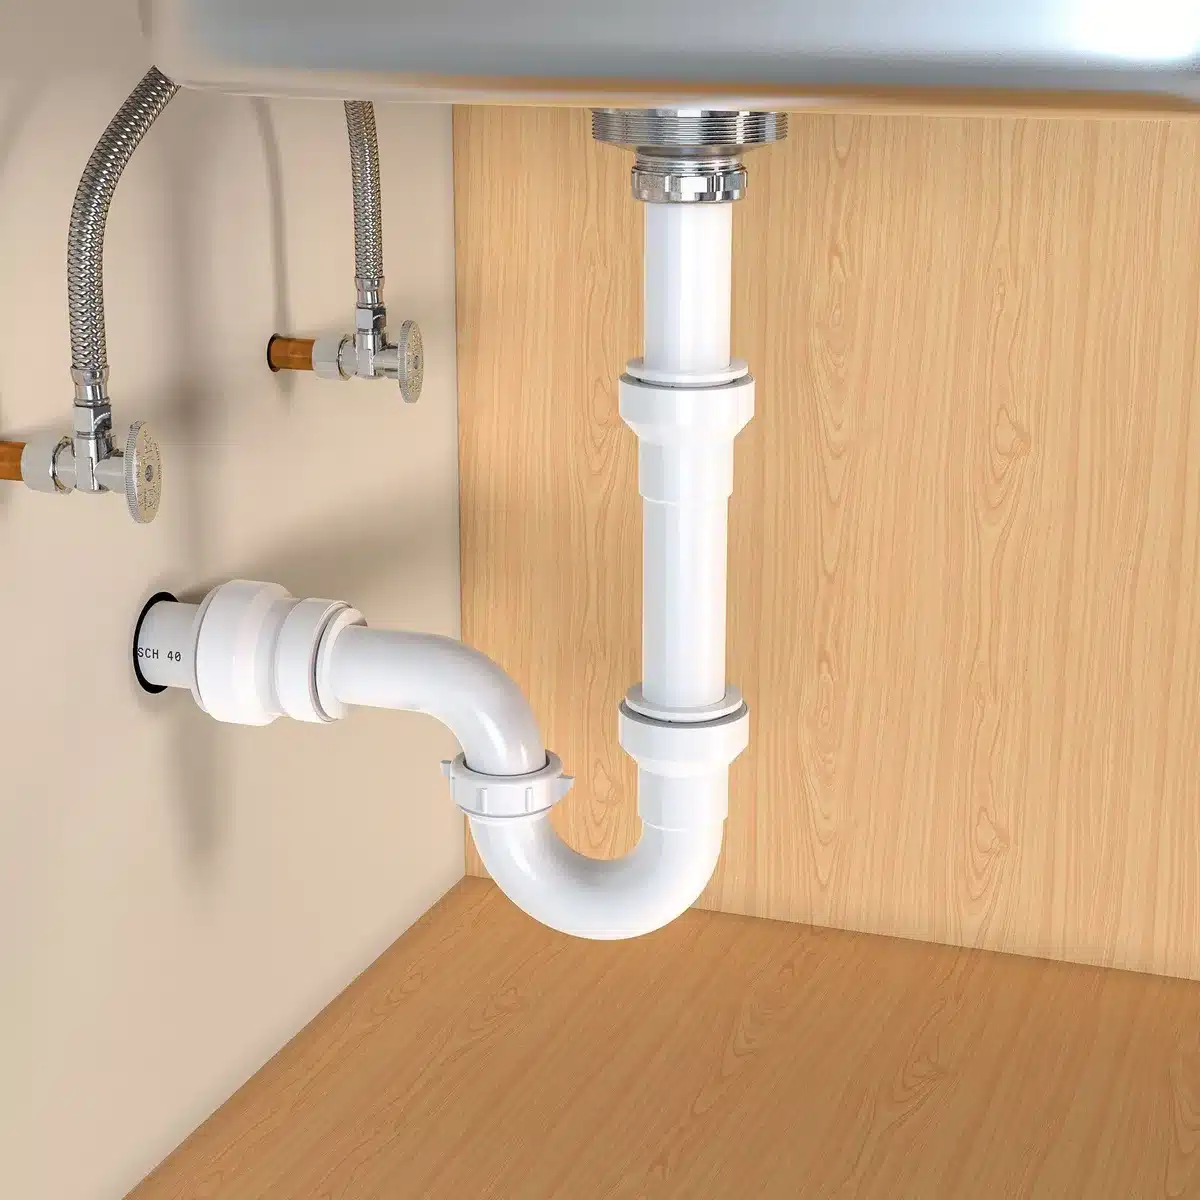
Image source: Web (Bing) / storage.googleapis.com (Web image (fair-use with source credit))
Per International Plumbing Code standards, residential drain traps must maintain a two-inch water seal to prevent sewer gas entry. Understanding this specification helps you distinguish between serviceable threaded connections and permanent solvent-welded joints that require cutting. This distinction determines whether disassembly is possible or if replacement is necessary.
Quick Answer
How to take apart under sink waste pipes involves loosening slip-joint nuts by hand. Place a bucket underneath to catch residual water. Support the pipe weight while unscrewing connections.
Inspect washers for wear before reassembly. Hand-tighten only to prevent cracking plastic components.
Know Your Drain: Identifying Trap Types and Materials Before You Touch Anything
Your success depends entirely on correctly identifying the pipe material and joint type before applying torque. Plastic tubular drains dominate post-1990 construction and feature standardized slip-joint nuts designed for hand disassembly. Chrome-plated brass systems found in older homes often seize due to mineral buildup and corrosion over decades of use.
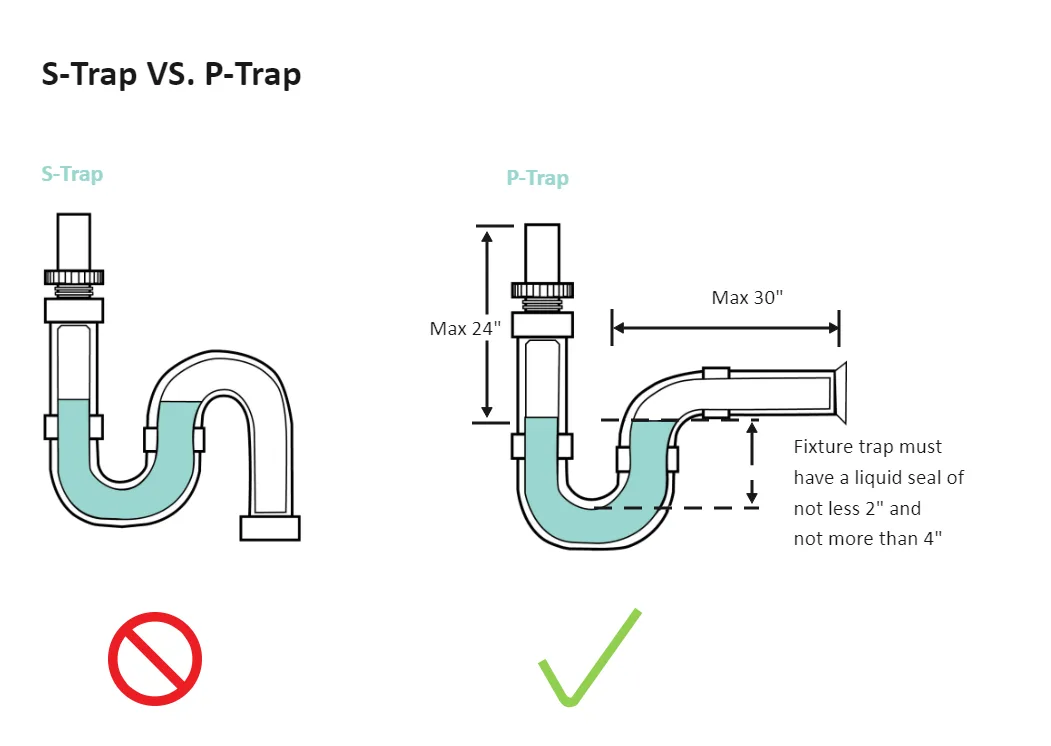
Image source: Web (Bing) / storage.googleapis.com (Web image (fair-use with source credit))
Solvent-welded PVC or ABS assemblies cannot be taken apart at all. These permanent bonds require cutting the pipe and installing new couplings during reassembly. Mistaking a glued joint for a threaded connection leads to cracked fittings and costly repairs.
Always verify joint type visually before attempting rotation.
Visual Identification Cues
Threaded slip joints show visible nut edges and a distinct seam where components meet. The compression washer sits inside this junction and creates the watertight seal. Glued joints appear seamless with no gap between pipe and fitting surfaces.
Material identification matters equally for tool selection. White or black plastic responds poorly to metal jaw pressure and cracks easily. Shiny metallic finishes indicate chrome brass that tolerates careful wrench use but risks cosmetic damage.
If you are unsure about your setup, our guide on whether all under-sink pipes supply clean water clarifies supply versus drain line distinctions.
| Material | Joint Type | Disassembly Method | Risk Level |
|---|---|---|---|
| PVC/ABS Plastic | Solvent Weld | Cut Only | High |
| Tubular Plastic | Slip Joint | Hand Tighten | Low |
| Chrome Brass | Slip Joint | Strap Wrench | Medium |
| Cast Iron | Hub/No-Hub | Specialty Tools | High |
S-trap configurations violate current building codes due to siphoning hazards that empty the water seal. These illegal traps lack proper venting and should be replaced entirely rather than serviced. Modern P-traps maintain their seal through correct venting and vertical drop alignment per manufacturer specifications.
The Essential Toolkit for Safe Under-Sink Disassembly
Proper tools prevent damage that turns simple maintenance into emergency plumbing calls. A strap wrench provides grip without marring chrome or crushing plastic surfaces. Channel lock pliers work for stubborn brass nuts but risk scratching finishes and overtightening plastic threads.
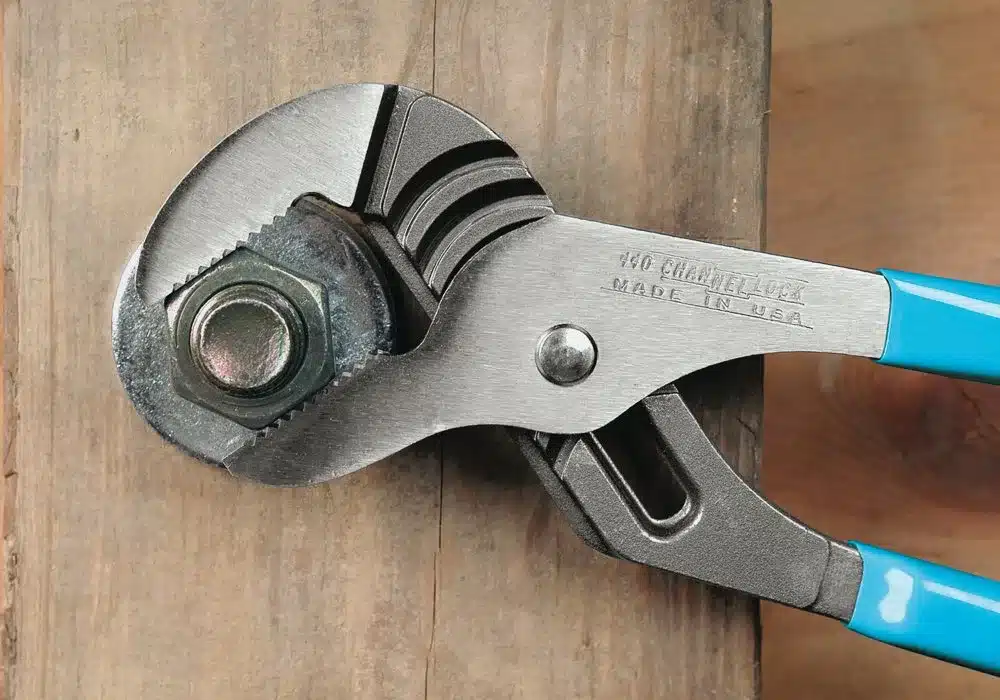
Image source: Web (Bing) / storage.googleapis.com (Web image (fair-use with source credit))
Always place a five-gallon bucket directly beneath the trap before starting. Residual water contains bacteria and debris that stain cabinetry and create biohazards. Old towels provide secondary containment for drips and cushion dropped components.
Adequate lighting is non-negotiable for spotting hairline cracks and worn washers in cramped spaces.
Must-Have Items Checklist
- Strap wrench for finish-safe gripping
- Bucket and absorbent towels
- LED work light or headlamp
- Replacement compression washers (1-1/4 inch or 1-1/2 inch)
- Needle-nose pliers for retrieving dropped parts
- Wire brush for cleaning corroded threads
For double sink configurations, the process scales up significantly. Our breakdown of taking apart double kitchen sink pipes covers the additional complexity of tee fittings and dual trap arms. Single basin setups remain straightforward when you have the right equipment staged before beginning.
Avoid adjustable wrenches on plastic slip nuts entirely. The pointed jaws concentrate pressure on small contact areas and crack aged polymer. Metal-on-metal contact also generates shavings that contaminate drain lines and cause future clogs.
Invest in dedicated plumbing tools rather than improvising with general-purpose hardware.
Step-by-Step P-Trap Removal Without Breaking Old Plumbing
Clear all items from under the sink cabinet before positioning yourself comfortably. Good posture prevents fatigue-related mistakes during extended work in confined spaces. Verify the bucket sits directly below both slip-joint connections to catch drainage from either end.
Loosen the downstream nut connecting the trap bend to the wall arm first. Turn counterclockwise using steady hand pressure only. Support the trap body with your free hand to prevent stress on upstream threads.
If resistance exceeds comfortable hand force, stop immediately and reassess joint condition.
Once the wall connection releases, loosen the tailpiece nut above the trap inlet. Water will drain into your bucket as this seal breaks. Remove the trap assembly completely once both ends are free.
Inspect the interior for grease accumulation or foreign objects causing blockages.
Critical Handling Precautions
Never let unsupported pipe weight hang from a single connection point. Gravity stresses old plastic and accelerates crack formation at thread roots. Hold each component securely until fully detached from adjacent sections.
Set removed parts on towels to prevent rolling and surface damage.
If you encounter unexpected resistance mid-process, refer back to material identification. Forcing a glued joint destroys surrounding infrastructure and multiplies repair costs tenfold. When dealing with seized brass fittings, penetrating oil applied overnight works better than brute force.
Patience preserves components that aggression destroys.
After removal, clean all mating surfaces with a soft cloth before inspection. Mineral deposits and degraded rubber create false positives during leak testing later. Fresh washers seat properly only against smooth, debris-free surfaces.
This preparation step separates successful reassembly from repeated failures.
When Nuts Won’t Budge: Dealing with Seized, Stripped, or Glued Joints
Seized metal nuts respond best to chemical penetration rather than mechanical force. Apply quality penetrating oil generously and wait twelve hours minimum. Tap the nut perimeter lightly with a hammer handle to vibrate threads and aid wicking.
Heat guns help expand metal slightly but risk melting adjacent plastic components.
Stripped plastic nuts require complete replacement regardless of removal method. Attempting to reuse damaged threads guarantees leaks upon reassembly. Cut away destroyed nuts carefully with a hacksaw blade wrapped in tape to protect underlying pipe.
New slip-joint kits cost under fifteen dollars and include fresh washers.
Glued joints discovered mid-disassembly demand immediate strategy adjustment. Stop all rotational force to avoid cracking connected fittings. Mark the joint location and plan for cutting and coupling installation instead.
Solvent-welded PVC requires primer and cement for proper reconnection per ASTM D2665 specifications.
Troubleshooting Decision Points
- Nut turns but does not loosen: Cross-threaded or stripped internally. Replace entire nut and washer set.
- Metal nut frozen solid: Soak in vinegar solution for calcium dissolution. Use strap wrench after twenty-four hours.
- Plastic deforms under pressure: Material has exceeded service life. Full assembly replacement recommended.
- No visible seam exists: Confirmed solvent weld. Proceed with cut-and-couple repair method.
Corrosion patterns reveal underlying issues worth addressing during reassembly. Green patina on brass indicates acidic water conditions that accelerate future failures. White chalky deposits signal hard water mineral accumulation requiring filtration solutions.
Addressing root causes extends the lifespan of newly installed components significantly.
When extraction proves impossible without destructive methods, document the situation photographically. Professional plumbers appreciate visual context when assessing difficult retrofits remotely. Sometimes the most economical path involves expert intervention rather than compounded DIY damage.
Knowing your limits protects both property and budget.
Reassembly and Leak Testing Like a Pro
Clean every mating surface thoroughly before installing new compression washers. Old rubber fragments and mineral scale prevent proper sealing even with brand-new gaskets. Verify washer orientation matches manufacturer diagrams exactly.
Beveled edges typically face toward the fitting interior while flat sides contact the nut.
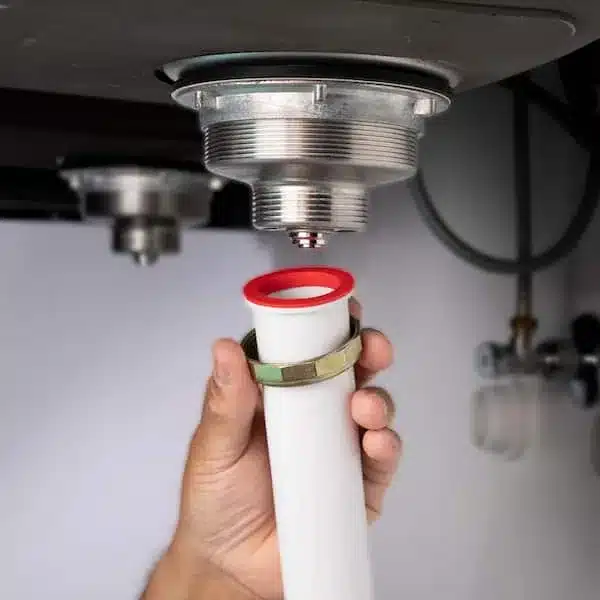
Image source: Web (Bing) / storage.googleapis.com (Web image (fair-use with source credit))
Hand-tighten slip nuts until snug resistance develops naturally. Add no more than one-quarter turn beyond finger-tight using gentle pressure. Overtightening compresses washers unevenly and creates leak paths around distorted edges.
Plastic threads strip at approximately twenty inch-pounds of torque, far below wrench capabilities.
Support full assembly weight while tightening final connections. Misaligned pipes bind against cabinet walls or adjacent fixtures creating stress points. Ensure trap maintains proper vertical drop between inlet and outlet per code requirements.
Slope affects drainage velocity and self-cleaning action within the bend.
Verification Protocol
Run cold water at moderate flow for sixty seconds while observing all joints. Dry paper towels pressed against connections reveal micro-leaks invisible to casual inspection. Check again after five minutes of continuous use to account for thermal expansion.
Temperature changes affect plastic dimensions and can expose marginal seals.
If leaks persist despite correct washer installation, reassess alignment rather than increasing tightness. Pipes forced into position store energy that eventually overcomes friction seals. Loosen both ends slightly and allow natural settling before retightening.
Gravity-assisted alignment produces superior results compared to muscle-forced positioning.
For related maintenance tasks, keeping appliances like dishwashers running smoothly prevents downstream drain issues. Regular filter cleaning reduces particulate load entering waste pipes and extends trap service intervals. Preventive care upstream simplifies downstream troubleshooting considerably when problems do arise.
Common Mistakes That Cause Leaks, Damage, or Code Violations
Overtightening plastic slip nuts remains the single most frequent cause of post-repair leaks. Excessive torque distorts compression washers and creates uneven sealing surfaces that drip immediately. Hand-tightening plus a quarter turn provides sufficient seal without risking structural failure.
Manufacturer specifications consistently warn against tool-assisted tightening on tubular plastic drains.
Ignoring proper trap alignment during reassembly guarantees future problems. Pipes forced into position store mechanical stress that eventually overcomes friction seals. Always loosen both connections slightly to allow natural settling before final tightening.
Gravity-assisted positioning produces superior long-term results compared to muscle-forced alignment.
Critical Safety and Compliance Warnings
Removing a trap without verifying venting status risks sewer gas exposure in living spaces. Dry traps lose their water seal and allow dangerous methane infiltration within hours. Keep a wet rag stuffed in open drain lines during extended work periods.
Restore water flow promptly after reassembly to reestablish the protective barrier.
S-trap configurations found in pre-1980 homes violate current International Plumbing Code standards. These unvented designs siphon their own seals during drainage and cannot be safely reinstalled. Complete replacement with code-compliant P-traps is mandatory upon discovery.
Local building inspectors flag these violations during property transfers and insurance assessments.
Mixing incompatible materials creates galvanic corrosion cells that destroy connections prematurely. Plastic-to-metal transitions require approved dielectric unions or specialized transition washers. Direct contact between dissimilar metals accelerates degradation far beyond normal service life expectations.
Verify material compatibility through manufacturer documentation before combining components from different eras or suppliers.
Chemical drain cleaners used prior to disassembly pose serious burn hazards during teardown. Residual caustic solutions remain active inside pipes for days after application. Wear chemical-resistant gloves and eye protection when handling recently treated drains.
Neutralize alkaline residues with diluted vinegar before beginning physical work to prevent skin injuries.
Frequently Asked Questions
How often should under-sink waste pipes be inspected?
Annual visual inspections catch minor issues before they become emergencies. Check for moisture stains, mineral deposits, or washer degradation during routine cleaning. Homes with hard water benefit from biannual checks due to accelerated mineral buildup.
Proactive maintenance extends component lifespan significantly beyond reactive repair cycles.
Can I reuse old compression washers after disassembly?
Reusing compressed washers rarely produces reliable seals regardless of apparent condition. Rubber and nylon deform permanently during initial installation and lose elasticity. New washers cost less than one dollar each and guarantee proper seating.
Always replace gaskets during any disassembly to prevent callback leaks.
What causes persistent leaks after correct reassembly?
Misaligned pipes create binding stress that overcomes washer compression over time. Loosen both slip nuts slightly and allow gravity to settle the assembly naturally. Retighten by hand only after confirming zero lateral tension exists.
Thermal expansion from hot water can also expose marginal seals missed during cold testing.
Is Teflon tape necessary on slip-joint threads?
Slip joints rely entirely on compression washers for sealing rather than thread engagement. Adding tape prevents proper nut advancement and reduces washer compression force. Reserve thread seal tape for tapered pipe threads like NPT fittings only.
Clean bare threads ensure maximum washer contact and optimal seal performance.
When should I call a professional instead of DIY?
Glued PVC assemblies requiring cutting demand professional tools and solvent-welding expertise. Extensive corrosion affecting multiple joints indicates systemic failure beyond simple washer replacement. Persistent leaks despite correct technique suggest hidden damage or improper original installation.
Licensed plumbers carry liability insurance protecting you from accidental property damage during complex repairs.
