
A fracked pipe under the sink usually means a split or crack in supply or drain plumbing, not a drip you can ignore. Water pools fast in the cabinet. Stored cleaners, paper goods, and the floor panel soak it up before you spot the source.
Most household fixture lines run at 40 to 80 psi per typical municipal supply guidance. That pressure turns a hairline split into a spray in seconds. Your first job is stopping water and sorting supply from drain before you grab tools.
Quick Answer
A fracked pipe under the sink is a cracked supply or drain line leaking into the cabinet. Shut off the hot and cold angle stops first. If they fail, use the main house valve.
Supply leaks spray when water is on. Drain leaks show when you run the faucet. Replace burst flex lines and split P-traps.
Do not epoxy pressurized pipes.
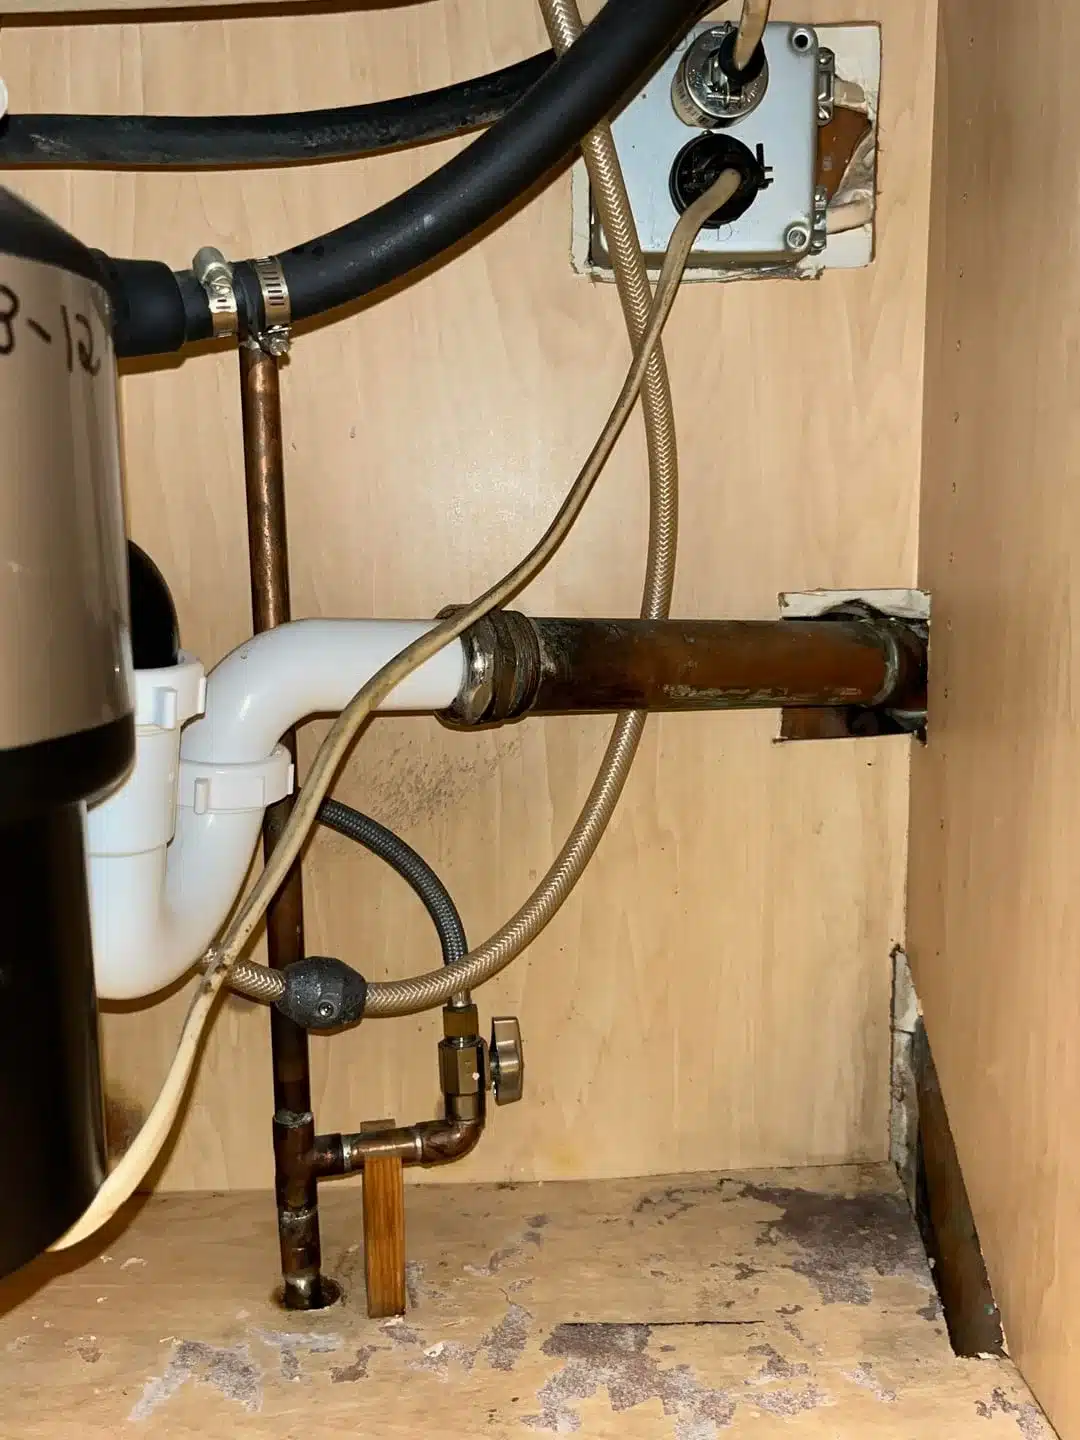
Image source: Web (Bing) / reddit.com (Web image (fair-use with source credit))
Water Under the Sink: Your First 60 Seconds Matter
Open the cabinet and look for active dripping, not just a wet floor. Move anything on the bottom shelf. Water hides under bottles and paper towel rolls.
Turn off both shut-off valves under the sink. These are usually chrome or oval handles on the supply lines to the faucet. Turn clockwise until they stop.
If a valve spins freely or won't budge, skip it and hit the main shut-off instead.
Open the faucet above to bleed pressure off the lines. Lay towels or a shallow bin under the leak. If you have a garbage disposal or outlet in the cabinet, keep standing water away from them.
Most cabinet damage happens in the first few minutes after a crack opens, not from the crack alone. Swollen particleboard and mold risk climb once wood stays wet. The EPA's household leak guidance notes that even small fixture leaks waste thousands of gallons yearly when left alone.
If water keeps coming after both stops are closed, you're likely looking at a drain-side leak or a stop that didn't seal. Don't close the cabinet and hope it dries. Trapped humidity keeps the back panel wet.
Supply Line or Drain? The Answer That Changes Everything
This fork decides your whole repair path. Get it wrong and you either leave pressurized water on or waste an hour on the wrong line.
Supply-side leaks live on the hot and cold lines between the angle stops and the faucet. They drip or spray when those valves are open. Even a small crack can pulse with line pressure.
Drain-side leaks sit on the tailpiece, P-trap, trap arm, or slip joints. They usually show up when you run water down the sink. With supply valves closed, a drain leak may look dry until you fill the basin and pull the plug.
| Signal | Supply leak | Drain leak |
|---|---|---|
| Water when stops are closed | Unlikely (unless stop is bad) | Possible after use |
| Spray or hiss | Common | Rare |
| Leak at nut or washer | At compression fitting | At slip-joint nut |
| Fix approach | Replace line or valve | Replace trap section |
Dry everything with a towel. Turn one supply valve on for two seconds if you feel safe doing so. Spray at a flex line or stop means supply.
No spray? Fill the sink halfway, drain it, and watch the trap and wall connection.
Not every line under there carries drinking water. Some hoses feed a dishwasher or disposal drain paths only. If you're unsure which pipe does what, our breakdown of potable vs drain lines walks through typical kitchen layouts.
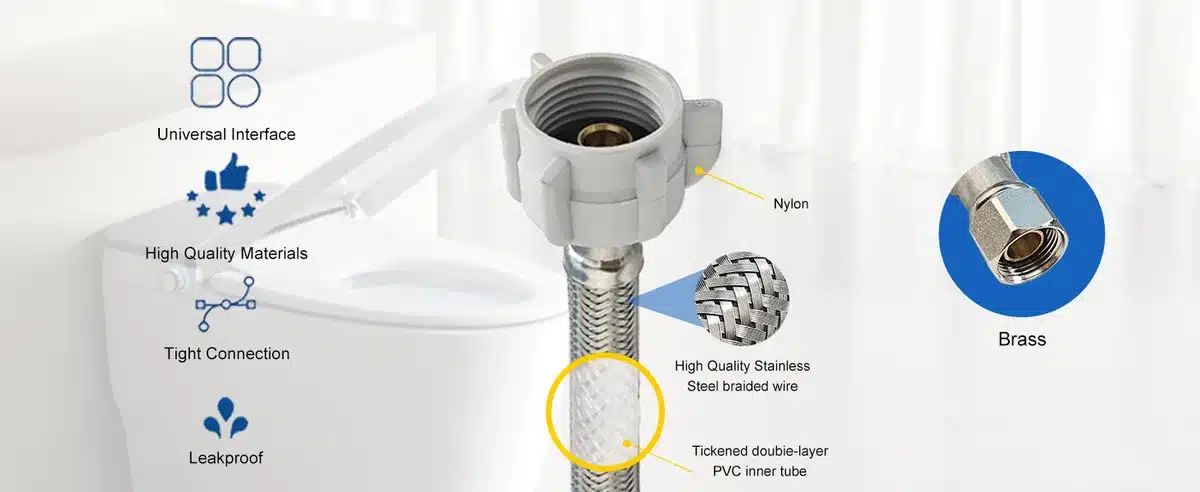
Image source: Bing (Web (fair-use with source credit))
What's Actually Under There: Pipes, Traps, and Fittings That Crack
Under a typical kitchen or bathroom sink you'll find two supply lines, two angle stops, a drain tailpiece, a P-trap, and a trap arm into the wall. Kitchen setups may add a dishwasher drain hose and a disposal connection. All of them can crack, but not in the same way.
Supply components include braided stainless flex lines, rigid copper or PEX runs, and compression fittings at the stops. Flex lines often fail at the ferrule or where the hose meets the faucet nut after years of slight movement. Copper can pinhole from corrosion.
PEX splits after hard freezes or sharp bends.
Drain components are usually PVC, ABS, or thin chrome brass on older vanities. The P-trap holds water to block sewer gas. Tailpieces crack at thin walls.
Slip-joint nuts squeeze a rubber washer. Over-tightening that nut is a classic way to crack the trap collar.
Common sizes matter when you buy parts. Supply flex lines often connect 3/8-inch compression ends to 1/2-inch nominal pipe. Bathroom lavatory drains are often 1-1/4-inch.
Kitchen sink drains are commonly 1-1/2-inch. Match diameter and connection type before you leave the store.
Aggregate repair reports as of 2026 still point to braided flex bursts and chrome trap tailpieces as the top two under-sink crack sites. Dishwasher drain hoses can split near the clamp too. That leak often gets blamed on the sink trap.
Run the dishwasher alone and watch the hose path. Routine dishwasher upkeep helps you spot worn hoses before they blow.
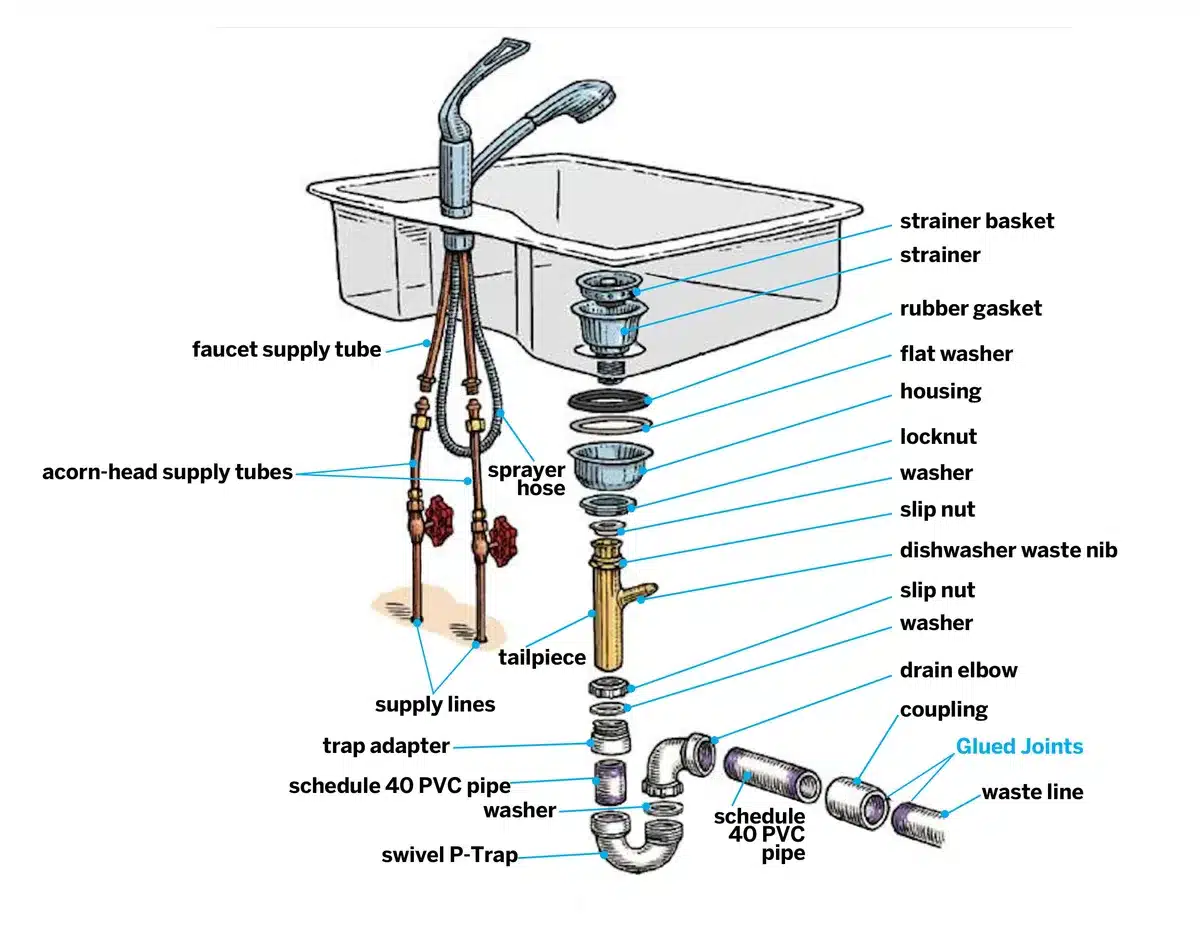
Image source: Web (Bing) / pinterest.com (Web image (fair-use with source credit))
The Repair Decision Tree: Patch, Replace, or Call a Plumber
Use this if/then flow once water is off and you know supply vs drain.
If the braided flex supply line is cracked: replace the whole line. Don't wrap it with tape or epoxy. Manufacturer specs for potable flex lines treat them as replaceable assemblies, not patchable pipe.
Shut both stops, unscrew both ends, and match length and connection size.
If the angle stop body is cracked: replace the valve. A split stop body won't seal again. If the valve is soldered onto copper with no union, that's a plumber job unless you're comfortable sweating pipe.
If the P-trap or tailpiece is split: swap the section. Slip-joint parts unscrew by hand or with gentle channel locks. Buy a trap kit that matches your drain diameter.
Hand-tighten, then a quarter turn with pliers. Snug, not crushed.
If rigid copper or PEX on the supply side is cracked: a push-fit repair coupling can work on accessible straight runs if local code allows it. Soldered copper in tight quarters often warrants a pro call. Never use PVC cement on a pressurized supply line.
If glued PVC or ABS drain pipe is cracked in the pipe body: cut out the bad section and install a coupling plus new pipe per solvent-weld rules for that material. Surface epoxy is OK on a non-pressurized drain at your own risk, but replacement is cleaner.
Call a plumber when: the crack sits inside the wall, you see multiple splits, stops won't shut, water touched electrical, or you smell sewage. That last one may be a drain or sewer issue, not a simple crack.
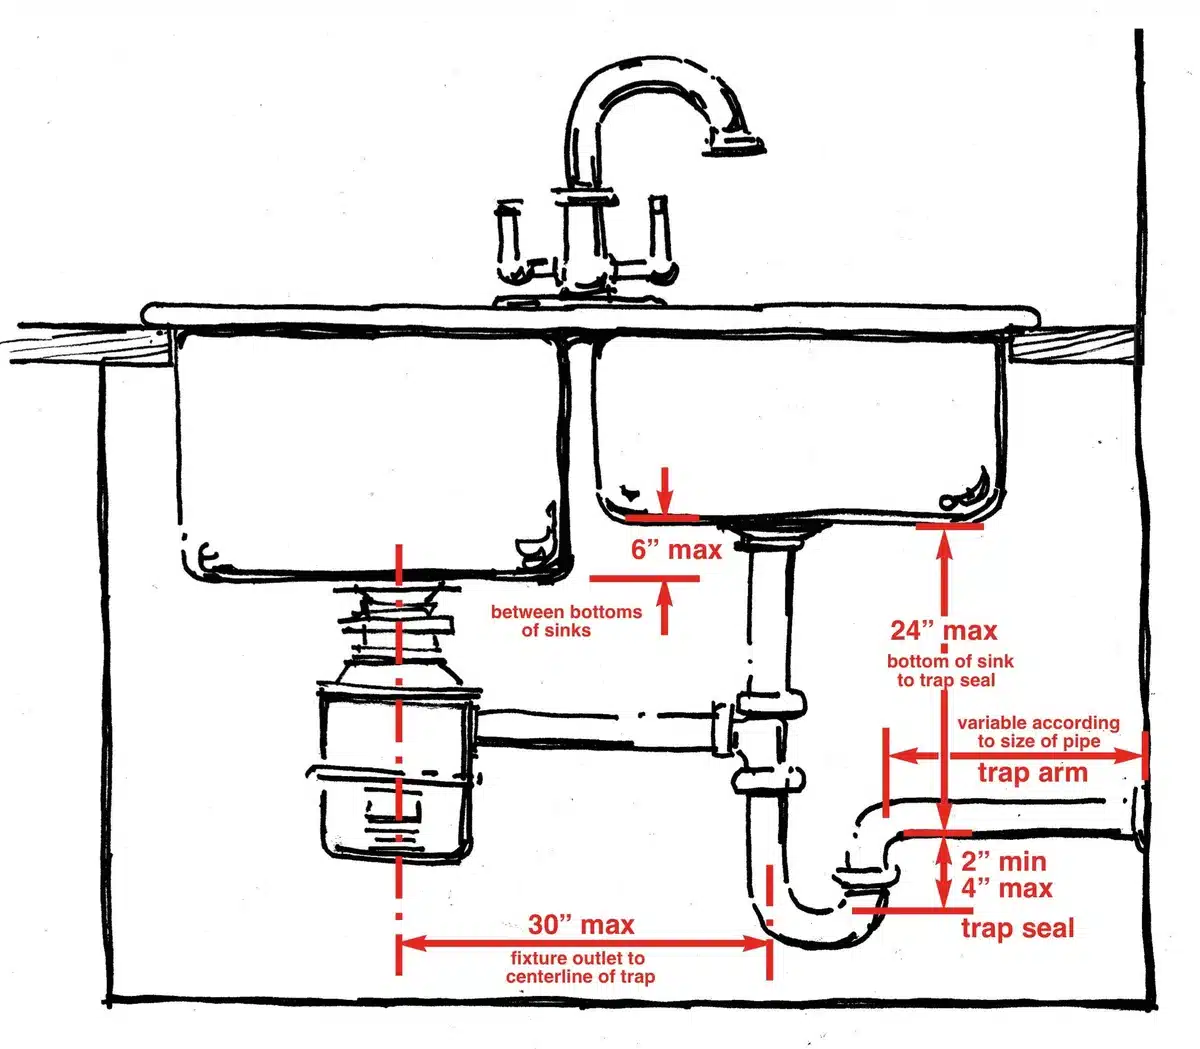
Image source: Web (Bing) / cecthbpp.blob.core.windows.net (Web image (fair-use with source credit))
What Actually Holds: Temporary Fixes vs Permanent Repairs by Situation
Temporary fixes buy hours or a day. Permanent fixes mean new parts installed correctly. Mixing them up is how small leaks turn into repeat floods.
| Situation | Temporary option | Permanent fix |
|---|---|---|
| Supply flex split, parts store closed | Shut off + bucket | New flex line same day |
| Pinhole spray on copper | Shut off only | Coupling or reroute |
| Hairline drain trap crack | Epoxy putty (drain only) | New trap section |
| Emergency overnight | Pipe repair clamp on supply | Replace section next day |
| Joint seep at slip nut | Tighten or new washer | New washer and reseat |
Epoxy putty and repair tape belong on drain lines or truly non-pressurized seepers. On a live supply line at 40 to 80 psi, those fixes fail fast. A pipe repair clamp can hold a straight supply crack until morning if the pipe is round and accessible.
Read the clamp's size range before you buy.
Permanent repair means matching material rules. IPC-approved materials and methods matter on potable lines. Push-fit couplings rated for behind-wall use can speed up PEX or copper repairs where code accepts them.
Drain work means proper primer and cement for PVC or ABS, not whatever glue is in the junk drawer.
After any fix, turn water on slowly. Check at full pressure for ten minutes on supply. Run the faucet and fill or drain the sink twice on drain work.
Come back after 30 minutes. Slow seeps often show once lines fully pressurize.
Dry the cabinet for 24 to 72 hours depending on saturation. The CDC notes on household mold tie ongoing dampness in enclosed spaces to mold growth within roughly one to two days on wet materials. Pull swollen particleboard if it's crumbling.
If you're renting, photograph the leak and notify the landlord before major disassembly. Insurance claims often hinge on sudden vs gradual leaks, so note when you first saw active water. For kitchen setups with a disposal, keep connections dry when you test repairs.
Leaks there mimic sink trap failures and confuse the decision tree fast. While the cabinet is open, check dispenser and filter paths for slow drips you might have missed.
Mistakes That Turn a Drip Into a Flooded Cabinet (Plus Safety You Can't Skip)
The biggest mistake we see is treating every wet spot the same. You tighten a slip-joint nut on a cracked flex line and the split opens wider. Pressure does that.
Always classify supply vs drain before you touch a wrench.
Epoxy putty on a live supply line is another repeat offender. It might slow a drip for minutes. At 40 to 80 psi it rarely holds.
Save putty for drain seepers or buy time only until you shut water off.
Leaving a bucket and walking away feels practical. It isn't. Particleboard swells within hours.
Mold can start on damp wood in one to two days per CDC dampness guidance. Dry the cabinet and pull anything soaked.
Electrical risk is real. Outlets, disposal cords, and dishwasher wiring often sit inches from the leak path. Standing water plus electricity means stop, shut off, and step back. Flip the kitchen circuit breaker if water touched an outlet.
Stuck angle stops tempt people to force them. Corroded stems snap. If a stop won't close, use the main shut-off.
Partial closure leaves pressure on the crack.
Renters sometimes rip out plumbing without photos or landlord notice. Document the leak first. Unauthorized changes can complicate habitability claims and repair billing.
Kitchen leaks get misread fast. A disposal drain flange leak or dishwasher hose split looks like a trap failure. Run each fixture alone before you buy parts.
A quick filter and hose check while the cabinet is open catches hidden splits upstream. A basic vinegar flush routine on the dishwasher side also helps you notice worn hoses before they split.
FAQs About Cracked Pipes Under the Sink
Can I use flex tape or epoxy on a cracked supply line under the sink?
No for permanent repair. Tape and epoxy may slow a drip briefly on pressurized lines. Shut off the water first.
Replace the flex line, valve, or coupling section. Manufacturer specs treat braided supply hoses as replace-only assemblies, not patchable pipe.
Why does my sink leak when the water is off?
That pattern usually points to the drain side. Supply valves closed means pressurized lines should stay dry. Water appearing after you run the faucet and drain it suggests a cracked P-trap, tailpiece, slip joint, or trap arm.
Fill the basin and watch joints.
How much does it cost to fix a cracked pipe under the sink?
Simple DIY swaps cost roughly a flex line or trap kit plus an hour of time. Plumber rates vary by region and after-hours timing. Straightforward part replacement sits far below cabinet flood remediation, mold treatment, or wall access work.
Is a hairline crack in a P-trap worth replacing?
Yes if you see an actual split in the plastic or brass wall. Joint seep at the nut may need only a new washer and reseat. Body cracks spread when you snug fittings or when hot drain water cycles.
Trap kits are cheap compared to repeat leaks.
Should I call a plumber or fix it myself?
Replace a burst flex line or P-trap if you're comfortable shutting water off and matching sizes. Call a pro for wall pipe cracks, soldered copper with no union, multiple splits, stops that won't seal, sewage odor, or any water near electrical. When unsure, shut off and call.
How long should I wait before turning water back on after repair?
Turn supply on slowly after assembly. Check joints at full pressure for ten minutes. Run the faucet and fill or drain the sink twice on drain work.
Recheck after 30 minutes. Slow seeps often show once lines fully pressurize.
Quick Decision Guide: Match Your Leak to the Right Fix
Use this table when you're standing at the cabinet with towels down and water off.
| What you see | Likely cause | Your move |
|---|---|---|
| Spray from braided hose when valve opens | Cracked flex supply line | Replace entire line |
| Drip at chrome stop handle or body | Failed angle stop | Replace valve |
| Wet trap collar after draining sink | Split P-trap or tailpiece | Swap trap section |
| Seep at slip-joint nut only | Bad washer or loose nut | New washer, hand plus quarter turn |
| Pinhole mist on copper | Corrosion split | Shut off, coupling or pro |
| Crack in glued drain pipe | PVC or ABS body failure | Cut out section, solvent-weld coupling |
| Leak only when dishwasher runs | Dishwasher drain hose | Replace hose and clamp |
| Water after stops closed, no spray | Drain path or bad stop | Retest supply, inspect trap |
If this fits, DIY tonight: one cracked flex line, one trap piece, one slip joint, parts match sizes, stops work, no electrical contact.
If this fits, shut off and call: wall penetration leak, soldered copper in tight space, repeated repair failure, sewage smell, or a cabinet floor you can't dry in 72 hours.
After any path, leave the cabinet open until wood reads dry. Musty cabinets under a kitchen sink often trace to slow hidden leaks, so a broader under-sink plumbing check beats fixing the same symptom twice. You've already done the hard part if water is off and the leak type is clear.
Match the row, swap the part, test twice, and sleep without a bucket under the pipe.
