
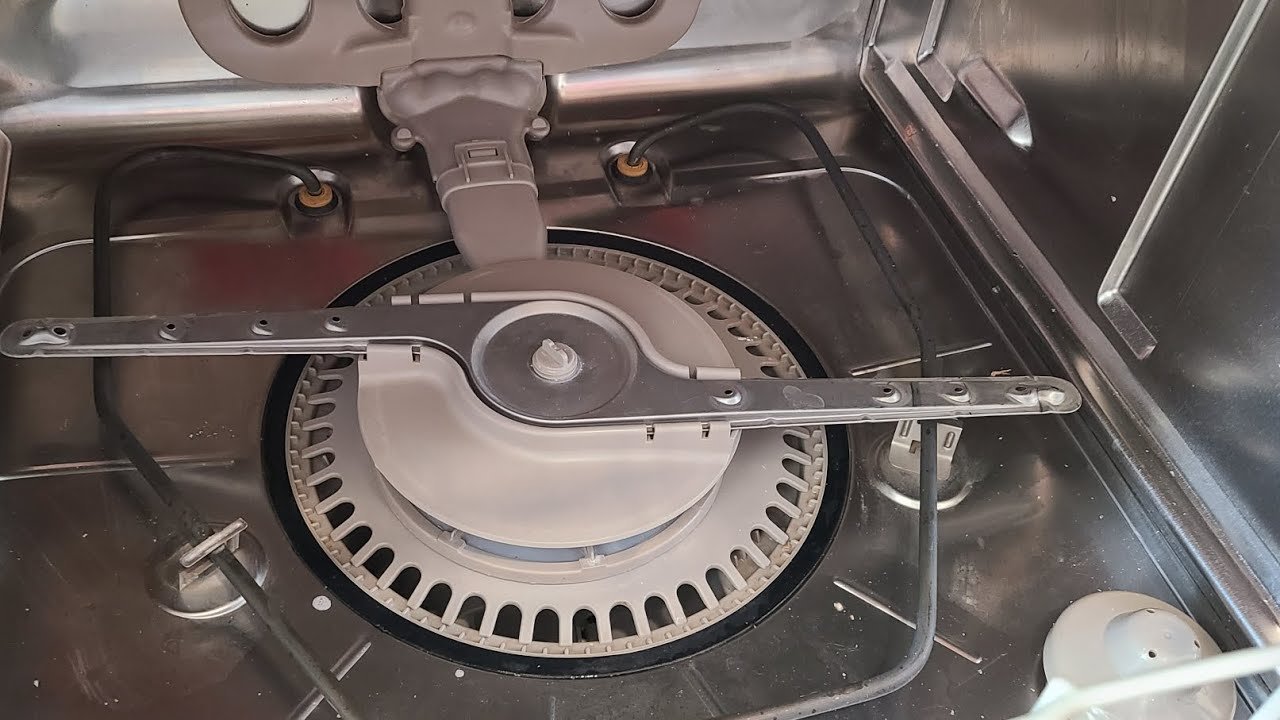
Your Kenmore dishwasher depends on a hidden mesh filter to trap food debris and keep recirculated water clean. When that screen clogs with grease and particles, water flow drops, dishes come out gritty, and the motor works harder than it should. Cleaning the filter is a 15‑minute task that restores performance, eliminates musty odors, and can prevent expensive service calls. This guide covers every Kenmore filter style, the exact removal steps, deep‑cleaning techniques, and a maintenance schedule that fits your household.
Why a Clean Filter Matters for Performance and Energy Use
The filter sits in the sump under the lower spray arm. It catches scraps before they can be pumped back onto your glasses. When the mesh is blocked, water struggles to reach every dish, cycles run longer, and the pump strains. The U.S. Department of Energy notes that routine appliance maintenance helps keep energy consumption in check—a clogged dishwasher filter is a common, avoidable drain on efficiency.
Watch for these warning signs:
- Gritty plates or visible food bits after a normal cycle
- Sour, musty odor every time you open the door
- Standing water at the tub bottom after the drain phase
- Cycle times that have crept longer than the manual specifies
- A greasy film on the filter housing itself
Ignoring the screen can push debris into the pump or drain line, turning a simple cleaning chore into a costly repair.
Identify Your Kenmore Filter Configuration
Kenmore uses a manual‑clean filter on nearly all residential models sold through 2026. Knowing your exact style prevents broken plastic or a stuck assembly.
Manual‑Clean vs. Partial Self‑Clean
True self‑cleaning filters are rare in Kenmore units. Almost every model requires hands‑on washing of a removable cartridge. If your owner booklet says “never remove the filter,” you may have a hybrid design—but those still benefit from periodic inspection.
Visual Identification
- Twist‑lock cylinder: A round cup 3–4 inches wide with a knurled grip
- Flat screen with frame: A shallow rectangular or round mesh held by tabs
- Screw‑secured assembly: Two small Phillips screws at the base (common in older Kenmore Elite models)
Shine a flashlight into the lower tub to confirm which mechanism you have before you touch anything.
Gather Your Tools and Prep the Area
Most supplies are already in your kitchen. Use the checklist below.
| Item | Why It Matters |
|---|---|
| Soft toothbrush or nylon brush | Reaches mesh pores without scratching plastic |
| Mild dish soap | Dissolves grease that water alone leaves behind |
| Bowl of warm water | Soaking loosens baked‑on residue |
| Clean microfiber cloth | Dries parts and wipes the housing |
| Toothpick or tweezers | Extracts stubborn particles from tight weave |
| Phillips screwdriver (if needed) | Only for screw‑held variants |
Safety first: Cut power at the breaker or unplug the unit—an accidental start can injure hands near the spray arm. Wear rubber gloves to guard against bacteria and sharp shell fragments. Work gently; aging plastic turns brittle, and forcing a stuck part often cracks the sump cover. If the assembly resists, stop and consult your manual rather than prying.
Step‑by‑Step Filter Removal
Access the Lower Tub
Slide out the bottom rack completely and set it aside. The filter sits directly under where the lower spray arm rotates. Remove any large food chunks from the tub floor with a damp paper towel before handling the cartridge.
Twist‑Lock Release Method
Grip the cylinder firmly. Turn it counterclockwise roughly a quarter to half turn until it stops. Lift straight up. In practice, a slight wiggle helps break the seal if the rubber gasket has hardened from grease buildup.
Tabbed or Screw‑Secured Variants
For tab models, press the two side releases inward and pull upward. For screwed versions, remove the fasteners first, then lift the frame. A common mistake is yanking at an angle, which bends the mesh—keep the motion vertical.
Once the filter is out, wipe the empty housing with a cloth to catch any settled slime.
Deep‑Clean the Mesh and Housing
A quick rinse removes surface dirt, but embedded grease needs agitation.
Warm Rinse and Soap Scrub
Hold the filter under warm running water for 30–60 seconds, tilting it so flow passes through both sides. Apply a drop of dish soap to the brush and scrub the outer cup, the inner screen, and the seam where they meet. Pay special attention to the fine mesh that lies inside the cup—this is where odor hides. Rinse until the water runs clear.
Vinegar Soak for Odor and Scale
If a musty smell remains after washing, mix equal parts warm water and white vinegar in a bowl. Submerge the filter for 20–30 minutes, then lightly scrub. Vinegar neutralizes odor without leaving a chemical film and helps dissolve mineral scale.
Final Inspection
Hold the mesh to a light. You should see clearly through every pore. If globs of grease persist, repeat the brush step. Dry the filter completely with a cloth—moisture trapped during reinstall can foster mildew.
Reinstall and Run a Test Cycle
Alignment is critical. Nest the inner screen inside the outer cup if your model separates them. Place the assembly into the sump guides and twist clockwise until it locks. For snap‑type filters, press until you hear a click.
Perform a gentle tug upward; the part should not lift. Run a short empty rinse cycle to confirm no leaks appear at the base. This verification step catches misseats that could rattle loose later.
Routine Maintenance Timeline
Set a phone reminder based on your household load.
| Usage | Clean Interval |
|---|---|
| Heavy (daily) | Every 4 weeks |
| Moderate (3–5 weekly) | Every 8–12 weeks |
| Light (1–2 weekly) | Every 4–6 months |
Pair the task with another chore so it sticks. After the filter, consider cleaning the interior walls of a stainless steel tub to keep the whole chamber fresh—our guide on stainless steel dishwasher maintenance walks you through the process.
Full Dishwasher Care Beyond the Filter
The screen is one part of a larger system. Every few months:
- Pull the lower spray arm and clear blocked holes with a toothpick.
- Wipe the door gasket where food particles hide.
- Check the drain hose and garbage disposal connection for clogs.
If you maintain a second dishwasher, the same approach applies to a Frigidaire filter cleaning—the steps are very similar. Using dinnerware that is both microwave and dishwasher safe also reduces chipping that adds debris to the wash.
Troubleshooting Stubborn Problems
Odor Returns Within Days
The smell may originate past the filter. Check the drain hose and the garbage disposal connection. A dry P‑trap or biofilm under the sink can cause persistent odors; our guide on musty smells under the sink helps identify the source. Running a hot vinegar cycle can also refresh the tub.
Water Pooling After Cycle
If the screen is clean yet water remains, the blockage is downstream. Inspect the under‑sink pipe layout for kinks or clogs in the drain line. A simple air‑gap cleaning often restores flow. If the drain hose is kinked, straighten it.
Dishes Still Have Particles
Avoid overcrowding—water needs a path to every surface. Verify the inlet temperature reaches 120°F (49°C). Clean spray arms and use quality detergent. The filter cannot compensate for a broken upper arm.
Common Mistakes That Shorten Filter Life
- Running the filter through the dishwasher: It won’t strip grease from the mesh and may warp the frame.
- Using a wire brush: Abrasive bristles enlarge pores, letting food pass into the pump.
- Skipping the inner screen: The fine layer hides inside the cup; missing it leaves an odor source.
- Forcing a stuck lock: Patience and a slight twist prevent cracked sump plastic.
- Reinstalling wet: Trapped moisture breeds smell; dry the filter thoroughly first.
When to Replace the Filter Altogether
If the plastic is cracked, the mesh torn, or the twist mechanism stripped, cleaning won’t help. Order a genuine replacement from Kenmore’s official parts site—match your model number exactly. Running without a sealed filter risks pump damage and may void your warranty.
Frequently Asked Questions
How often should I clean my Kenmore dishwasher filter?
Every 1–3 months depending on usage. Daily households benefit from monthly care; light users can stretch to quarterly. Odd smells or spots are your cue to clean sooner.
Can I clean the filter in the dishwasher?
No. The mesh must be hand‑scrubbed. A machine wash cannot reach embedded grease and may deform the cartridge.
What if the filter is damaged or cracked?
Replace it. A compromised screen lets debris into the pump. Genuine parts are available from the manufacturer.
Why does my dishwasher smell even after cleaning the filter?
Odor often lives in the drain hose, door seal, or spray arms. Wipe gaskets, run a hot vinegar cycle, and check sink‑side traps.
Do I need to clean the filter if I use rinse aid?
Yes. Rinse aid reduces water spots chemically but does nothing for physical food capture. The screen still needs mechanical cleaning.
Can I run the dishwasher without the filter installed?
Never. The filter protects the recirculation system. Operating without it invites immediate clogs and warranty loss.
Conclusion
A clean Kenmore dishwasher filter is the single highest‑leverage habit for spotless dishes and a longer‑lasting appliance. Set a recurring reminder on your phone today—spend just 15 minutes each interval following the steps above. Your next load will prove the difference: quieter operation, shorter cycles, and genuinely sparkling clean dishes.
