
If you're wondering how to take pipe underneath double kitchen sink apart, you can do it safely with a few basic tools and a little planning. The P-trap is the curved section that holds water to block sewer gas, and most faults come from worn washers or seized nuts.
Manufacturer specifications and trade guidance show residential kitchen drains commonly use 1-1/2 inch trap piping, with trap seals around 2 to 4 inches, as of 2026. Gather tools, prep the cabinet, and follow the quick answer then the step-by-step.
Quick Answer
How to take pipe underneath double kitchen sink apart starts with mapping the pipes.
Place a bucket under the trap to catch water and debris.
Loosen slip nuts by hand, then use pliers to finish.
Support any garbage disposal before disconnecting it.
How to Remove Pipes Under a Double Kitchen Sink
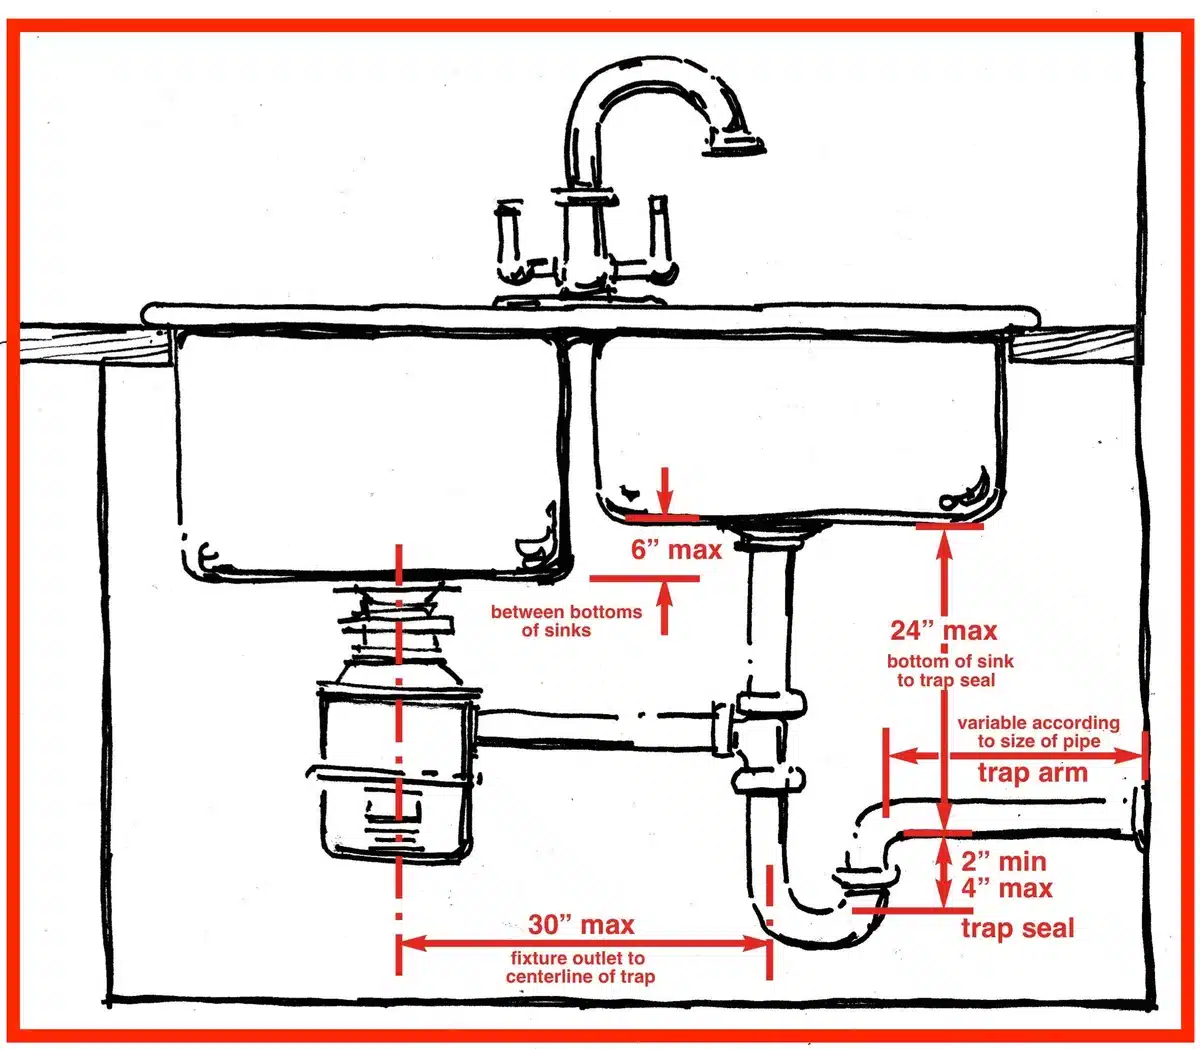
Image source: Bing (Web (fair-use with source credit))
What can go wrong, common problems and risks with double-sink drains
Many DIY attempts stall when a nut won't move. Seized threads, brittle plastic, and heavy corrosion are the usual problems. Corroded galvanized or brass traps can flake and fail during removal.
Key risks to avoid
- Electrical hazard if the garbage disposal remains powered. Turn the breaker off first and tag it. See OSHA guidance for electrical lockout basics.
- Chemical burns from recent drain cleaners. Flush thoroughly and ventilate before touching fittings.
- Cracked plastic caused by over-tightening. Hand-thread then snug with pliers only.
If you find wall penetration, advanced rust, or a mainline blockage, document your findings and get professional help. For targeted pipe repair steps, review the site's practical repair page on repair steps at https://kitchenbucks.com/broken-pipe-under-kitchen-sink/.
Tools, parts, and safety checklist (bucket, wrenches, washers, PPE, power-off disposal)
A short tools table keeps you focused. Assemble these items before you start.
| Tool or part | Purpose | Note |
|---|---|---|
| Bucket, towels | Catch water and protect cabinet | 2–3 gallon shallow bucket |
| Channel-lock pliers | Loosen slip nuts | 10–12 inch size |
| Slip-joint pliers | Small nuts and tight spots | Pair with adjustable wrench |
| Adjustable wrench | Metal fittings | 8–12 inch |
| Utility knife | Cut tape or old caulk | Sharp blade |
| Replacement washers | Replace damaged seals | For 1-1/2 inch drains |
| Gloves, safety glasses | Personal protection | Always use both |
| Flashlight/headlamp | Illumination | Hands-free recommended |
Safety steps
- Turn off the garbage disposal from the breaker. Unplugging may not cut power at the source.
- Clear the cabinet fully, so you can move and place tools.
- Lay towels to protect the cabinet floor and reduce cleanup.
- Keep replacement washers and a parts tray handy to avoid losing small pieces.
While under the sink, consider reorganizing with smart storage ideas, a useful reference is the under-counter storage guide at https://kitchenbucks.com/under-kitchen-counter-storage-ideas-2/.
Identify your setup: visual cues for disposal, dishwasher, shared tee, or two traps
A quick visual inspection tells you which workflow to follow. The photo below shows the key parts to identify.
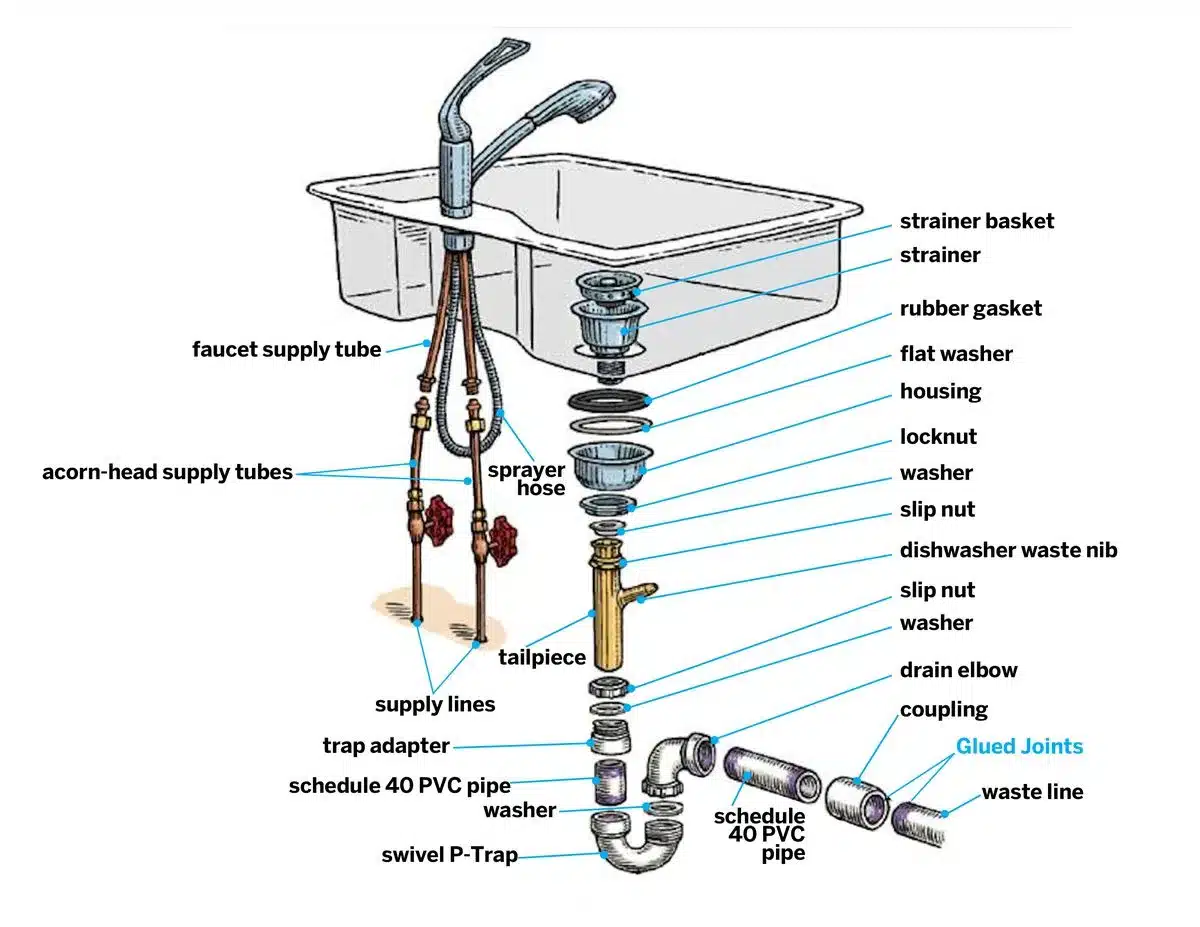
Image source: Bing (Web (fair-use with source credit))
What to look for and what it means
- Tailpiece, the straight pipe under each drain. Two tailpieces that join into one indicate a shared tee.
- P-trap, the U-shaped bend that holds water. Each basin can have its own trap or share one.
- Trap arm, the horizontal section that leads to the wall. Check its slope for proper drainage.
- Discharge elbow, the outlet from a garbage disposal. Some disposals use left-hand threads on large nuts. Support the unit before loosening.
- Dishwasher hose on a small inlet nipple. Expect some water when you remove the clamp.
- Air gap on the counter, which will have a hose under it. Disconnect that hose before you remove the trap to avoid trapped water.
Material clues
- White PVC or ABS pipes mean plastic traps and nuts, usually hand-tight.
- Chrome-plated brass looks shiny and resists surface damage, though threads can corrode.
- Dull, rusty pipes are galvanized or cast-iron and often need cutting. If you see heavy rust near the wall, plan for replacement.
If you spot mold or recurring leaks, check cleanup and remediation guidelines at https://kitchenbucks.com/black-mold-under-kitchen-sink/.
Prep the workspace: cabinet protection, bucket placement, and disposal support
Spend ten minutes on setup, and the job goes faster.
Prep checklist
- Remove all items from the cabinet and sweep out debris.
- Place a shallow bucket under the lowest joint and set towels around it. Use a small tray for nuts and washers.
- Turn off disposal power at the breaker, and leave the breaker off until reassembly is complete.
- Lay out tools in order of use, so you do not reach awkwardly under the cabinet.
Support tips
- Use a block of wood or have an assistant hold the disposal when loosening the discharge nut. Do not let the unit hang by hoses or wires.
- If you expect stuck nuts, apply penetrating oil and let it sit while you set up. Ten minutes of soak time often helps.
Before loosening anything, photograph the setup from multiple angles. Photos are invaluable when aligning parts during reassembly and when ordering replacements.
Quick decision points before you loosen anything
If slip nuts turn easily by hand, proceed with the standard removal steps.
If metal nuts stay stuck after penetrating oil, plan to cut and replace the section.
If you see heavy corrosion at the wall connection, call a plumber to avoid wall or floor damage.
Code and vent note
Local plumbing codes set trap and vent requirements. For code direction and reference, consult the International Code Council at https://www.iccsafe.org.
Step-by-step: removing the P-trap and trap arm (visual checkpoints for each step)
Turn off the disposal breaker, position the bucket under the trap, and keep towels handy. Hand-loosen nuts first, then use pliers.
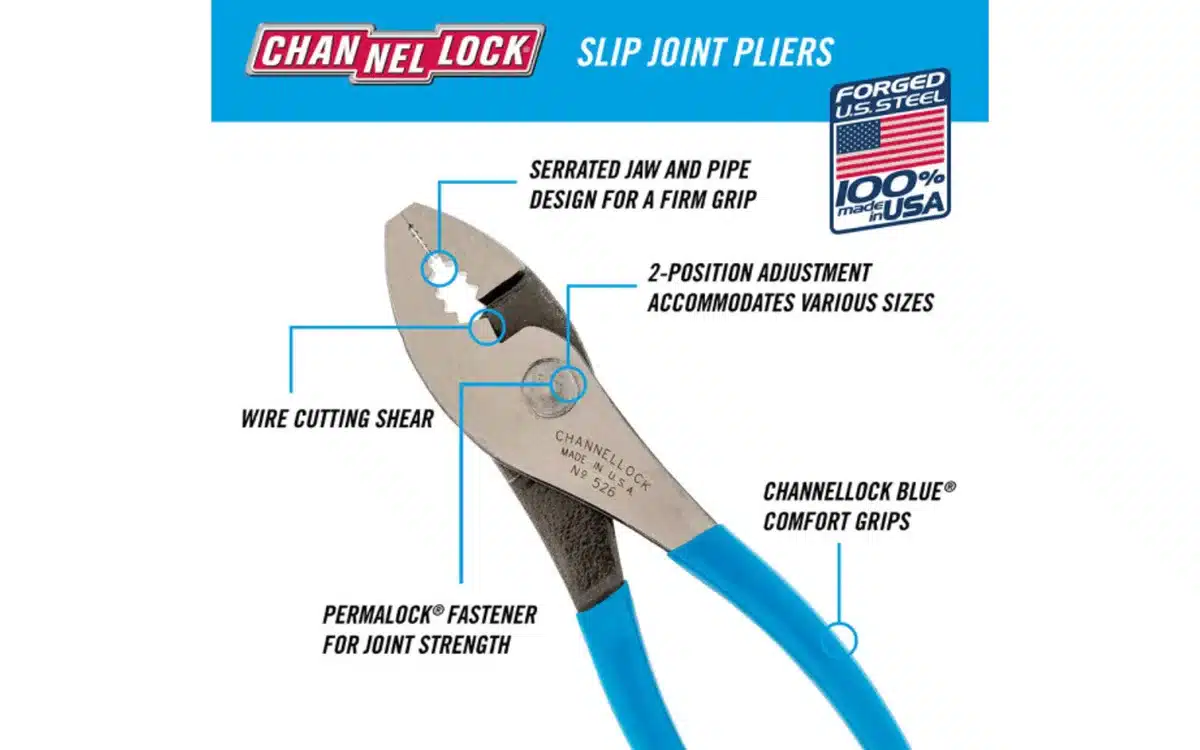
Image source: Bing (Web (fair-use with source credit))
Step-by-step, compact
- Remove the dishwasher hose clamp if present, and pull the hose off the inlet. Expect a small spill.
- Hold the trap steady and unscrew the slip nut at the trap outlet where it meets the trap arm. Turn the nut counterclockwise.
- Loosen the nut at the trap inlet where it meets the tailpiece, lower the trap into the bucket, and empty its contents.
- If the trap arm runs into a tee or wall adapter, loosen that slip nut and slide the arm out. Inspect the end for corrosion and gasket residue.
Visual checkpoints
- Tailpiece end clean and straight signals a normal slip-joint.
- Cone washer small-end seating inside the trap inlet means correct orientation.
- Large clumps of grease or foreign objects in the trap mean you need a thorough clean.
If a nut turns but the joint does not separate, stop and photograph the connection. For stubborn nuts, apply penetrating oil, wait, and work the nut back and forth gently.
Removing pipes for specific configurations (decision branches)
Work differently depending on whether you have two traps, a shared tee, or a disposal on one side.
Two separate P-traps
- Action, remove only the affected trap. This isolates the job and keeps the other sink usable.
- Tip, clean and reinstall the other trap if its washer shows wear.
Shared trap and tee
- Action, remove the single trap and inspect the sanitary tee for lodged debris. Expect a larger spill.
- Tip, check the tee outlet to the wall for corrosion before reassembly.
Disposal on one side
- Action, support the disposal and remove the discharge elbow nut. Some nuts have left-hand threads, so try the opposite direction if the nut won’t move.
- Tip, do not pull the disposal by its cord. Restore power only after secure reassembly and testing.
If you find a damaged wall outlet or a venting issue, consult a licensed plumber for rework and code compliance.
Inspect, clean, and decide: what to replace (washers, nuts, trap arm, whole trap)
Replace any rubber washer that looks cracked, flattened, or hard. Replace traps that show stress cracks, pinhole leaks, or heavy corrosion.
Inspection checklist
- Washers, cone and flat types, check for hardness or deformation. Replace if defective.
- Slip nuts, look for stripped threads or rounded flats. Replace damaged nuts.
- Tailpieces, ensure no dents or kinked ends that prevent sealing. Replace if bent.
- Trap body and trap arm, replace if brittle or heavily corroded.
Cleaning steps
- Dump solids into the bucket and scrub the trap with a bottle brush and hot water.
- Use a mild degreaser for oil and grease, avoid handling while caustic drain cleaners remain in the pipes.
- Rinse parts thoroughly before reassembly.
Material choice guidance
- Plastic traps are inexpensive and resist corrosion, making future service easier.
- Brass or chrome traps are more durable and can be preferable where visible or where durability matters.
- Consider the wall outlet condition before changing materials.
A typical plastic trap costs $10 to $30, brass traps run $25 to $60. For more grease-cleanup approaches tied to under-sink work, see the grease cleanup guide on the site at https://kitchenbucks.com/best-way-to-clean-grease-off-kitchen-cupboards-2/.
Reassembly and leak-testing: washers, hand-tighten rules, and torque cues
Hand-thread every slip nut first, then tighten only a small amount with pliers. Over-tightening flattens washers and causes leaks.
Reassembly steps
- Insert new cone or flat washers properly, cone small-end toward the tailpiece.
- Hand-tighten nuts until snug. Ensure the trap aligns without sideways pressure on the washers.
- Tighten plastic nuts a quarter to a half turn past hand-tight. Tighten metal nuts a half to three quarters turn. Do not force.
Leak-testing
- Run cold water for one minute while watching each joint for drips.
- Run both sinks together to check shared tees and crossover flow.
- Let water stand in the trap for several minutes, then recheck joints.
Check trap arm slope, keep about 1/4 inch fall per foot to the wall to maintain flow and avoid standing water in the arm.
Troubleshooting sticky fittings, seized nuts, and persistent odors
Apply penetrating oil and wait ten to fifteen minutes, then try gentle back-and-forth turns. If that fails, cut and replace the affected section.
Steps for stuck metal
- Spray penetrating oil on the threads, wait, then use channel-locks with steady pressure.
- Use heat cautiously on metal only, avoid heating plastic, nearby finishes, and the disposal.
- If the nut breaks or threads strip, cut the trap and install a new trap assembly.
Fixing persistent sewer gas
- Refill the trap by running water for a minute, then test for leaks.
- Check dishwasher hose routing for a high loop or air gap to prevent backflow.
- If odors persist, venting may be blocked and requires professional clearing.
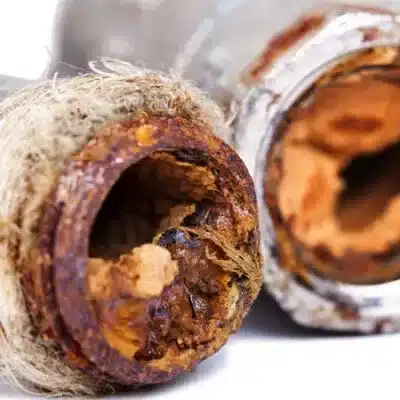
Image source: Bing (Web (fair-use with source credit))
If you see heavy corrosion at the wall, stop cutting and call a licensed plumber to avoid making matters worse.
When to call a licensed plumber, corrosion, vents, sewage backup, or code changes
Call a licensed plumber when you encounter heavy corrosion that risks wall damage, or when sewage backs up past the trap. Call a pro for reworking vents, soldering copper, or any code-impacting reroute.
If you lack access to proper cutting tools, or if a repair would open the wall, professional service protects your home and ensures code compliance.
Time estimates and typical costs (parts pricing, how long each repair usually takes)
Simple trap removal and cleaning, 15 to 45 minutes, parts under $30.
Replacing a trap or trap arm, one to three hours, parts $10 to $60.
Cutting and repiping a corroded run, one to four hours, parts and labor $50 to $200 plus as needed.
For general home projects and seasonal upkeep, the site blog has related posts at https://kitchenbucks.com/blog/, useful for planning small repairs.
Photo checklist and visual guide to document before/after (what to photograph and why)
Take these images before you begin to speed reassembly and parts ordering
- Wide shot of the cabinet underside showing both drain lines and the disposal.
- Close-up of each slip nut and washer to capture thread and gasket condition.
- Photo of the disposal mounting, serial plate, and discharge elbow.
- Close-up of corroded threads or wall penetration.
- Image of the dishwasher hose and any air gap or high loop.
Photos help avoid mistakes, and they are useful if you need a parts match or to share with a professional.
Frequently Asked Questions
How long does a typical trap removal take?
Most straightforward trap removals take 15 to 45 minutes, including cleanup. If the slip nuts are seized, add 30 to 90 minutes for penetrating oil time and possible cutting. Replacement of corroded sections or rework behind the wall can add several hours and may require a plumber.
Can I swap a corroded metal trap for plastic?
Yes, you can replace a corroded brass or galvanized trap with PVC or ABS in most cases. Confirm the wall outlet is intact. Use the correct 1-1/2 inch trap size and maintain proper trap arm slope.
Plastic resists corrosion and usually simplifies future maintenance.
What if the slip nut strips or breaks during removal?
If a slip nut strips or breaks, photograph the joint, cut out the damaged section, and install a new trap assembly. Cutting may be done with a hacksaw or reciprocating saw. If the wall outlet or vent is involved, call a plumber for safe replacement and code compliance.
How do I stop sewer gas after reassembly?
Refill the trap by running water for one minute, then inspect all joints for leaks. Replace faulty washers and reseat nuts carefully, hand-tight then snug. If the smell persists, check for blocked vents or multiple dry traps and consult a plumber for vent inspection.
Is it safe to work near the garbage disposal?
Only if the disposal power is off at the breaker. Turn the breaker off and confirm no power at the outlet. Support the disposal before loosening the discharge nut, and never let the unit hang by hoses or the electrical cord.
When is a professional required for sink drain work?
A professional is required for heavy corrosion at wall penetrations, mainline sewage backups, blocked vents, or any job that requires cutting copper and soldering. Also hire a plumber if the repair affects code compliance or structural elements.
Final Recommendation, decision guide for DIY or pro
If the work is cleaning a trap, replacing washers, or swapping a plastic trap, you can do it yourself with basic tools. If you find heavy corrosion, wall damage, sewage backup, or vent issues, hire a licensed plumber. Document the layout with photos, keep spare washers on hand, and test thoroughly after reassembly.
