
You want homemade donuts right now, but there's no donut pan in your kitchen. That single missing tool stops most people before they start. It shouldn't.
Warm, fluffy donuts with that perfect golden crust are absolutely achievable with tools you already own — a glass, a cookie cutter, or even just your hands. This guide covers every method, the exact dough formula, and the frying or baking techniques that deliver bakery-quality results. No special equipment required.
Why You Don't Need a Donut Pan
A donut pan is a convenience, not a necessity. Before dedicated pans became common, home bakers shaped and fried donuts by hand for generations. The pan only helps with even baking in an oven; if you plan to fry (which gives superior texture anyway), the pan is irrelevant.
The real key is proper dough handling, correct oil temperature, and a reliable shaping method. Master those three things, and your donuts will turn out beautifully every time, pan or no pan.
Best Alternative Shaping Tools
Almost every kitchen has at least one of these items. Choose based on what you have on hand and how uniform you want your donuts to be.
Round Cookie or Biscuit Cutter
This is the most reliable alternative. Use a 3 to 3.5-inch round cutter for the outer ring, and a 1-inch cutter (or a clean bottle cap) for the center hole. On a lightly floured surface, press straight down without twisting — twisting seals the edges and prevents the donut from rising evenly.
For a thorough visual walkthrough of shaping dough by hand and with cutters, see this dedicated guide on shaping rings without a specialty pan.
Drinking Glass or Mason Jar Rim
If you don't have dedicated cutters, a standard drinking glass works for the outer circle. A shot glass or the small end of a piping tip handles the center hole. Dip the glass rim in flour before each cut to prevent sticking.
Freehand Shaping
Freehand shaping gives rustic, irregular donuts that look genuinely homemade. Roll the dough into a snake about 3/4 inch thick, pinch the ends together to form a ring, and gently stretch it to the size you want. The slight inconsistencies in shape fry evenly as long as the thickness is uniform.
Aluminum Foil Rings
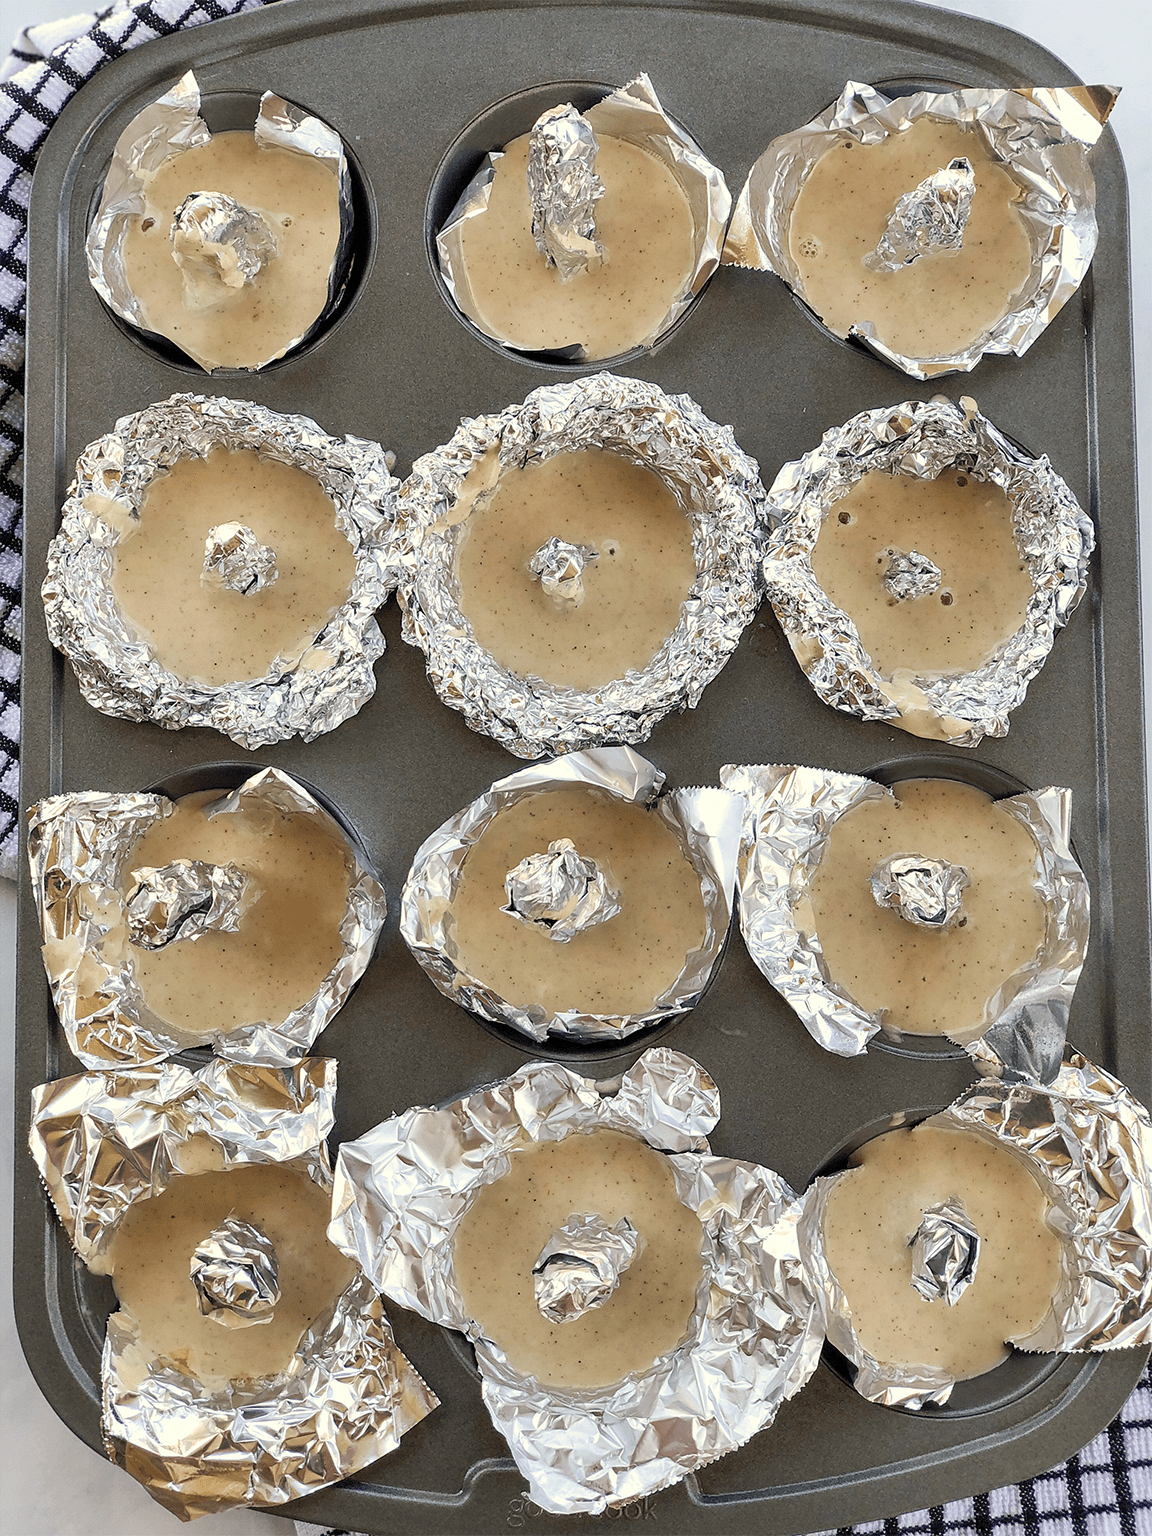
For baked donuts on a flat sheet tray, form rings out of double-layer aluminum foil. Shape each ring to about 3 inches outer diameter and press it onto a parchment-lined baking sheet. Spoon or pipe batter into the foil rings, then remove them after baking. This method produces the cleanest baked donut shape without a pan.
The Right Dough Recipe for Pan-Free Donuts
The best dough for pan-free donuts is one that holds its shape during frying or baking. This recipe delivers a tender crumb with enough structure to keep the ring intact.
Basic Yeast Dough
| Ingredient | Amount |
|---|---|
| All-purpose flour | 3 ½ cups (440g) |
| Active dry yeast | 2 ¼ teaspoons (one packet) |
| Warm milk (110°F) | ¾ cup |
| Granulated sugar | ¼ cup |
| Large egg | 1 |
| Unsalted butter, softened | 3 tablespoons |
| Salt | 1 teaspoon |
Steps:
- Activate the yeast. Combine warm milk and sugar in a small bowl. Sprinkle yeast on top and let it sit for 5–7 minutes until foamy. If it doesn't foam, your yeast is dead — start fresh.
- Mix dry ingredients. In a large bowl, whisk flour and salt.
- Combine wet and dry. Add the yeast mixture, egg, and softened butter. Mix until a shaggy dough forms.
- Knead. Turn the dough onto a floured surface and knead for 8–10 minutes until smooth and elastic. The dough should feel soft and slightly tacky, not sticky.
- First rise. Place in a greased bowl, cover with plastic wrap, and let rise in a warm spot for 1–2 hours until doubled in size.
- Punch down and shape. Roll the dough to ½-inch thickness, cut your rings, and place them on a parchment-lined tray for a second rise of 30–40 minutes.
A common mistake at this stage is rolling the dough too thin. Half an inch is the sweet spot — any thinner and your donuts will be dense and flat; any thicker and the center may not cook through.
Quick Baking Powder Version (No Yeast)
If you want donuts in under an hour, use a baking powder version. The texture is closer to a cake donut — denser but still tender.
| Ingredient | Amount |
|---|---|
| All-purpose flour | 2 cups (250g) |
| Baking powder | 2 teaspoons |
| Sugar | ½ cup |
| Salt | ½ teaspoon |
| Milk | ½ cup |
| Egg | 1 |
| Melted butter | 2 tablespoons |
| Vanilla extract | 1 teaspoon |
Mix dry ingredients in one bowl, wet in another, combine until just incorporated. Do not overmix — a few lumps are fine. The batter will be thicker than pancake batter but softer than yeast dough. For baked donuts, pipe this batter directly into your foil rings or a greased muffin tin with the center dented in using the back of a spoon.
Frying vs. Baking: Which Method Wins?
Both methods produce excellent donuts, but they serve different preferences.
Frying
Frying creates the classic donut texture: a crispy, golden-brown exterior with a soft, airy interior. The Maillard reaction and caramelization happen fast, giving you deep flavor in about 90 seconds per side.
Oil temperature is everything. Use a deep-fry or candy thermometer and maintain 350°F–365°F. Below 340°F, the donuts absorb oil and become greasy. Above 375°F, they burn on the outside before the inside cooks. Fry no more than three donuts at a time in a standard pot to avoid dropping the oil temperature.
Use vegetable, canola, or peanut oil. Avoid olive oil (low smoke point) or coconut oil (imparts flavor). Drain fried donuts on a wire rack, not paper towels — paper traps steam and softens the crust.
Baking
Baked donuts are lighter in fat and calories, with a texture closer to a muffin or cake. They require a preheated 375°F oven and 9–11 minutes of baking time. Without a pan, your foil rings or muffin tin are essential.
The trade-off is crust quality. Baked donuts will never develop the same crunchy exterior as fried ones. To compensate, brush them with melted butter immediately after baking, then dip in cinnamon sugar or glaze while still warm — the butter helps the coating adhere and adds richness.
For easy cleanup after baking, the same technique you use for cleaning aluminum pots and pans works well on baking sheets with stubborn caramelized sugar spots.
Step-by-Step Shaping and Cooking Process
Yeast Donuts (Frying)
- Roll risen dough to ½-inch thickness on a floured surface.
- Cut outer rings with a 3-inch cutter, then punch out centers with a 1-inch cutter. Reserve the holes to fry as donut holes.
- Arrange rings on a floured baking sheet, cover loosely, and let rise 30 minutes.
- Heat oil to 350°F in a heavy-bottomed pot (at least 3 inches deep).
- Fry 2–3 donuts at a time. Cook 45–60 seconds per side until deep golden.
- Transfer to a wire rack. Let cool just enough to handle, then glaze or coat.
Cake Donuts (Baking)
- Preheat oven to 375°F.
- Shape foil rings on a parchment-lined baking sheet (or grease a muffin tin).
- Pipe or spoon batter into rings, filling halfway.
- Bake 9–11 minutes until the edges are golden and a toothpick comes out clean.
- Cool 2 minutes in the rings, then remove to a wire rack.
- Glaze or coat while still warm.
Glazes, Toppings, and Decorating
The glaze is what transforms a good donut into a memorable one. Apply it while the donuts are still warm — the heat helps the glaze set in a thin, even layer.
Simple Vanilla Glaze
- 1 ½ cups powdered sugar, sifted
- 2 tablespoons milk (or buttermilk for tang)
- ½ teaspoon vanilla extract
Whisk until smooth. Dip the top of each warm donut and let excess drip off. Set on a rack for 10–15 minutes to set.
Chocolate Glaze
- 1 cup powdered sugar
- 2 tablespoons cocoa powder
- 2 tablespoons milk
- 1 tablespoon melted butter
Whisk thoroughly. For a richer version, melt 4 ounces of semi-sweet chocolate with 2 tablespoons of butter and 1 tablespoon of corn syrup, then dip.
Topping Ideas
- Cinnamon sugar (½ cup sugar + 1 tablespoon cinnamon) — toss warm donuts in a bag with the mixture
- Crushed toasted nuts
- Shredded coconut (toast it first for better flavor)
- Rainbow sprinkles — apply immediately after glazing before the glaze sets
For a festive presentation, you can match your decorating approach to a party theme just as you would choose the right shade for cabinet makeovers — think seasonal colors, edible glitter for celebrations, or cocoa dusting for a sophisticated finish.
Troubleshooting Common Problems
Donuts came out greasy. The oil was too cold. Check that you're frying at 350°F–365°F and not overcrowding the pot.
Donuts are dense and heavy. The dough was overworked or the yeast didn't activate properly. Knead only until smooth, and always proof your yeast first.
Center hole closed up during frying. The dough was too soft or the second rise was too long. Keep the second rise to 30–40 minutes and handle rings gently when transferring to oil.
Baked donuts stuck to the foil. The foil wasn't greased. Spray the inside of your foil rings with nonstick spray before adding batter.
Uneven browning when frying. Your oil depth may be too shallow. Use at least 2–3 inches of oil so the donuts float freely without touching the bottom of the pot.
Storage and Freshness
Fresh donuts are best the day they're made. If you need to store them:
- Room temperature: Place in an airtight container lined with paper towels for up to 2 days. The paper towels absorb excess moisture. Replace them daily.
- Freezing (unfried dough): After shaping and the second rise, freeze the rings on a tray, then transfer to a freezer bag. Fry directly from frozen, adding 30–45 seconds per side.
- Freezing (finished donuts): Freeze unglazed donuts in a single layer. Thaw at room temperature, then warm in a 300°F oven for 5 minutes before glazing.
Never refrigerate donuts — cold temperatures accelerate staling and dry out the crumb.
Final Tips for Consistent Results
- Use a kitchen scale for flour measurements. Volume measurements (cups) vary widely; 3 ½ cups can mean anywhere from 400g to 500g depending on scooping method. The difference ruins the dough.
- Maintain consistent room temperature during rising. A drafty kitchen slows yeast activity. Use your oven with the light on (no heat) as a proofing box.
- Test your oil temperature before every batch. Even experienced cooks see temperature swings after adding cold dough.
- If you regularly clean your ceramic cooktop after frying, you already know why a splatter screen is worth using during the frying process.
Conclusion
Making donuts without a donut pan is not a compromise — it's a return to the traditional method that produced some of the best donuts long before specialty bakeware existed. A glass, a cutter, or your own hands, combined with the right dough and correct oil temperature, will give you donuts that rival any bakery.
The only real requirement is a willingness to get your hands floured and your oil hot. Everything else is just technique, and now you have all of it. Pick your shaping method, mix up a batch, and enjoy fresh homemade donuts within an hour — no pan needed.
Homemade donuts are best enjoyed the same day. Experiment with glazes and toppings, and don't forget to fry the holes for a bonus batch of bite-sized treats. For cleaning up after a frying session, a reliable homemade cleaner cuts through grease faster than store-bought alternatives — follow a simple degreaser recipe to keep your stovetop and counters spotless without harsh chemicals.
And if after all this you find yourself wanting more baking inspiration beyond donuts, browse the latest ideas on the blog for seasonal treats, kitchen tips, and creative twists on classic recipes.
