
If your dishwasher leaves dishes cloudy or smells, here is how to clean the inside of a stainless steel dishwasher and stop the problem fast. Start with a short inspection, then clean the filter and spray arms, wipe seals, and run a targeted hot cycle to remove scale and grease.
Manufacturer specifications confirm many sanitize cycles reach about 150°F, which helps loosen grime and reduce bacteria. Aggregate user guidance as of 2026 favors citric acid for descaling over repeated strong vinegar. Read the quick answer next, then follow the stepwise workflow.
Quick Answer
how to clean the inside of a stainless steel dishwasher, start with the filter.
Remove and clean spray arms and wipe the gasket.
Run a hot, empty cycle with citric acid powder.
Finish with a baking soda rinse to refresh the smell.

Problem / common pain points you’ll see (smell, scale, film, mold, rust)
You will usually find one of five problems. Sour or rotten odors point to trapped food in the filter or sump. White chalky deposits on the tub or element mean hard-water scale.
Greasy film on walls or glassware shows oil or incomplete detergent rinsing. Black spots along the gasket indicate mold or mildew. Rust specks signal chipped rack coating or iron in water.
Each sign changes the cleaning path you take.
What’s inside a stainless-steel dishwasher that matters for cleaning (filters, spray arms, gasket, heating element)
Key parts hide soils and need inspection: the removable filter, spray arms, door gasket, detergent dispenser, heating element, racks, and drain/sump. Filters trap solids and cause most odors. Spray arms with clogged nozzles reduce cleaning coverage.
Tubs are usually stainless steel 304 or 430, with 304 more corrosion resistant. Seals are often EPDM rubber or silicone, and EPDM can degrade with strong acids. Heating elements may be exposed or concealed, which affects safe cleaning access.
| Component | Why it matters |
|---|---|
| Filter assembly | Traps food, source of smells |
| Spray arms | Nozzle clogs reduce water distribution |
| Door gasket | Mold accumulates in folds |
| Heating element | Scale buildup affects heating and drying |
| Drain and sump | Biofilm causes persistent odors |
Inspection checklist — how to diagnose the specific problem (smell, white scale, black gunk, rusty specks)
Turn the dishwasher off and open the door. Smell the interior for sour or musty odors. Pull the bottom rack and inspect the filter, drain, and sump for food or sludge.
Spin the spray arms by hand and look for clogged holes. Check the gasket for black spots and sticky residue. Scan the tub and element for white scale or rust spots.
Note each finding before you pick a cleaning branch.
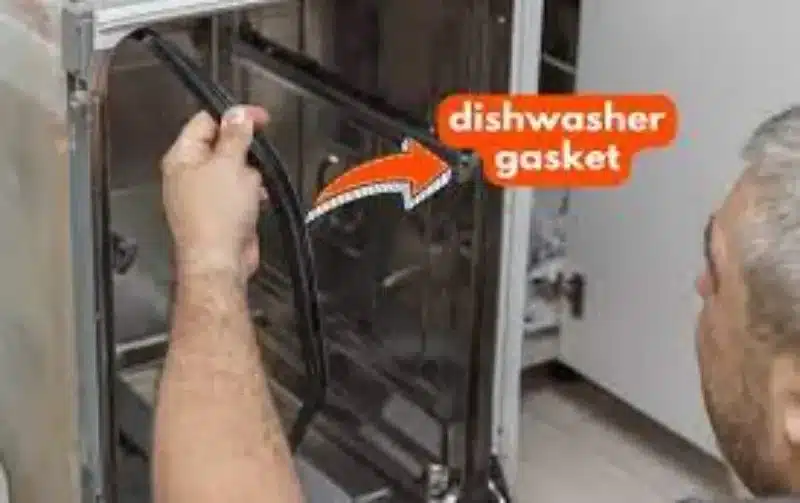
This photo shows the gasket folds where mold and debris often collect, the exact place to scrub.
Decision workflow: pick the right cleaning path (routine refresh vs odor/grease vs scale vs mold vs rust)
If you find trapped food or a rotten smell, start with the filter clean and a hot citric-acid cycle. If you find white mineral deposits, prioritize descaling. If there is greasy film, do a soapy interior wipe then run a degreasing or citric cycle.
If you see mold on seals, scrub with 3% hydrogen peroxide and dry the area.
Decision table
| Problem | First action | Follow-up |
|---|---|---|
| Rotten smell | Clean filter and sump | Citric acid hot cycle |
| White scale | Descale with citric acid | Repeat if needed |
| Greasy film | Wipe tub and racks | Hot degreasing cycle |
| Black gasket mold | Scrub with 3% hydrogen peroxide | Air-dry door open |
| Rust spots | Treat with non-abrasive cleaner | Inspect rack coating |
If the drain backs up or odors persist after these steps, the issue may be in the drain hose, trap, or garbage disposal. Call a plumber if you cannot clear the blockage.
Tools, cleaners, and chemicals that are safe for stainless tubs
Use chemistry that removes scale and grease without harming metal or seals. Citric acid powder, baking soda, mild dish soap, 3% hydrogen peroxide, and non-abrasive stainless cleaners are safe when used correctly.
Avoid concentrated chlorine bleach on stainless because free chlorine can pit the passive layer. Avoid frequent full-strength vinegar on EPDM seals because acetic acid can weaken rubber. Manufacturer guides and aggregate reviews as of 2026 favor citric acid for routine descaling.
Tools and materials table
| Tool or cleaner | Use |
|---|---|
| Soft-bristle brush | Scrub gasket and filter |
| Microfiber cloth | Wipe tub and door |
| Citric acid powder | Descale mineral deposits |
| Baking soda | Deodorize after cleaning |
| 3% hydrogen peroxide | Treat gasket mold |
| Toothpick or interdental brush | Clear spray-arm holes |
Safety reminders
- Wear gloves and eye protection when handling concentrated cleaners.
- Never mix bleach with acids or peroxide.
- Check the owner’s manual for any banned products to avoid voiding warranty.
Step-by-step routine clean (weekly filter, monthly empty-cycle descaling, quick wipe routine)
Keep the routine short and consistent to prevent buildup.
Weekly, 10 minutes
- Rinse the filter and clear visible debris.
- Wipe the door gasket and inner door edge.
- Run a quick rinse after heavy, greasy loads.
Monthly, 30 to 60 minutes
- Remove and deep-clean the filter.
- Clear spray-arm holes and the drain area.
- Run an empty hot cycle with 1 to 2 tablespoons citric acid.
- Finish with 1 cup baking soda on the bottom and a short hot rinse.
How to run a safe citric-acid cycle
- Place 1 to 2 tablespoons citric acid in the detergent cup or a small bowl on the bottom rack.
- Select the hottest, longest normal cycle and run the dishwasher empty.
- Inspect the tub afterward and repeat once if scale remains.

This shows the measured dose used for a typical descaling cycle.
Remove, clean, and reinstall the filter safely
Turn power off if you will reach near wiring or the element. Pull the bottom rack to access the filter.
Filter cleaning steps
- Unlock and lift out the filter, noting its orientation.
- Rinse under hot water and scrub with a soft brush to remove trapped solids.
- Soak heavily clogged filters 15 to 30 minutes in warm soapy water, then scrub and rinse.
- Check the rubber O-ring and mating surfaces for damage and replace the filter if torn.
Reinstall and test
- Dry the filter before reinstalling and secure any twist-locks.
- Run a short rinse and listen for unusual noise, which can indicate misalignment.
- If the filter resists seating, consult the manual rather than forcing it, to avoid damaging the seal.
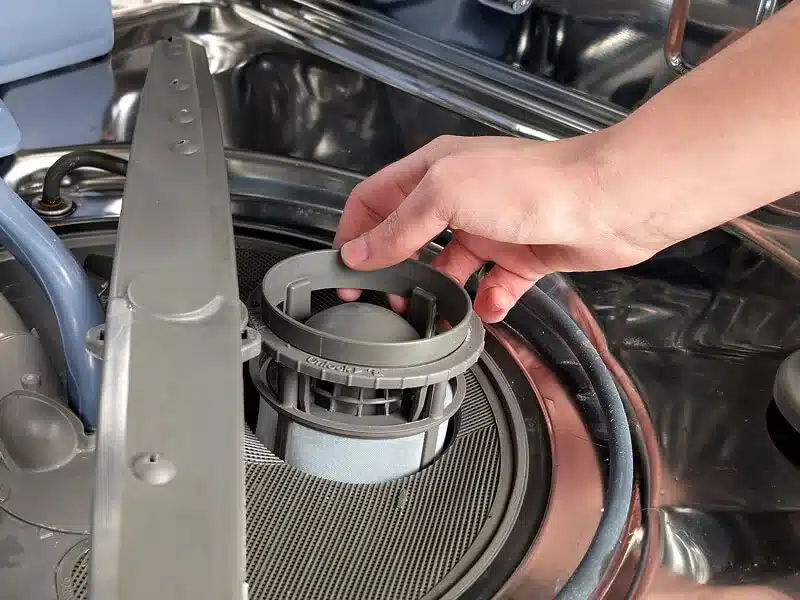
This close-up highlights the mesh and O-ring areas that trap food.
Clear and test spray arms and drain openings
Clogged spray arms are a common reason for poor washing results. Remove arms if your model allows.
Spray-arm cleaning
- Remove upper and lower spray arms when possible.
- Rinse and clear nozzle holes with a toothpick or interdental brush.
- Spin the arm by hand to ensure it turns freely.
- Check for cracks or mineral buildup at bearings.
Drain and garbage-disposal check
- Clear visible debris from the drain opening and sump.
- If the dishwasher drains into a garbage disposal, run the disposal with water to clear solids.
- If the drain still backs up, the clog may be in the trap or hose. Call a plumber for blockages you cannot clear.
Test run
- Reinstall arms and racks, then run a short hot rinse.
- Confirm water exits cleanly into the disposal or household drain.
- If arms fail to spin, recheck nozzles and mounting clips.
Wiping the tub, door, and detergent dispenser correctly
Use mild soap and soft cloths to remove film without scratching stainless.
Tub and door
- Mix warm water and a few drops of mild dish soap.
- Wipe the interior with a microfiber cloth, following the grain of the finish.
- Rinse the cloth and dry the surfaces to prevent spots.
Detergent drawer and dispenser
- Remove loose powder and caked residue with a damp cloth.
- Use a soft brush to clean corners and the latch area.
- Dry thoroughly before closing the dispenser.
Gasket care
- Apply 3% hydrogen peroxide to a soft toothbrush and scrub gasket folds.
- Rinse with a damp cloth and dry the seal.
- Leave the door cracked between cycles to reduce moisture.
Targeted fixes — follow the branch for your problem
Follow the exact fix that matches your inspection finding.
Sour odor and greasy film
- Remove and deep-clean the filter.
- Wipe the tub and racks with warm soapy water.
- Run a hot empty cycle with 1 to 2 tablespoons citric acid, then finish with 1 cup baking soda to deodorize.
Hard-water scale and white crust
- Remove debris from filter and spray arms.
- Run a citric-acid descaling cycle on the hottest setting.
- Repeat once for heavy scale, then wipe affected areas.
Mold on gaskets
- Scrub gasket folds with a soft brush and 3% hydrogen peroxide.
- Rinse and dry, then leave the door cracked after cycles.
- Repeat weekly until mold stops returning.
Rust spots and iron stains
- Use a non-abrasive stainless cleaner with oxalic acid or a similar formulation.
- Apply with a soft cloth, rub gently, rinse, and dry.
- Inspect and repair chipped rack coating to prevent further flakes.
Clogged drain or garbage-disposal issues
- Clear visible debris and run the disposal with water.
- If water still backs up, the blockage may be in the hose or trap.
- Call a plumber if you cannot clear the clog safely.
Mistakes to avoid (what scratches, corrodes, or voids warranties)
Never use steel wool or metal scouring pads on stainless. They scratch the finish and leave iron particles that rust. Use soft brushes and cloths only.
Do not use chlorine bleach on the stainless tub. Bleach can damage metal and seals. Use 3% hydrogen peroxide on gaskets for mold instead.
Avoid pouring full-strength vinegar into the bottom frequently. Repeated strong acetic acid exposure can degrade rubber seals. Always check the owner’s manual for banned products.
Never mix cleaners. Mixing bleach with acids or peroxide creates toxic gases and hazardous reactions. Follow label safety instructions.
Safety, warranty, and compliance tips
Turn power off before working near wiring or exposed elements. If you cannot safely access a component, stop and call service.
Read the owner’s manual for approved cleaners and service warnings to avoid voiding warranty. Photograph preexisting damage before deep cleaning to document the appliance condition.
Follow label PPE guidance for concentrated descalers. Wear gloves and eye protection and ventilate the area. For chemical handling basics, refer to OSHA guidance on chemical safety at OSHA chemical safety guidance.
Dispose of unused concentrated cleaners per label and local regulations. Do not pour concentrated chemicals into storm drains or open soil.
Maintenance plan and schedule you can stick to (weekly, monthly, seasonal checklist)
Keep this simple routine and you will prevent most problems.
Maintenance schedule
| Interval | Tasks |
|---|---|
| Weekly | Rinse filter, wipe gasket, quick debris check |
| Monthly | Deep-clean filter, clear spray arms, citric-acid cycle |
| Quarterly | Inspect racks, treat small rust spots, deodorize |
| As needed | Treat mold, clear drain clogs, call tech for leaks |
Practical maintenance tips
- Store a cleaning kit under the sink with citric acid, cloths, and a soft brush.
- Run a hot rinse after greasy or heavy loads.
- Use rinse aid to reduce spotting in hard-water areas.
- For related kitchen upkeep, see guidance on cleaning greasy cabinets and floors at these practical references: "greasy-cabinet cleaner guide" and "cleaning floors tips".
, greasy-cabinet cleaner guide
When to call a pro or service technician
Call a technician for leaks, electrical faults, or persistent odors after full cleaning. Those problems can indicate failed pumps, blocked drain lines, or damaged seals that need repair.
Contact a plumber if you cannot clear a drain hose or trap blockage. Avoid DIY plumbing fixes if you lack the correct tools and experience, because mistakes often cause water damage.
If you see corrosion or pitting on the tub or heating element, stop cleaning and call service. Corrosion may mean chemical damage or failing components that require professional replacement.
Quick troubleshooting cheat-sheet
Dishes still dirty, check the filter and spray arms first. Those two items cause the most cleaning failures.
White film on dishes, run a citric-acid descaling cycle and use rinse aid. Cloudy glass often points to mineral scale or grease residue.
Sour smell after cleaning, recheck the sump and drain hose. Persistent odor after a deep clean suggests a deeper drain biofilm or disposal connection issue.
Expert tips and pro advice
Run the hottest normal cycle monthly with citric acid to prevent scale buildup. In hard-water areas increase frequency to every 3 to 4 weeks.
Keep a microfiber cloth and toothbrush in your cleaning kit for quick spot cleaning. These items let you remove small soils before they become bigger problems.
If you see rust on dishes but not the tub, inspect rack coating for chips and replace or repair damaged racks to stop flakes. Consider water testing if iron appears repeatedly.
Costs, timing, and quick metrics
Citric acid powder typically costs five to fifteen dollars per pound at retail. A tablespoon per monthly cycle lasts a long time.
A full monthly deep clean, including disassembly and a descaling cycle, takes about thirty to sixty minutes. Weekly checks take roughly ten minutes.
Professional service calls for leaks or electrical faults normally start around eighty to one hundred fifty dollars, and vary by region and fault severity.
Frequently Asked Questions
How often should I descale a stainless dishwasher?
If you live in a hard-water area above seven grains per gallon, descale every one to two months. For moderate water hardness, monthly descaling keeps deposits controlled. Less frequent descaling, such as quarterly, works where water is soft and scale forms slowly.
Can I use white vinegar in my dishwasher?
You can use white vinegar occasionally for light mineral spots, but frequent use risks degrading EPDM seals and some finishes. Citric acid is gentler for regular descaling and is the preferred long-term option in many manufacturer guidelines.
Will bleach remove mold in the gasket area?
Do not use bleach on the stainless tub or gasket. Bleach can pit stainless and attack rubber seals. Use 3% hydrogen peroxide on gasket mold, then rinse and dry.
Repeat cleaning until mold stops returning.
Why are my dishes still cloudy after cleaning?
Cloudy dishes result from mineral scale or greasy residue. Run a hot citric-acid descaling cycle, use rinse aid, and verify proper detergent dosing. Also check spray arms and the filter for clogs that reduce rinse effectiveness.
Can I scrub the heating element?
Avoid metal scouring pads on the heating element or any interior surface. Use a citric-acid cycle for mineral buildup and a soft cloth for light stains. If the element shows corrosion or pitting, stop cleaning and call service.
When does cleaning risk voiding warranty?
Using banned chemicals or disassembling electrical parts can void warranty coverage. Check your owner’s manual for listed restrictions and document preexisting damage before deep cleaning or service calls.
Final recommendation, a simple decision guide
If trapped food or odors are present, clean the filter and run a citric-acid hot cycle first. If scale dominates, focus on descaling and repeat as needed. Treat gasket mold with 3% hydrogen peroxide and keep the door cracked to dry between uses.
For leaks or persistent clogs that resist cleaning, call a qualified technician.

1 thought on “How to Clean the Inside of a Stainless Steel Dishwasher”