
How to fix pipes under kitchen sink starts with finding the leak source fast and stopping water from spreading. If the drip is coming from the P-trap, tailpiece, supply line, or disposal, many repairs take 20 to 60 minutes with basic tools.
In our research, a typical kitchen sink trap uses a 1-1/2 inch inner diameter P-trap and 3/8 inch compression supply ends, common across US and UK installs as of 2026. Manufacturer specifications confirm you must shut off local angle stops before touching fittings. Below is a clear decision flow, tools list, and stepwise fixes.
Quick Answer
how to fix pipes under kitchen sink, first isolate the leak source.
Shut off the nearest angle stop or the main water.
Tighten or replace the leaking slip nut or supply line.
Replace a cracked P-trap or worn cartridge if needed.
Call a licensed plumber for bursts, electrical risk, or sewer odor.
Quick actions & key insight (shutoffs, containment, immediate triage)
Stop water, contain the mess, then diagnose. Turn the nearest angle stop clockwise. If that valve will not close, shut off the main water supply and call a plumber.
Put a bucket and towels under the leak to protect the cabinet. Use a flashlight and remove stored items so you can work safely.
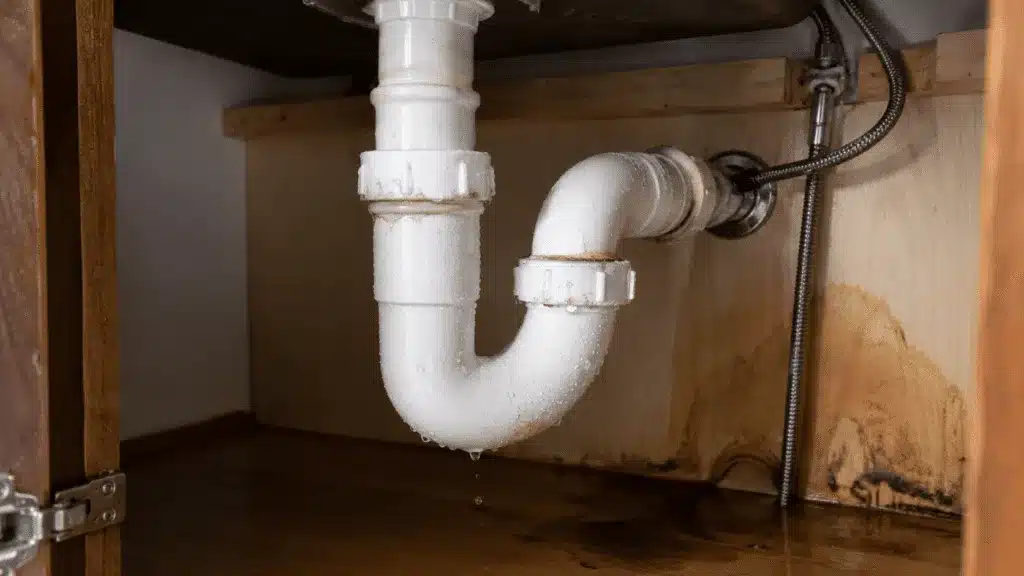
Common problems under a kitchen sink — what each symptom usually means
If water pools on the sink deck, the faucet base or cartridge is likely the source. That water usually runs down into the cabinet before you see it.
Drips at the vertical pipe below the sink point to the tailpiece or slip-joint above the P-trap. A wet curved trap means a cracked trap, bad slip-washer, or loose slip nuts.
Leaks near the wall connection suggest the trap arm, trap adapter, or wall stub-out. Slow drainage with gurgling usually means a clog in the trap or trap arm. Sewage smell indicates a lost trap seal or blocked vent and needs prompt attention.
If a garbage disposal is wet at the flange or discharge, check the gasket and mounting ring. If the leak is electrical, shut off power before working.
What’s under the sink: parts, materials, and joint types that matter
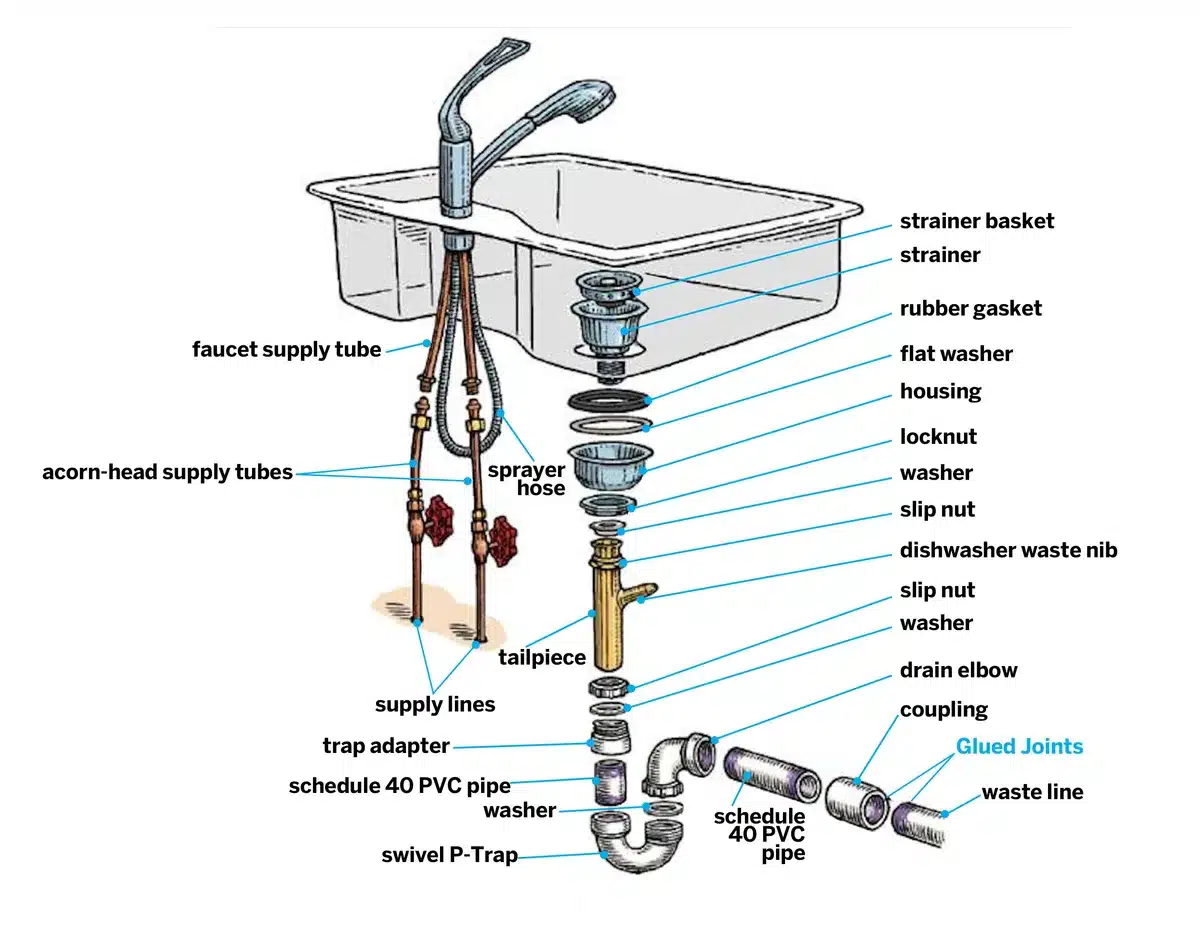
Knowing the parts speeds diagnosis. Key components are the sink strainer or flange, tailpiece, P-trap, trap arm, trap adapter, garbage disposal and its discharge, dishwasher hose and air gap, supply lines, and angle stops.
Materials and common sizes
- Typical P-trap inner diameter, kitchen: 1-1/2 inch.
- Common supply connection: 3/8 inch compression nut where the hose meets the valve.
- Pipe materials: PVC, ABS, brass, copper, stainless braided hose, and PEX for supply lines.
Joint types to recognize
- Slip-joint: nut and rubber slip-washer, common on P-traps.
- Compression: nut and ferrule compressing on tubing, common at angle stops.
- Sweat, or soldered joints: copper joined by solder, needs a torch or pro.
- Threaded tapered (NPT): tapered threads sealed with PTFE tape on male threads.
- Push-fit connectors: push-to-connect fittings for quick repairs.
Why this matters
Slip-washers are cheap to replace, while a crushed ferrule usually needs replacement. Soldered joints require skill and safety precautions. Push-fit connectors work well for many quick repairs, but check local code before using them for a permanent fix.
Tools and materials table
| Tool or part | Use | Typical cost |
|---|---|---|
| Adjustable wrench, channel-lock pliers | Tighten and loosen nuts | $10–25 |
| Bucket and rags | Contain water | $0–15 |
| Replacement 1-1/2" P-trap | Swap cracked traps | $10–35 |
| Braided supply line (3/8") | Replace damaged hose | $8–30 |
| Slip washers and gaskets | Seal slip joints | $2–10 |
| Hand auger | Clear deeper clogs | $20–60 |
For cabinet mold after a leak, see our practical mould checklist. If the pipe is broken and you suspect larger damage, use our steps to assess full replacement needs. To protect stored items during repairs, try these under-cabinet storage ideas.
Decision tree: quick diagnostic questions to find the problem
Answer these in order, each yes or no sends you to the next action. Use this to choose a DIY fix or to call a plumber.
Step 1, is water still flowing freely?
- Yes, shut off the nearest angle stop immediately. If the angle stop will not close, shut off the main water and call a plumber. Do not continue without isolation.
- No, go to Step 2.
Step 2, where is the water coming from?
- From the flexible supply line near the angle stop, go to supply-line repair.
- From the curved P-trap, go to the trap repair branch.
- From the disposal flange or discharge, go to disposal fixes.
- From the sink deck, go to faucet base repairs.
- If it is a slow drain or gurgle, follow the clog branch.
Step 3, is there a sewage odor or persistent backup?
- Yes, stop and call a licensed plumber. This indicates trap failure, venting problems, or deeper sewer issues.
- No, continue to the relevant fix steps.
Branch A, supply-line signs
- Wet threads, frayed braided hose, or water spraying near the valve. Replace the supply line or the angle stop if the valve leaks.
Branch B, P-trap signs
- Puddling under the curved trap, sludge in trap, or cracks. Clean or replace the trap and slip washers.
Branch C, disposal signs
- Water at the sink flange or discharge hose. Unplug the disposal, inspect the flange gasket, and check the mounting ring.
Branch D, faucet deck signs
- Pooling on the deck or water dripping from the faucet. Tighten mounting hardware and replace the cartridge or O-rings if needed.
Branch E, clog vs leak
- Slow draining after cleaning the trap means a deeper clog in the trap arm or wall. Use a hand auger before calling a plumber.
If you reach unexpected corrosion, inability to isolate water, or electrical hazards, stop and call a professional.
Branch A, signs pointing to supply line or shutoff valve
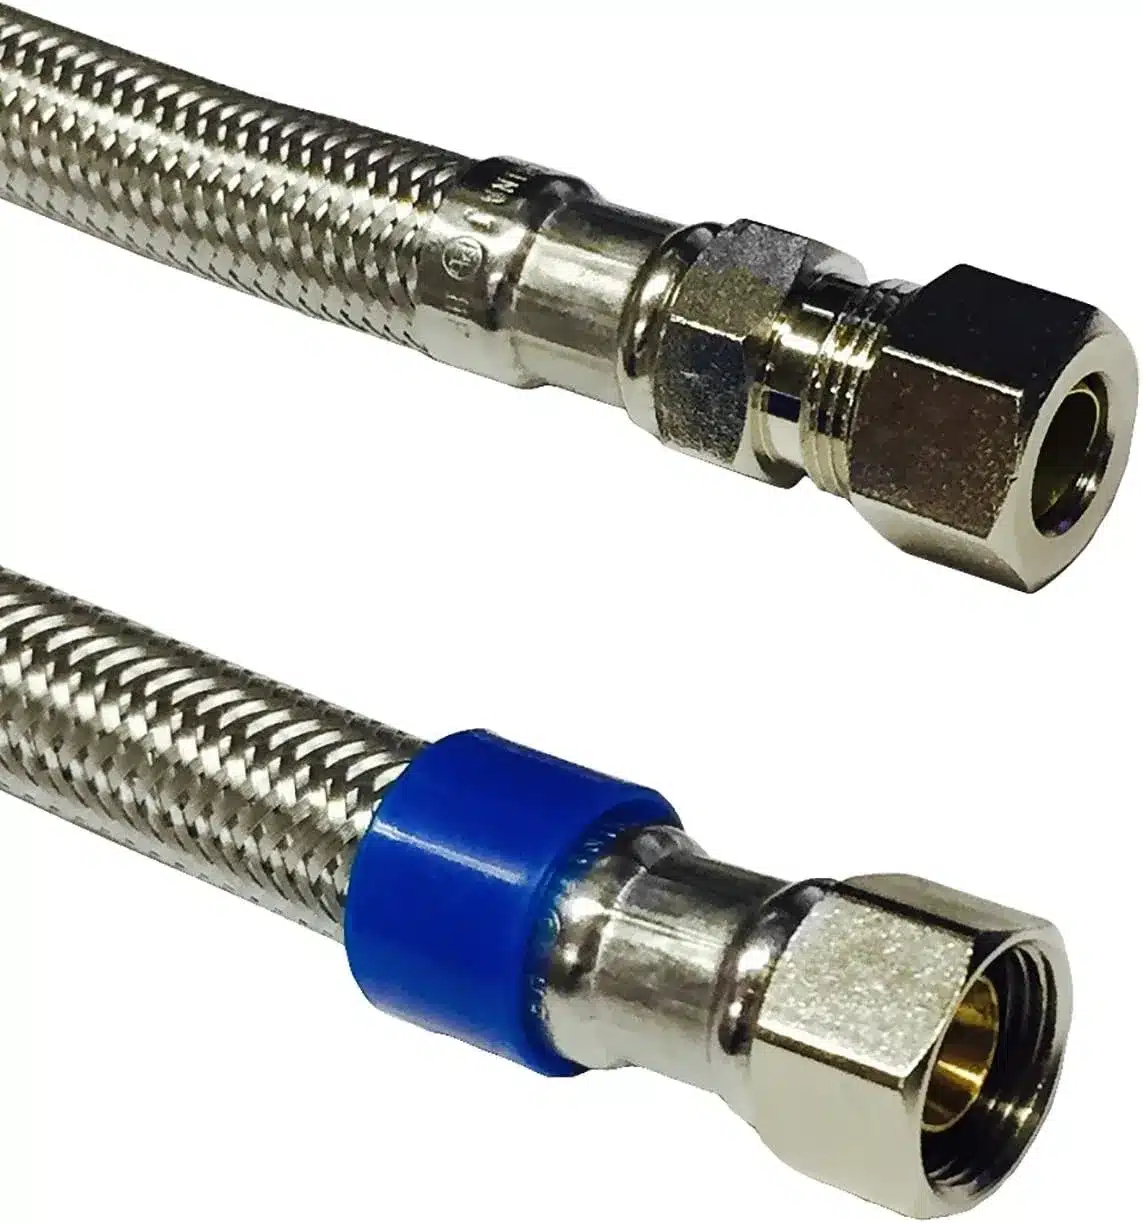
If the braided hose shows frayed braid or wetness at the nut, plan to replace the entire supply line. Tightening an old ferrule rarely solves a split braid.
Tools to have
- Adjustable wrench, channel-lock pliers, bucket, new 3/8 inch braided line.
Quick steps
- Turn off the angle stop and open the faucet to drain pressure.
- Loosen the nut at the valve while holding the valve body.
- Remove the old line, install the new line hand-tight, then tighten a quarter turn with a wrench.
- Turn water on slowly and check for leaks.
If the compression nut leaks after replacement, replace the compression nut and ferrule or use a push-fit connector if allowed by code. Do not use PTFE tape on compression ferrules.
Fix branch: braided supply lines, compression fittings, and angle stop repairs (tools + step‑by‑step)
Follow these If/Then checks during the repair. Replace the line if the hose body is compromised.
Tools and parts
- Adjustable wrench, channel-lock pliers.
- Replacement 3/8 inch braided stainless supply line.
- Bucket, towels, penetrating oil for stuck nuts.
Step 1, isolate and drain
- Turn the angle stop clockwise until closed. If it will not close, shut off the main.
- Open the faucet to drain residual water.
- Put a bucket under the connection.
Step 2, inspect
- Note whether the leak is at the nut, hose body, or valve stem.
- If the braid is split, replace the entire supply line.
Step 3, replace the supply line
- Loosen the nuts at both ends and remove the old line.
- Install the new line, finger-tighten, then give a small wrench turn. Avoid over-tightening.
- Turn water on slowly and check each connection for two minutes.
If the angle stop is the leak source
- Replace the angle stop. If it is soldered or seized to the stub-out, call a plumber. Replacing a valve is safe when the stub-out is accessible and the valve is not fused.
For code and venting requirements, consult the International Code Council at ICC. For mold risk after leaks, see the CDC's cleanup guidance at CDC.
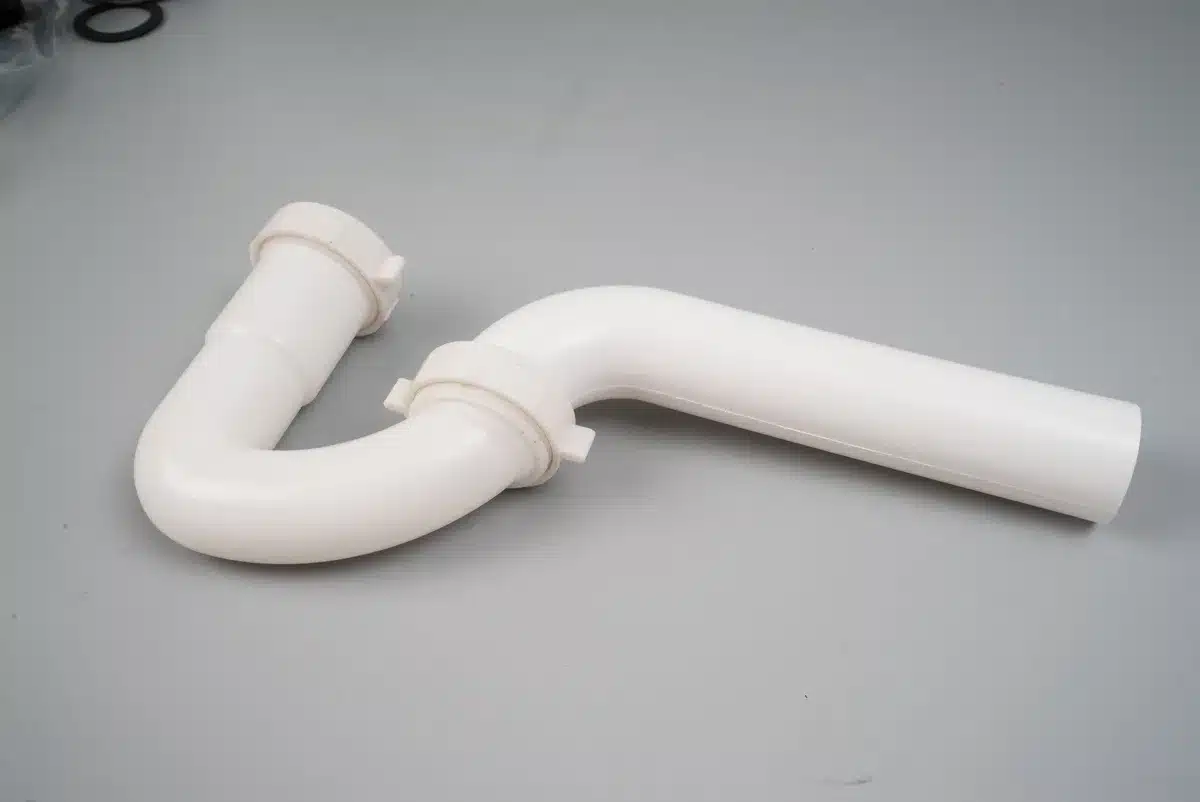
Fix branch: P-trap, slip-washers, trap adapters, and trap arm replacement (tools + step‑by‑step)
A leaking P-trap often shows as water pooled directly under the curved piece. Replace the trap or its slip-washers when you find cracks, brittle plastic, or persistent seepage.
Tools and parts
- Bucket, rags, flashlight.
- Slip-joint pliers, adjustable wrench.
- Replacement 1-1/2 inch P-trap assembly and slip washers.
Stepwise repair
- Put a bucket under the trap and loosen the slip nuts.
- Remove and empty the trap, inspecting for hair, grease, or cracks.
- Replace the rubber slip washers, or swap the entire trap if cracked.
- Reassemble, hand-tighten slip nuts, then give a small wrench turn. Avoid over-tightening plastic nuts.
Troubleshooting
- If the tailpiece threads are stripped, cut back and install a new tailpiece with a trap adapter.
- If the trap arm is misaligned and distorts the joint, reposition or replace the trap arm.
- Push-fit trap adapters are useful for quick repairs where local code permits them.
Fix branch: garbage disposal flange, mounting ring, and discharge hose fixes (safe procedure)
Unplug the disposal and check the flange and mounting assembly first. Most leaks come from a bad flange gasket or loose mounting bolts.
Steps for flange leaks
- Cut power at the breaker and confirm the unit is unplugged.
- Place a bucket under the disposal and disconnect the discharge to the trap.
- Inspect the sink flange gasket and mounting ring, replace the gasket if it is deformed.
- Tighten the mounting ring evenly. Follow the disposal manual for the correct sequence.
Discharge hose and clamp
- Tighten or replace the clamp where the discharge meets the trap inlet. Use stainless clamps for longevity.
When to replace the disposal
- Replace the unit if the mounting system is corroded or the disposal body is cracked. Confirm electrical and plumbing clearances before installation.
Fix branch: faucet base leaks — cartridges, O-rings, mounting nuts, and resealing
Tightening the mounting nut can stop some leaks, but persistent dripping often requires a new cartridge or O-rings.
Quick checks and steps
- Tighten the mounting nut under the sink while an assistant holds the faucet to prevent twisting.
- If leak continues, shut the angle stops, disconnect supply lines, and remove the faucet.
- Replace worn O-rings and the cartridge as needed, following manufacturer specifications. Cartridges typically cost $20 to $80.
Deck sealing guidance
- Use plumber's putty for many stainless steel flanges, or silicone for stone counters if the manufacturer recommends it. Tighten mounting hardware evenly to avoid warping.
When to call a pro
- If the mounting is seized, corroded, or the sink deck is damaged, a licensed plumber will prevent further damage.
Fix branch: clearing slow drains, using a hand auger, and when to avoid chemicals
Remove and inspect the P-trap first, then use a hand auger if the clog persists. Enzyme cleaners work for organic buildup, but avoid caustic chemicals.
Step 1, clear the trap
- Remove the trap with a bucket under it and clean out grease and debris. This resolves most kitchen clogs.
Step 2, use a hand auger
- Feed a 3 to 6 foot hand auger into the tailpiece toward the wall to clear the trap arm. Stop if you feel resistance that does not budge.
When to avoid chemical cleaners
- Do not use lye or sulfuric acid cleaners if a disposal or seals are present. These products damage seals and are hazardous. Use enzyme cleaners for maintenance instead.
If the clog is deep or recurring, call a plumber with a camera inspection tool.
When to stop and call a plumber
Call a plumber when you cannot isolate the leak or when repairs risk electrical hazards. Professionals prevent larger water damage and ensure code compliance.
Red flags
- Angle stop will not shut off and water continues to flow.
- Multiple corroded joints or soldered pipes that require heating.
- Strong sewage odor or persistent backups after you clean the trap.
- Electrical hazards near water, such as a leaking disposal you cannot isolate.
Permits and code
- Major drain relocations and venting changes often require a permit. Check local building rules before altering drains.
If you find extensive mold or rotten cabinet material, consult remediation services and see practical steps for cabinet mold in our mould checklist.
Costs, parts sizing, and time estimates (pricing table and common measurements)
Most household fixes are low cost and quick. Typical part prices and times are below.
| Repair type | Typical part cost | DIY time |
|---|---|---|
| Tighten or replace slip washer | $2–10 | 15–30 minutes |
| Replace P-trap (1-1/2") | $10–35 | 20–45 minutes |
| Replace braided supply line (3/8") | $8–30 | 15–30 minutes |
| Faucet cartridge swap | $20–80 | 30–60 minutes |
Measure before you buy. Confirm the trap inner diameter and supply end sizes for a smooth swap.
Safety, local code highlights, and electrical precautions (soldering, disposals, permits)
Always turn off power before working near a disposal. Confirm the breaker is off and the unit is not plugged in.
Avoid open flame soldering inside cabinets without proper clearance and fire control. If soldering is required and cabinets are combustible, hire a licensed plumber. For code questions, consult the International Code Council at ICC.
For mold safety after leaks, refer to CDC cleanup guidance at CDC.
Preventive maintenance and simple upgrades that cut future repairs (braided lines, push-fit, drip trays)
Replace braided supply lines every eight to ten years or on first sign of fraying. Install a drip tray under the trap to catch small leaks and protect cabinet floors.
Upgrades that help
- Swap multi-turn angle stops for quarter-turn ball valves for reliable shutoff.
- Use push-fit connectors for quick, code-compliant repairs where allowed.
- Run hot water after greasy loads and use a sink strainer to reduce trap buildup.
Quick troubleshooting checklist, pro tips, and the short decision guide you can print
Use this one-page flow to decide fast, and act safely.
Checklist
- Shut off the nearest valve, or main if necessary.
- Clear the area, place a bucket, and inspect joints with a flashlight.
- Hand-tighten nuts, then use a wrench for a small extra turn.
- Replace washers or the trap if leaks persist.
- Turn water on slowly and observe for two minutes.
Pro tips
- Use penetrating oil on corroded nuts, wait 10 minutes, then use two wrenches to prevent twisting pipes.
- Wear gloves and eye protection when clearing traps.
- Keep replacement slip-washers, a small trap, and a braided hose in your toolbox for quick fixes.
For cleaning grease stains after a leak, see our practical cleaning tips.
Frequently Asked Questions
How long does replacing a P-trap take?
A P-trap swap usually takes 20 to 45 minutes for a DIYer. Allow time to confirm the 1-1/2 inch size and to dry the area before returning items.
Can I use PTFE tape on slip joints?
No. PTFE tape is for tapered male threads only. Replace rubber slip washers for slip joints and replace ferrules on compression fittings.
When should I replace braided supply lines?
Replace braided stainless supply lines every eight to ten years or immediately if you see fraying or wet spots along the braid.
Will a hand auger damage my pipes?
A short 3 to 6 foot hand auger used gently will not damage PVC or metal trap arms. Stop if you feel hard resistance, and call a plumber for deep obstructions.
What if the angle stop won't shut off?
Shut off the main water immediately and call a licensed plumber. Working without isolation risks flooding and greater damage.
