
If you're wondering how to change the light globes in a glass top range hood, most jobs are straightforward and safe. You usually need a few hand tools, the correct replacement bulb or LED retrofit, and careful handling of the glass shade to avoid cracks or fingerprints.
Manufacturer specifications confirm many domestic hoods accept bulbs up to 60 watts and 120 volts, and MR16 lamps are about 50 millimeters across. As of 2026, more hoods use integrated LED modules that may not be user-serviceable. Read the quick answer next, then follow the inspection and step-by-step guidance.
How to Change Light Globes in a Glass-Top Range Hood
Quick Answer
how to change the light globes in a glass top range hood, most are DIY.
Turn off the breaker before you touch wiring.
Remove the glass, replace the correct bulb, then reseat the globe.
Call a pro for damaged wiring or integrated LED modules.
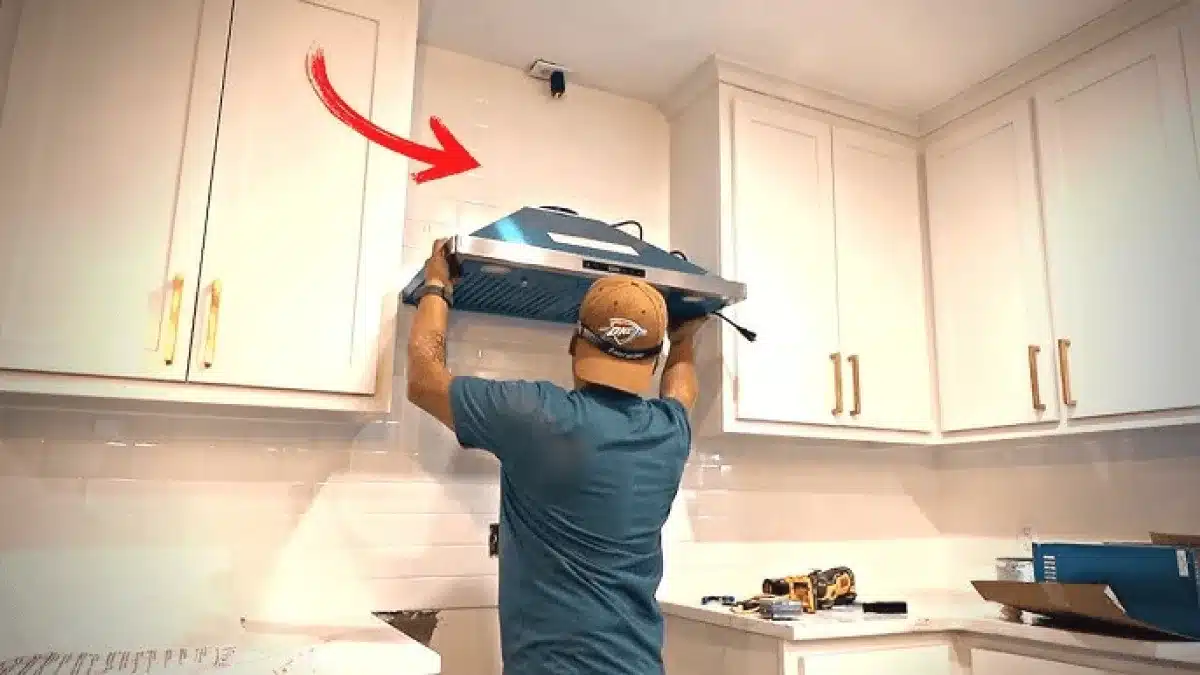
Problem / common pain points when replacing hood globes (glass breakage, transformer issues, wrong bulb)
Rushing glass removal often chips or shatters the shade.
Halogen MR16 bulbs run hot and fail faster when handled with bare skin.
LED retrofit failures usually trace to transformer or driver incompatibility.
Common real issues include wrong base type, overtightened trim screws, and poor socket contact.
When you find a buzzing transformer, burnt socket, or melted insulation, stop.
Follow NFPA guidance and isolate the circuit, then contact a licensed electrician for wiring faults.
How glass-top range hood lighting is built: components and bulb types
A typical hood lighting assembly has a glass globe, a trim ring or clips, a lamp holder, and either a line-voltage feed or a transformer for low-voltage lamps.
Glass globes attach by screws, spring clips, twist rings, or magnets.
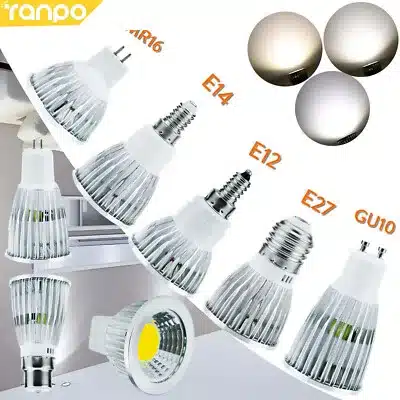
Usual bulb types are E12 or E26 screw-base, GU10 twist-lock, and MR16 GU5.3 two-pin lamps.
| Bulb type | Base/socket | Voltage typical | Heat level | Service notes |
|---|---|---|---|---|
| MR16 | GU5.3 two-pin | 12V low-voltage | High | Avoid touching glass, check transformer type |
| GU10 | GU10 twist | 120V mains | High | Twist to remove, direct mains, no transformer |
| Candelabra | E12 screw | 120V mains | Moderate | Simple swap, common in older hoods |
| Integrated LED module | fixed connector | varies | Low | Often non-serviceable, may need module swap |
Transformers matter because many MR16 halogens run on 12 volts through magnetic transformers.
If you switch to LED, match the LED to the transformer type or replace the transformer with a dedicated LED driver.
For LED efficiency and enclosed-fixture ratings, see ENERGY STAR guidance.
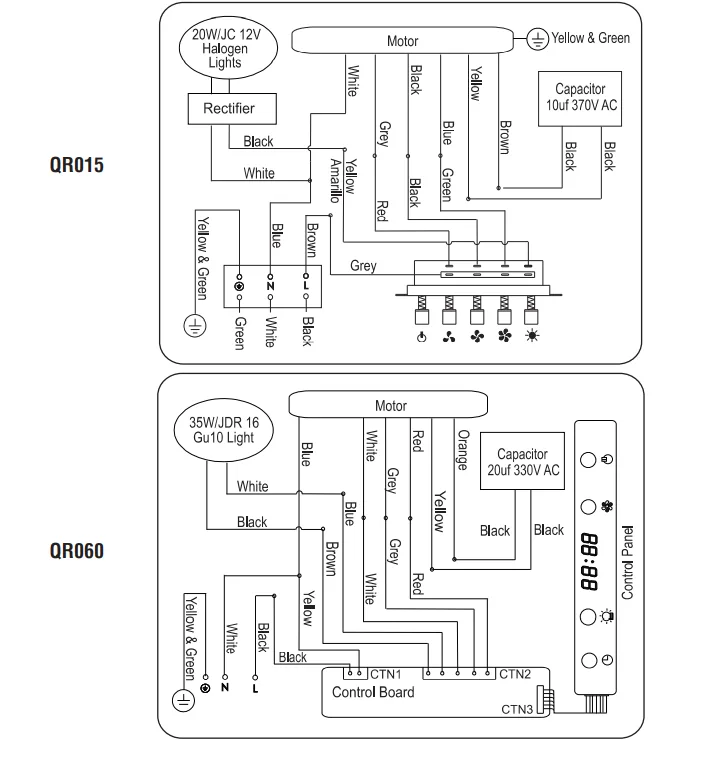
Tools, PPE, and replacement parts checklist
Gather tools and safety gear before you start.
A tidy workspace and a padded surface reduce breakage risk.
| Item | Why you need it |
|---|---|
| Phillips and flathead screwdrivers | Remove trim screws or retaining rings |
| Needle-nose pliers | Pull push-fit pin bulbs or connectors |
| Non-marring gloves or lint cloth | Protect halogen bulbs and glass |
| Multimeter | Verify voltage at socket or transformer |
| Sturdy step stool | Safe access to under-cabinet hood |
| Towel or foam pad | Rest glass globe while you work |
| Replacement bulb or LED retrofit | Match base, voltage, and wattage |
Manufacturer labels inside the hood usually state maximum wattage.
Bring the old bulb as a sample to the store to match odd bases faster.
For post-job cleanup, use tested cabinet cleaning steps to remove fingerprints and grease.
Identify your hood: fasteners, bulb base, and voltage — a simple inspection guide
Turn the breaker off, then inspect under the hood with a flashlight.
Look for a model label that lists bulb type and max wattage.
Take a clear photo of the bulb and socket if you need help matching parts.
Glass fastening types to recognize
Screws, spring clips, twist rings, and magnets are the most common methods.
If you see screws around the trim, support the glass and back out screws one at a time.
For spring clips, press the glass to one side and free the opposite clip first.
Bulb/socket identification
If the lamp unscrews, it is an E12 or E26 screw-base.
Two exposed pins about 5 millimeters apart indicate an MR16 GU5.3.
A twist-and-lock base indicates a GU10 mains lamp.
Voltage and rating checks
Use a multimeter to confirm whether the socket is roughly 120 volts or about 12 volts.
If you read around 12 volts, you have a transformer in the circuit and must check driver compatibility before fitting LEDs.
Write down the hood model and bulb details for parts shopping.
Decision workflow — which replacement path to follow (visual flow with conditional branches)
If the glass removes easily, follow the simple bulb-swap path.
If the glass is glued, heavy, or the light is integrated, follow the pro path.
Path A: Screw-in bulbs (E12/E26)
Unscrew the bulb counter-clockwise while supporting the glass.
Replace with the same base and respect the hood's maximum wattage.
Hand-tighten only, then test.
Path B: Twist-lock / GU10 bulbs
Push and twist counter-clockwise to remove.
Insert and twist clockwise to seat the new lamp.
No transformer checks are needed for GU10 mains lamps.
Path C: Low-voltage MR16 (GU5.3) with transformer
Pull MR16 straight out while wiggling gently.
If the transformer is visible and quiet, replace with the same-voltage MR16.
If the transformer is noisy or missing, decide between an MR16 LED rated for that transformer or replace the transformer with an LED driver.
Path D: Integrated LED modules or non-serviceable fixtures
If the module plugs out via a connector, replace the module only.
If it is soldered or sealed, plan for a technician or a hood replacement.
Path E: Heavy, glued, or commercial glass
Do not force removal.
Call a service technician for large island hoods or commercial units to avoid injury and damage.
Transformers, drivers, and LED retrofit decisions
Identify the transformer type before buying LEDs.
Magnetic transformers often cause flicker with some LED retrofits. Electronic transformers may work with certain LEDs only.
| Transformer type | Typical use | LED compatibility |
|---|---|---|
| Magnetic | Older MR16 halogen systems | Often incompatible with LED drivers |
| Electronic | Newer low-voltage systems | Some LEDs compatible, check label |
| Dedicated LED driver | LED retrofit systems | Compatible with specific LED modules |
If the transformer hums or fails voltage checks, isolate power and get a licensed electrician to replace it.
For LED efficiency tips and enclosed fixture guidance, consult ENERGY STAR resources.
Step-by-step removal and installation actions (supporting glass, safe bulb handling, seating, and fastening)
Turn off the breaker and verify power is off with a multimeter.
Let bulbs and metal cool for ten minutes before you touch anything.
- Support the glass, then remove screws or release clips.
- Lower the glass onto a padded towel.
- Put on non-marring gloves or use a lint-free cloth when handling bulbs.
- Remove the old bulb: unscrew, pull straight out, or push-and-twist depending on the base.
- Insert the replacement bulb, seat it straight, and avoid forcing it.
- Replace clips or screws, hand-tighten only, then restore power and test.
Do not touch halogen glass with bare hands. Oils create hot spots and shorten life.
If a bulb is snug, add a bit of cloth for grip rather than prying on the socket.
Dispose of old bulbs according to local rules.
Reinstall, test, and verify — what to check after power-up (flicker checks, dimmer behavior, heat)
After reassembly, restore power and watch the lamp for 60 seconds.
Look for steady light, no buzzing, and no excessive heat around the socket.
Check these items
- Stable light output, no visible flicker.
- No buzzing from transformer or fixture.
- Glass and trim stay cool to the touch in normal use.
- Dimmer compatibility, if applicable.
If flicker or buzzing appears, power down and reseat the bulb. If the issue persists, test transformer voltage or try a compatible bulb.
Replace noisy transformers, rather than continuing to operate them.
Troubleshooting branches — common failures and fixes
No light after replacement, check the breaker, hood switch, and bulb seating.
If power reaches the socket, replace the bulb with a known-good one to test contacts.
If the socket is corroded or charred, replace it.
Flicker or buzz often points to driver incompatibility, poor contact, or a failing transformer.
Try a bulb known to be compatible with the transformer. If flicker continues, replace the transformer with a dedicated LED driver for stable operation.
New LED dies quickly, check dimmer compatibility and transformer type.
Many older dimmers and magnetic transformers are not suitable for low-wattage LEDs and cause premature failure.
Replace with an LED-compatible dimmer or suitable driver.
Glass cracked during removal, secure the area and turn the breaker off.
Collect shards with heavy gloves and use puncture-resistant containers. If shards remain stuck in fasteners, call a technician.
When wiring insulation is melted or sockets are burnt, stop and call a licensed electrician.
Wiring damage is a fire risk and needs professional repair.
Mistakes to avoid (touching halogen, mismatched voltage, overtightening glass screws, ignoring transformer type)
Do not touch halogen glass with bare fingers. Oils create hot spots and can ruin the bulb.
Match base type, voltage, and hood wattage from the label before you buy replacements.
Avoid overtightening trim screws, which can crack thin glass. Hand-tighten only.
Do not retrofit LEDs into a low-voltage system without confirming driver compatibility.
Aggregate user reports show repeated failure when LEDs meet magnetic transformers they were not designed for.
If wiring looks damaged or insulation is melted, isolate power and call an electrician.
Safety, compliance, and disposal (breaker lockout, UL/ETL ratings, NEC basics, bulb recycling)
Turn off and lock out the circuit at the breaker before you work on fixed wiring.
Verify power is off with a multimeter at the socket.
Use UL or ETL listed bulbs and fixtures, and follow the hood's enclosed-fixture ratings.
Works outside these ratings increase heat risk and can damage insulation.
For wiring work, follow local electrical codes and NFPA guidance for safe practices.
If you are unsure about transformer replacement or altered wiring, hire a licensed electrician.
Dispose of bulbs per local rules. Compact fluorescents contain mercury and need hazardous-waste recycling.
Halogen and most LEDs may be disposed as household waste in many areas, but check municipal guidance.
Costs, parts pricing, and time estimates
A simple bulb swap typically takes 10 to 30 minutes for one person.
Low-voltage checks and transformer work can take 30 to 90 minutes.
Technician calls for integrated modules or heavy glass usually take longer and cost more.
| Item | Typical cost (USD) | Typical time |
|---|---|---|
| Standard E12/E26 bulb | $3 to $12 | 10–15 minutes |
| MR16 halogen | $4 to $15 | 15–30 minutes |
| MR16 LED retrofit | $8 to $35 | 15–30 minutes |
| Replacement transformer | $25 to $120 | 30–90 minutes |
| Electrician service call | $75 to $200 plus parts | 60–120 minutes |
LEDs cost more up front, but last many times longer than halogen.
Factor transformer replacement into the budget when converting MR16 halogen systems to LED.
When to call a pro — clear decision criteria
Call a licensed electrician if you find damaged wiring, burnt sockets, or melted insulation.
These signs indicate overload or arcing and require professional repair.
Call a technician if the transformer is inaccessible, noisy, or fails voltage checks.
Transformer replacement often means disassembling the hood canopy.
Call a specialist for heavy island glass, glued globes, or hidden fasteners.
Two-person lifts and proper equipment prevent injury and damage.
Call an appliance technician for seized fasteners, corrosion, or broken globes trapped behind trim.
They have tools to remove remaining shards safely.
Quick printable checklist and shopping list
Checklist, prep and safety
- Turn off breaker and verify power is off with a multimeter.
- Lay a padded towel beneath the globe.
- Wear non-marring gloves and have a helper for large glass.
Shopping list, bring the old bulb
- Old bulb sample, or note base type and voltage.
- Replacement bulb matching base, voltage, and hood wattage.
- Non-marring gloves, medium Phillips screwdriver, needle-nose pliers.
- Multimeter and small container for screws.
Notes
- For warm kitchen light, choose 2700K to 3000K.
- Match CRI 80 or higher for accurate color rendering.
- Keep old bulb labeled for quick matching on future trips.
Expert Tips / Pro Advice
Work with a second person for large or island globes to reduce drop risk.
Label screws and small parts as you remove them, a plastic container keeps hardware together.
Bring the old bulb to the store, retail staff match obscure bases faster with a sample.
If switching to LED, match color temperature across kitchen fixtures for consistent light.
Choose 2700K to 3000K for warm ambiance, or 3500K to 4000K for brighter task lighting.
Pick LEDs with CRI 80 or higher for accurate food and surface colors.
Maintenance / Long-Term Optimization
Inspect sockets and clips every six months and replace corroded parts.
Replace glass with hairline cracks immediately, they can fail under heat.
LED conversions reduce heat and replacement frequency.
Keep a small kit of spare bulbs and tools under the counter for fast swaps.
Real Scenarios / Case Examples
A common issue involves an LED retrofit flickering in a legacy magnetic transformer system.
Fixing it with a dedicated LED driver removed flicker and extended bulb life to 20,000 hours or more in aggregate user reports.
Another case involved a homeowner overtightening trim screws and cracking thin glass.
The replacement globe cost about $30 and a simple hand-tighten rule prevented repeat damage.
Frequently Asked Questions
Can I replace a halogen MR16 with an LED MR16 directly?
You can, if the LED is matched to the transformer type. Check whether your transformer is magnetic or electronic with a multimeter. If incompatible, either buy an MR16 LED rated for that transformer or have an electrician replace the transformer with a dedicated LED driver to avoid flicker and early failure.
Why does my new LED flicker or buzz?
Flicker usually means driver or transformer incompatibility, or a poor socket contact. Test with a known-good, compatible bulb to isolate the issue. If the transformer is magnetic and the LED is not rated for it, replace the transformer or use an LED designed for magnetic drivers to stop flicker.
How do I know if the globe is safe to remove by myself?
If the glass is small, reachable from a stable stool, and held with visible screws or clips, you can remove it safely. If the globe is large, glued, or fasteners are hidden, call a technician. Heavy or island globes often require two-person lifts and proper equipment.
What bulb specs should I bring when shopping?
Bring the old bulb or a photo showing the base and markings. Note the base type (E12, E26, GU10, GU5.3), voltage (12V or 120V), and the hood's maximum wattage from the label. If you plan an LED retrofit, note transformer type and any dimmer present.
How should I dispose of old bulbs?
Follow local disposal rules. Compact fluorescents contain mercury and must go to hazardous-waste recycling. Many municipalities accept LED and halogen bulbs in household waste, but check local guidance or your waste authority website for exact procedures.
Final Recommendation / Decision Guide
If the globe and socket are accessible and wiring looks sound, replace the bulb yourself using gloves and a multimeter for checks.
If you find integrated LEDs, damaged wiring, a noisy transformer, or heavy/glued glass, hire a licensed electrician or appliance technician for safe repair.
