
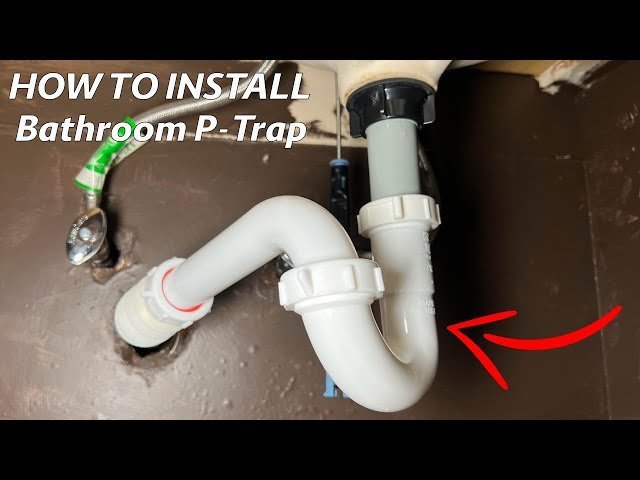
A dripping, smelly, or slow-draining kitchen sink is almost always traced to one component: the P-trap. This curved pipe does more than look like plumbing art — it holds a water seal that blocks sewer gases from entering your home while allowing wastewater to flow freely.
Installing a new P-trap is one of the most straightforward DIY plumbing tasks you can tackle. With basic tools, a clear plan, and about 45 minutes, you can replace yours without calling a plumber. This guide walks you through every step, from gathering supplies to testing for leaks.
Tools And Materials Needed
Having everything within reach before you start prevents mid-job trips to the hardware store. Below is the complete list of what you will need.
Essential Tools
- Adjustable wrench — for tightening and loosening slip nuts
- Pipe wrench — helpful if old fittings are stuck or corroded
- Slip-joint pliers — gives extra grip on stubborn nuts
- Hacksaw or pipe cutter — for trimming pipes to the right length
- Measuring tape — for accurate distance checks
- Plumber's tape (Teflon tape) — seals threaded connections
- Bucket — catches water that spills when you disassemble the old trap
- Old towel or rag — for drying parts and cleaning up drips
- Safety glasses and work gloves — protect against debris and grime
Required Materials
- P-trap assembly kit — includes the curved trap section, trap arm, and tailpiece extension
- Slip nuts and conical washers — these create watertight seals at each connection
- PVC or metal pipes — match what your existing plumbing uses (most modern homes use PVC)
- Pipe joint compound or plumber's putty — optional but adds an extra layer of leak protection
- Extension tube (if needed) — bridges gaps when the sink drain and wall pipe don't align perfectly
Preparing The Area
Proper preparation is the difference between a 30-minute swap and a frustrating afternoon. Take these steps seriously.
Turn Off Water Supply
Locate the shutoff valves under your sink — usually one for hot water and one for cold. Turn each clockwise until it stops. Open the faucet and let any remaining water drain out. This depressurizes the system and prevents an unexpected shower when you loosen the pipes.
Clear The Cabinet Space
Remove everything stored under the sink: cleaning supplies, trash bins, pans. Lay down an old towel to catch drips and protect the cabinet floor. Good lighting matters here — use a work light or headlamp if the under-sink area is dark. You need to see every connection clearly.
 The full P-trap kit laid out before installation, showing all slip nuts and washers.
Removing The Old P-Trap
Before you can install the new trap, you need to take the old one out. Even if it looks clean, expect some dirty water and debris to spill.
Loosen Slip Nuts
You will see two or three slip nuts connecting the P-trap: one where the tailpiece meets the sink drain, one where the trap arm meets the wall pipe, and one at the bottom curve of the trap itself. Turn each nut counterclockwise by hand first. If they are stuck, use slip-joint pliers gently — do not force them hard enough to crack the nut.
Keep your bucket directly underneath. Water will start dripping once the seals break.
Detach Old Trap
Once all nuts are loose, slide the old P-trap free. Tilt it over the bucket to empty any standing water and sludge. Inspect the inside briefly — if you see heavy grease buildup or mineral deposits, your drains may need a deeper clean. Check the condition of the existing wall pipe and sink tailpiece for cracks or corrosion while you have access.
If the wall pipe threads look damaged, you may need to address that before proceeding. For guidance on tackling more involved repairs, our guide on fixing leaking connections covers common issues you might encounter at this stage.
Measuring And Cutting Pipes
The most common mistake in P-trap installation is cutting pipes too short. Measure carefully, and remember the old adage: you can always cut more off, but you cannot add length back.
Measure Pipe Length
Dry-fit the new trap components without tightening anything. Hold the curved trap section up to the sink tailpiece and the trap arm to the wall pipe. Use your tape measure to find the exact distance between these connection points, following the actual path the pipe will take — not a straight line.
Most P-trap kits come with an adjustable telescoping section that slides to fit. If yours does not, or if the gap is too large, you will need a separate extension tube. Account for the depth of the slip nut fittings in your measurement — about half an inch per connection.
Cut Pipes To Fit
Mark the cut line with a pencil. Use a hacksaw or a ratcheting pipe cutter for a straight, square cut. A jagged or angled cut will not seal properly against the washer inside the slip nut.
After cutting, remove burrs from the outer and inner edges using sandpaper or a deburring tool. Smooth edges help the washer slide on without tearing and create a better seal. Wipe the cut ends clean with a rag.
Assembling The New P-Trap
With the pipes cut to length, assembly goes quickly. Pay close attention to washer orientation — this is where leaks start.
Attach Trap Bend
Slide a slip nut and then a conical washer onto the tailpiece coming down from the sink drain. The tapered side of the washer faces the threaded end of the nut. Push the trap bend up onto the tailpiece, then hand-tighten the slip nut.
Do not over-tighten PVC fittings. Hand-tight plus a quarter turn with a wrench is enough. Overtightening can crack the nut or distort the washer, actually causing leaks rather than preventing them.
Connect Trap Arm
Slide a slip nut and washer onto the trap arm. Insert the trap arm into the open end of the trap bend, then into the wall pipe opening. Align everything so the trap bend sits level and the arm points straight into the wall.
Tighten both slip nuts by hand, then give each a snug turn with your wrench. The trap should be able to hold its position without sagging or twisting.
 Hand-tightening a slip nut on the P-trap — the first step before final wrench adjustment.
Installing The P-Trap
This is the moment everything comes together. The goal is a straight, stress-free alignment with no gaps at any joint.
Align And Connect Pipes
Check that the trap bend hangs directly below the sink drain and that the trap arm runs level to the wall. If the pipes are pulling to one side or seem forced, loosen the nuts and adjust. Forced connections will leak.
The water seal in a P-trap should be about 2 to 4 inches deep — this is the column of water trapped in the curve that blocks sewer gases. If your trap is too shallow, gases can pass through. If too deep, debris settles more easily.
If you are working with an older home or a configuration that requires pipe modifications, our guide on changing pipes under the sink provides more detail on adapting to unusual layouts.
Tighten Slip Nuts
Starting from the sink drain, tighten each slip nut in sequence: tailpiece to trap bend, trap bend to trap arm, trap arm to wall pipe. Work your way down and outward. Use your wrench for the final quarter turn, but stop as soon as you feel resistance increase.
Mark each nut with a pencil dot after tightening. This lets you see at a glance if a nut has rotated loose during testing.
Testing For Leaks
Do not close the cabinet and call it done without testing. A tiny drip behind the trap can saturate your cabinet base and lead to warped wood or mold within weeks.
Run Water
Turn the water supply valves back on slowly. Open both the hot and cold faucets to full flow for at least one minute. This fills the trap and pressurizes the system.
Let the water run, then switch it off. Wait 30 seconds and listen — you may hear a drip before you see one.
Check Connections
Dry every joint with a rag. Then run your fingers underneath each connection — slip nuts, the wall pipe joint, the sink drain basket. Any moisture at all means the connection needs tightening or the washer is seated wrong.
For hard-to-see spots, place a piece of dry paper towel under each joint. Come back in 10 minutes. A wet spot on the paper confirms a leak.
If you find a leak, tighten the offending nut another eighth to quarter turn. If the leak persists, disassemble the joint, check that the washer is facing the right way (tapered side toward the nut threads), and reassemble.
Periodically inspect your P-trap connections as part of routine kitchen maintenance — the same way you would check your dishwasher filter for buildup. Early detection prevents bigger problems.
Tips For Maintenance
A well-installed P-trap requires surprisingly little attention, but a few habits will keep it working foryears without issue. Here is what to focus on.
Regular Cleaning
Disassemble and clean the P-trap at least twice a year. Place your bucket underneath, loosen the slip nuts, and remove the curved section. Pour out any trapped water and debris. Use a stiff bottle brush or an old toothbrush to scrub away grease film and sludge from the inside walls. Rinse thoroughly with hot water before reassembling.
If you notice a persistent musty odor under the sink even after cleaning, the smell may be coming from bio-film inside the wall pipe rather than the trap itself.
Preventing Clogs
Never pour cooking grease or oil down the drain — it hardens inside the trap and narrows the passage. Use a sink strainer to catch food scraps, coffee grounds, and rice before they enter the pipes. Once a week, flush the drain with boiling water (if your pipes are metal) or very hot tap water (if PVC) to dissolve any slow-forming buildup.
A monthly treatment of baking soda followed by vinegar, then flushed with hot water, keeps the trap clear without harsh chemicals. These simple steps reduce the chance of a complete blockage that requires pulling the trap apart in an emergency.
Frequently Asked Questions
What tools are needed to install a P-trap?
You need an adjustable wrench, slip-joint pliers, a hacksaw or pipe cutter, measuring tape, plumber's tape, a bucket, and a rag. Most DIYers already own these.
How do I prevent leaks when installing a P-trap?
Ensure all washers face the correct direction (tapered side toward the nut threads), hand-tighten nuts before using a wrench, and do not overtighten PVC fittings. Test every joint by running water and feeling for moisture.
Can I install a P-trap myself easily?
Yes. The job takes 30–60 minutes for a standard double-basin sink. The most challenging part is cutting pipes to the exact length — measure twice, cut once.
How do I measure for the right P-trap size?
Most residential kitchen sinks use a 1½-inch P-trap. Measure the diameter of your existing tailpiece and wall pipe to confirm. Standard trap kits include adjustable sections that fit most sink-to-wall distances between 6 and 18 inches.
What if my pipe alignment is off?
If the sink drain and wall pipe do not line up vertically, you may need an offset trap arm or a flexible extension. For unusual configurations, our guide to installing pipes under the sink covers adjustment techniques.
Conclusion
Installing a P-trap under your kitchen sink is a straightforward weekend task that delivers immediate results: no more sewer smells, faster drainage, and peace of mind knowing your plumbing is sealed properly. With the right tools, careful measurements, and a patient approach to tightening connections, you can complete this project yourself and save the cost of a service call.
Start by gathering your materials and clearing the cabinet space. Follow each step — removal, measuring, assembly, and leak testing — without rushing. A properly installed P-trap will serve you reliably for years. If you run into a stubborn fitting or an unusual pipe layout, our article on diagrams of plumbing under the kitchen sink can help you visualize the connections before you start.
Take the first step today. Your nose — and your wallet — will thank you.
