
Is your Kenmore dishwasher leaving dishes with a gritty residue or not cleaning effectively? A clogged filter is a common culprit, and thankfully, cleaning it is a straightforward maintenance task that can dramatically improve your appliance's performance. This guide will provide you with in-depth, practical steps to locate, remove, clean, and re-install your Kenmore dishwasher filter, ensuring sparkling clean dishes with every cycle.
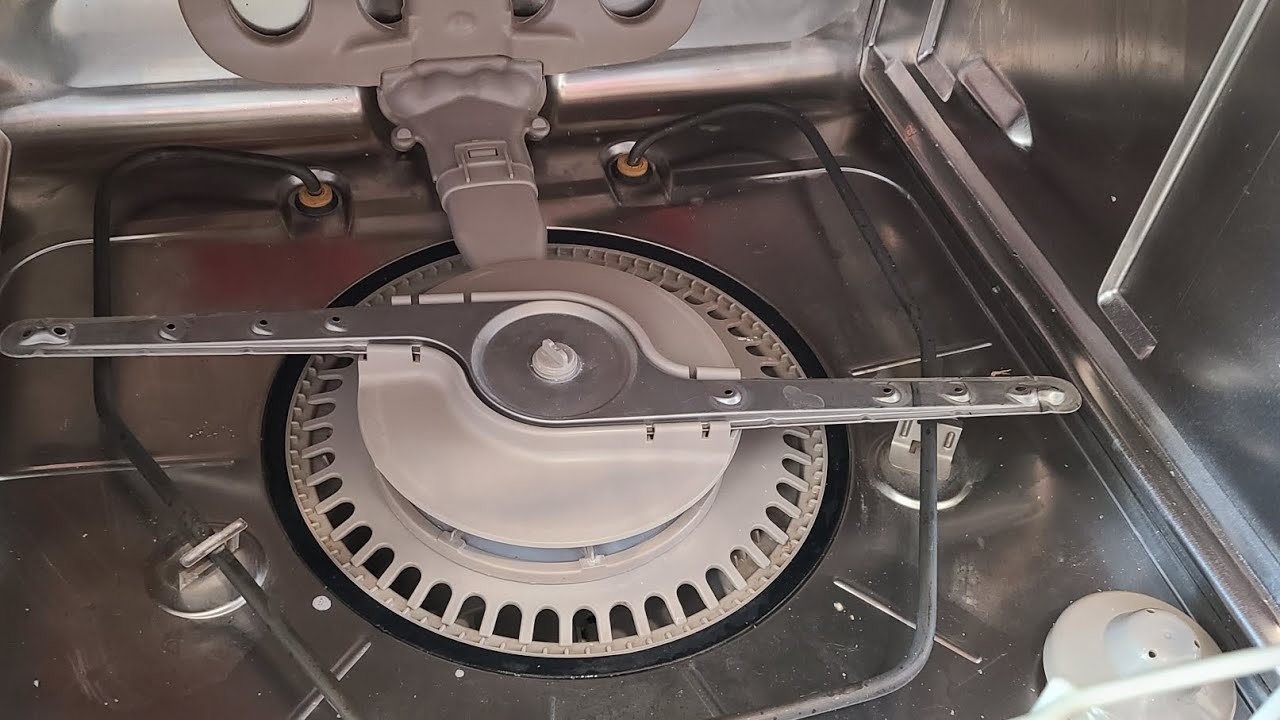
 Understanding the different parts of your dishwasher filter assembly is key to proper cleaning and reinstallation.
Credit: www.reddit.com
Understanding the different parts of your dishwasher filter assembly is key to proper cleaning and reinstallation.
Credit: www.reddit.com
Essential Tools and Materials for Filter Cleaning
Before you begin, gathering the right supplies ensures a smooth and effective cleaning process. You likely have most of these items in your home already.
Tools You'll Need
- Screwdriver: Depending on your Kenmore model, you might need a Phillips or flat-head screwdriver to access certain components or housing.
- Soft-bristled brush: An old toothbrush or a dedicated cleaning brush works perfectly for scrubbing away food particles without damaging the filter mesh.
- Flashlight (Optional): To make dimly lit areas inside the dishwasher tub more visible.
- Tweezers (Optional): Useful for picking out stubborn debris lodged in tight spots.
Cleaning Materials
- Warm water: The primary cleaning agent.
- Mild dish soap: Helps loosen grease and grime.
- White vinegar: An excellent natural degreaser and deodorizer, highly effective for breaking down mineral deposits and tough stains.
- Clean cloths or paper towels: For wiping down components and drying.
Safety Gear
- Rubber gloves: Protects your hands from sharp edges and cleaning solutions, while also keeping them clean.
- Protective eyewear (Optional): Recommended if you are sensitive to splashes, especially when using vinegar.
Having these items ready will transform what might seem like a chore into a manageable and efficient maintenance task.
Safety First: Preparing for Dishwasher Maintenance
Prioritizing safety is paramount when working on any appliance. A few simple precautions can prevent injury and potential damage to your dishwasher.
Power Down and Shut Off Water
- Unplug the Dishwasher: Always disconnect the power supply to the dishwasher before you begin any cleaning or maintenance. This is the most critical safety step to prevent electrical shock.
- Turn Off Water Supply: Locate the shut-off valve for the dishwasher's water supply (often found under the sink; you can learn more about under kitchen sink plumbing). Turn the valve clockwise to shut off the water flow to the appliance.
Protective Measures
- Wear Gloves: As mentioned, rubber gloves protect your hands. Dishwasher interiors can sometimes have sharp edges from food debris or components.
- Handle Components Gently: Dishwasher filters and their housing can be made of plastic and may become brittle with age. Avoid excessive force when removing or reinstalling them.
Followingthese simple guidelines ensures a safe and effective filter cleaning experience.
Locating Your Kenmore Dishwasher Filter
The filter in your Kenmore dishwasher is designed to capture food particles and debris, preventing them from circulating back onto your dishes and clogging the pump. Its location is typically standardized across models, but always consult your owner's manual if you are unsure.
Common Filter Placement
In most Kenmore dishwashers, the filter is situated at the bottom of the wash tub, directly beneath the lower spray arm. It's usually a cylindrical or a two-part system (a coarse outer filter and a fine inner filter).
Accessing the Filter Area
- Remove the Lower Dish Rack: This is the first crucial step. Pull the bottom rack completely out of the dishwasher. This provides unobstructed access to the tub floor where the filter assembly resides.
- Identify the Filter Assembly: Once the rack is out, look for a circular component that appears to be removable. It might have a handle or notches for grip.
Understanding this placement is key. A clogged filter here means food debris isn't being properly trapped and could be redeposited onto your dishes. This is a primary reason for less-than-perfect wash results.
Removing the Filter Assembly
Removing the filter is usually a simple twist-and-lift process. Kenmore designs these components for user-friendly access and cleaning.
Step-by-Step Removal
- Unlock the Filter: Once you've located the filter assembly, you'll typically find that it locks into place. Most Kenmore models use a quarter-turn or half-turn mechanism. Gently rotate the filter counter-clockwise. You should feel it loosen and disengage.
- Practical Tip: If the filter feels stuck, double-check that you've turned it far enough. Forcing it can damage the locking tabs.
- Lift Out the Outer/Coarse Filter: In many systems, the outermost component is a coarse cylindrical filter. Lift this piece straight up and out of its housing.
- Remove the Inner/Fine Filter (if applicable): Some Kenmore models have a secondary, finer mesh filter nested within the coarser one, or situated beneath it. Carefully lift this component out as well. It often has a flat, disc-like shape.
Once removed, you will likely be surprised by the amount of food particles, grease, and other gunk that have accumulated. This visual will reinforce the importance of regular cleaning.
It's essential to keep your dishwasher's internal components clean to ensure optimal performance. If you've also noticed any unpleasant odors, cleaning the dishwasher rinse aid dispenser can also help.
Cleaning the Filter Components
With the filter assembly removed, it's time to give it a thorough cleaning. This process is straightforward but vital for restoring your dishwasher's efficiency.
Initial Rinse
- Take the filter components to your sink.
- Rinse them under warm running water. This will dislodge a significant amount of loose food debris and gunk.
Detailed Cleaning
For more stubborn residue, grease, or potential mineral buildup, you'll want to do a more thorough scrub:
- Prepare a Cleaning Solution:
- Fill a basin or the sink with warm water.
- Add a few tablespoons of mild dish soap.
- For tougher grime or odor issues, add about half a cup of white vinegar to the warm water. The acidity of vinegar is excellent for breaking down grease and mineral deposits.
- Scrub the Filter(s):
- Using your soft-bristled brush or an old toothbrush, gently scrub all surfaces of the filter components. Pay special attention to the mesh areas to ensure no food particles are lodged within.
- In practice, you'll find that the mesh is delicate, so avoid aggressive scrubbing that could tear it or deform its structure.
- Rinse Thoroughly:
- After scrubbing, rinse each filter component completely under running water. Ensure all soap, vinegar, and dislodged debris are washed away. You should be able to see light through the mesh clearly when it's clean.
If you're dealing with particularly tough, caked-on food particles, soaking the filter in the vinegar solution for 15-30 minutes before scrubbing can be very effective.
Reinstalling the Filter Assembly
Proper reinstallation of the filter is just as important as cleaning it. A correctly seated filter ensures it functions as intended and prevents leaks or operational issues.
Ensure Correct Orientation
- Check Filter Components: Confirm you have all the parts you removed. Different Kenmore models may have a single unit or two distinct parts (a coarse outer and a fine inner filter).
- Identify Placement: Hold the filter assembly parts and look at their shape. You’ll notice they are designed to fit in a specific orientation within their housing at the bottom of the tub.
Secure the Filter
- Insert the Fine Filter (if applicable): If your model has a secondary fine filter, place it into its designated spot first.
- Position the Coarse Filter: Place the larger, often cylindrical, filter back into its housing.
- Twist to Lock: Align the filter with the locking mechanism in the housing and twist it clockwise. You should feel it "click" or seat firmly into place. Apply gentle pressure to ensure it's snug and secure.
- A Common Mistake: Forgetting to properly lock the filter can lead to it coming loose during the wash cycle, causing poor performance or even allowing debris to enter the pump.
A secure filter prevents the spray arms from being obstructed and ensures water is properly filtered before being pumped out. If you're looking for more general appliance maintenance, exploring tips on how to clean stainless appliances naturally could be beneficial for your kitchen.
Testing Your Dishwasher After Cleaning
After successfully cleaning and reinstalling the filter, it’s wise to test your dishwasher to confirm everything is working correctly.
Running a Test Cycle
- Short Cycle: Select a quick wash or rinse cycle. This allows you to observe the dishwasher's operation without a full load.
- Observe for Leaks: While the cycle runs, check the base of the dishwasher and around the door for any signs of water leaks. Leaks could indicate the filter is not properly seated or there's another issue with the component.
- Listen for Unusual Noises: Pay attention to any grinding, thumping, or unusual sounds. These could signal that the filter is obstructing the spray arm or that it hasn't locked into place correctly.
- Check Drainage: Once the cycle is complete, ensure the water has drained fully from the tub. Standing water suggests a potential clog or a problem with the drainage system, possibly related to filter installation.
- Inspect Dishes: For added confidence, run a small load of dishes and check their cleanliness. They should appear free of debris and washed effectively.
If you encounter any issues, power down the dishwasher again and re-check the filter installation.
Ongoing Maintenance Tips for Your Kenmore Dishwasher
Regular filter cleaning is just one part of maintaining your Kenmore dishwasher for optimal performance and longevity. Adopting a consistent maintenance routine can prevent future problems.
Establish a Cleaning Schedule
- Monthly Check: For most households, cleaning the filter once a month is sufficient. This prevents significant buildup.
- Bi-Weekly for Heavy Use: If your dishwasher runs daily or you frequently wash heavily soiled items, consider checking and cleaning the filter every two weeks.
- Visual Cues: Pay attention to your dishwasher's performance. If you notice reduced cleaning efficiency or water pooling, it’s a sign the filter needs attention sooner.
Inspect for Damage
During your regular cleaning, carefully inspect the filter and its housing for any cracks, breaks, or signs of wear. A damaged filter can compromise the entire system. If you find damage, it's best to replace the filter promptly to avoid more significant issues. You can usually find replacement filters by searching your Kenmore model number.
Use Appropriate Detergents
Using the correct dishwasher detergent is crucial. Harsh chemicals or excessive amounts can contribute to residue buildup within the dishwasher and on the filter. Always use a high-quality, dishwasher-specific detergent and follow the manufacturer's recommended dosage. This is also a good time to ensure your dishwasher rinse aid dispenser is functioning correctly, as rinse aid helps improve drying and prevent spots.
Other Maintenance Tasks
- Clean Spray Arms: Food particles can clog the small holes in the spray arms. Periodically remove and clean them, or use a toothpick to clear any blockages.
- Wipe Down Door Seals: Food debris and grime can accumulate on the rubber door seals, potentially leading to odors or leaks. Wipe them down regularly with a damp cloth.
- Deep Cleaning: Occasionally, you might want to perform a deeper clean of the entire dishwasher interior, often done with vinegar or a specialized dishwasher cleaner.
Consistent, simple maintenance will keep your Kenmore dishwasher performing at its best and help you avoid costly repairs down the line.
 Thoroughly cleaning the filter ensures all food particles and debris are removed.
Credit: www.youtube.com
Thoroughly cleaning the filter ensures all food particles and debris are removed.
Credit: www.youtube.com
Frequently Asked Questions About Kenmore Dishwasher Filters
Q1: Where is the filter located in my Kenmore dishwasher?
A: The filter is typically found at the bottom of the dishwasher tub, directly beneath the lower spray arm. You will need to remove the bottom dish rack to access it.
Q2: How do I know if my Kenmore dishwasher has a removable filter?
A: Most modern dishwashers, including Kenmore models, feature removable filters for cleaning. Look inside the tub floor for a component that appears to twist or lift out. Consulting your dishwasher’s user manual is the most reliable way to confirm and identify its specific filter type and location.
Q3: How do I clean a Kenmore dishwasher filter if it's very dirty?
A: For heavily soiled filters, soak them in a solution of warm water and white vinegar for 15-30 minutes before scrubbing with a soft brush. Rinse thoroughly under running water until all debris and cleaning solution are removed.
Q4: How often should I clean my Kenmore dishwasher filter?
A: It's recommended to clean the filter at least once a month. If you use your dishwasher frequently or wash a lot of greasy or heavily soiled dishes, cleaning it every two weeks is advisable. Performing regular visual checks can help you determine the best frequency for your household.
Conclusion: Sparkling Dishes Start with a Clean Filter
Cleaning your Kenmore dishwasher filter is a simple yet incredibly effective maintenance task that directly impacts the cleanliness of your dishes. By dedicating a few minutes each month to locate, remove, clean, and reinstall this vital component, you ensure your dishwasher operates efficiently, preventing clogs, odors, and the re-deposition of food debris.
Remember to always prioritize safety by unplugging the appliance and turning off the water supply. With the right tools and a little know-how, you can easily keep your filter spotless, leading to consistently sparkling dishes and a more reliable appliance. Don't overlook this small step – your dishwasher, and your dishes, will thank you for it. For more kitchen appliance tips, consider browsing our blog for further advice.
